 50.005 CSE
- The Hyper Text Coffee ☕️ Pot Control Protocol
- Submission
- The Architecture
- Inspecting Packets with Wireshark
- HTTP Status Code
- HTCPCP Status Code
- HTTPS
50.005 Computer System Engineering
Information Systems Technology and Design
Singapore University of Technology and Design
Natalie Agus (Summer 2025)
Hyper Text Coffee Pot Control Protocol
In NS Module 5, we learnt about the Client-Server and the Web, mainly about basics of socket programming and the HTTP message request/replies.
At the end of this lab exercise, you should be able to:
- Deploy web server and client applications
- Understand how HTTP works
- Implement a toy variant of HTTP called HTCPCP
- Explore differences between HTTP and HTTPs using packet sniffer (Wireshark / termshark)
- Analyse various captured packets exchanged between the browser, web server, and HTCPCP server
The Hyper Text Coffee ☕️ Pot Control Protocol
The Hyper Text Coffee Pot Control Protocol (HTCPCP) is a whimsical communication protocol for controlling, monitoring, and diagnosing coffee pots that is based on HTTP. It is specified in RFC 2324, published on 1 April 1998 as part of an April Fools prank. In this lab, we are not going to control a real coffee pot (although it is possible) but a virtual one via the HTCPCP protocol.
This lab is created to give you some kind of understanding on how to deploy fullstack (sort of) application that can be accessible via the network. You will then deploy both the web application and the HTCPCP server and sniff the packets exchanged using Wireshark.
The base code for project was originally taken from here, refactored, styled and adapted with more functionalities added to suit our learning experience in the lab (and also ported to C). Special thanks to 2023 CSE TAs Cassie and Ryan for the inspiration, ideas, and contribution to create this lab.
Submission
Once you have completed all tasks, schedule a checkoff as a Team with your Lab TA by next week Friday 6PM.
✅ Checkoff
Demonstrate the features implemented in Task 1 and Task 7 to our TAs to obtain the checkoff mark for this lab.
System requirements
You need a C11-compatible compiler (gcc or clang) and make to build this project, and Wireshark (or equivalent) installed in your system. The project uses only standard POSIX interfaces and has no external library dependencies. Linux and macOS are both supported. You are free to use any CLI or GUI based network protocol analyser. The latter is recommended for beginners. The rest of this lab is written with the assumption that you used Wireshark. Other equivalent network protocol analyser should have similar functionalities.
Source Code
Clone the starter code:
git clone https://github.com/natalieagus/cse-lab-htcpcp-2026-starter
You should have the following files:
.[PROJ_DIR]
├── db
│   ├── currently_brewing.json
│   └── past_coffees.json
├── dissector
│   ├── htcpcp.lua
│   ├── img
│   │   ├── wireshark_after_data.png
│   │   └── wireshark_after.png
│   └── README.md
├── log
│   └── coffeepot.log.sample
├── Makefile
├── README.md
├── src
│   ├── config.h
│   ├── json_util.c
│   ├── json_util.h
│   ├── main.c
│   ├── server_pot.c
│   └── webapp.c
└── webapp
    ├── assets
    │   ├── coffee_pot_old.gif
    │   ├── coffee_pot.gif
    │   ├── favicon.ico
    │   ├── robots.txt
    │   └── styles.css
    └── templates
        ├── base.html
        ├── coffeedata.html
        ├── error.html
        ├── history.html
        ├── includes
        │   └── make_coffee_form.html
        └── index.html
Then build the project:
make
This produces three executables inside bin/: server_pot, webapp, and main.
There are two main processes to run:
- A HTCPCP compliant Coffee Pot Server: implemented in C using POSIX sockets that accepts requests from
coffee://URI scheme (instead of http or https). - A full-stack web application (also in C, using POSIX sockets) that serves a regular HTTP-based web client and also helps you send HTCPCP requests to the coffee pot server using your web browser.
You can spawn both processes from the main launcher:
make run
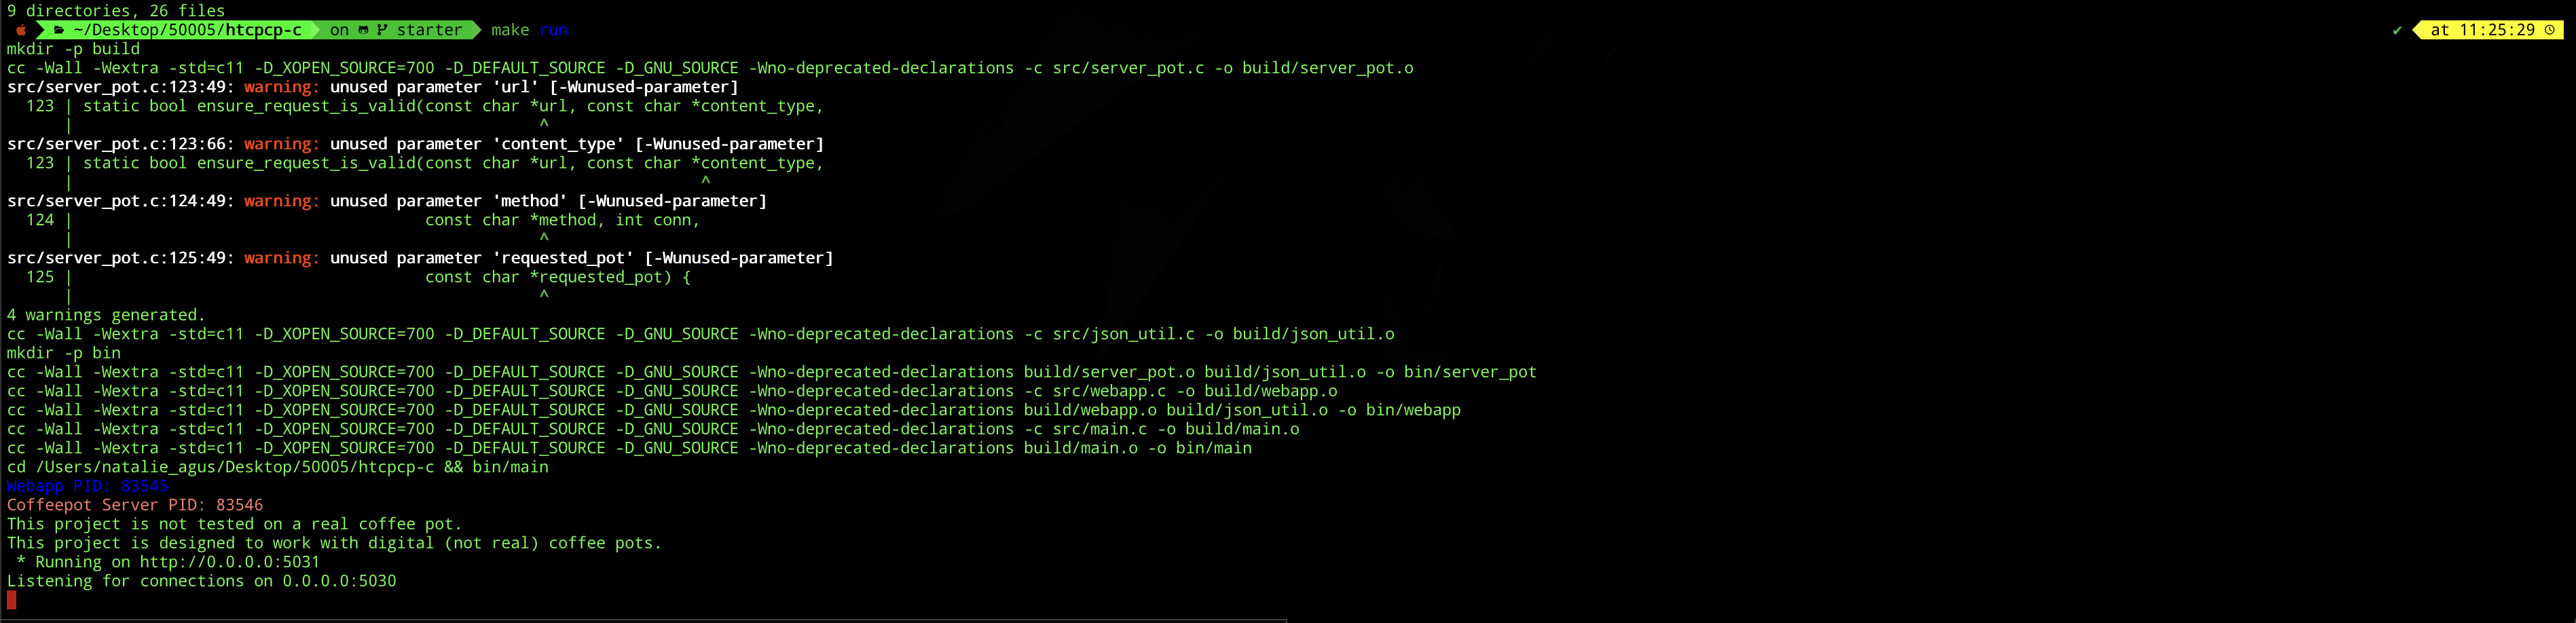
Then type the following in your web browser: http://127.0.0.1:5031. You should see this:
To quit, press Ctrl+C to send SIGINT.

Otherwise, you can also spawn them on two separate terminal sessions. Assuming you’re at the project directory, spawn the coffee pot server:
./bin/server_pot
Then, spawn the web application (http):
./bin/webapp

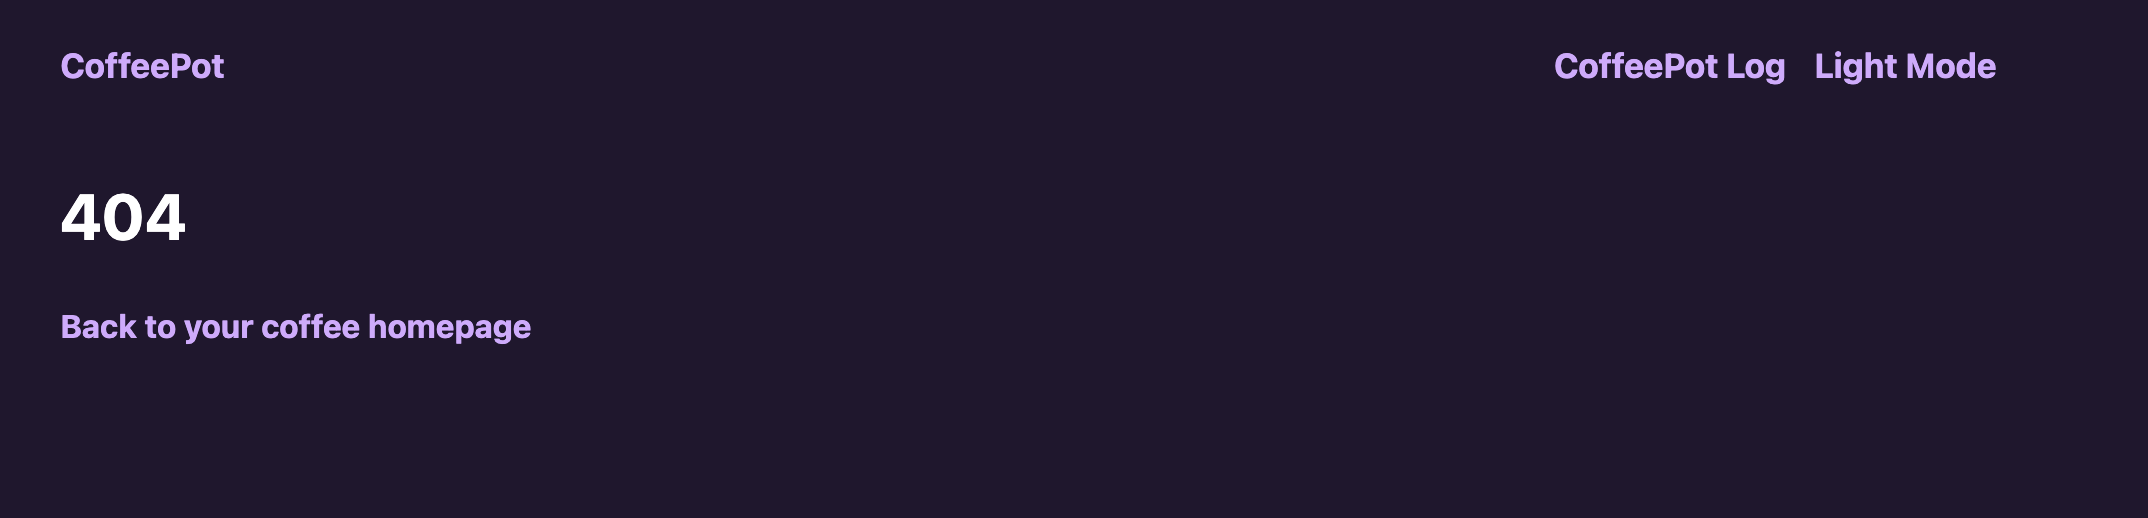
The code is now incomplete, so you’re seeing an error response 404 by default.
Options
Both bin/server_pot and bin/webapp accept a -local flag to bind only to localhost instead of all interfaces:
./bin/server_pot -local
./bin/webapp -local
You can also invoke this via:
make run-local
localhost vs 127.0.0.1
You might have heard the term localhost or 127.0.0.1 if you just want to spawn a web server locally during development Both “localhost” and “127.0.0.1” are used to refer to the local host or the loopback interface of a device.
“localhost” is a hostname that is used to refer to the current device itself. It is a standard hostname that resolves to the loopback IP address, which is typically “127.0.0.1” in IPv4 or “::1” in IPv6.
When you access “localhost” in a web browser or any other network application on your device, it is resolved to the loopback interface, allowing communication with services running on the same device.
127.0.0.1 is the loopback IP address assigned to the localhost. It is part of the reserved IP address block for loopback addresses. When you use 127.0.0.1 directly, you are specifically referring to the loopback interface’s IP address. It is the most commonly used loopback address in IPv4.
Since localhost is just a hostname, you can change them to be whatever you want. You can do this by editing /etc/hosts:

And then flush your system’s DNS cache to ensure it takes effect:
# macOS
sudo dscacheutil -flushcache

# Linux
sudo systemctl restart systemd-resolved
0.0.0.0 vs 127.0.0.1
Sometimes you might have read that you can spawn your server on 0.0.0.0 (if you were to deploy it on remote server like aws EC2 and expect it to be publicly reachable). When an IP address is set to “0.0.0.0,” it is a special value that represents all available network interfaces or all IPv4 addresses on the local machine. It is often used to specify that a service or application should listen on all available network interfaces, meaning it can accept connections from any IP address assigned to the machine.
For example, if a web server is configured to listen on 0.0.0.0:5000, it will accept incoming connections on all available IP addresses and interfaces of the machine.
This is different from when you access 127.0.0.1 or localhost on your machine, as you are connecting to services or applications running locally, within the same device. In summary, 0.0.0.0 represents all available network interfaces and is used for accepting connections from any IP address on the machine. 127.0.0.1 is the loopback address used to refer to the local machine itself, enabling communication with services running locally.
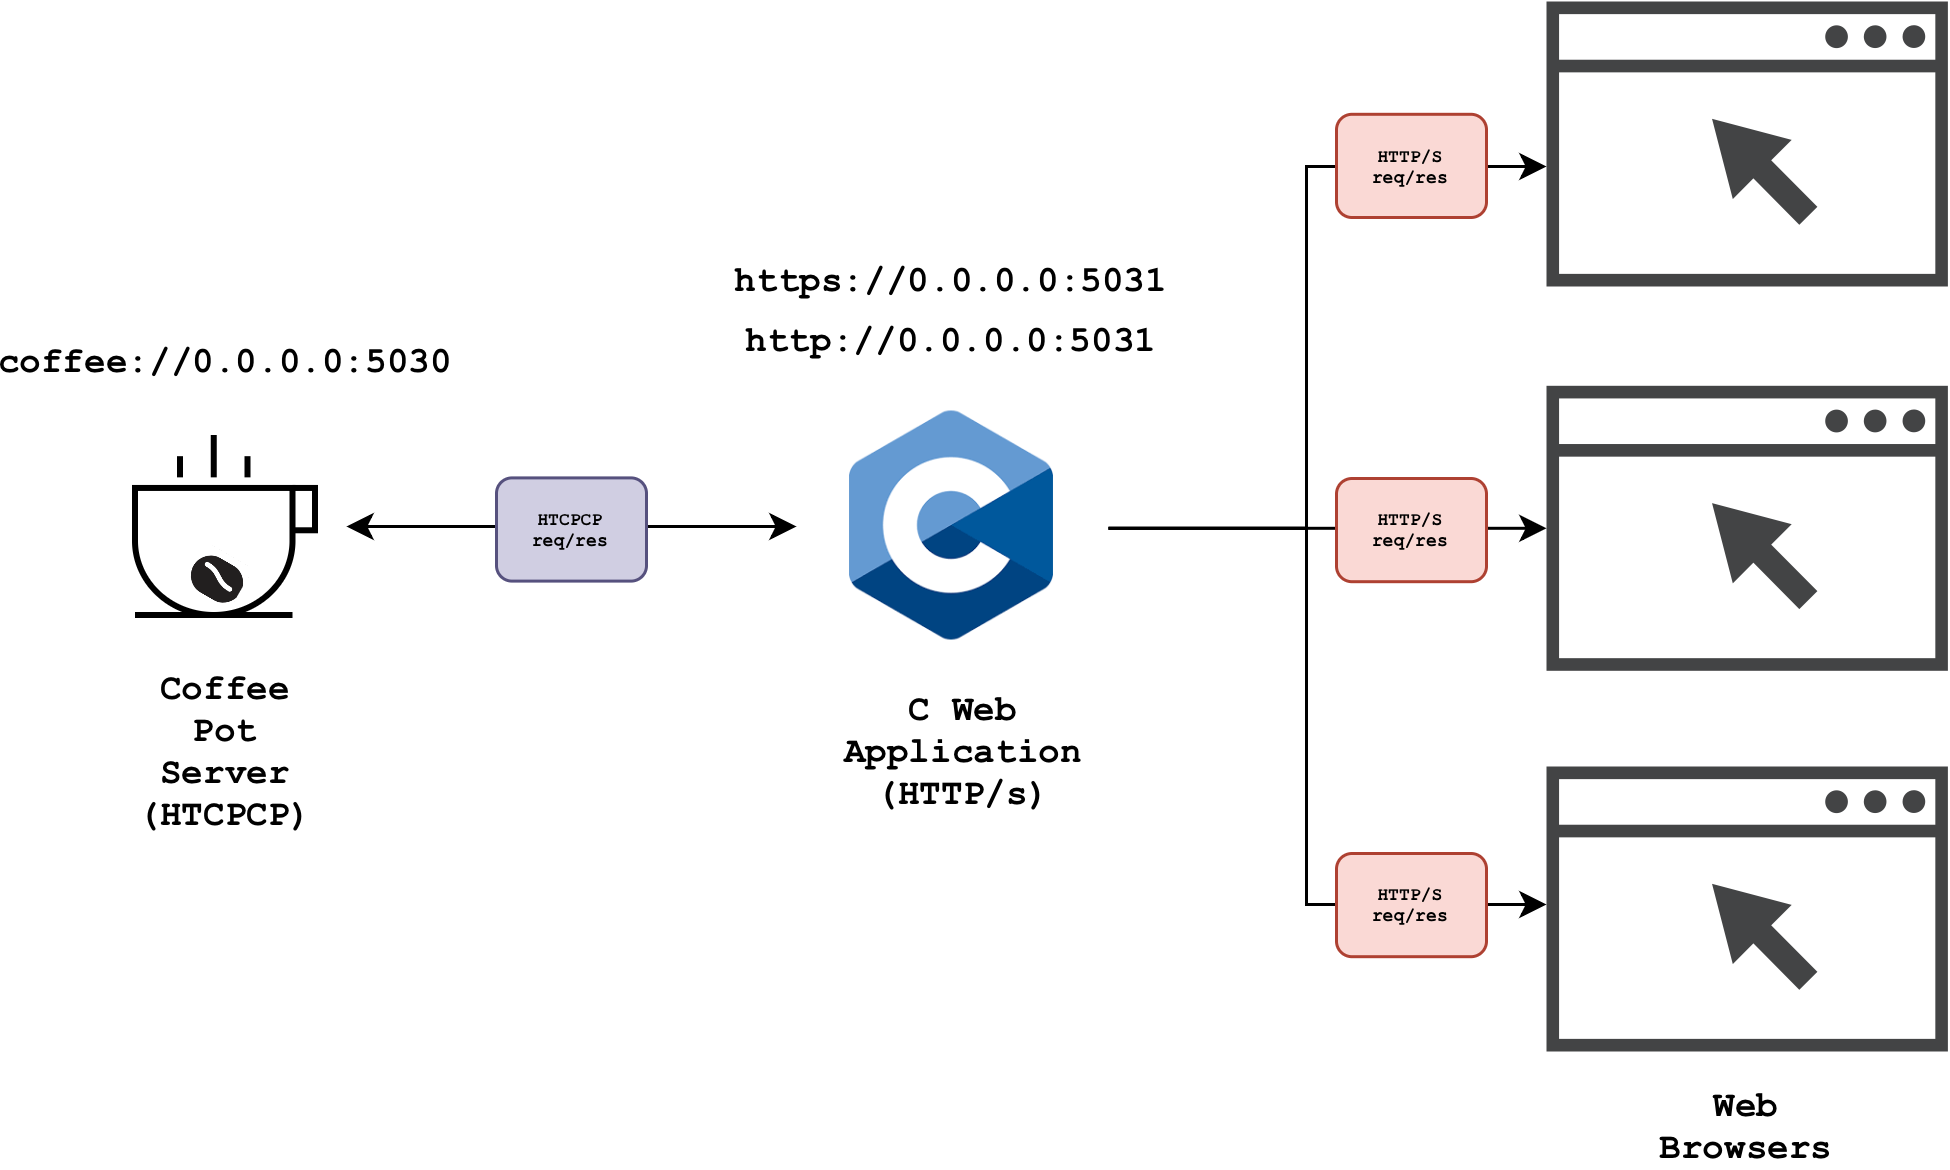
The Architecture
The diagram below summarises the architecture of the simple system:
Task 1
TASK 1: Study the architecture of the project, then complete all the TODO in ./src/server_pot.c.
Please refer to the readme of the project before proceeding to understand further details about the system and answer related questions on eDimension. In particular, you should pay attention to the following:
- What protocol(s) is/are used to exchange messages between the web application and the web browser?
- What protocol is used to exchange messages between the web application and the coffee server?
- Do the browser send messages directly to the coffee server? Why or why not?
There are three TODO sections in total to complete.
Create HTCPCP Response Header
static void handle_connection(int conn){

    // other code

    // TODO: make 200 OK header
    char headers_to_send[1024];
    /* use snprintf to edit headers_to_send to contain the right string
    /* END OF TODO */

     // other code
}
The HTCPCP response headers stored in headers_to_send should form the following string:
- The status line:
HTCPCP/1.1 Status-Code Reason-Phrase\r\n. At this point of our code, ourStatus-Codeshould be200. Find out whatReason-Phrase200should have. - Subsequent header field lines, each terminated with
\r\n:Serverfield name withCoffeePotas its valueContent-Typefield name with the appropriate media type as its valueDatefield name withdate_stras its value
- Add a final
\r\nat the end to mark the end of the header and the beginning of the body
Each header field line should follow the format Field-Name: value\r\n. You can build the full string using snprintf.
Here’s an example for HTTP response message. This is for your reference only, adapt the header fields for HTCPCP:
HTTP/1.1 200 OK\r\n
Content-Type: text/html\r\n
Date: Tue, 09 Apr 2024 18:37:30\r\n
\r\n
<html>
<head>
    <title>Example</title>
</head>
<body>
    <p>This is an example of a response body.</p>
</body>
</html>
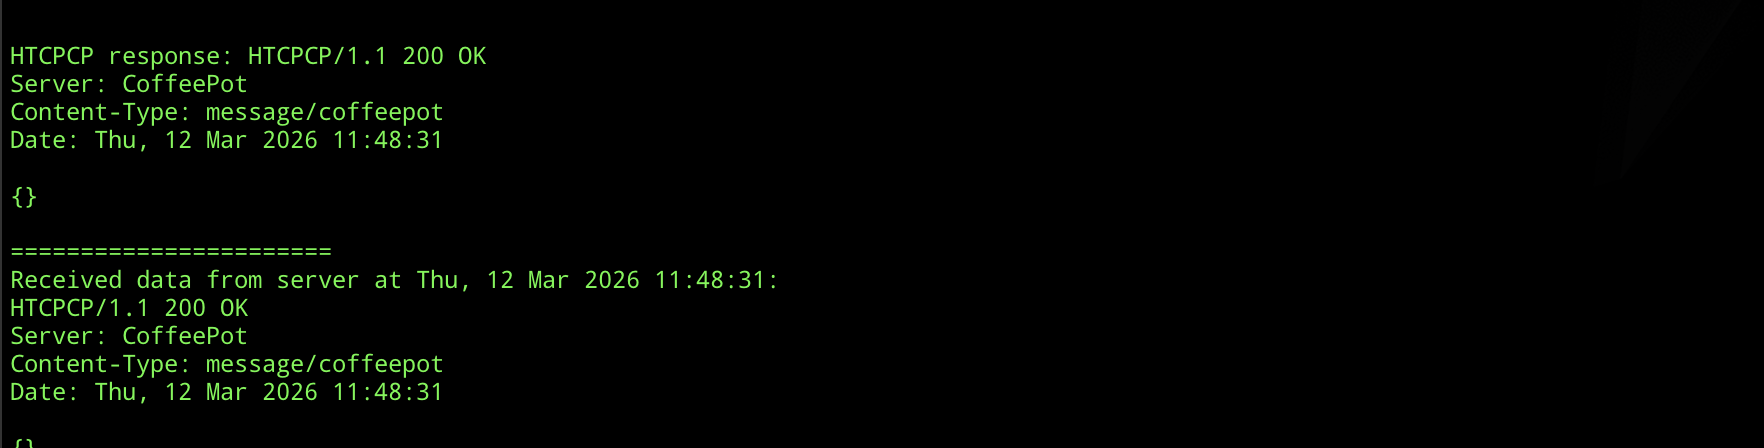
When you implement this properly, you should see the following printed out:
Handle Rejected Valid Request
static void handle_connection(int conn){
// other code
if (!additions_valid || !str_in_list(method, ACCEPTED_METHODS)) {
// TODO: craft 406 response
/* 406 Not Acceptable with list of valid additions */
char resp[MAX_BUF] = ""; // modify this line
/* Further edit resp to match the response */
/* END OF TODO */
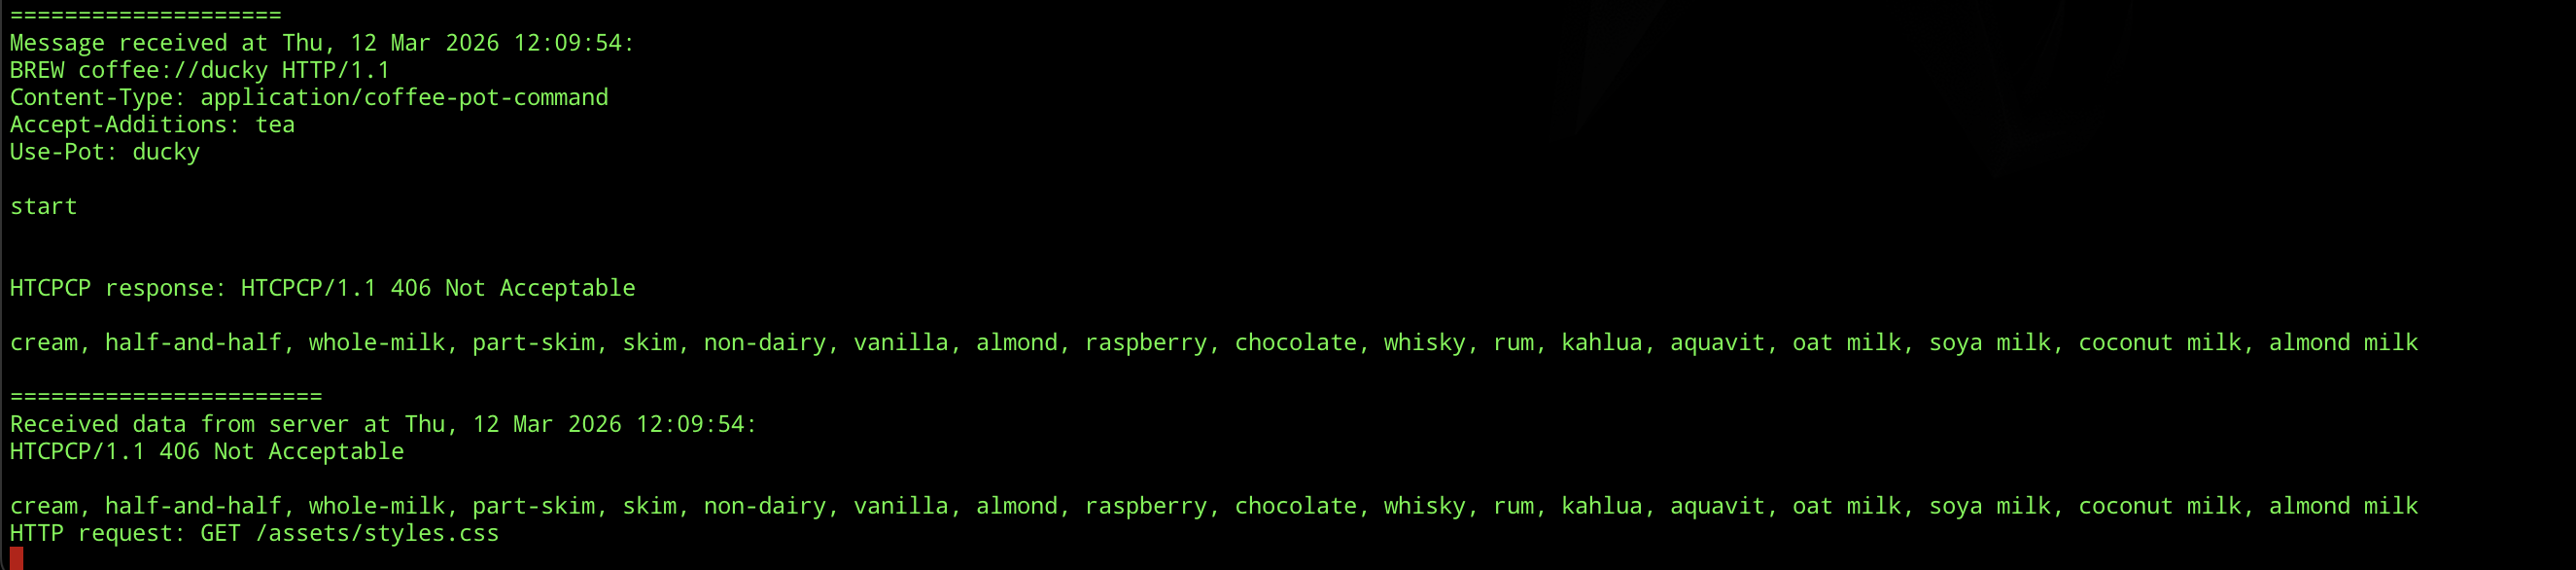
printf("\n\nHTCPCP response: %s\n", resp);
send(conn, resp, strlen(resp), 0);
return;
}
// other code
}
Construct resp to complete this TODO. It should contain appropriate HTCPCP headers with error code 406 because the client requested something unacceptable. You should write a list of accepted additions as the response body. You can iterate over ACCEPTED_ADDITIONS (defined in config.h) to build this list. Don’t forget to format the response properly with \r\n line endings as you did in the previous TODO.
This is what you should see in the console once you implement this method properly:
Complete message request checking
This function is called once per connection to ensure that the request format is valid and follows a proper HTCPCP protocol. Complete its implementation.
If all checks pass, this function should return true. Otherwise, it should call send_error which sends the appropriate HTCPCP response back to the client and returns false.
static bool ensure_request_is_valid(const char *url, const char *content_type,
                                    const char *method, int conn,
                                    const char *requested_pot)
{
    /* TODO: Basic request checking
     *
     * 1. Extract the URI scheme (text before "://") and validate it
     *    against ACCEPTED_COFFEE_SCHEMES (from config.h)
     * 2. Check the path after "://" conforms to <SCHEME>://<HOSTNAME>
     *    where HOSTNAME must be "ducky"
     * 3. Validate the HTTP method against ACCEPTED_METHODS (from config.h)
     * 4. Check the Content-Type conforms to "application/coffee-pot-command"
     * 5. Specific check: reject "tea" pot requests
     *
     * For each failed check, call send_error(conn, error_message) with
     * an appropriately crafted HTCPCP error message containing the
     * status code and reason-phrase, then return false.
     * If all checks pass, return true.
     */
    return true;
}
send_error is pretty simple to use, just pass conn fd and populate the error string:
send_error(conn, "[ERROR_MESSAGE]");
Consult src/config.h for accepted schemes (protocols), hostname, and available pots. The correct URL should be anything that conforms to <SCHEME>://<HOSTNAME>, where HOSTNAME is ducky.
Test Invalid Requests
The file src/webapp.c already contains some test routes for you to see if you have implemented ensure_request_is_valid properly. Utilize them by checking that your coffee pot server indeed returns the correct statuses given these scenarios.
/* /test-400: bad URI scheme */
connect_to_server("GET caffeine://ducky HTTP/1.1\r\n"
                  "Content-Type: application/coffee-pot-command\r\n\r\n");

/* /test-404: unknown hostname */
connect_to_server("GET coffee://psyduck HTTP/1.1\r\n"
                  "Content-Type: application/coffee-pot-command\r\n\r\n");

/* /test-501: unrecognised method */
connect_to_server("MILK coffee://ducky HTTP/1.1\r\n"
                  "Content-Type: application/coffee-pot-command\r\n\r\n");

/* /test-415: wrong content type */
connect_to_server("GET coffee://ducky HTTP/1.1\r\n"
                  "Content-Type: application/tea-pot-command\r\n\r\n");
You can trigger these routes by visiting /test-400, /test-404, /test-501, and /test-415 in your browser while both servers are running.

You might want to read the rest of the labs first before returning to complete the code, especially this section about http status code.
In the terminal, you should see the following printed out as you try each invalid request URL:
====================
Connected to: 127.0.0.1:56371

====================
Message received at Thu, 12 Mar 2026 12:13:44:
GET caffeine://ducky HTTP/1.1
Content-Type: application/coffee-pot-command


=======================
Received data from server at Thu, 12 Mar 2026 12:13:44:
HTCPCP/1.1 400 Bad Request


HTTP request: GET /assets/styles.css
HTTP request: GET /test-404

====================
Connected to: 127.0.0.1:56380

====================
Message received at Thu, 12 Mar 2026 12:13:56:
GET coffee://psyduck HTTP/1.1
Content-Type: application/coffee-pot-command


=======================
Received data from server at Thu, 12 Mar 2026 12:13:56:
HTCPCP/1.1 404 Server Could Not be Found


HTTP request: GET /assets/styles.css
HTTP request: GET /test-501

====================
Connected to: 127.0.0.1:56386

====================
Message received at Thu, 12 Mar 2026 12:13:59:
MILK coffee://ducky HTTP/1.1
Content-Type: application/coffee-pot-command


=======================
Received data from server at Thu, 12 Mar 2026 12:13:59:
HTCPCP/1.1 501 Not Implemented


HTTP request: GET /assets/styles.css
HTTP request: GET /test-415

====================
Connected to: 127.0.0.1:56391

====================
Message received at Thu, 12 Mar 2026 12:14:03:
GET coffee://ducky HTTP/1.1
Content-Type: application/tea-pot-command


=======================
Received data from server at Thu, 12 Mar 2026 12:14:03:
HTCPCP/1.1 415 Unsupported Media Type
Inspecting Packets with Wireshark
In the previous lab, you learned how to load and view captured packets with Wireshark. This time around, you will be doing the capturing on your own. Start both bin/server_pot and bin/webapp and open Wireshark.
First, sniff the loopback interface:
macOS users need to install chmodbpf package before being able to sniff loopback interface. See here.
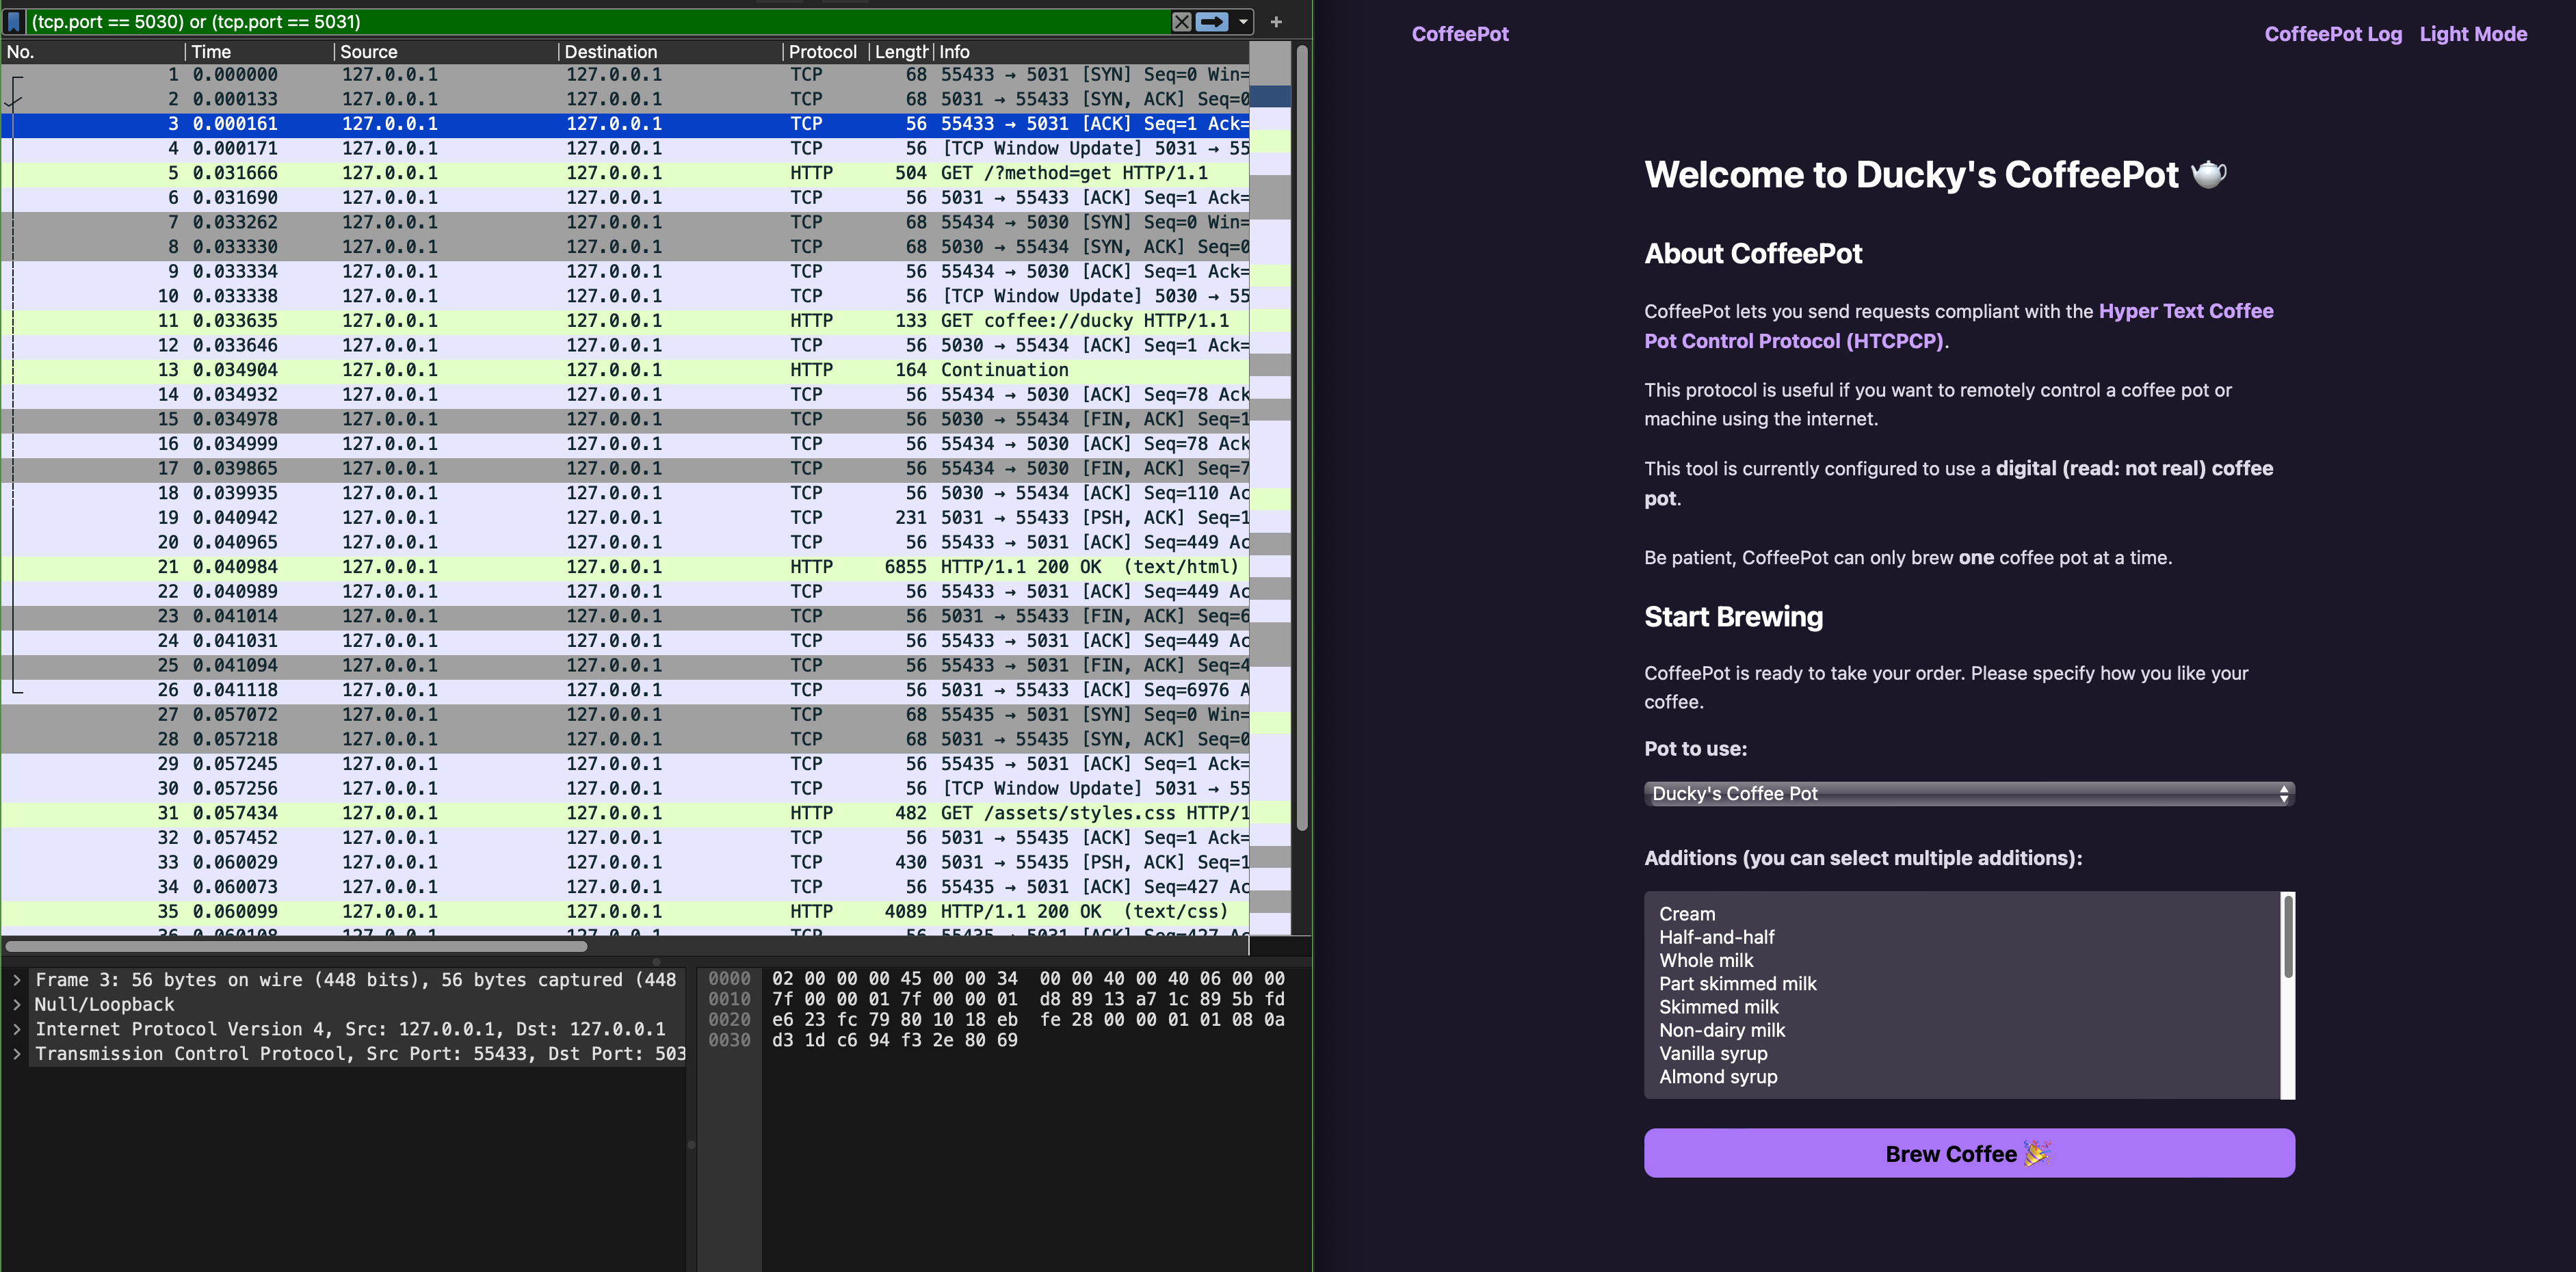
Then, apply the filter (tcp.port == 5030) or (tcp.port == 5031). Open your web browser and access the homepage of your site http://127.0.0.1:5031. You should see some packets captured as follows:
We assume you have completed Task 1 for this. Otherwise, simply read along and skip to Task 2.
Notice that there’s no HTCPCP traffic since Wireshark doesn’t have a dissector for it.
Task 2
TASK 2: Install the HTPCPCP dissector for Wireshark.
You can follow this readme file prepped by your TA. This readme file exists under dissector/ directory of the project you just cloned for this lab too.
After the dissector is successfully installed, you should see custom HTCPCP tag appearing:
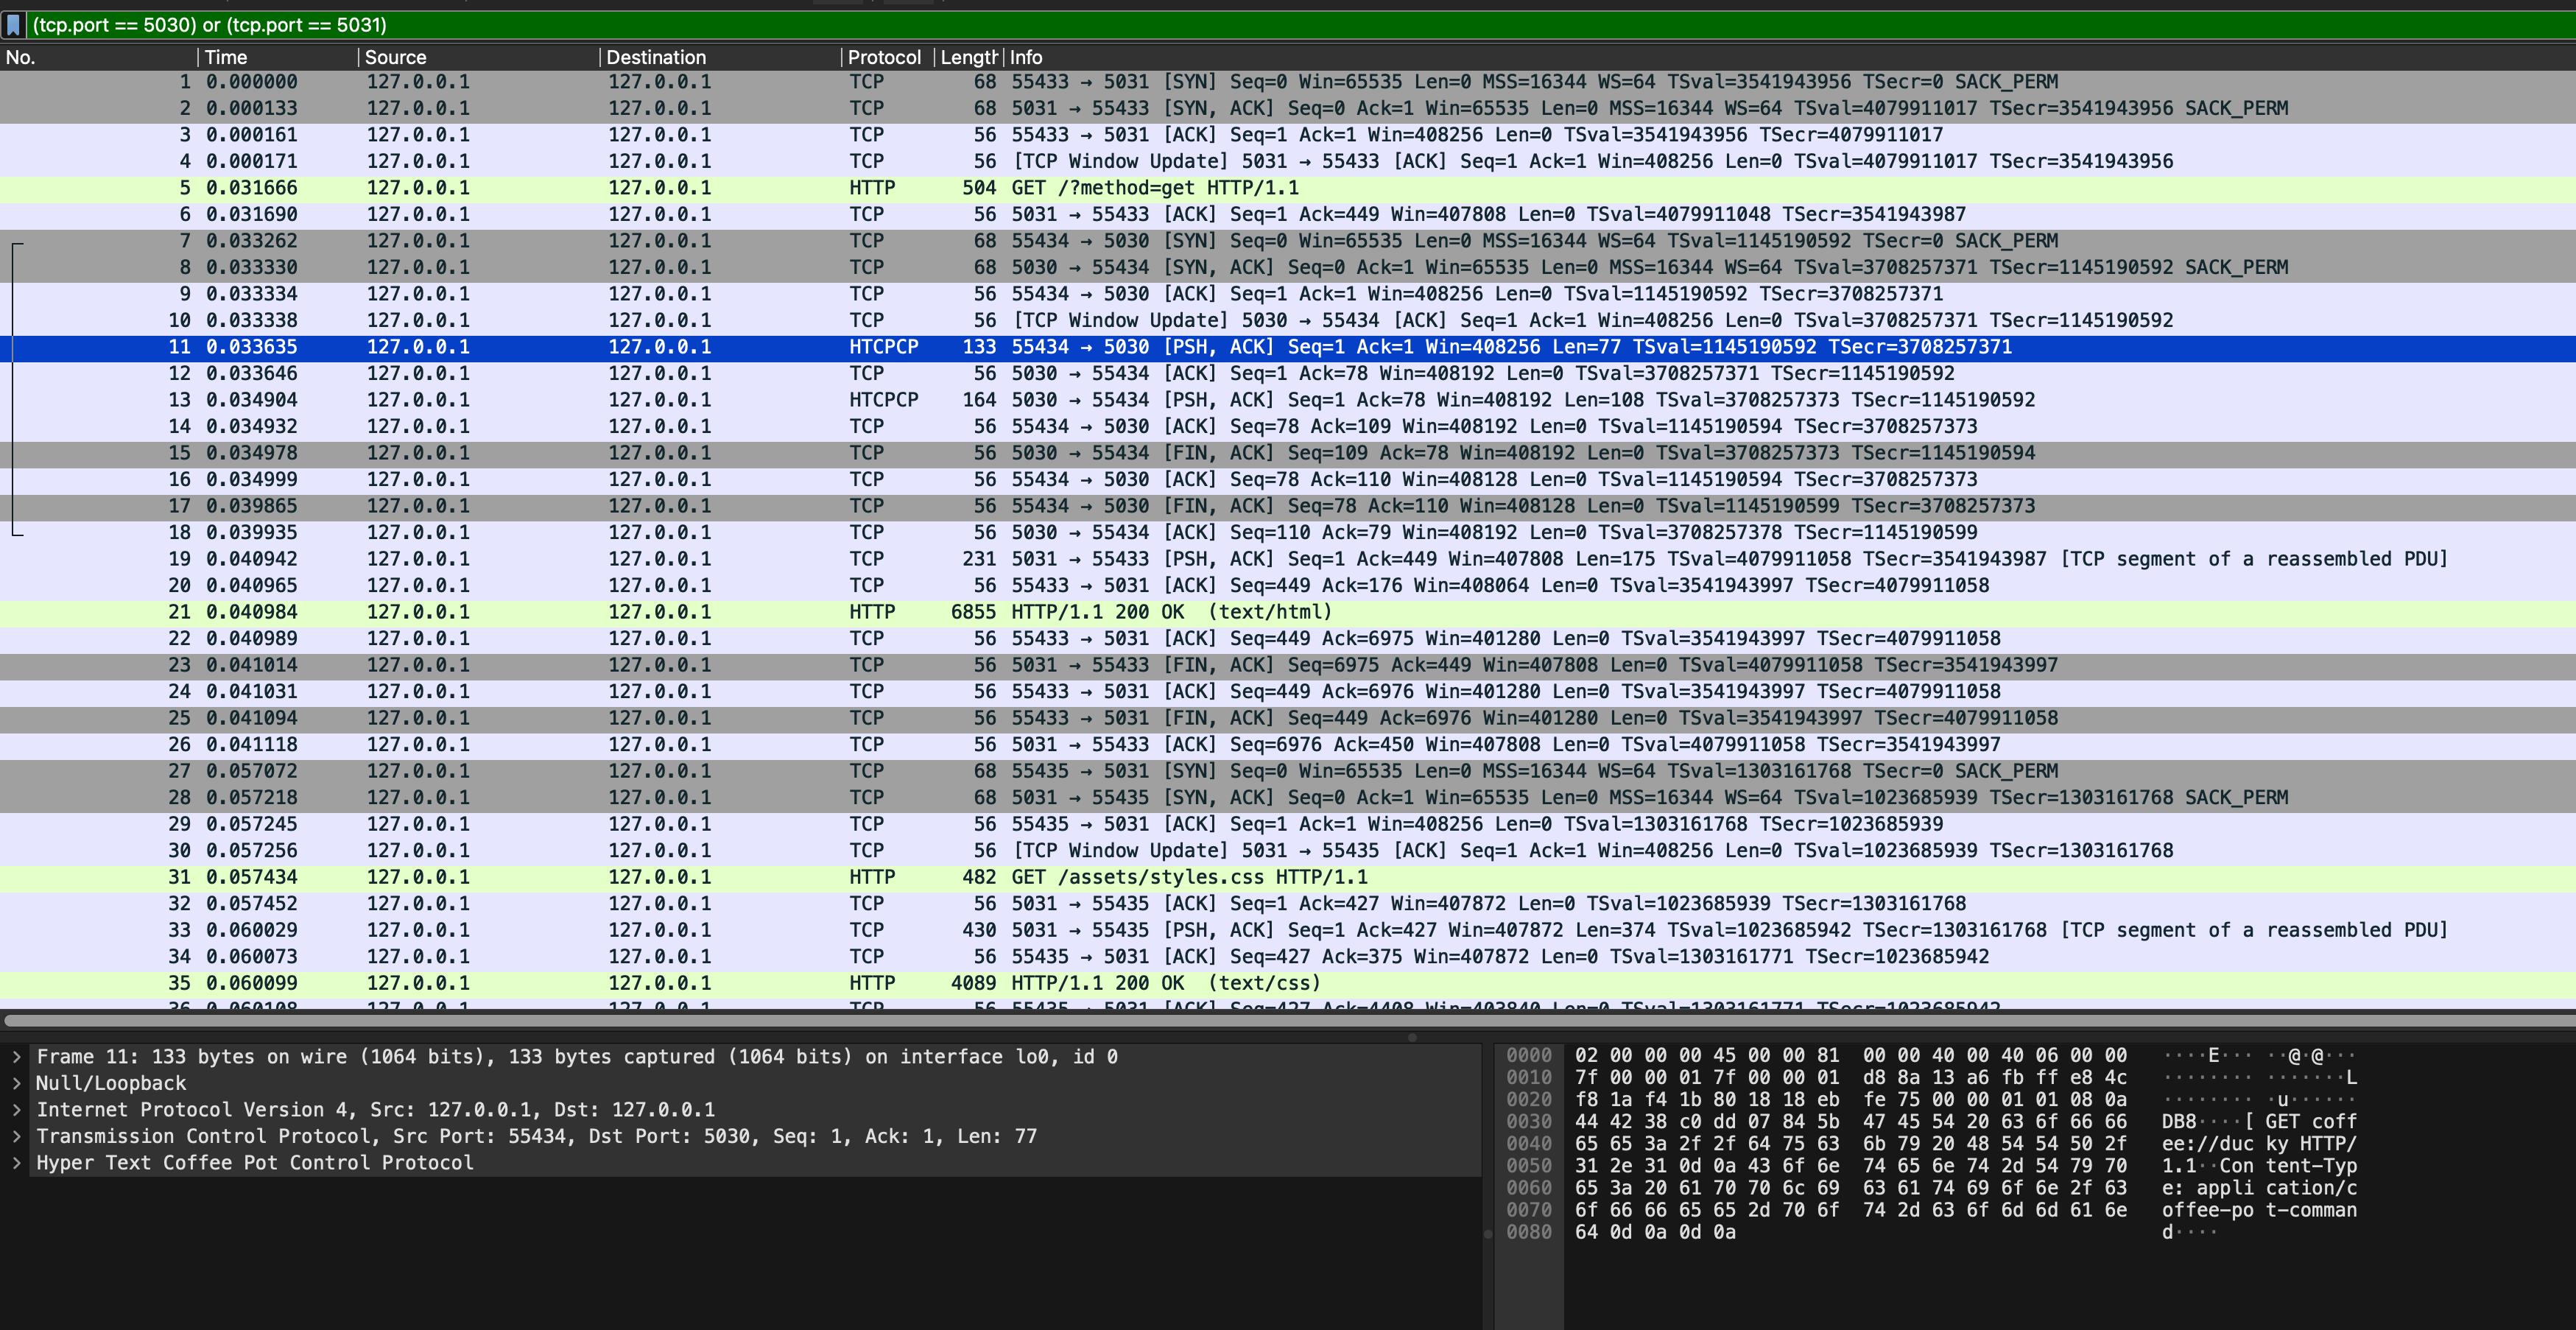
You can also filter the traffic by tag HTCPCP instead of port:
Then, interact with the site: brew some coffee with milk, view your coffee beans, etc to confirm that more HTCPCP packets are captured by Wireshark:
Head to eDimension to answer a few quiz pertaining to this task.
Task 3
TASK 3: Inspecting transport layer protocol (TCP) and TCP ports used
The file src/config.h states the ports used for the webserver and coffee server:
#define HOST               "0.0.0.0"
#define LOCALHOST          "localhost"
#define COFFEE_SERVER_PORT 5030
#define WEBSERVER_PORT     5031
#define BREW_TIME          5
#define TIME_STRING_FORMAT "%a, %d %b %Y %H:%M:%S"
When we start both processes: the webserver and the coffee server, both servers bind themselves to port 5031 and port 5030 respectively to listen and wait for connection requests. Once a client attempts to connect to the socket, a new TCP socket is created using 4 identifiers: client IP, client port, server IP and server port.
The web browser is a client to the C webapp (the webserver part), and the C webapp is a client to our coffee server.
Open sample_capture/homepage_coffee.pcapng in Wireshark and apply htcpcp or (tcp.port == 5031) filter. You will something like this, and use it to answer a few questions on eDimension.
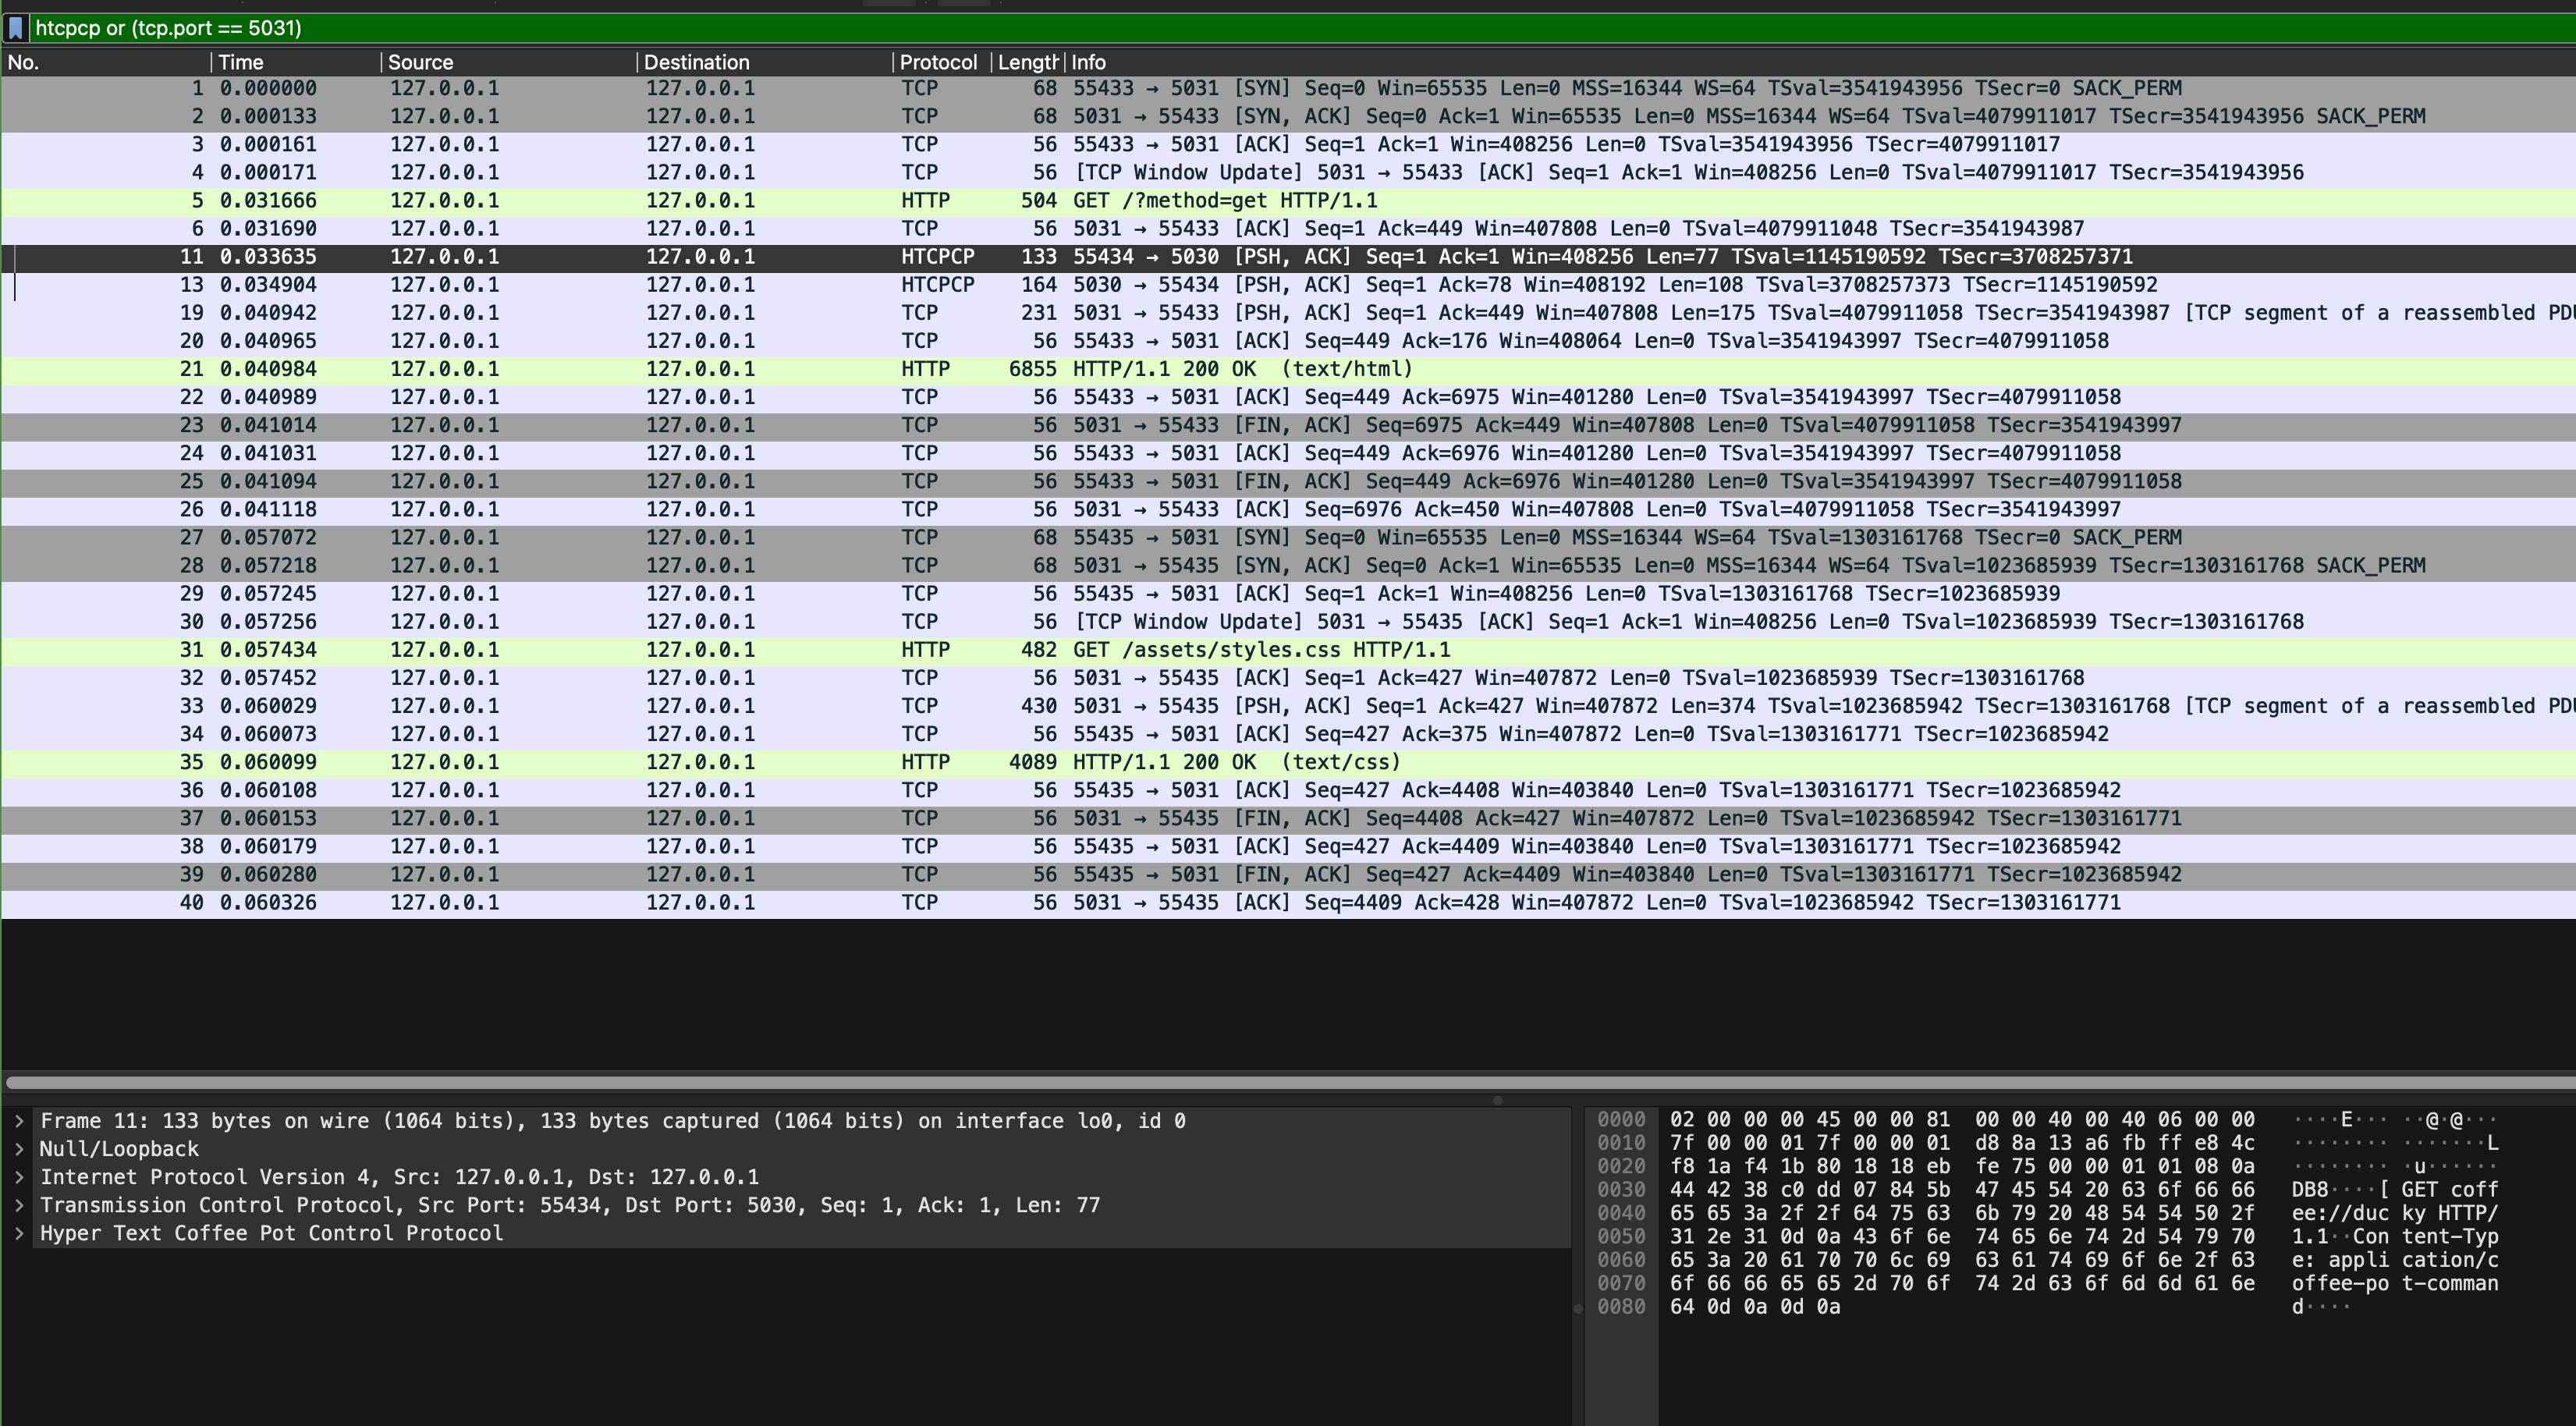
Pay attention to these few things:
- Can you find SYN, SYN-ACK, and ACK messages? When do we need these handshakes?
- What are the ports used for communication by the web browser and the webapp?
- What are the ports used for communication by the webapp and the coffee server?
- How many HTTP response(s) is/are present in the capture? What about request(s)? How can you tell which one(s) is/are the request vs the response?
- Repeat question 4 but with HTCPCP packets
Task 4
TASK 4: Inspect HTCPCP Messages
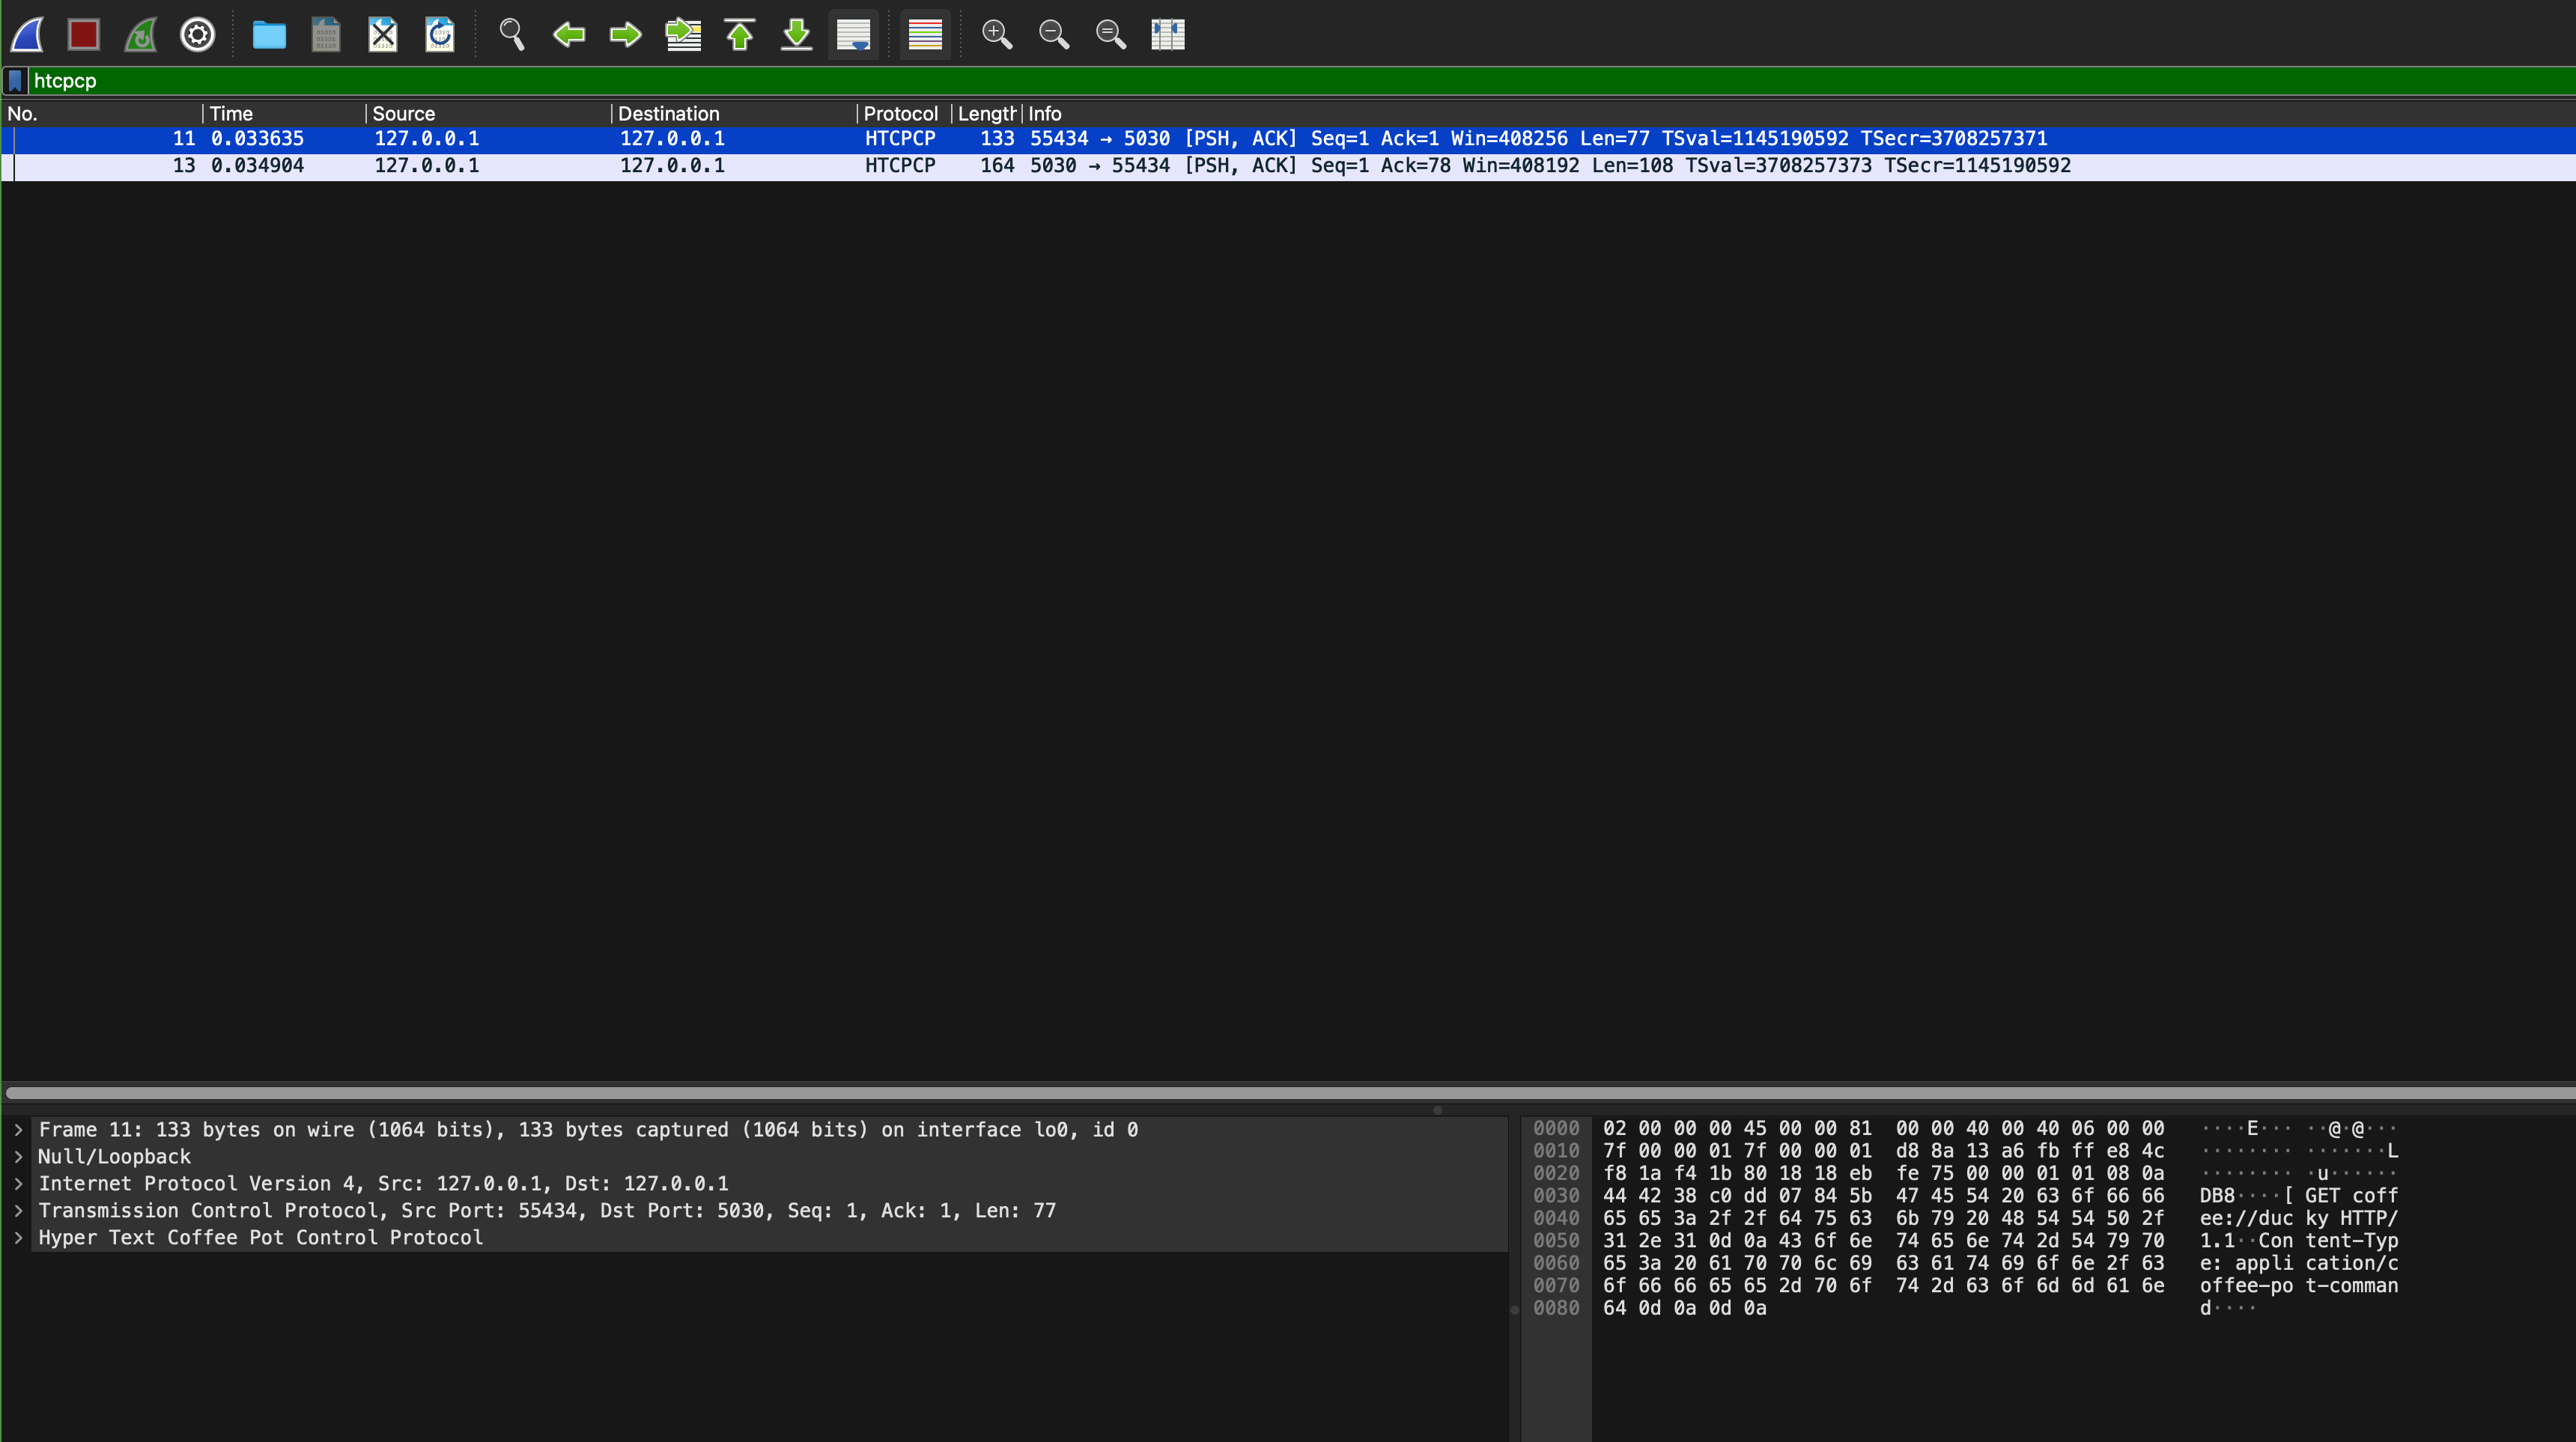
Now open sample_capture/coffee_brew.pcapng, and add the htcpcp filter on it:
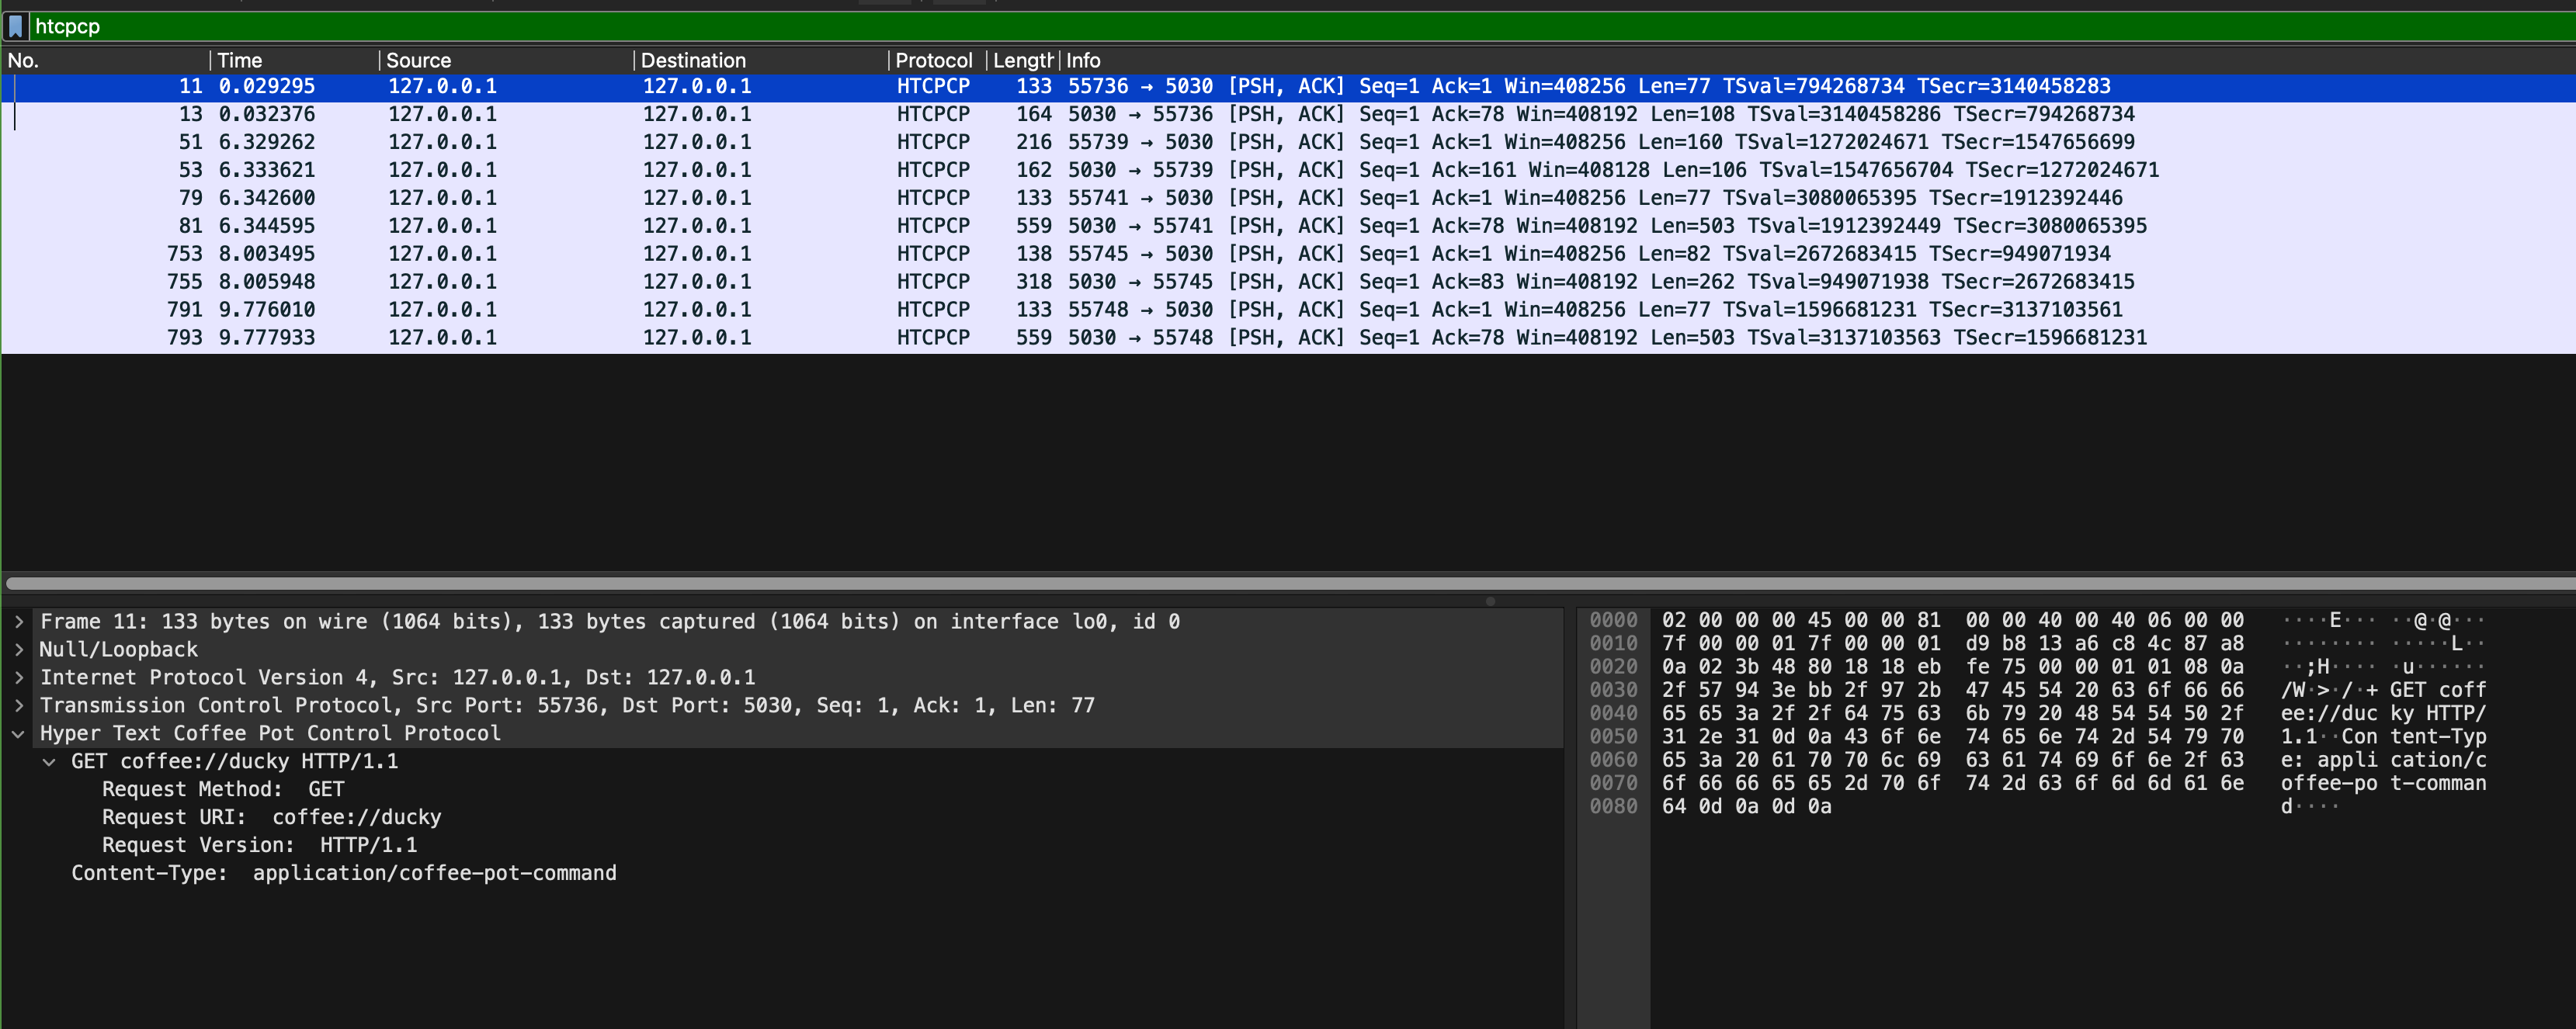
We captured these packets when we navigate to our coffee site homepage, brew a coffee, and query the beans currently used to brew the coffee. Inspect its content and answer a few questions on eDimension. In particular, pay attention to these few things:
- What are the formats of HTCPCP request and response messages?
- What are the ports used for communication by the webapp and the coffee server? Do they remain the same?
- Read the HTCPCP RFC, and find the corresponding implementation in
src/webapp.candsrc/server_pot.c. There aren’t many of them. - What are the implemented HTCPCP methods? What headers are accepted on the messages
Task 5
TASK 5: Inspect HTTP Messages
Repeat Task 4, but now you inspect HTTP messages (use http filter on sample_capture/coffee_brew.pcapng):
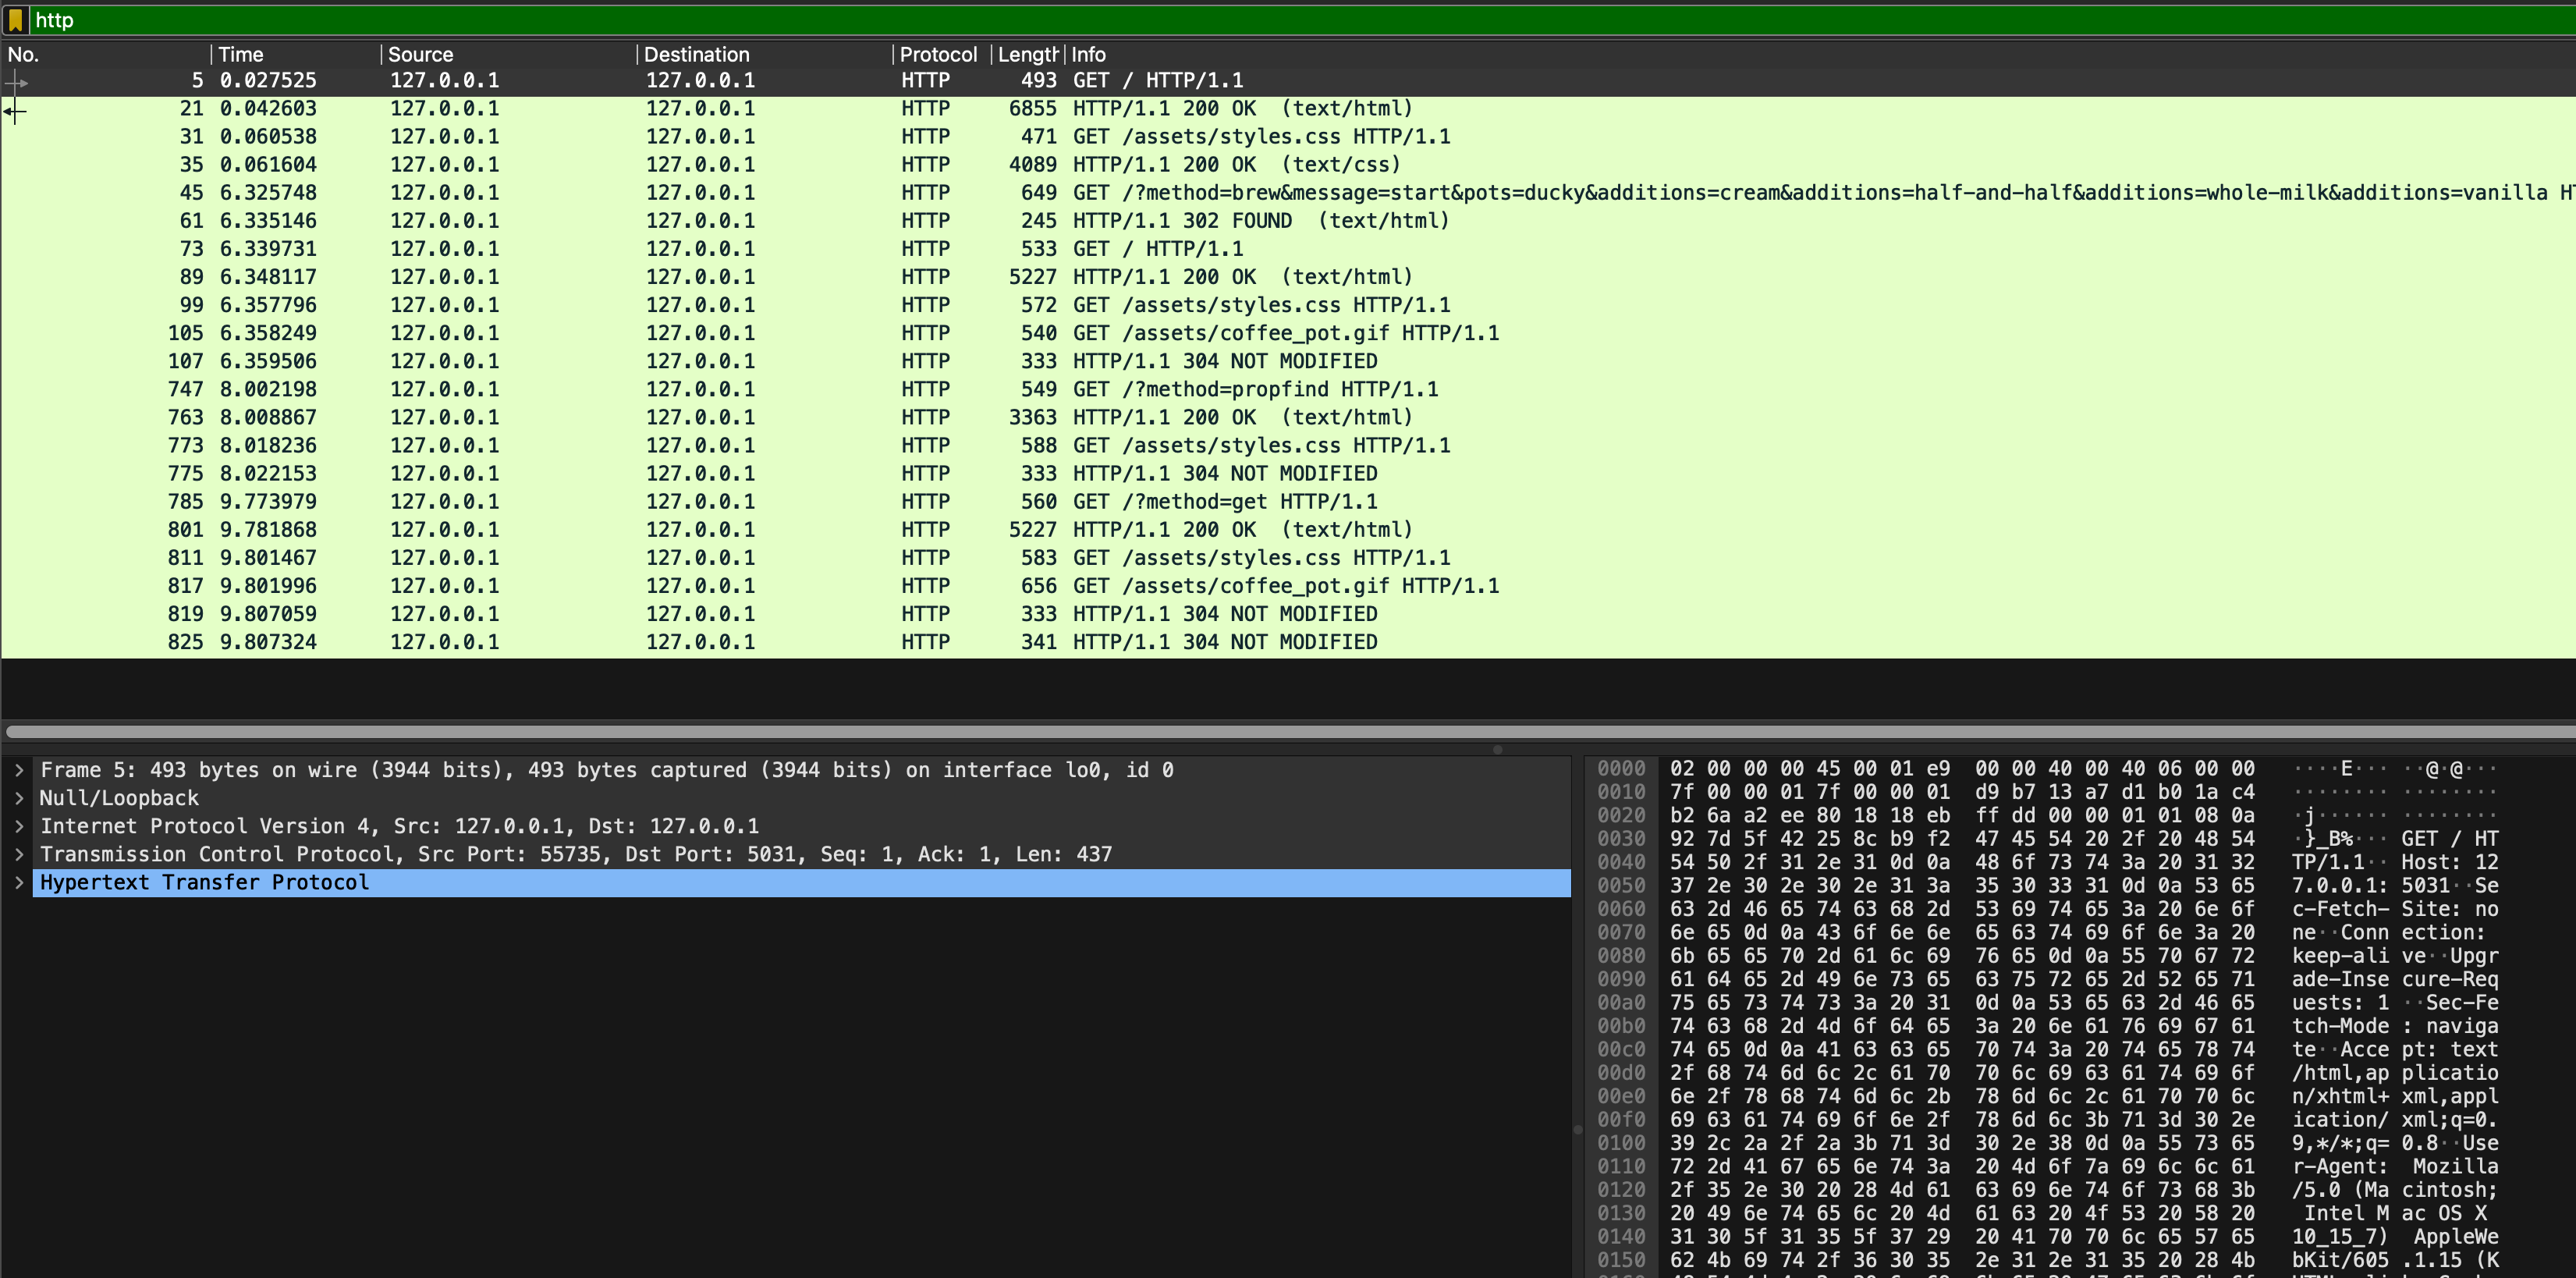
In particular, pay attention to these few things:
- Which packet contains the request made by the browser to get the base HTML page?
- What are the ports used for communication by the web browser and the webapp? Do they remain the same?
- Which HTTP protocol is used? Is the connection persistent? Why and why not?
- How does the browser ask for more assets?
- The browser and the webapp communicate via HTTP, not HTCPCP, but the user wishes to brew coffee (and indirectly communicate with the coffee server). How do we tell the webapp the format of the HTCPCP message to be sent to the coffee server? Hint: see message number 45
As usual, head to eDimension to answer several questions pertaining to this task.
HTTP Status Code
In this section, we will explore the concept of status code. In HTTP, status codes are three-digit numbers that indicate the outcome of an HTTP request. Each status code conveys a specific meaning to help identify and troubleshoot issues during communication between a client and a server.
Our TAs Ryan and Cassie recommend the PG13 version: https://http.cat and https://http.dog instead.
HTTP status codes are divided into 5 categories:
1xx: Informational, indicates a provisional response consisting only of the Status-Line and optional headers, and is terminated by an empty line
2xx: Successful, indicates that the client’s request was successfully received, understood, and accepted
3xx: Redirection, indicates that further action needs to be taken by the user agent in order to fulfill the request
4xx: Bad Request, indicates that the server cannot understand the request due to malformed syntax, and client should not resend the request without any modifications
5xx: Server Error, indicates cases in which the server is aware that it has erred or is incapable of performing the request
When you inspect coffee_brew.pcapng, you will see several status code:
Task 6
TASK 6: Study HTTP status code 200, 302, 304.
Inspect which request results in those responses with those status code and head to eDimension to answer several questions about it.
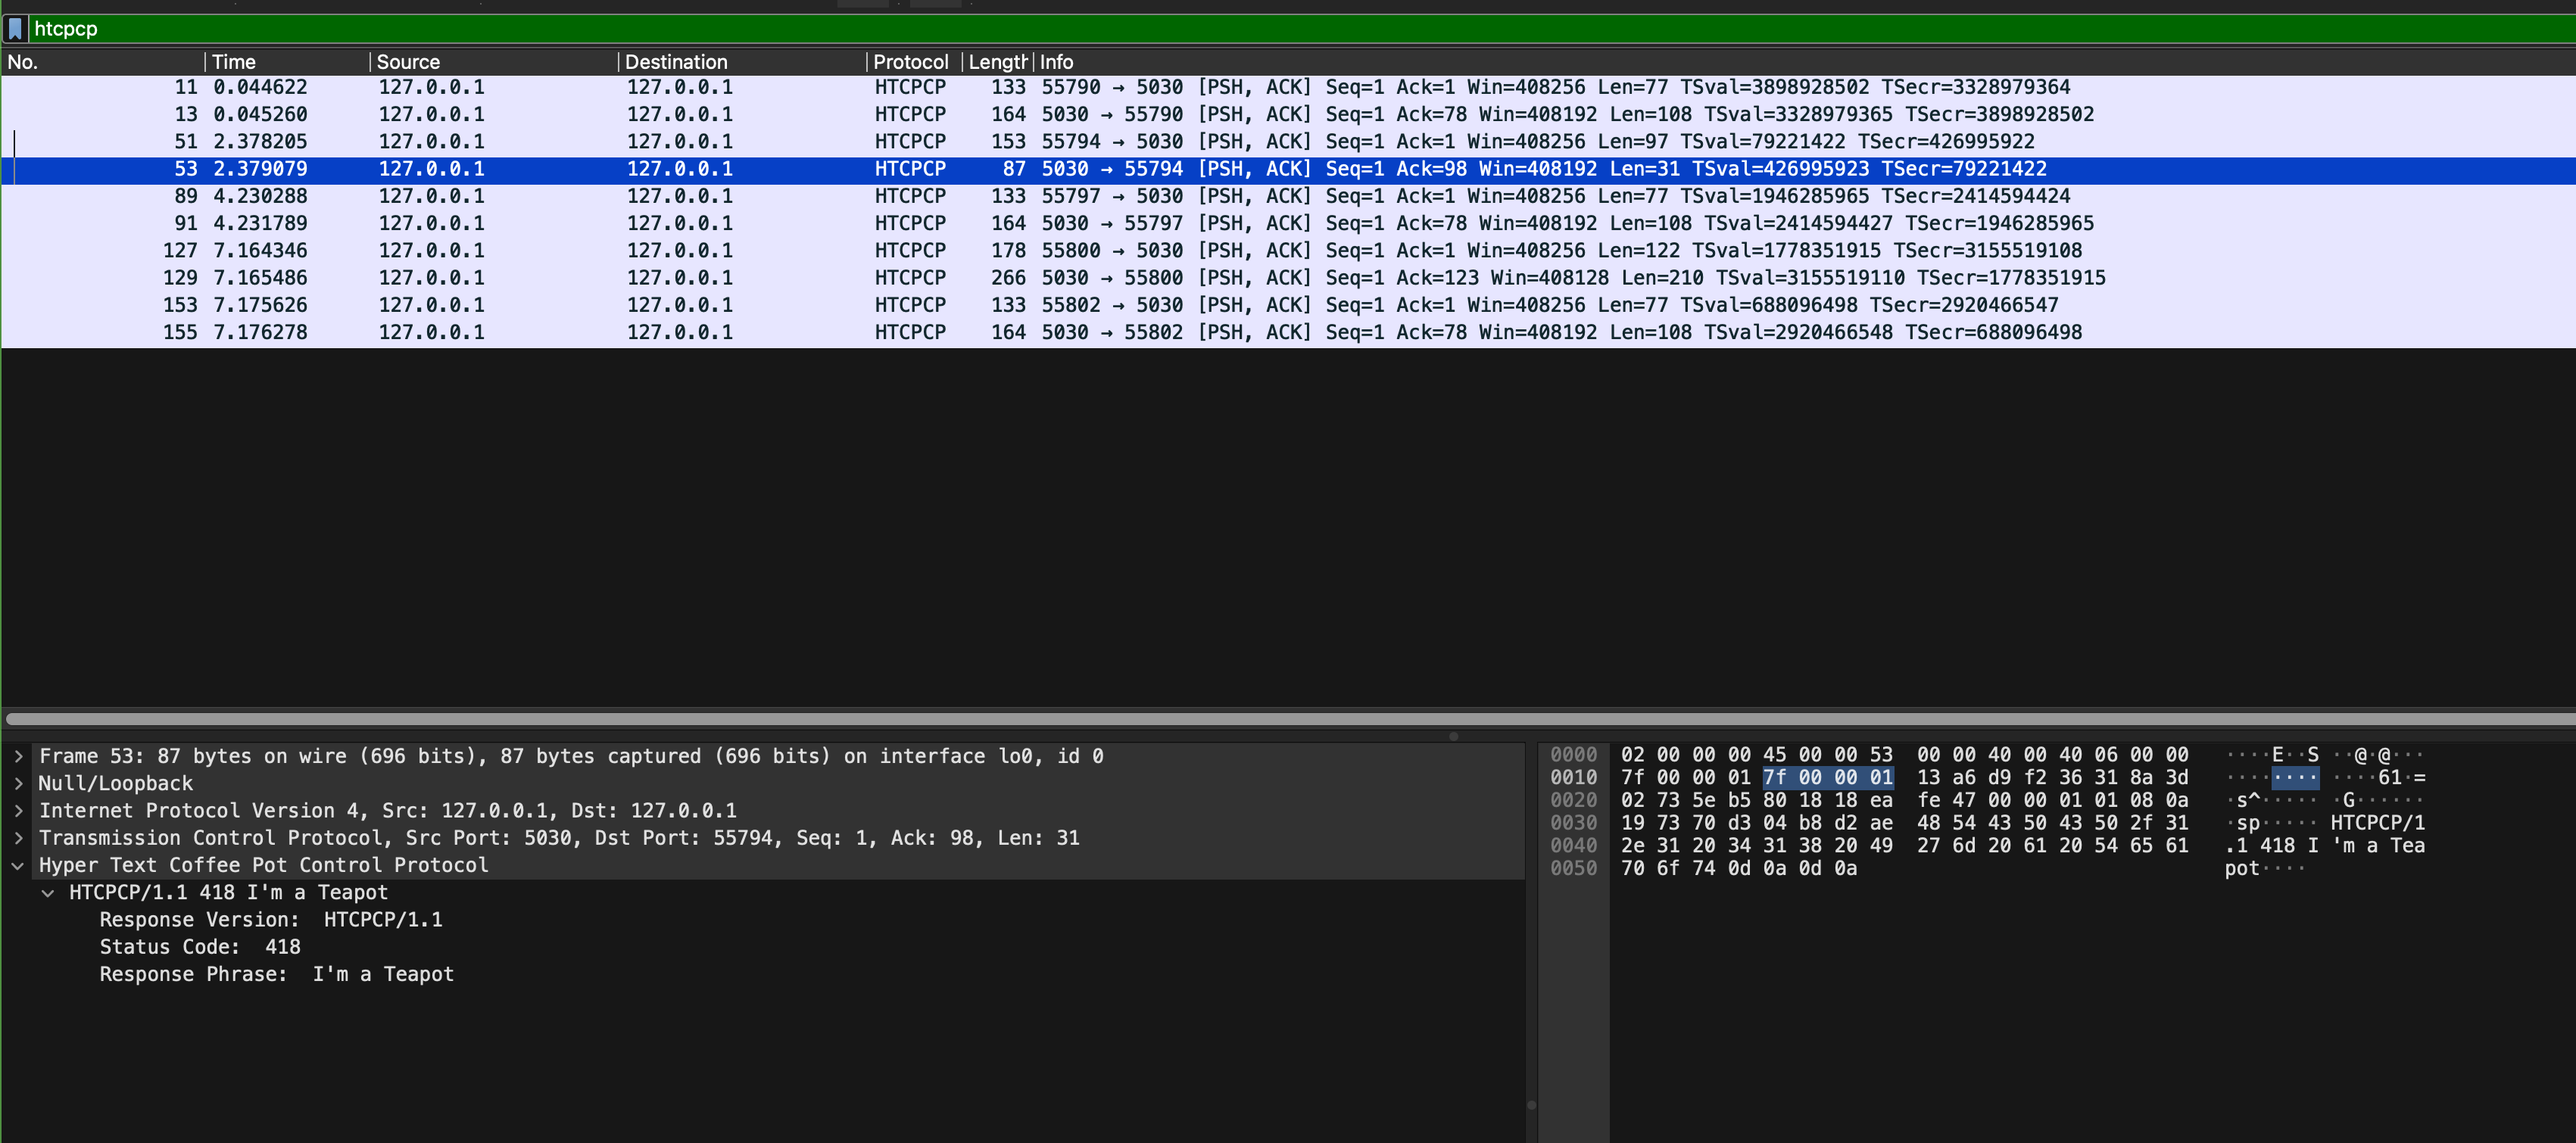
HTCPCP Status Code
There are two additional HTCPCP status code:
- 418: I’m a Teapot
- 406: Not Acceptable
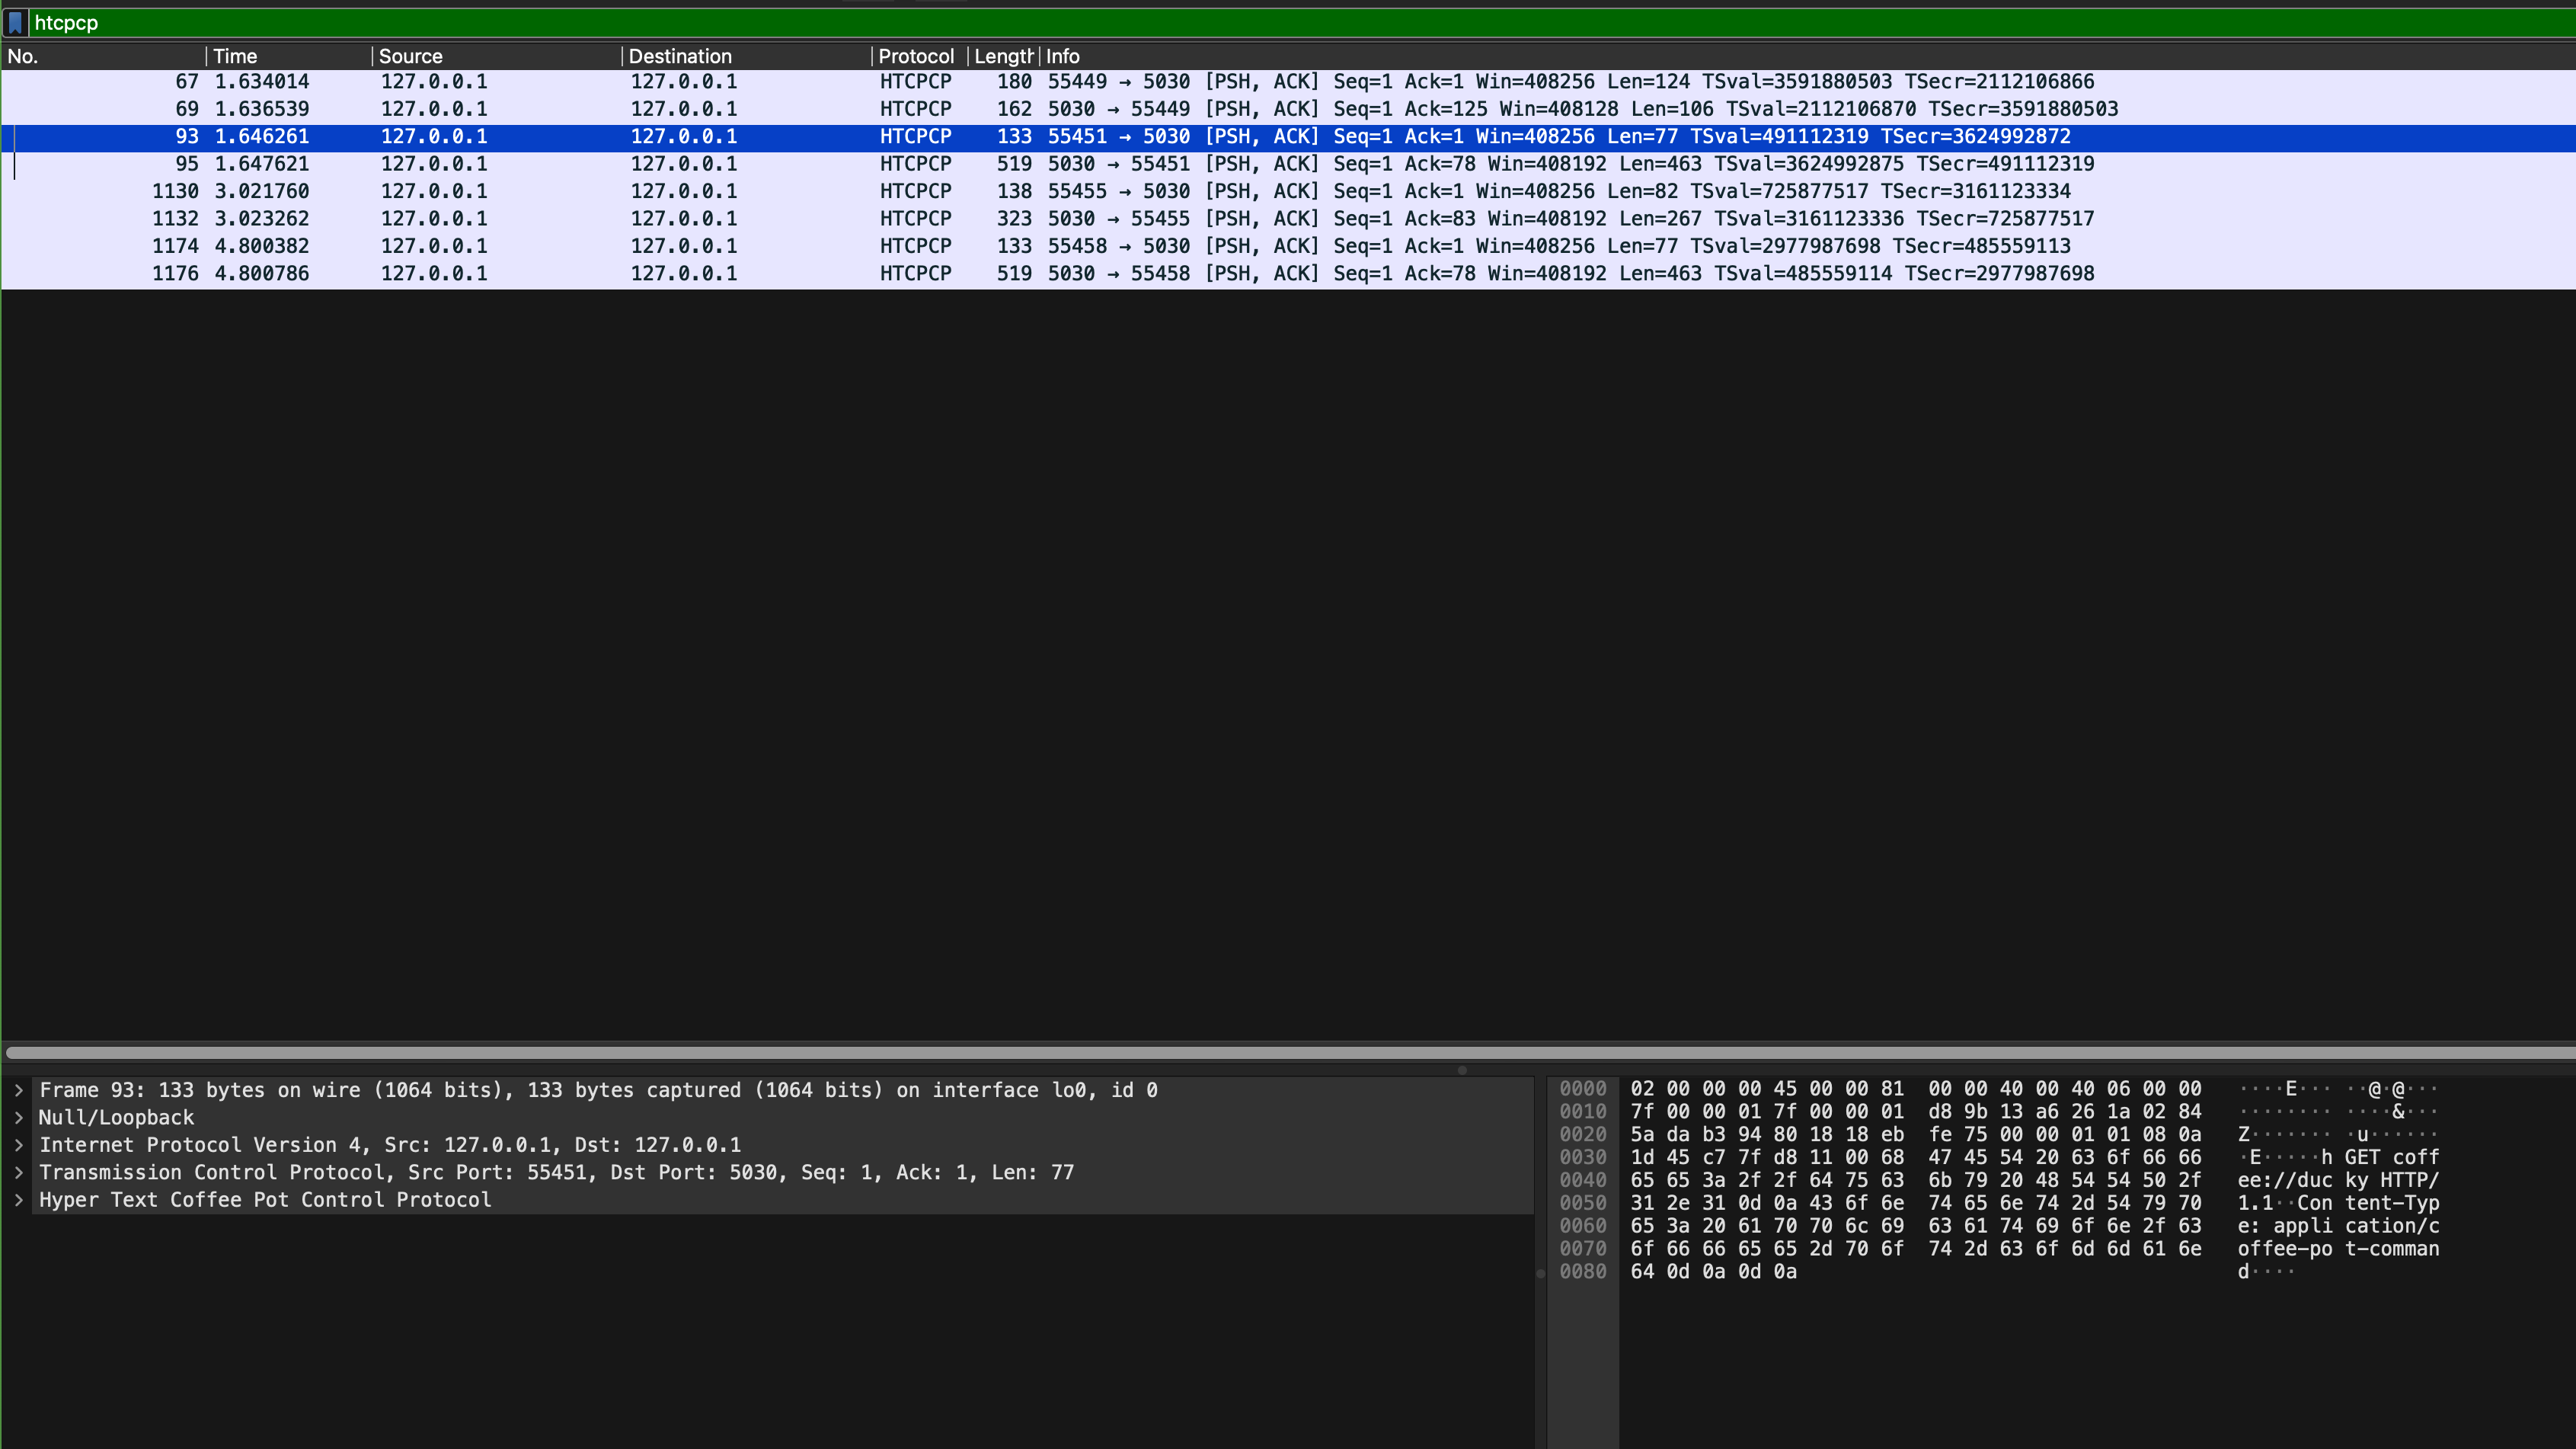
Both are implemented by our coffee server. Open sample_capture/coffee_418_406.pcapng and add htcpcp filter on it. In particular, see packet 53 and 129:
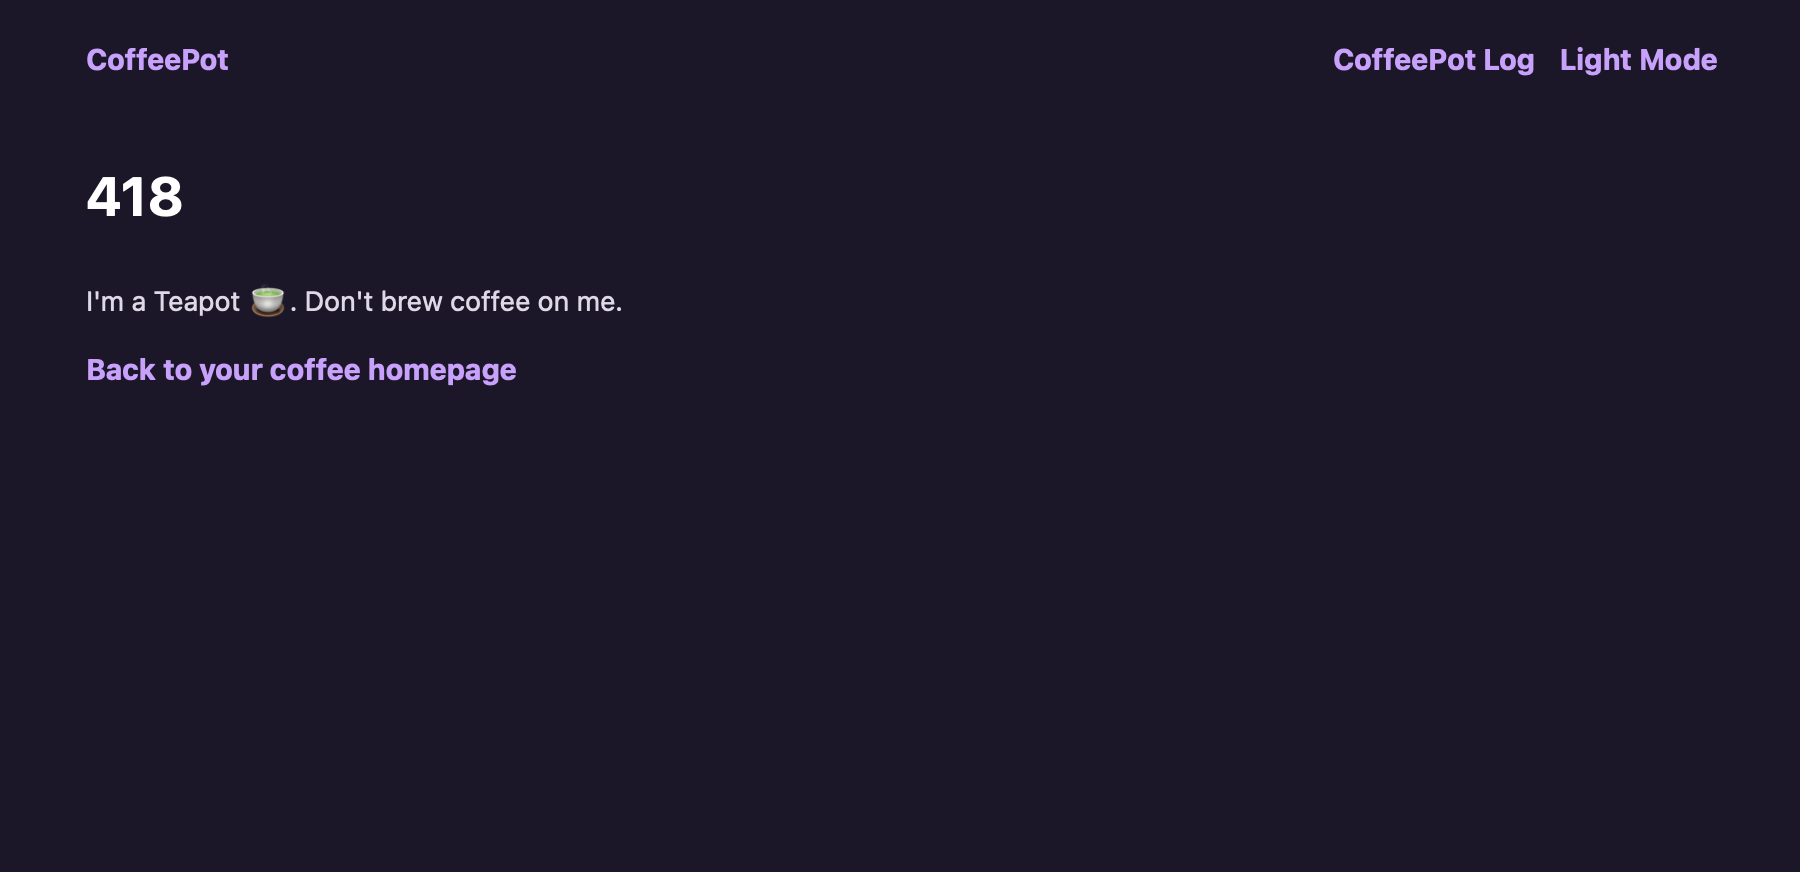
From the web browser, you can trigger 418 by trying to brew coffee with a teapot:

Which will result in this page being generated by the webapp and passed to our web browser:
You can trigger 406 by trying to brew coffee with chamomile option (who would do that? chamomile + caffeine doesn’t give you the most pleasant feeling 🤧):
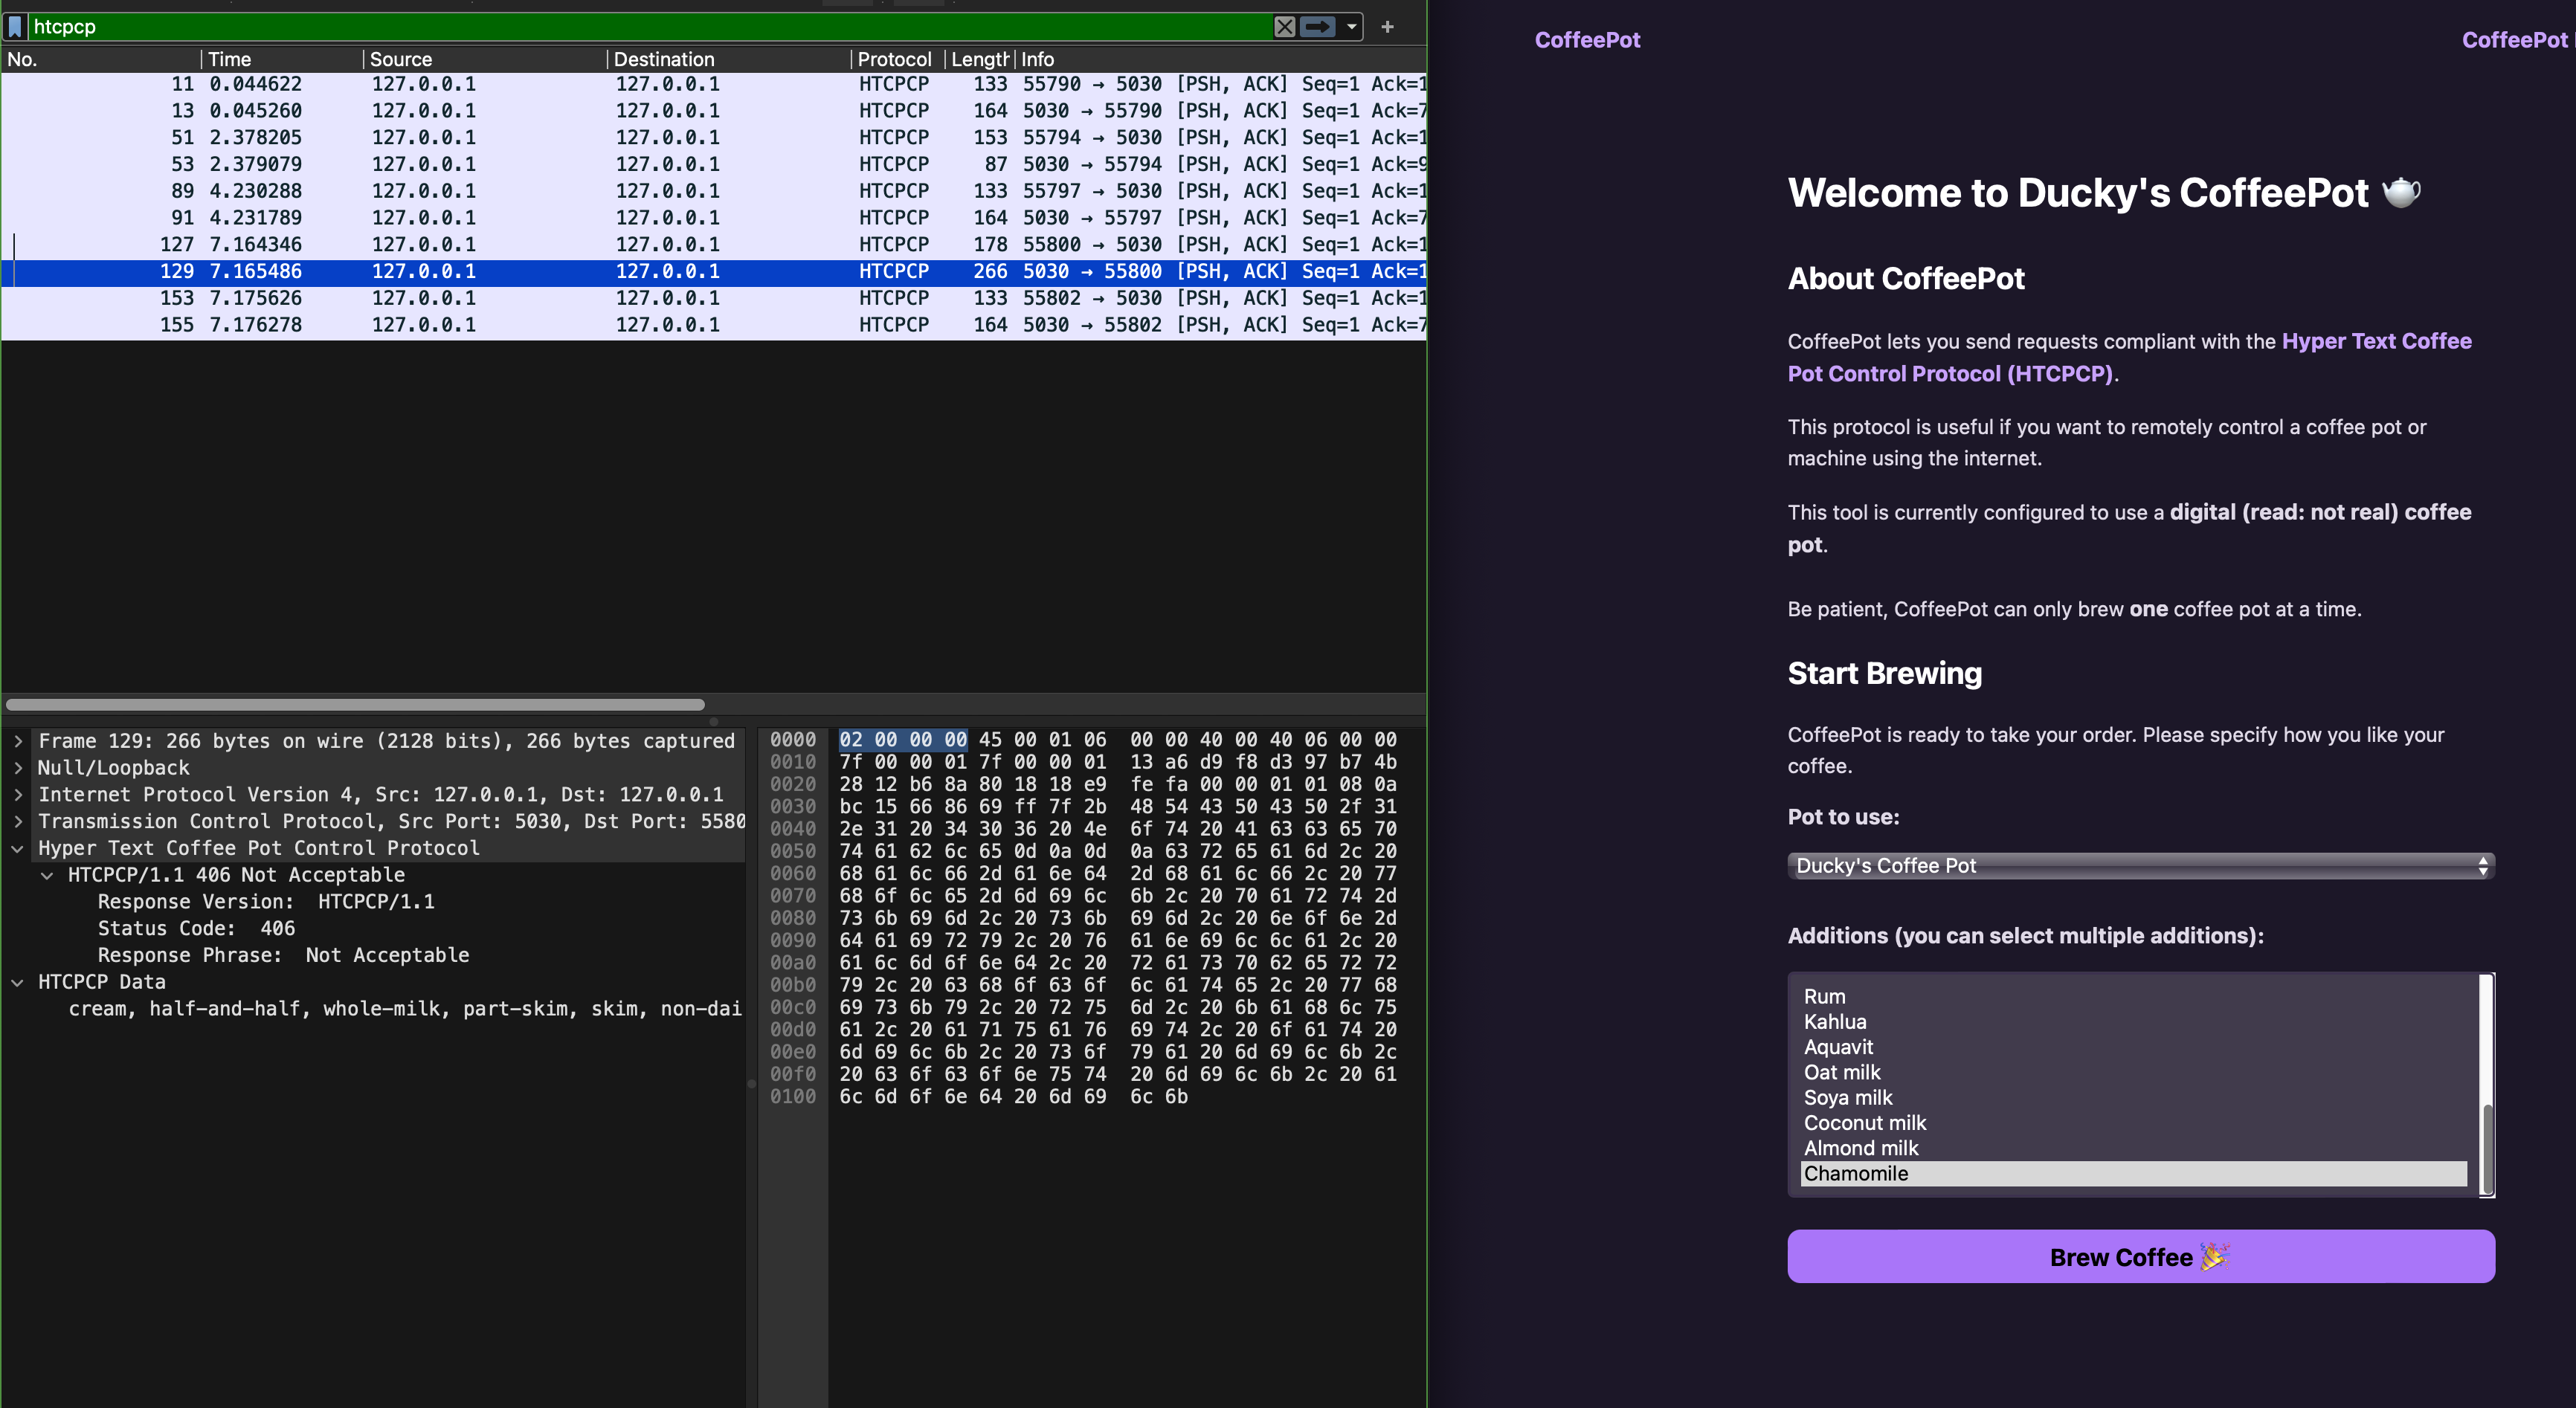
However we have not implemented anything in the webapp to handle that status code 406 (unlike status 418).
Task 7
TASK 7: Confirm handling of HTCPCP status code 406, 418, etc (other than 200). You may choose to embellish the reason-phrase in the frontend app if you wish.
Check that you can handle illegal requests properly. For instance, you shall see this page when you attempted to brew coffee with addition of chamomile:

HTTPS
Notice that you can inspect the content of HTTP messages on Wireshark. This is not desirable since we typically do not want anyone to sniff what we are browsing on the web. HTTPS is a secure way to send data between a web server and a web browser.
TLS
In HTTPs, the communication protocol is encrypted using Transport Layer Security (TLS) or, formerly, Secure Sockets Layer. TLS secures communications by using asymmetric public key infrastructure, where two keys are used to secure communications between two parties:
- The private key: this key is controlled by the owner of a website and it’s kept private. This key lives on a web server (where the website is hosted) and is used to decrypt information encrypted by the public key.
- The public key: this key is available to everyone who wants to interact with the server in a way that’s secure. As you have already known, information that’s encrypted by the public key can only be decrypted by the private key.
Public keys are typically embedded in a certificate signed by a trusted Certificate Authority (CA). A certificate is a trusted document that contains a public key and other data of the respective private key owner. Either your browser or your OS ships with a set of trusted CA certificates. If a new CA comes into the market, then the browser or the OS will need to ship a software updates containing the new CA’s information.
Your browser will typically complain if you try to access a site with untrusted Public Key.
Task 8
TASK 8: Enable HTTPs using a reverse proxy
The C webapp serves plain HTTP. To enable HTTPS in front of it, you can use stunnel or nginx as a TLS termination proxy that forwards decrypted traffic to the C webapp on port 5031.
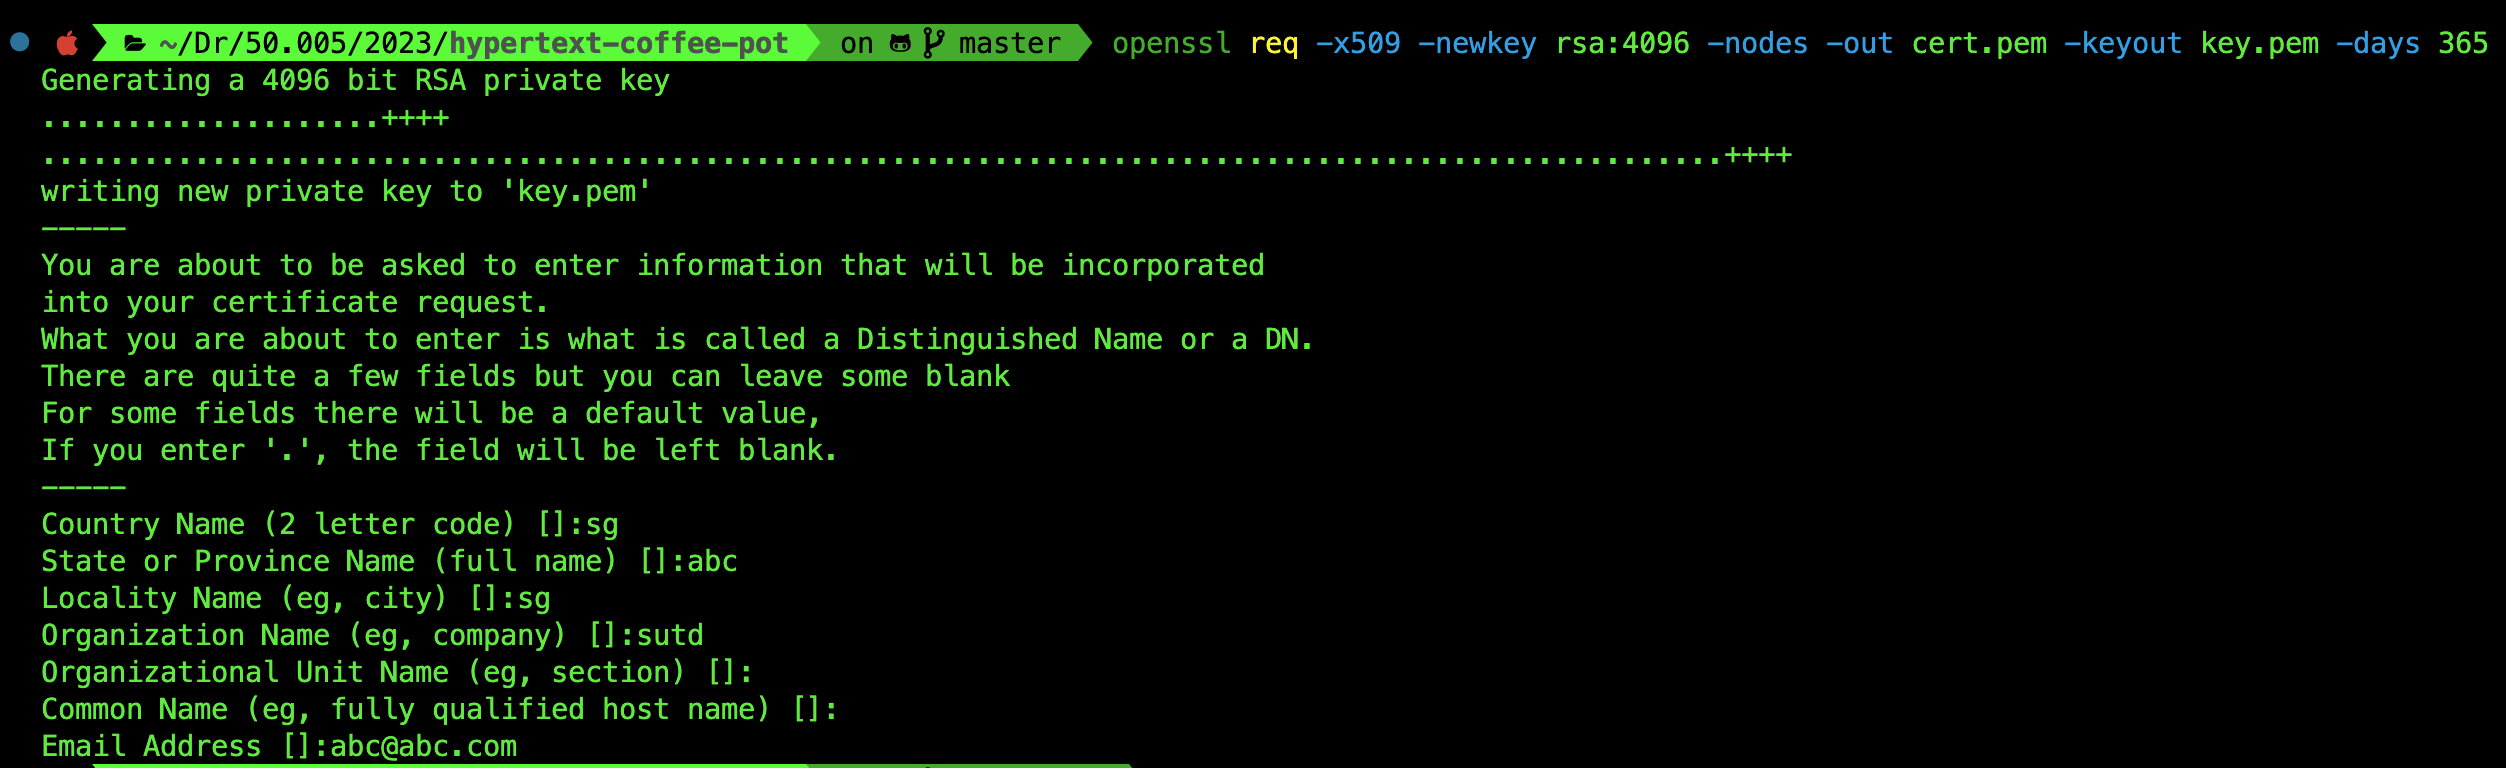
First, generate a self-signed certificate and private key:
openssl req -x509 -newkey rsa:4096 -nodes -out cert.pem -keyout key.pem -days 365
You need to have openssl installed. We assume you already have it since it’s required for Programming Assignment 2. If you don’t have it installed, google it.
You will be prompted to key in some details as such, fill it with whatever you want:
You will have two files in the root folder of the repository: cert.pem and key.pem. Next, install stunnel if you do not have it:
# macOS (Homebrew)
brew install stunnel

# Ubuntu / Debian
sudo apt install stunnel4
stunnel works on both macOS and Linux. On macOS, Homebrew installs it as stunnel (not stunnel4). On Ubuntu/Debian the package is called stunnel4 but the command is still stunnel.
Create a config file named stunnel.conf in the root folder of the repository (the same directory where cert.pem and key.pem were generated):
; stunnel.conf: place this in the repo root alongside cert.pem and key.pem
[https]
accept  = 5443
connect = 127.0.0.1:5031
cert    = cert.pem
key     = key.pem
Then launch the proxy from the repo root so that the relative paths to cert.pem and key.pem resolve correctly:
# run from the repo root
stunnel stunnel.conf
You can now access your site at https://127.0.0.1:5443 (note the different port number). Your browser will warn you about the self-signed certificate:
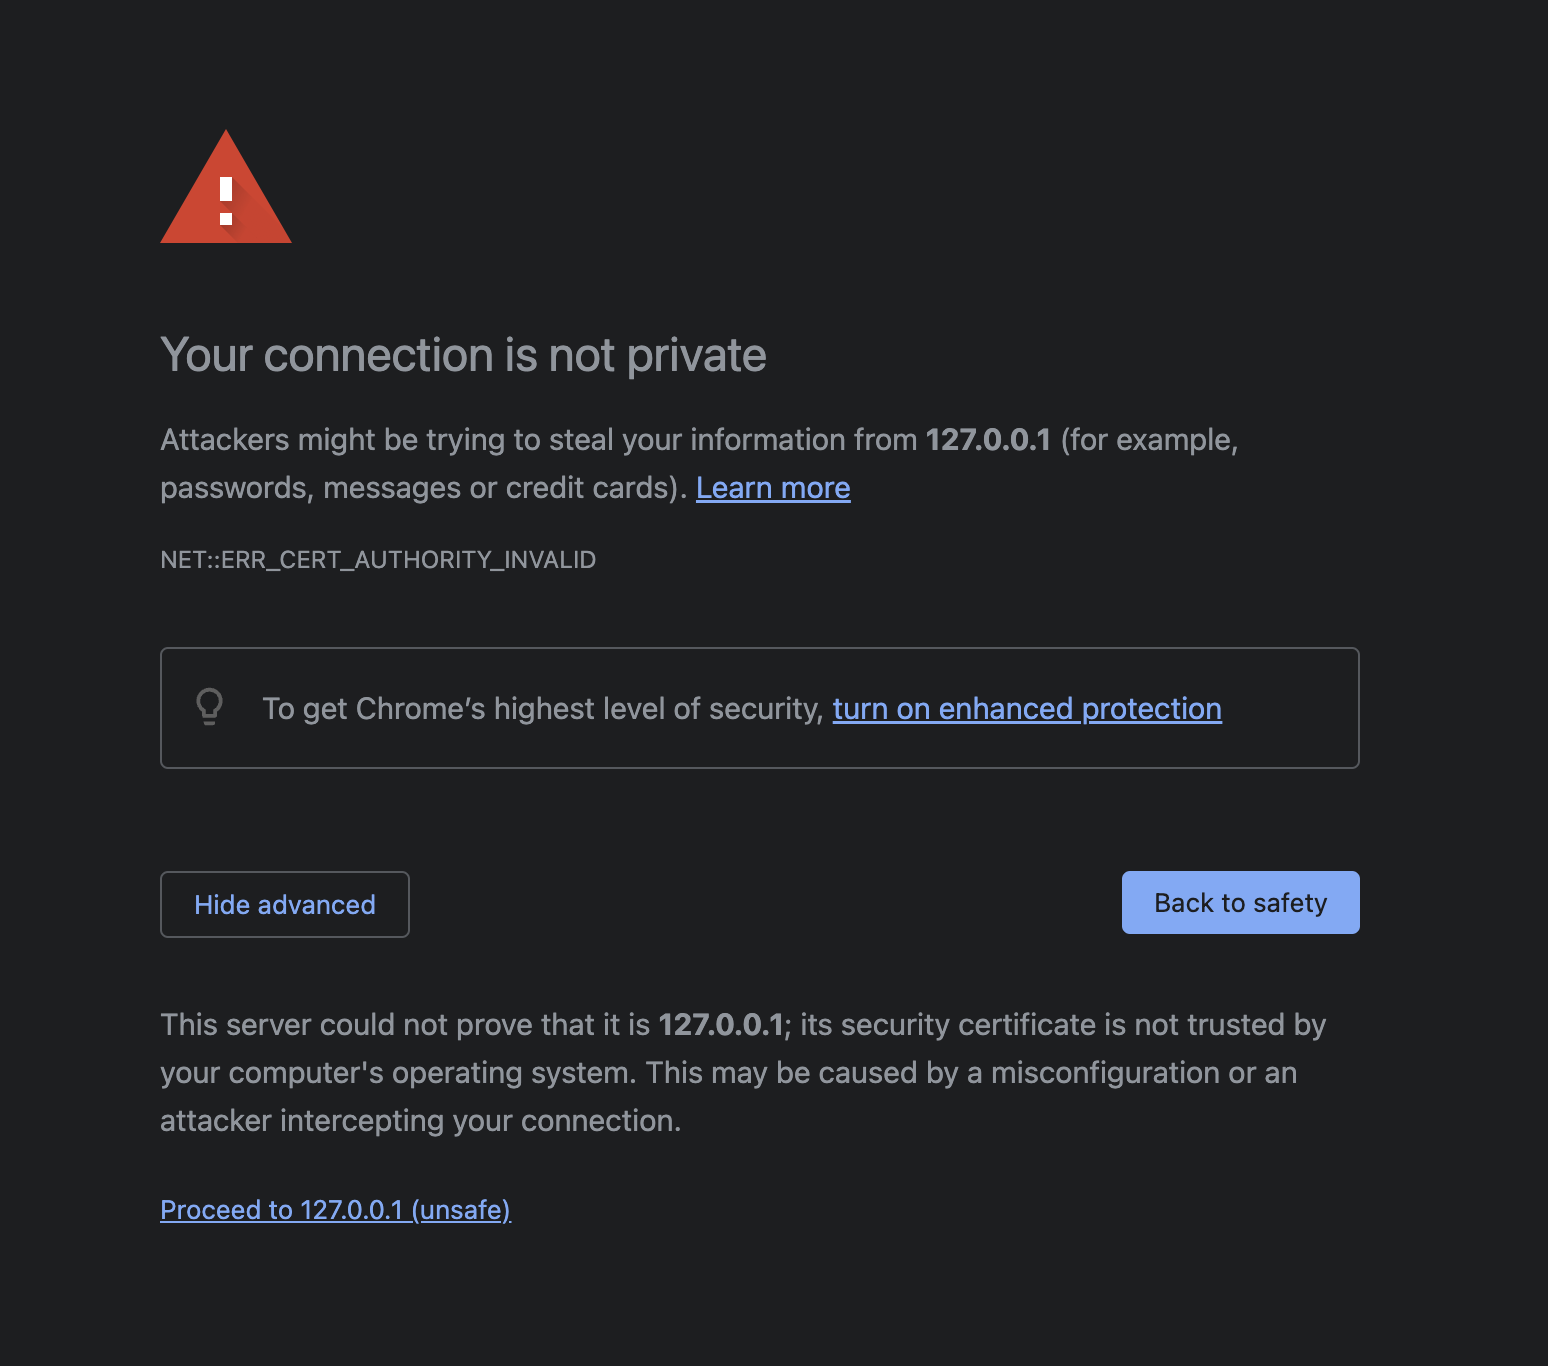
Think! Why does this warning come about? What does it mean by This server could not prove that it is 127.0.0.1?
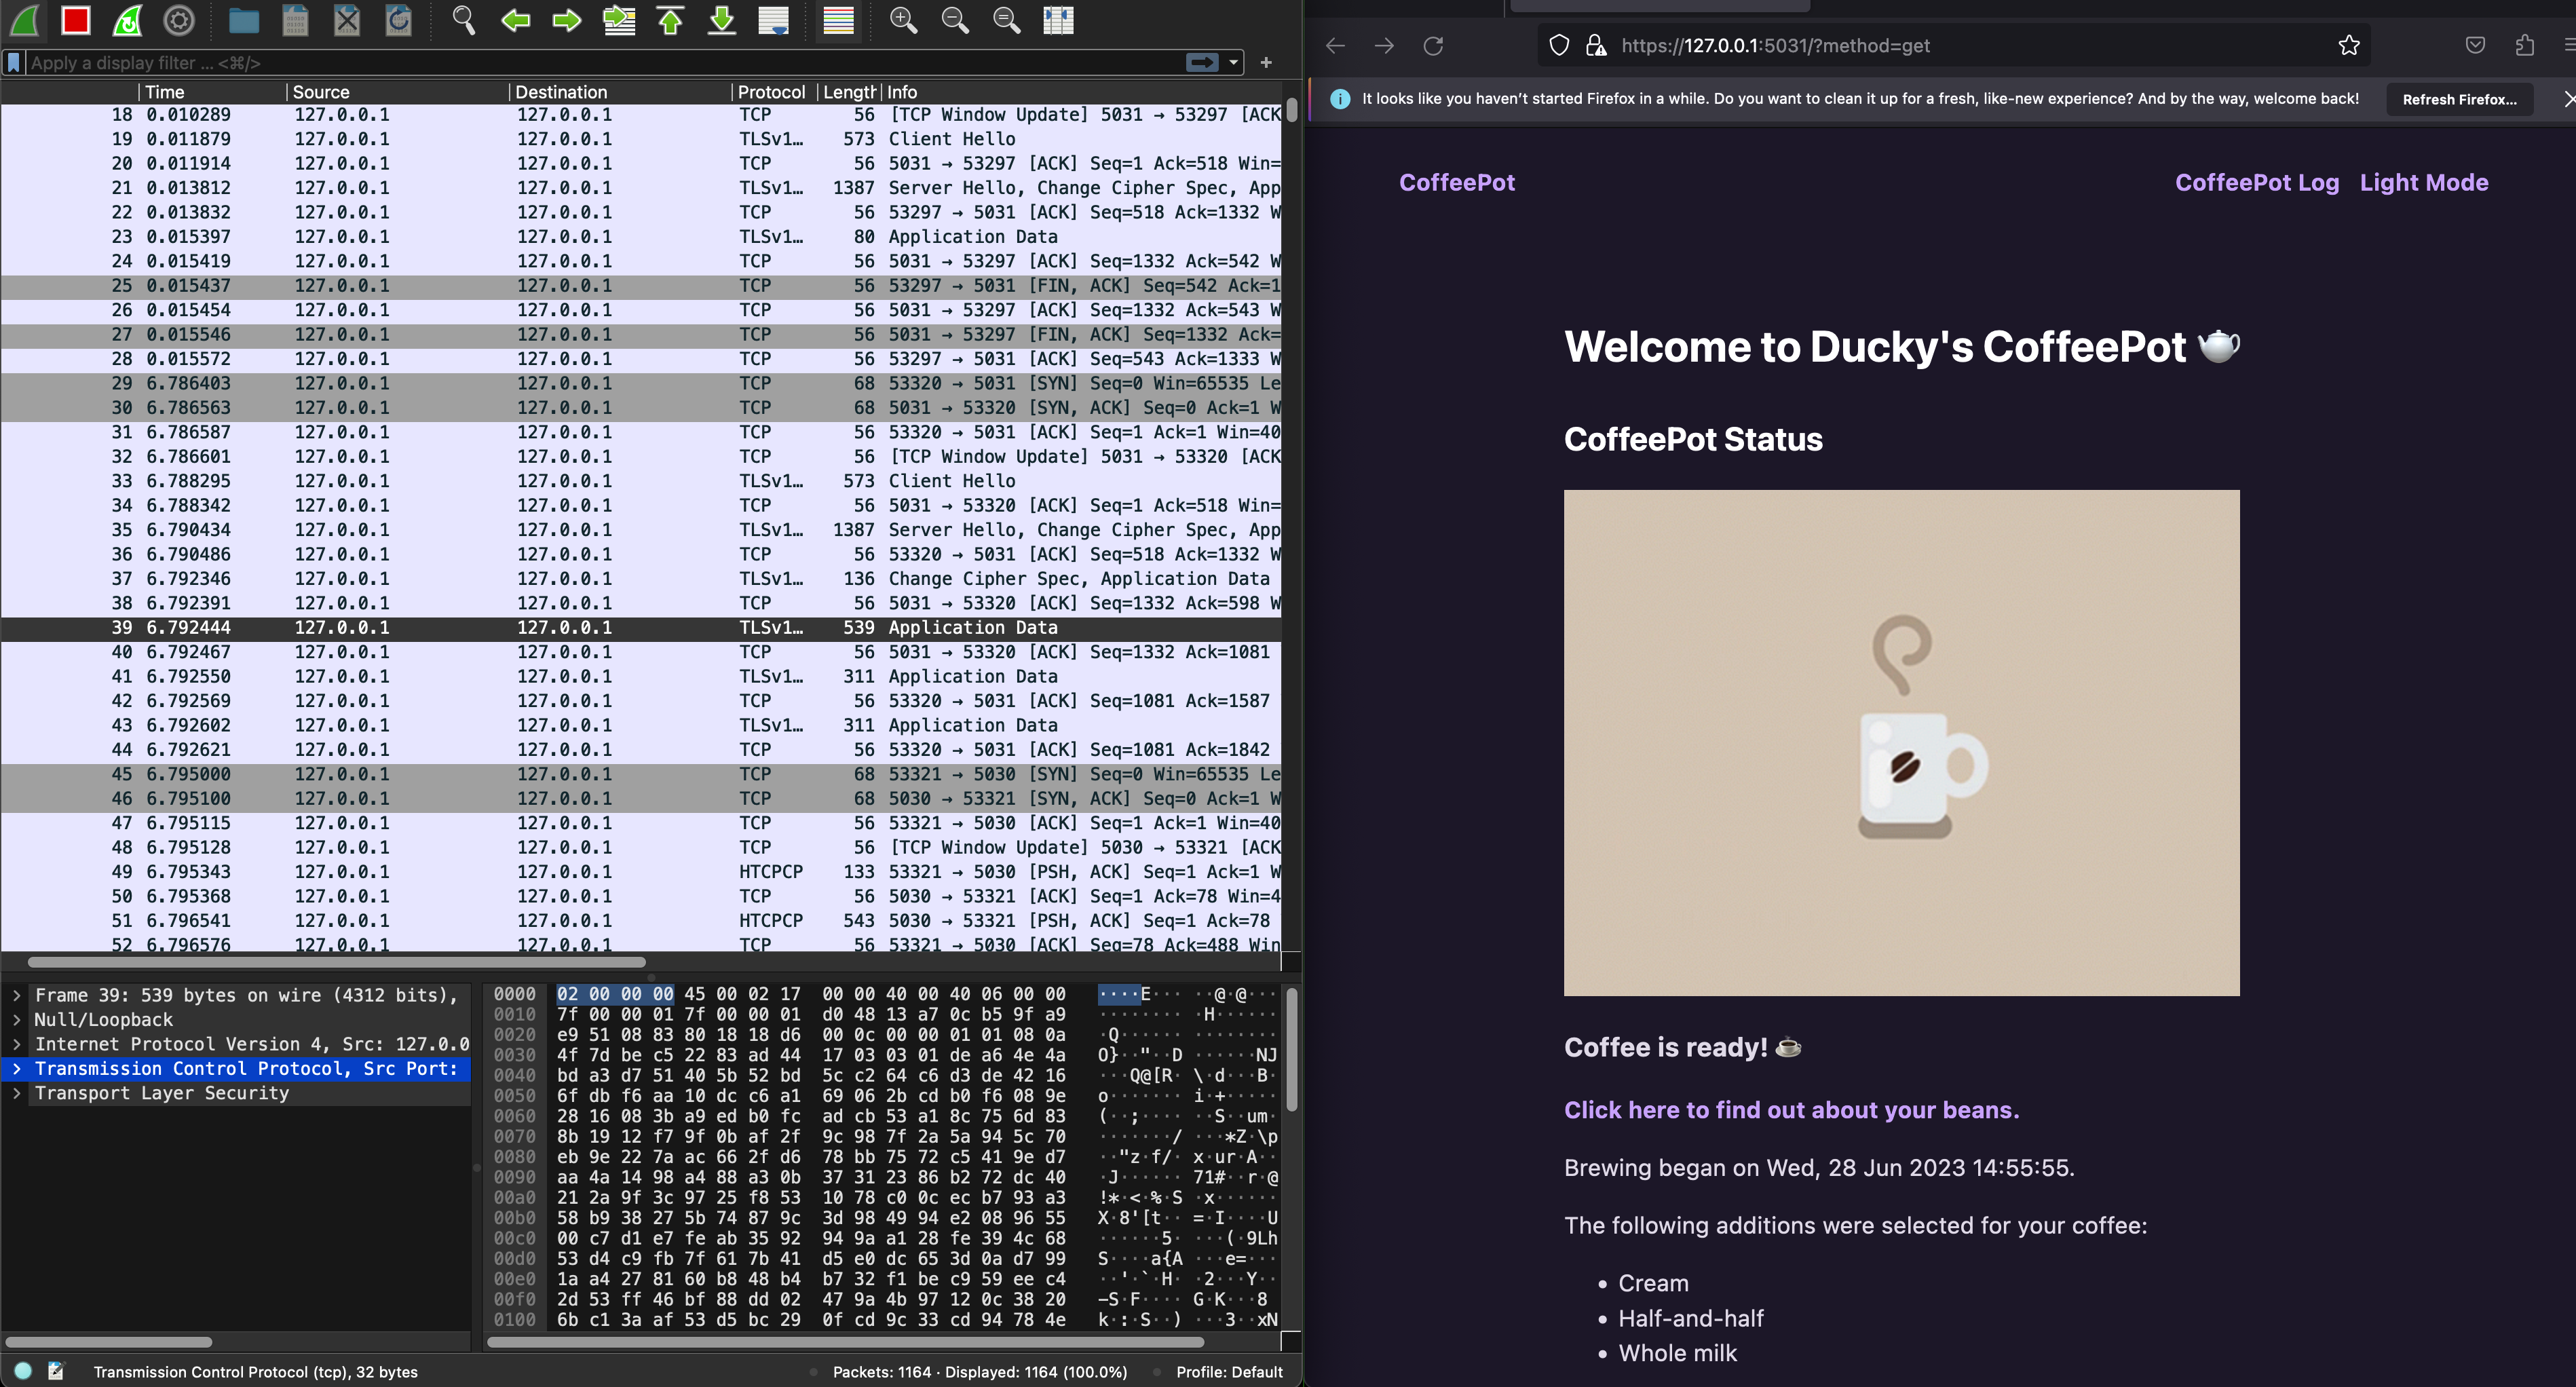
You can just click proceed anyway, and you should be able to view your webpage as per normal. However this time round, when you open Wireshark and sniff your loopback channel while loading the CoffeePot homepage, all packets are encrypted and Wireshark will not be able to decode https packets. It will all appear as TLS packets, with encrypted application data:
With HTTPs enabled at the proxy layer, can you still inspect the HTCPCP messages and their content? Why? Head to eDimension to answer a few questions pertaining to this task.
By default, stunnel runs in the background so once you’re done, you should kill it:
pkill stunnel
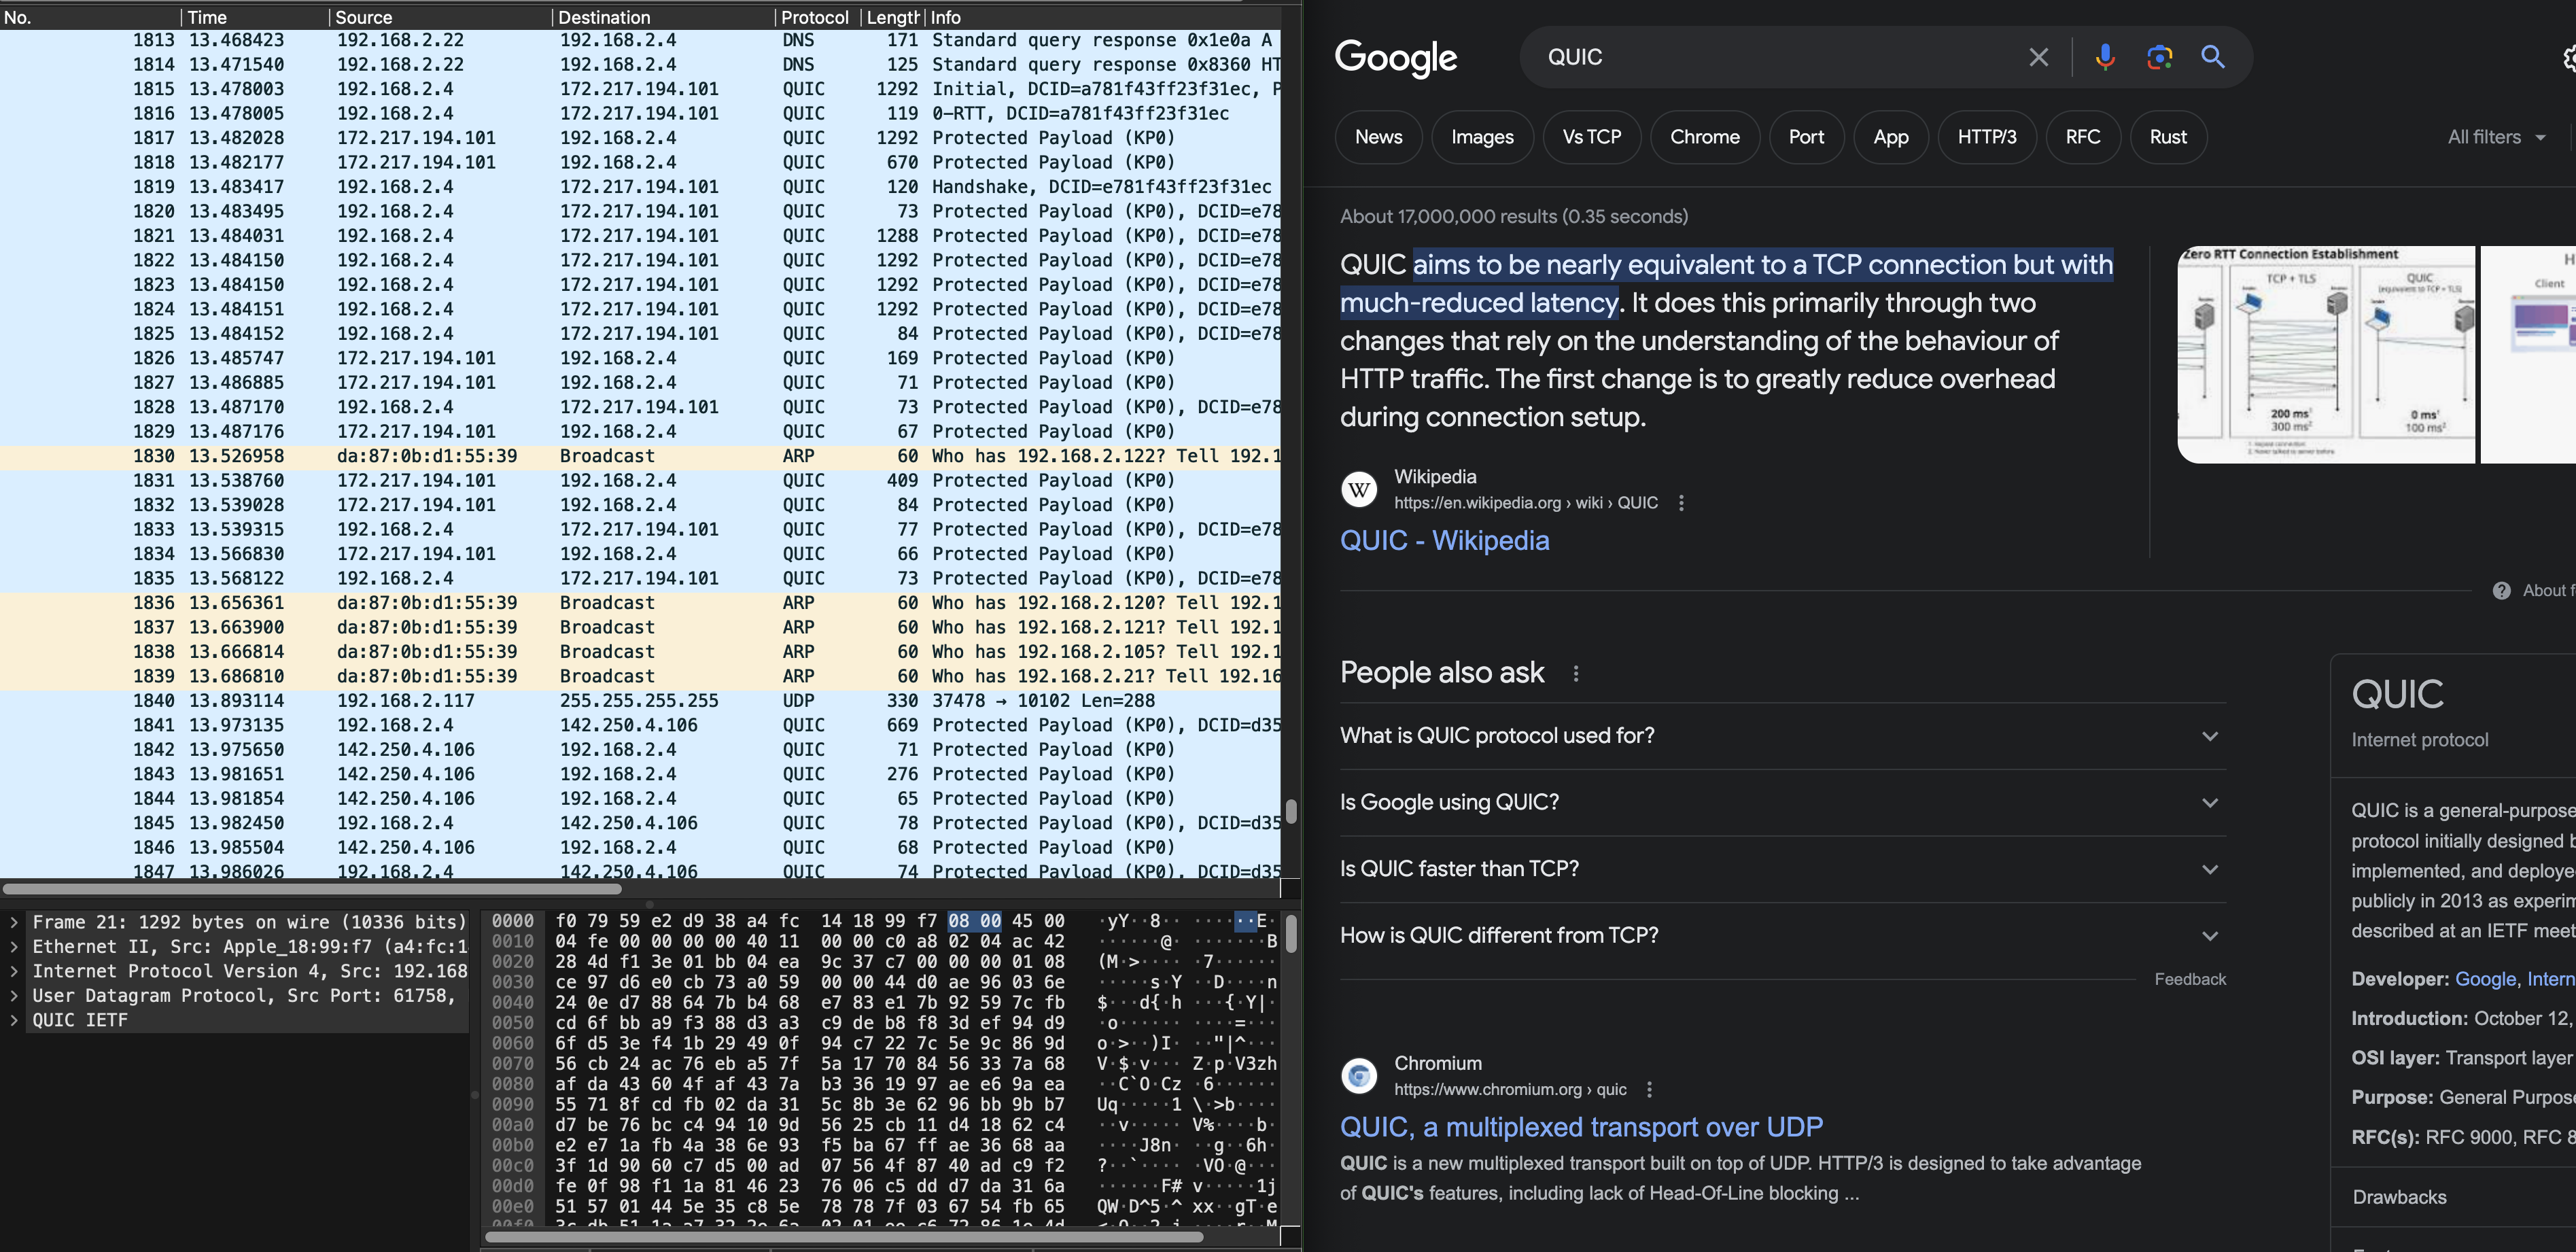
QUIC
Modern browsers at the time of this writing (Jan 2025) have moved to utilise QUIC: a multiplexed transport over UDP. Its goal is to improve user experience by reducing page load times, and it started as an alternative to TCP+TLS+HTTP/2.
QUIC is out of syllabus, but we figured it would be fun to know.
Summary
In this lab, you have learned several things pertaining to our syllabus:
- Understand client-server model of network applications
- Understand how web server works and the HTTP requests and responses
- Understand how wireshark packet sniffer and analyzer works and its application
It might do you some good to try and draw the space-time diagram of sample_capture/homepage_coffee.pcapng as practice. Although it is not formally graded, it might give you a better understanding on TCP handshake and the timeline of HTTP messages exchanged between server/client.