 50.005 CSE
- Submission
- The Terminal and The Shell
- Basic Commands
- Path
- Configuring a Terminal Session Using
.rcFiles - Common Commands
- Standard Streams
- Pipe
| - Why do we use the CLI?
- Shell Scripting
- Summary
- Appendix
50.005 Computer System Engineering
Information Systems Technology and Design
Singapore University of Technology and Design
Natalie Agus (Summer 2025)
Introduction to the Command Line Interface
An operating system Kernel’s job is to provide services so that softwares can communicate with hardware. It manages computer system hardware, memory, and processes (among all others). Its services are exposed via the system call interface, which in itself is wrapped in C standard Library to provide an API that user applications can interact with. Various user applications are made so that the OS services are usable to humans. These services are those you encounter daily when using a computer, for example:
- File management (rename, create, list files, delete, etc),
- Process management (run and terminate),
- System diagnostics (RAM used, CPU %, disk space),
- I/O operations like printing, reading from disk, communication via network, resource management (overclock speed, VM size),
- Protection (security and permission settings), etc.
Submission
You are to complete this lab’s quiz on eDimension as you complete the tasks.
No checkoff required for this lab.
The Terminal and The Shell
The Terminal
The terminal is environment (window) where you type and read the output, while the shell is the program that interprets and executes those commands. You are probably using macOS Terminal, iTerm2, Windows Terminal, GNOME Terminal depending on your OS.
Fun fact
The term “terminal” in the context of operating systems and computing has its origins in the early days of computers. Initially, computers were large, centralized machines that were accessed by multiple users through individual terminal devices.
These terminals were called “terminal” because they served as the endpoint (or the terminus) of a communication line between the user and the mainframe or minicomputer.
Today, when we refer to the “terminal” on a computer, we’re usually talking about a terminal emulator program that provides a text-based interface to the operating system. Users can enter commands through a shell (like bash, zsh, or PowerShell), which are then executed by the operating system. The term “terminal” has thus evolved from its original meaning but retains the core concept of being the point of interaction between a user and the computer system.
The History
This is how we access the mainframe (a gigantic computer) in the past, via end-devices called the “terminals”:
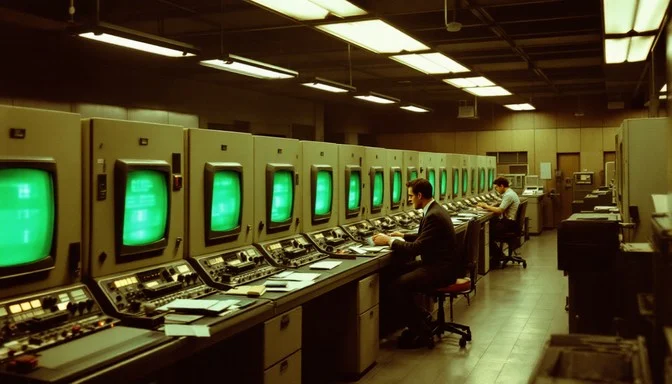
Each terminal is that keyboard/screen set and they’re wired to connect to the mainframe (the computer) where the kernel and OS is. The shell runs on the mainframe so the shell must send/read data to/from the Terminal. Here’s the rough setup:
Cold war terminal keyboard/screen
        |
   serial cable
        |
serial port on mainframe/minicomputer
        |
OS device file: /dev/ttyS0
        |
login program / shell
Pay attention to the device file: /dev/ttyS0 is the software handle for “serial port 0”. There can be many terminals connected, each has its own port plugged to the mainframe and each has a device file /dev/ttySx. Its job is to let programs read/write bytes to that port, so a read from /dev/ttyS0 receives what the terminal keyboard typed, and a write to /dev/ttyS0 sends chars to appear on the terminal screen. The real hardware is something like a UART/serial controller on the computer and the OS driver exposes it as /dev/ttyS0. In modern computers, the terminal is just one “window” in the same computer you’re working on, so everything is virtualised. We will dive deeper into it in this section.
Modern Setup
When you open a Terminal window, it will launch the CLI shell process (or more accurately: make syscall to exec shell process) and connecting your keyboard/screen to that shell’s input/output.
The Shell
A shell is one of these user applications that acts as an interface to allow users to access OS services. It is named shell because it is seen as an “outer” layer around the OS kernel.
CLI and GUI Shell Overview
OS shells are made either in a form of command-line interface (CLI, also known as) where users can provide commands via text, or graphical user interface (GUI) where users can provide commands via mouse clicks. In this lab, we are going to learn a little bit about the command-line interface, how stream works, and shell scripting (using bash).
For a GUI shell, there usually is no terminal. The “shell” is the desktop environment or launcher itself, such as: explorer.exe (Windows), Finder + Dock + desktop server (macOS), GNOME Shell / KDE Plasma (Linux).
CLI Shell
You would need to install any POSIX-compliant OS before coming to this lab. See here for guide.
In order for us to be able to use CLI, we need to be familiar with their commands and their calling syntax. In particular, we are concerned with UNIX-type shells (POSIX is an IEEE standard that acts as a standard UNIX version) in this course.
- Open your terminal/command line window.
- The terminal window in front of you contains a
shell, which enables you to use commands to access OS services.
Task
TASK 1: To find your current shell, type the command: echo $SHELL
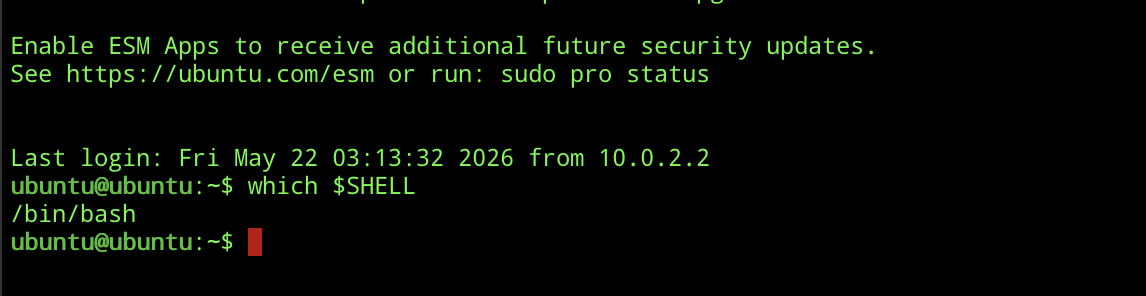
Bash shell (bash is used in the screenshot above. There are other shells as well: z-shell) or fish. Which one to choose? It is entirely up to you.
The CLI accepts commands (the first word, e.g. ps, that you type into the CLI is the command), entered line by line and it will be executed sequentially. There are two types of commands in general, commands with and without options or arguments.
Basic Commands
Introduction
There are two types of commands in general: system programs or built-in.
A command is none other than just the name of the program we want the shell to execute plus its inputs/options/arguments. When we type the command git clone https://some-url, we are asking the shell to make a syscall to create a new process, run git, and pass clone https://some-url as an input. It then wait for git to complete and terminate, before presenting the user with a new prompt.
Therefore, if your shell complains that command x not found, it simply couldn’t find the executable whose name matches the first word of your command.
Not all commands are system programs though, some of them are built into the Shell’s source code (commands like exit and cd) because
Without Options
Task 2
TASK 2: Try the following basic commands in sequence date, cal, pwd, who, clear.
E.g: type date and press enter. You should see today’s date given to you, for example:
bash-3.2$ date
Thu May  5 14:08:51 +08 2022
bash-3.2$
Do the same thing with cal, pwd, who, clear.
- Figure out what each command does using
man - You can use
man <command>and pressqto quit anytime.
If your distro does not come with cal, you can install it first using sudo apt install ncal.
With Options
The commands you have typed above are those that do not require options or more arguments (although they do accept these too). Some commands require more input arguments.
For example, the command ps shows the list of processes for the current shell, while ps -x shows all processes that are owned by the current user even when it doesn’t have a controlling terminal.
bash-3.2$ ps
  PID TTY           TIME CMD
61581 ttys000    0:01.80 /bin/zsh -l
61605 ttys000    0:00.00 /bin/zsh -l
61652 ttys000    0:00.00 /bin/zsh -l
61653 ttys000    0:00.04 /bin/zsh -l

bash-3.2$ ps -x
  PID TTY           TIME CMD
  393 ??         0:02.43 /System/Library/Frameworks/LocalAuthentication.framework/Support/coreauthd
  394 ??         1:29.34 /usr/sbin/cfprefsd agent
  398 ??         0:00.05 /System/Library/Frameworks/ColorSync.framework/Versions/A/XPCServices/com.app
  399 ??        25:02.92 /usr/libexec/UserEventAgent (Aqua)
  401 ??         2:06.64 /usr/sbin/distnoted agent
  403 ??         0:12.27 /System/Library/PrivateFrameworks/CloudServices.framework/Helpers/com.apple.s
  404 ??         2:02.15 /usr/libexec/knowledge-agent
  405 ??         0:06.55 /usr/libexec/lsd
  406 ??         3:05.55 /usr/libexec/trustd --agent
  407 ??        15:44.58 /usr/libexec/secd
  409 ??         0:02.05 /System/Library/CoreServices/sharedfilelistd
  410 ??        40:41.61 /System/Library/PrivateFrameworks/CloudKitDaemon.framework/Support/cloudd
  411 ??         0:00.19 /System/Library/CoreServices/backgroundtaskmanagementagent
  412 ??         0:05.30 /System/Library/PrivateFrameworks/TCC.framework/Resources/tccd
  413 ??        12:36.92 /usr/libexec/nsurlsessiond
Some commands accept single hyphen (-) as options, and some other accepts double hyphens (–), or no hyphen at all. It really depends on convention, so be sure to read the manual properly.
For example, the command: git commit -v -a --amend stands for:
- Use git to stage new changes (
commit) - Automatically stage all files that have been modified/deleted (
-a) - Do it in a verbose way, with detailed message highlighting all diff (
-v) - Replace the tip of the current branch by creating a new commit (
--amend)
Path
Basics of Directory
The file system has many directories, starting from the ROOT (symbolised as a single forward slash /) and you can have directories within a directory thus forming a hierarchy of directories. Each “level” is separated by the forward slash symbol.
For instance,
/Users/natalie_agus/Downloads simply look like this in the window:

If your directory has spaces in its name, you need to use the backslash) to indicate that it is part of the string, eg:
/Users/natalie_agus/Google\ Drive
Task 3
TASK 3: Find your starting context by running the command pwd, followed by ls:
- The command
lslists all files that exist in this context, which is the Desktop directory in the example above (/Users/natalie_agus/Desktop) - When you run the command ls by itself, it uses your current directory as the context, and lists the files that are in the directory you are in.
- You can use the
lscommand to list the files in a directory that’s not your current directory, e.g:ls /Users/natalie_agus/Downloads
Now try another command called cd to change the current working directory:
- Change the current working directory into any directory that’s accessible from the current context
- The command cd is analogous to double clicking a folder in the GUI
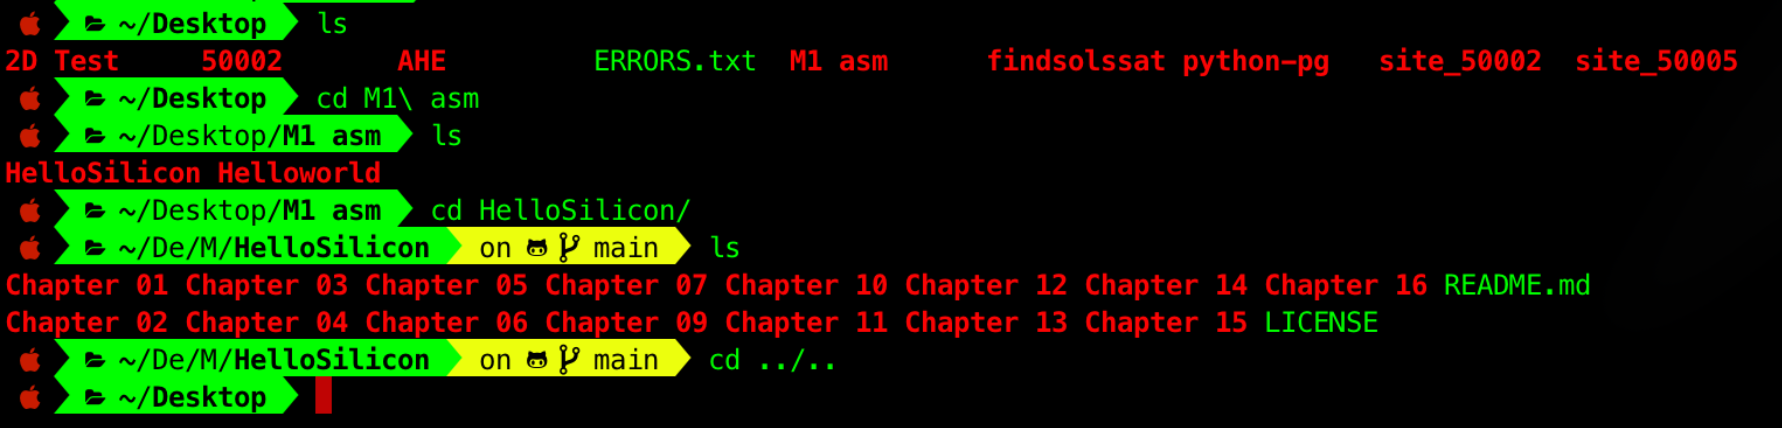
- You can go “back” to one previous directory level using the command
cd ..(or you can chain it to go two levels up for instance,cd ../..
Environment Variables
Another way of providing context is through something called environment variables. Tryout the command: cd $HOME
- The
$HOMEpart is a reference to the HOME variable, and is replaced by the path to your home directory when the command is run. - In other words, running cd
$HOMEis the same as runningcd <actual path to your home>, orcd ~(~ is a default shell variable that points to the current User’s home directory, and it also has other usages that you can read if you’re free). - To checkout what the value of your
$HOMEvariable is, type the command: echo$HOME
To find out about your current environment variables, you can enter the command env. Look at the values of common variables such as HOME and PATH. You can also create your own environment variables using the command export.
For example:
- Run the command:
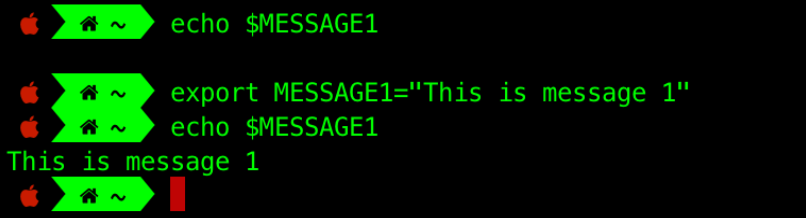
export MESSAGE1="This is message 1" - You can now execute
echo $MESSAGE1and observe get the string output
In the example below, the environment variable $MESSAGE1 initially did not exist. After we export it, we can now print the environment variable $MESSAGE1.
$PATH Environment Variable
One of the most important environment variables you’ll work with on the command line is $PATH.
- This is the key to how our shell knows which file to execute for commands like cd or echo or other built-in or installed programs.
- The PATH variable provides the additional context that the command line needs to figure out where that particular file is in the system.
Therefore, if you have installed an app (e.g: Telegram) and tried to execute the binary from the command line and met with the error command not found, it simply means you haven’t added the path where that binary is to the $PATH environment variable.
For example, you can add the binary of the Telegram app onto the $PATH using the command export, and now you can simply execute it from anywhere (a new Telegram window is opened on the second Telegram command):

Some commands, such as cd, are usually shell built-ins, so they do not need to be found through $PATH.
Task 4
TASK 4: Examine the value for $PATH in your system.
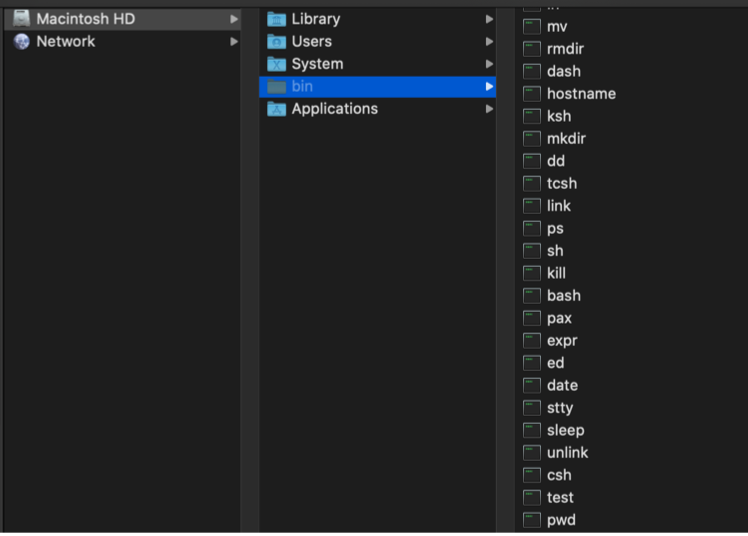
Open that folder (from your Desktop GUI) and navigate to that path. You may need to enable viewing of hidden files. If you are using WSL, you need to cd to this path as there’s no GUI. The screenshot below shows the content of /bin/ directory where some default system programs like ps, date, pwd, echo, etc reside:
Configuring a Terminal Session Using .rc Files
Motivation
The command export that modifies the environment variable is only valid for this session. For instance, the Telegram command above will not work anymore if a user opens a new Terminal session (need to export again).
The .rc File
To avoid this hassle, there exists a setup script (unique to each shell) that is run whenever a new session starts. This script is typically placed in the user’s home directory. For instance, .bashrc (yes, with this exact name) is a Bash shell script that Bash runs whenever it is started interactively. For Z-shell, this script is called .zshrc.
In short, it initialises an interactive shell session. You can put any command or setup instructions that you could type at the command prompt in that file. It works by being run each time you open up a new terminal, window or pane.
The term “rc” in filenames like .bashrc, .zshrc, or .vimrc stands for “run commands” or “runtime configuration.” These “rc files” are configuration files that contain settings, variables, and scripts that are loaded and run by their respective programs upon startup. For shells like bash and zsh, their respective rc files (~/.bashrc for Bash and ~/.zshrc for Zsh) are used to configure the shell environment. This can include setting up environment variables, aliases, functions, and other shell settings that customize the behavior or appearance of the shell.
Task 5
TASK 5: Add Desktop to your $PATH environment variable permanently.
We assume you use bash:
- Go to your home directory:
cd $HOME - Create a new file called .bashrc:
touch .bashrc(or.zshrcif you’re usingzsh, etc) - Open the file with any text editor, eg:
nano .bashrc - Type:
export PATH="$HOME/Desktop:$PATH"at the end of the file - Save the file by pressing CTRL+X, and then follow the instruction and press
Enter - Restart your session by typing
exec bash - Print your
$PATHusingecho $PATHcommand and notice how Desktop is now part of your environment variable
bash-3.2$ cd $HOME
bash-3.2$ touch .bashrc
bash-3.2$ nano .bashrc
bash-3.2$ echo $PATH
/Users/natalie_agus/Desktop:...
bash-3.2$
Using export makes the PATH variable available not just in the current shell session, but also in any child processes started from the current shell.
Common Commands
Shortcut: alias
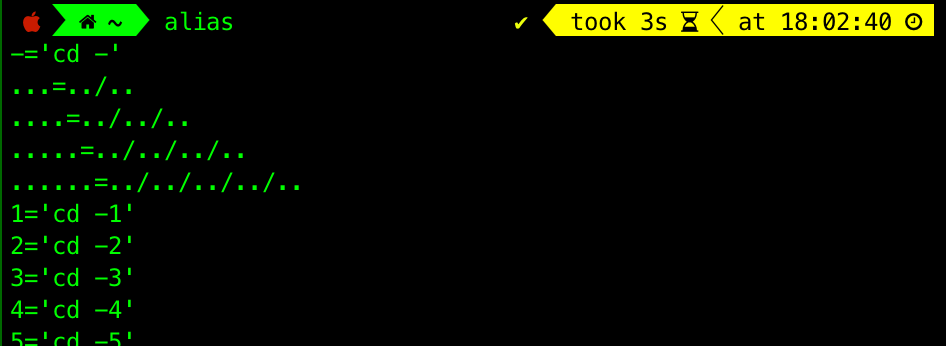
An alias lets you create a shortcut name for a command, file name, or any shell text. By using aliases, you save a lot of time when doing tasks you do frequently. You can see current aliases using the alias command:
Or create an alias:
alias name='command'- Example:
alias gst='git status'
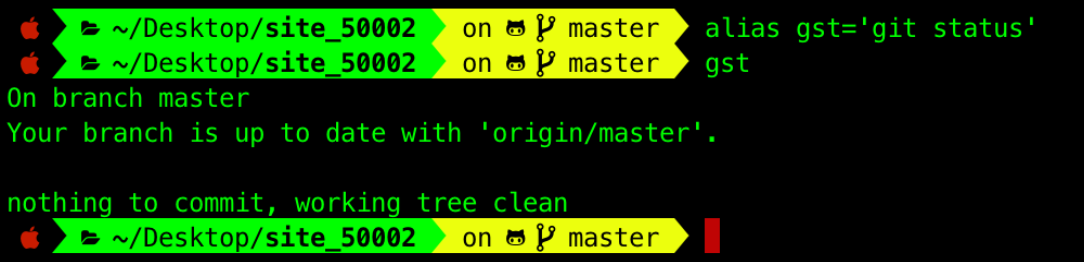
alias is particularly useful when you define them in your shell’s setup script.
General system usage and statistics
Note that each of the commands below accept OPTIONS. Read their manuals for more information using the man command.
man <command>
Shows documentation of the <command> (press q to exit the window after you’re done reading).
ls <options>
Shows the list of files in the current directory.
ps <options>
Shows the list of processes in the system.
sudo <command>, sudo apt install <packagename>
sudo Executes the command with administrative privileges. apt is a package manager, it installs packages for Debian-based Linux distributions. We can use it to install anything, eg install node and npm. Using package manager is recommended since you can simply update or remove (uninstall) it too (sudo apt remove <packagename>, etc).
sudo apt updatesudo apt install nodejs npm- For mac users, you can use brew as your package manager instead.
chmod +x <path/to/filename>
Make a file executable. However, firstly, you need to declare in your script which interpreter to use.
- You state the path to this interpreter as the first line in your file
- This is called a shebang.
- In Unix-like operating systems, the shebang line provides the path to an executable program (e.g.
bash,python) that can interpret the following lines as executable instructions, allowing the user to run the text file as an executable program by typing the name of the file directly in the shell provided the execute permission bit is set.
- In Unix-like operating systems, the shebang line provides the path to an executable program (e.g.
- For instance, if this file is a shell script, it should be
#!/bin/shor#!/bin/bash. If it is a python script, the interpreter should be something like#!/usr/bin/env python
df <options>...
Shows the available disk space in each partition.
top
Monitors processes and system resource usage on Linux.
ifconfig <options>
Displays information about all network interfaces currently in operation.
kill -9 <pid>, pkill <process_name>
Kills (ends) the process matching the given pid, analogous to when you click the close (x) button on the window of a running app, but stronger (find the details on your own).
ping <servername> <options>
Checks connection to a server. For example, ping google.com tells you whether your connection is active or not.
File creation and manipulation
Note that each of the commands below accept OPTIONS. Read their manuals for more information using the man command.
mkdir <dirname>
Creates a directory (folder).
rmdir <dirname>, rm -r <dirname>
Deletes an empty directory, and the latter removes a directory that contains files. Be careful! Deleting things from the command line doesn’t allow you to retrieve it back. Unlike deleting from the GUI, it won’t be found in the trash.
touch <newfilename.format>
Creates a new file with whatever name and format you want.
mv <source> <destination>
Moves a file from the source path to destination path. Commonly used to rename files.
cp <source> <destination>
Copies a file from a location to another.
locate <filename>
Locate a particular filename in your file system, if you have set it up in the first place. Will return a path to that <filename>.
cat <path/to/filename>
Displays the contents of a file, and
wc <path/to/filename>
Prints a count of newlines, words, and bytes for each input file.
Command-Line Text Editor: nano, vim
Command-line text editor provides a handy way to manipulate text files in terminal without the need of installing any other apps. There are a few options, but two of the most popular ones are nano and vim. The latter has a higher learning curve, so we will stick to nano for quick editing.
You can open any created text file using the command:
nano <path/to/filename>- Then you can start typing as per normal
- Press Ctrl + X to exit, and then Enter to save
- You can press Ctrl + G as well to bring up the shortcut menu anytime during editing
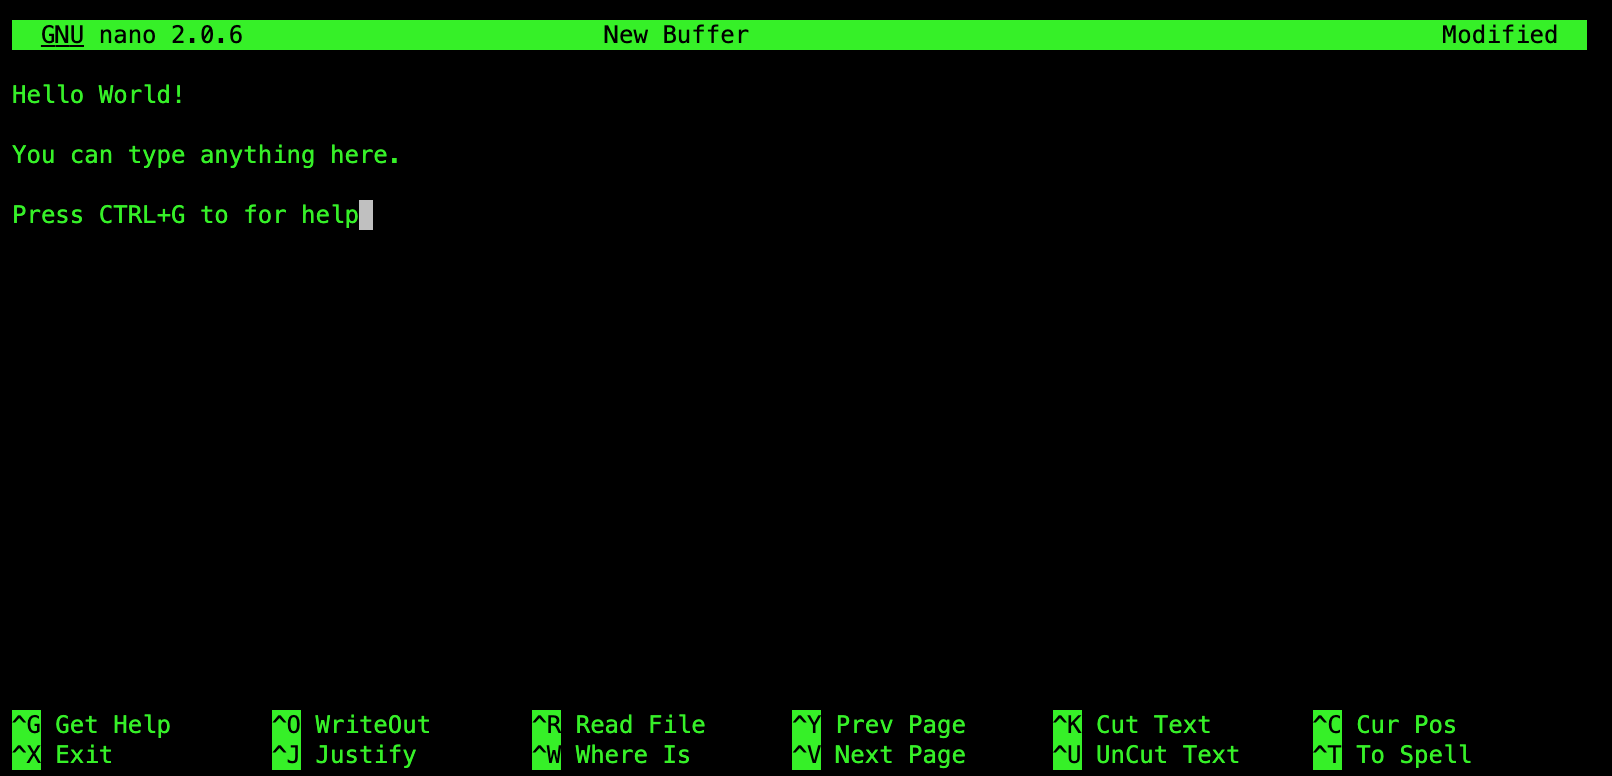
After saving, you can check the content of the file using the command cat <path/to/filename>.
Standard Streams
Disclaimer
This section is longer than a normal CLI tutorial because we are using the CLI as the first concrete example of an OS abstraction. You do not need to memorise every device name yet. Focus on the idea that a process reads and writes through file descriptors, and the OS connects those descriptors to terminals, files, or pipes.
Standard streams are input and output communication channels between a running process and its environment when it begins execution.
They carry data from the environment that launched the program, typically the terminal, into the program as input, and then carry the program’s output back to that same environment.
The three standard I/O connections are:
- standard input:
stdin- standard output:
stdout- standard error:
stderr
For example, when you run:
tr '[:lower:]' '[:upper:]' < test.txt
and type:
hello
the characters travel from the terminal into the tr process through stdin. The program converts them to uppercase and sends:
HELLO
back out through stdout, which appears in the same terminal.
The movement of data from the terminal into tr, and from tr back to the terminal, happens through streams. A stream is a flow of bytes between a process and something else, such as a terminal, file, or pipe.
From the earlier section, we know that the terminal is the text interface, while the shell is the command interpreter. The terminal does not directly “understand” your commands. The shell interprets commands, starts programs, and connects their standard streams.
By default:
stdinreceives input from your keyboard.stdoutsends normal output back to your terminal display.stderrsends error output back to your terminal display.
How Terminal I/O Works
The keyboard and display can be shared among so many processes in our modern computers.
Key Idea
Streams in Linux/Unix-like systems are treated as though they were files. You can read text from a file, and you can write text into a file. Both of these actions involve streams of data.
Processes do not need to know whether their input comes from a real keyboard, a file, a pipe, or a terminal emulator. They simply read from stdin and write to stdout or stderr.
From Physical Terminal to Modern Terminal Emulator
In the earlier history section, we saw that old terminals were real keyboard/screen devices connected to a mainframe or minicomputer.
The setup looked roughly like this:
Cold war terminal keyboard/screen
        |
   serial cable
        |
serial port on mainframe/minicomputer
        |
OS device file: /dev/ttyS0
        |
login program / shell
The important point is:
/dev/ttyS0 is not the physical terminal itself.
It is the OS device file representing the serial port connected to that terminal.
So if a program reads from /dev/ttyS0, it receives bytes typed on the terminal keyboard. If a program writes to /dev/ttyS0, those bytes are sent back to the terminal screen.
The old physical setup can be visualised like this:
OLD PHYSICAL TERMINAL SYSTEM
============================

Physical terminal
keyboard + screen
        |
        | serial cable carrying bytes
        |
Main computer serial port hardware
UART / serial controller
        |
OS device driver
        |
/dev/ttyS0
        |
+-----------------------------+
| Shell process               |
|                             |
| fd 0 stdin   ── read  ─────┐ |
| fd 1 stdout  ── write ───┐ | |
| fd 2 stderr  ── write ─┐ | | |
+-------------------------|-|-|-+
                          | | |
                          v v v
                      also to /dev/ttyS0
The mapping is:
Physical terminal  = the keyboard + screen box
Serial cable       = carries raw characters
UART/serial port   = real hardware on the main computer
/dev/ttyS0         = OS device file for that serial port
Shell              = program running on the main computer
Input flow:
"l" is pressed
   ↓
terminal sends byte 'l'
   ↓
serial cable
   ↓
main computer serial port
   ↓
OS driver
   ↓
/dev/ttyS0
   ↓
shell reads it as stdin
Output flow:
shell prints "hello"
   ↓
writes bytes to stdout
   ↓
/dev/ttyS0
   ↓
OS driver
   ↓
serial port
   ↓
serial cable
   ↓
physical terminal screen shows "hello"
The physical terminal is mostly just a keyboard and screen and the shell runs on the main computer.
Modern Terminal Emulator Setup
Today, when you open Terminal, iTerm2, or the VS Code terminal, we are not using a real serial terminal, but instead it’s a terminal emulator.
A terminal emulator simulates the old physical terminal using a pseudo-terminal, usually shortened to PTY.
MODERN TERMINAL EMULATOR SETUP
==============================

                       keyboard
                          |
                          v
+-------------------+   writes    +-------------------+
| Terminal app      | ----------> | PTY master        |
| Terminal/iTerm    |             | terminal side     |
| VS Code terminal  | <---------- |                   |
+-------------------+   displays  +---------+---------+
                                            |
                                            | connected by OS
                                            |
                                  +---------+---------+
                                  | PTY slave         |
                                  | process side      |
                                  | e.g. /dev/pts/3   |
                                  +----+---------+----+
                                       ^         ^
                                       |         |
                              stdin fd 0         | stdout fd 1
                                       |         | stderr fd 2
                                       |         |
                                  +----+---------+----+
                                  | Shell process     |
                                  | bash / zsh        |
                                  |                   |
                                  | reads commands    |
                                  | starts programs   |
                                  +-------------------+
Modern mapping:
Old physical terminal      → modern terminal app window
Old serial cable           → pseudo-terminal connection
Old /dev/ttyS0             → modern /dev/pts/3
Old shell on mainframe     → modern zsh/bash on your computer
So the difference is that:
/dev/ttyS0is a real serial terminal line handler in the OS/dev/pts/3is a virtual terminal line handler in the OS
Both give the shell the same illusion “I have a keyboard input stream and a screen output stream.”
Standard Streams and Terminal Devices
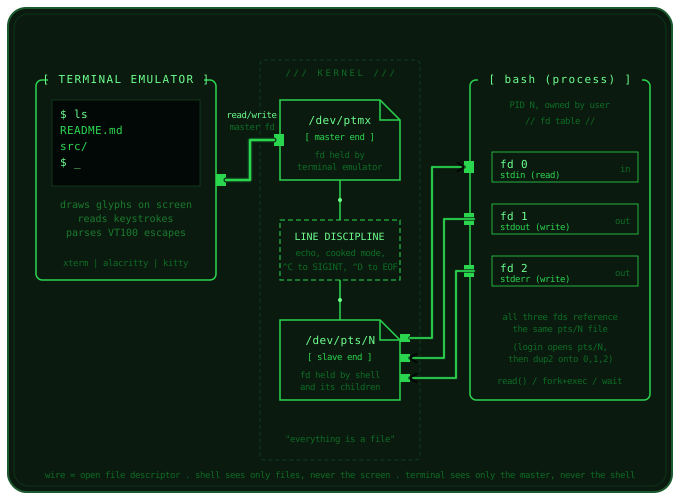
Before we can continue, we need to know beforehand that EVERY running process starts with three standard file descriptors.
File Descriptors
A file descriptor is a small integer used by the OS to identify an open file-like resource belonging to a process. We summarise briefly here but you will learn more about it in the later weeks when we reach Filesystem.
The standard file descriptors are:
0 = stdin
1 = stdout
2 = stderr
So when a process starts, it usually already has these three file descriptors open:
fd 0  →  standard input
fd 1  →  standard output
fd 2  →  standard error
In a terminal session, they often point to the same terminal device:
fd 0  →  /dev/pts/3
fd 1  →  /dev/pts/3
fd 2  →  /dev/pts/3
or on macOS:
fd 0  →  /dev/ttys004
fd 1  →  /dev/ttys004
fd 2  →  /dev/ttys004
This means:
read input from the terminal
write normal output to the terminal
write error output to the terminal
Back to the Process
When a process starts, it usually inherits three already-open file descriptors from its parent process: 0, 1, and 2. By convention, these are called stdin, stdout, and stderr.
| File descriptor | Stream name | Usual meaning |
|---|---|---|
0 |
stdin |
where the process reads input from |
1 |
stdout |
where the process writes normal output to |
2 |
stderr |
where the process writes error messages to |
stdin, stdout, and stderr are represented using file descriptors.
These three are not physical devices. They are simply the process’s default input and output channels.
When you run a program from a terminal, the shell usually connects all three file descriptors to the same terminal device:
fd 0  stdin   → terminal device
fd 1  stdout  → terminal device
fd 2  stderr  → terminal device
That is why when you inspect a running program with tools like lsof, you may see its file descriptors 0 (stdin), 1 (stdout), and 2 (stderr) pointing to something like /dev/pts/x:
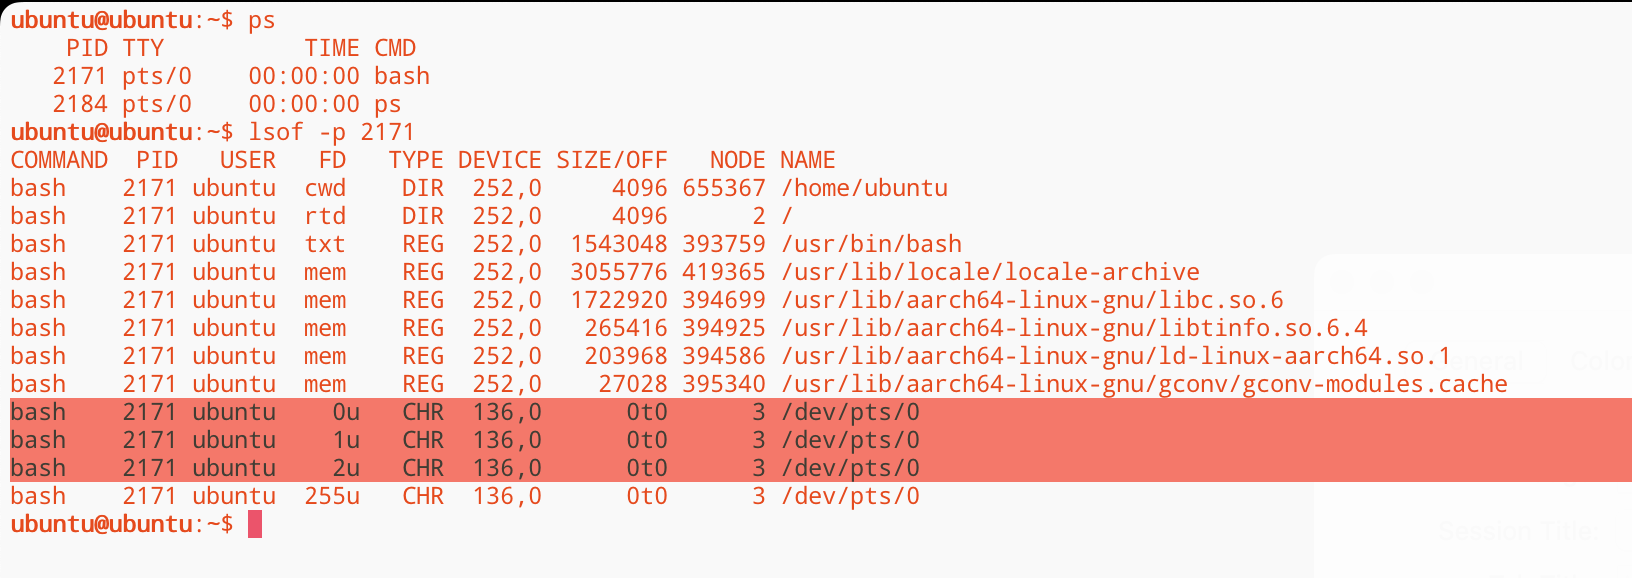
Those are the terminal devices that the OS connected to the process’s standard streams.
Another example: when you run a Python script as such:
python3 playground.py
the shell starts the Python process and connects the Python process’s standard streams to the terminal.
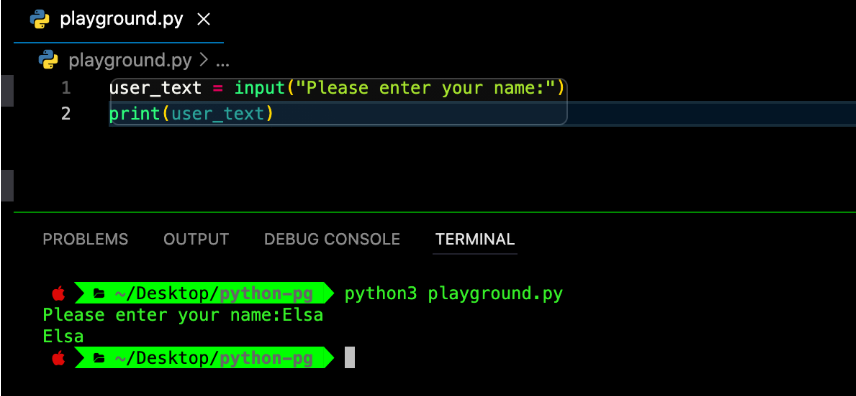
- Input from your keyboard is passed to the terminal app, then terminal device file like
/dev/pts/xand finally Python process’sfd 0:stdin. - Output from your Python process is passed through
fd 1:stdoutto the terminal device file/dev/pts/xand then to the terminal app, then we can see it on the screen. - Error messages works the same as output just that it’s routed via
fd 2:stderr.
Here’s a simplified illustration:
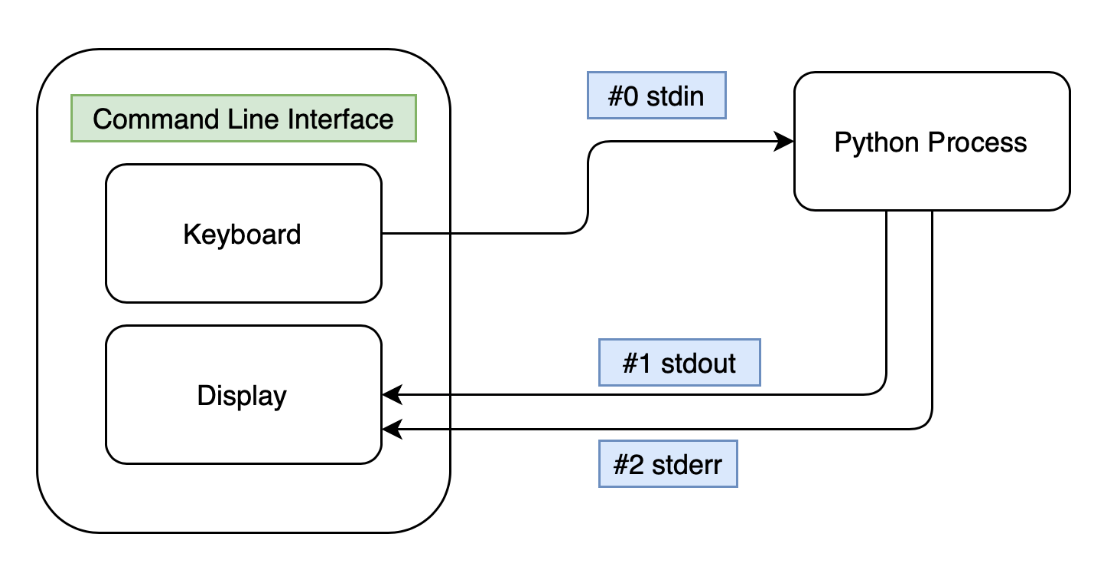
You can observe the 3 file descriptors by running a Python script in one terminal and letting it hang. Then, from another terminal, find its process ID and inspect it using the lsof command.
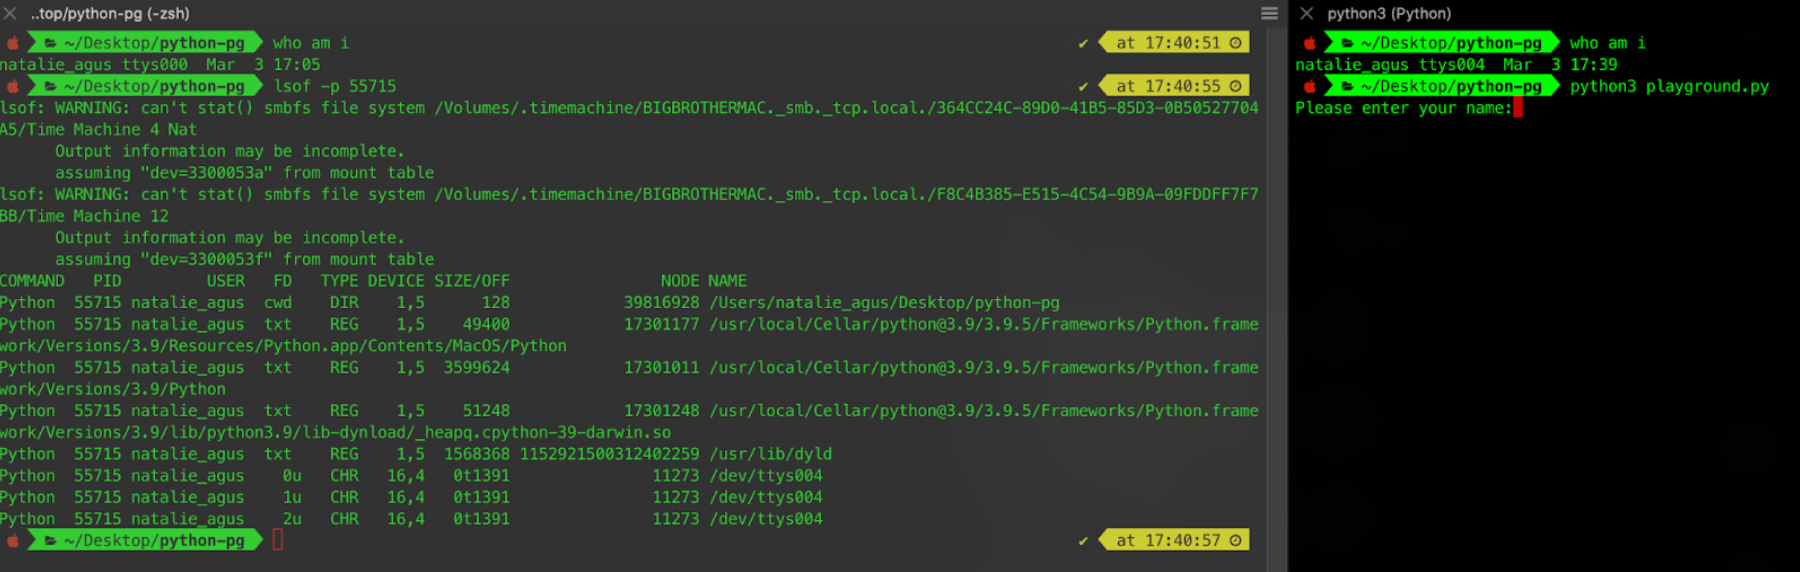
You can see in the last few lines that stdin, stdout, and stderr all point to a terminal device file, such as:
/dev/ttys004
or, on Linux:
/dev/pts/3
The exact name depends on your OS and terminal system.
Common examples:
/dev/ttyS0    = physical serial port terminal
/dev/ttyUSB0  = USB serial adapter
/dev/ttys004  = macOS terminal device
/dev/pts/3    = Linux pseudo-terminal slave
The big idea is that
stdin,stdout, andstderrare the process-side names./dev/pts/3,/dev/ttys004, files, or pipes are the OS-side objects they are connected to.
Standard Output
A standard output is the default place where normal output goes. It is also called stdout. When a process writes to stdout, the output usually appears in the terminal.
For example:
echo "hello"
means:
write the string "hello" to standard output
The flow is:
echo process
   ↓ writes to stdout
terminal device
   ↓
terminal app displays "hello"
More precisely:
- The
echoprocess writes tostdout. stdoutis connected to a terminal device such as/dev/pts/3or/dev/ttys004.- The terminal app displays the output in its window.
The shell starts echo, but the shell is not the thing visually drawing the characters on the screen. The terminal app is responsible for displaying the text.
Standard Input
The standard input, stdin, is the default place where a process receives input.
For example, try typing the following and pressing Enter.
cat
The cat program waits for input from stdin. Since stdin is connected to your terminal, anything you type from the keyboard is sent into the cat process.
The flow is:
keyboard
   ↓
terminal app
   ↓
terminal device
   ↓
cat stdin
   ↓
cat stdout
   ↓
terminal display
That is why cat appears to repeat whatever you type.
It continues until you send EOF, which means end of file. In a terminal, you can usually send EOF by pressing:
CTRL + d
Standard Error
The standard error, stderr, is where error messages go.
For example:
cat <inexistent_path/to/filename>
This command tries to read from a file that does not exist, so cat prints an error message.

stderr is separate from stdout because we often want to treat normal output and error output differently. For example, a program may produce useful output on stdout, while also producing warnings or error messages on stderr.
By default, both stdout and stderr are displayed in the same terminal window. However, they are still separate streams.
Stream Redirection
We can redirect standard streams.
Redirection means changing where stdin, stdout, or stderr points.
The common operators are:
<    redirect stdin
>    redirect stdout
2>   redirect stderr
>>   append stdout
Redirecting stdout
<command> > <filename>
This redirects the stdout of <command> to <filename>.
That means whatever the command prints normally will be written into the file instead of displayed on the terminal.
Example:
echo "hello" > output.txt
Instead of showing hello on the terminal, the shell connects stdout to output.txt.
echo process
   ↓ stdout
output.txt
> will truncate, meaning erase, the original content of the file before writing new output.
If you want to append to the existing content instead, use:
echo "hello again" >> output.txt
Redirecting stdin
<command> < <filename>
This redirects the stdin of <command> so that the command reads input from the file instead of the keyboard.
Example:
tr 'a-z' 'A-Z' < input.txt
This means:
read text from input.txt
send it into tr through stdin
print converted output to stdout
The flow is:
input.txt
   ↓ stdin
tr process
   ↓ stdout
terminal display
This is particularly useful for commands that naturally read from input streams.
Redirecting stderr
<command> 2> <filename>
This redirects stderr to a file.
Example:
cat missing_file.txt 2> error.txt
The normal output stream is still connected to the terminal, but error messages are written into error.txt.
The flow is:
cat process stdout  → terminal
cat process stderr  → error.txt
This is useful because normal program output and error messages are separate streams.
Summary of Standard Streams
A process usually starts with three standard streams:
stdin   fd 0   input stream
stdout  fd 1   normal output stream
stderr  fd 2   error output stream
In a normal terminal session, all three are connected to a terminal device:
fd 0  → terminal input
fd 1  → terminal output
fd 2  → terminal error output
Historically, this terminal device could be a real serial terminal line like:
/dev/ttyS0
Today, in a terminal emulator, it is often a pseudo-terminal like:
/dev/pts/3
The shell interprets commands and starts programs:
terminal app → shell → program
But the standard streams connect the running program to its environment:
keyboard/file/pipe → stdin → process → stdout/stderr → terminal/file/pipe
Test write to other session’s output
Open two shell sessions in a separate terminal windows, and type ps to print out the output terminal for each session. Then, you can try to write something to the output file of the second session using echo and output redirection >:
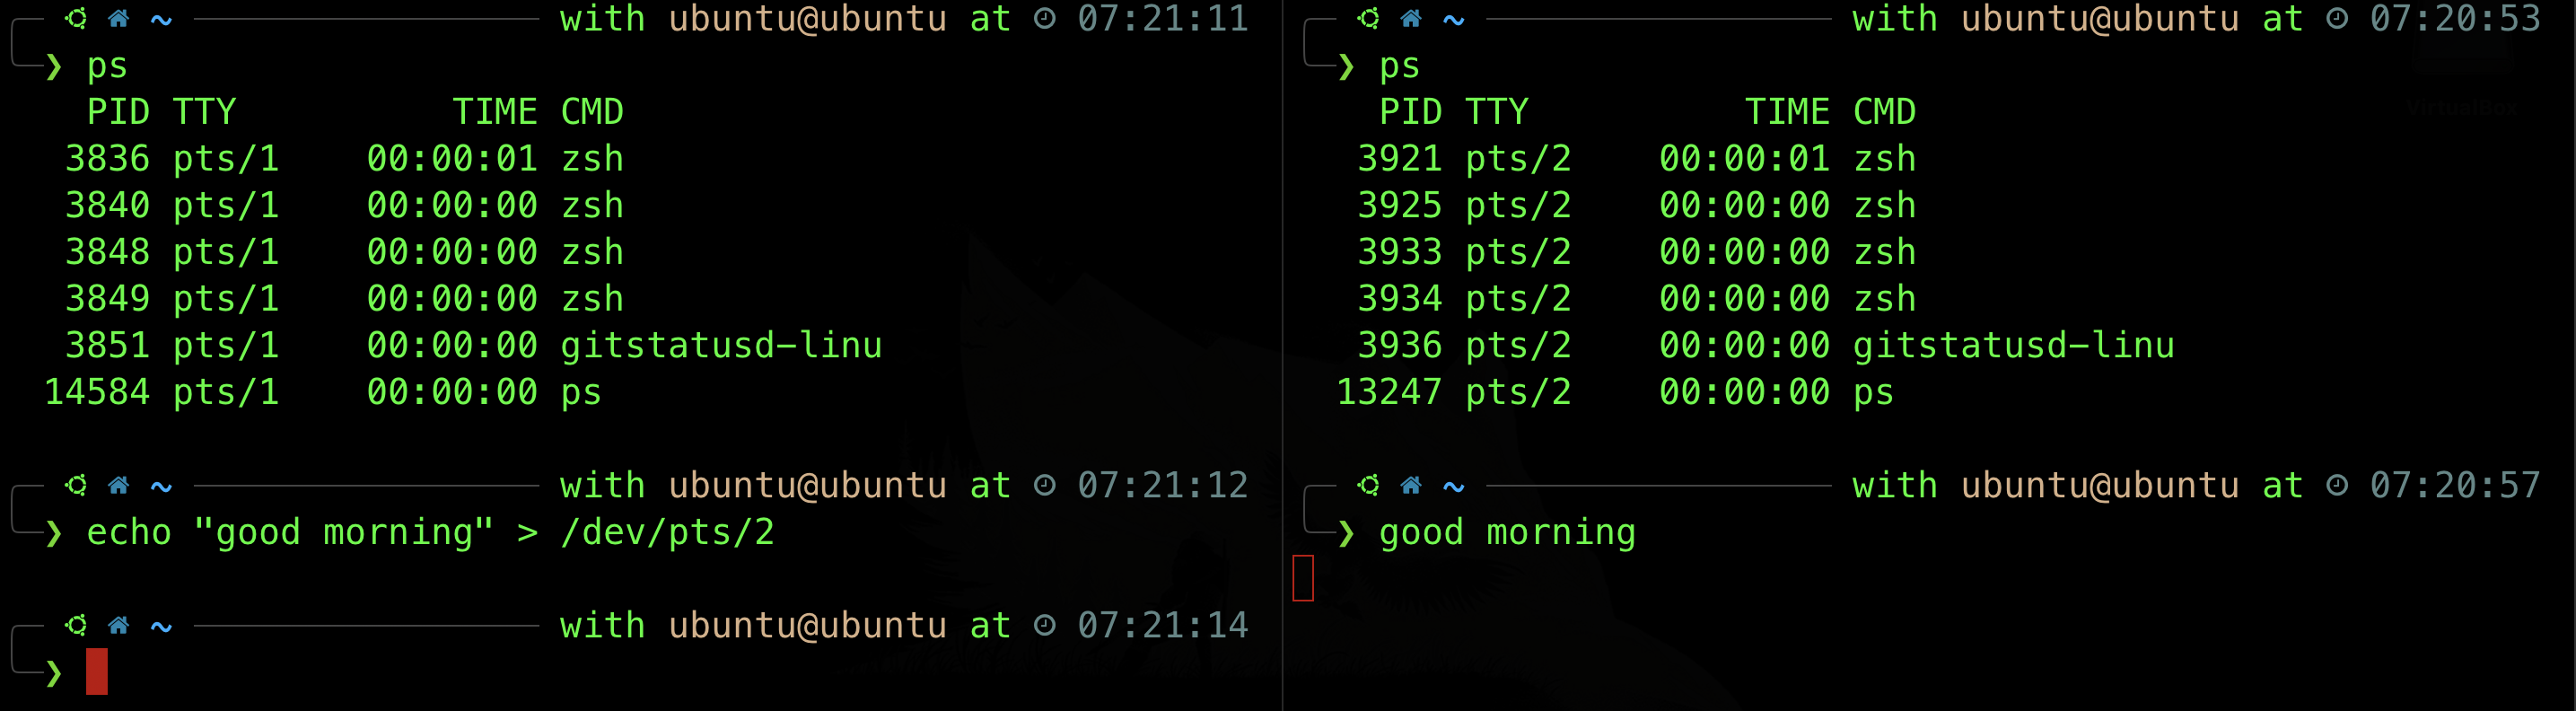
In the example above, two shell sessions are present. The file /dev/pts/1 and /dev/pts/2 are each session’s input/output file. Therefore, if you type the command:
echo "good morning" > /dev/pts/2
The word “good morning” appears in the second shell session.
When you open two terminal windows, each one creates a separate shell session. Each session has its own terminal output file, like /dev/pts/1 and /dev/pts/2. These files represent the different terminal sessions you are using.
Task 6
TASK 6: One example of a program that benefits from stream redirection is tr. It is a command line utility for translating or deleting characters. Do the following:
- Create a text file with the following content: ”Hello, have a good day today!”, name it
test.txtand save it to your current directory. - Then, type the following in the command line (don’t forget to navigate to your current directory first using
cd!):tr "[a-z]" "[A-Z]" test.txt -
You will see such usage suggestion instead:
 usage:  tr [-Ccsu] string1 string2
         tr [-Ccu] -d string1
         tr [-Ccu] -s string1
         tr [-Ccu] -ds string1 string2
This is because tr cannot get input directly from a file. It only reads from stdin.
- Now try
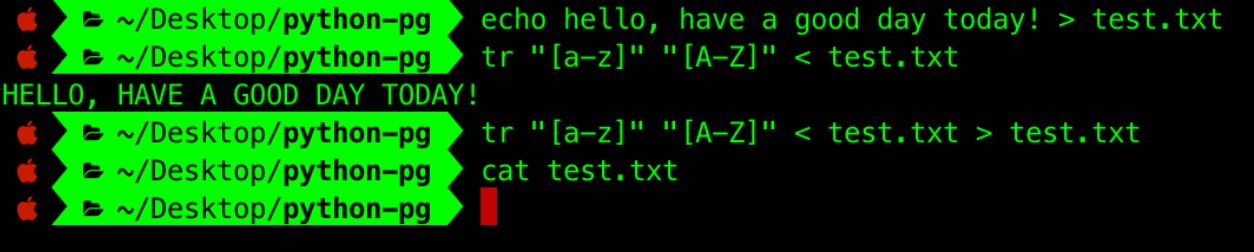
tr "[a-z]" "[A-Z]" < test.txt. Your console should print ”HELLO, HAVE A GOOD DAY TODAY!”, capitalizing the content of thetest.txtfile (but not changing its content). - So based on your observation, can you deduce what is the difference between these two commands:
tr "[a-z]" "[A-Z]" < test.txttr "[a-z]" "[A-Z]" test.txt
- Now what if we want to store the capitalized content to another file? Try:
tr "[a-z]" "[A-Z]" < test.txt > new_test.txt. You should find that “HELLO, HAVE A GOOD DAY TODAY!” exists withinnew_test.txt, since we redirectstdoutto create this new file. - What if we want to write back to
test.txt? What can you deduce from the output?
The screenshot below might help you for steps 1-7 above.
Pipe |
The Pipe | is a special feature in Linux that lets you use two or more commands such that output of one command serves as input to the next. Since pipes are a feature of the shell (and not a command), they are available in any shell environment, including bash, zsh, and others found on Unix-like systems such as Linux and macOS
It may sound similar to stream redirection, but the general rule of thumb is that if you’re connecting the output of a command to the input of another command, use a pipe, denoted as | symbol. If you are outputting to or from a file use the redirect.
Task 7
TASK 7: Find out how pipe works.
-
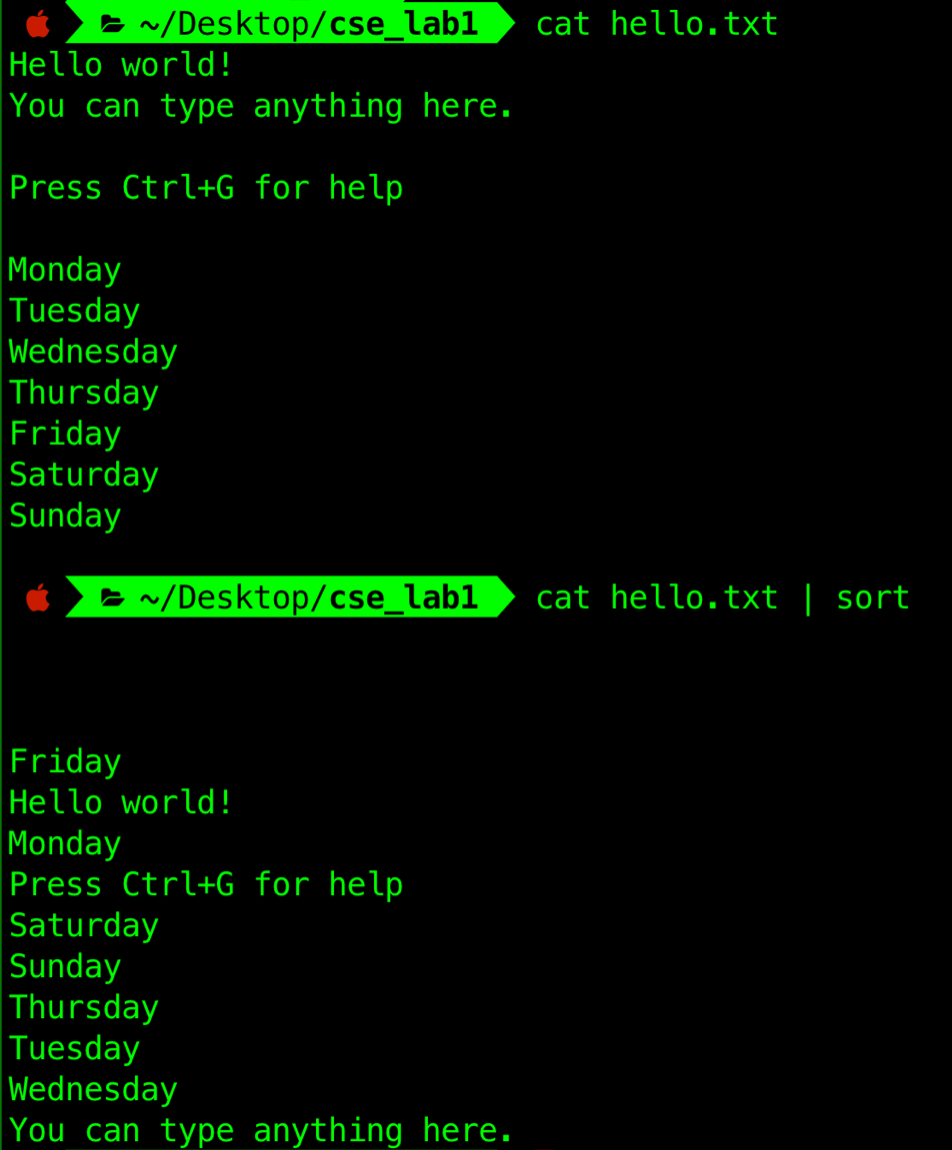
Suppose we want to pass the output of
catcommand as the input ofsortcommand. We can’t do this with redirection:
-
However, using pipe works. It serves as a way to allow interprocess communication (Week 3 materials):
Download Files using curl
The curl command allows us to transfer data (download, upload) online. For instance, we can download the GNU general public license text file using the command:
curl -o GPL-3 https://www.gnu.org/licenses/gpl-3.0.txt
- The
-ooption: Write output to<filename>instead ofstdout
If you don’t have any command (e.g: there’s an error saying command [command] not found), install it using sudo apt install curl.
Output Filtering
One last handy tool to learn is output filtering. The grep or awk command will scan the document for the desired information and present the result in a format you want. The command grep also accepts regex to search for more complex patterns.
A filter takes input from one command, does some processing, and gives output.
Task 8
TASK 8: Suppose we have a long document, that GNU license we downloaded from the command curl above. Search and filter for a particular string.
To download the license again, type the command:
curl -o GPL-3 https://www.gnu.org/licenses/gpl-3.0.txt
Now search for a string inside a file using the commands:
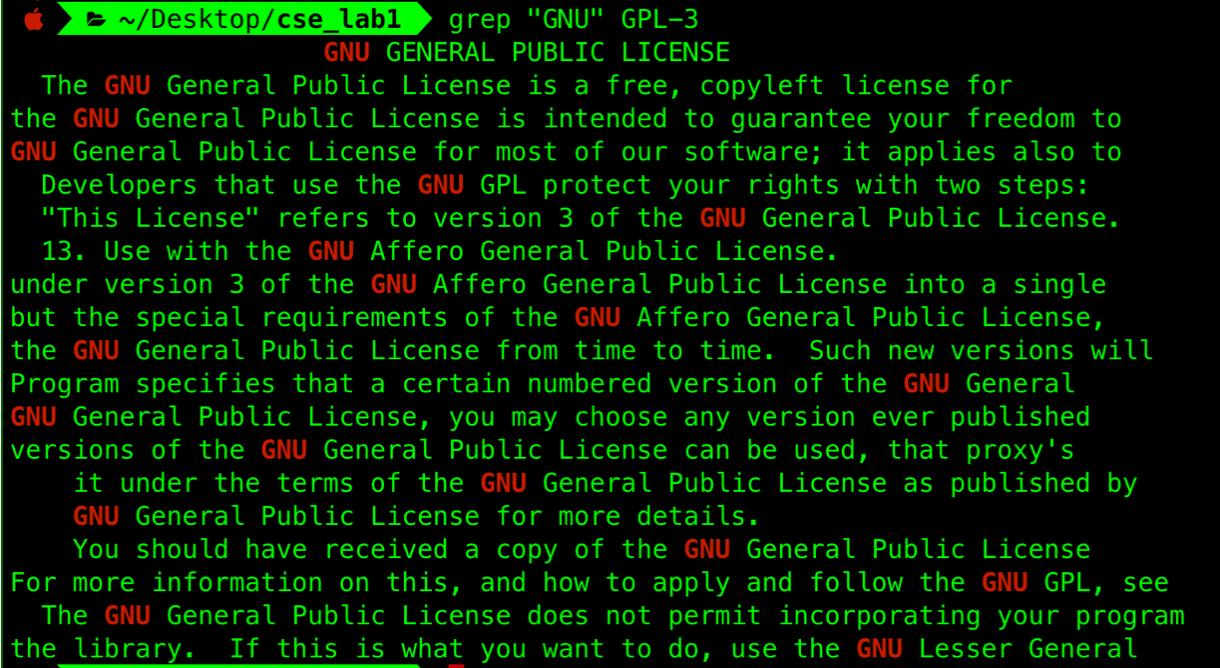
grep "<string>” <path/to/file>- For example:
grep "GNU" GPL-3prints every line containing “GNU” word. - Some shells don’t require the quotation marks for single-word search, so you can try
grep GNU GPL-3as well.
Here are the common grep options to try:
-i: both lower and upper case-v: search everything that does not contain the<string>-n: prints the line number too
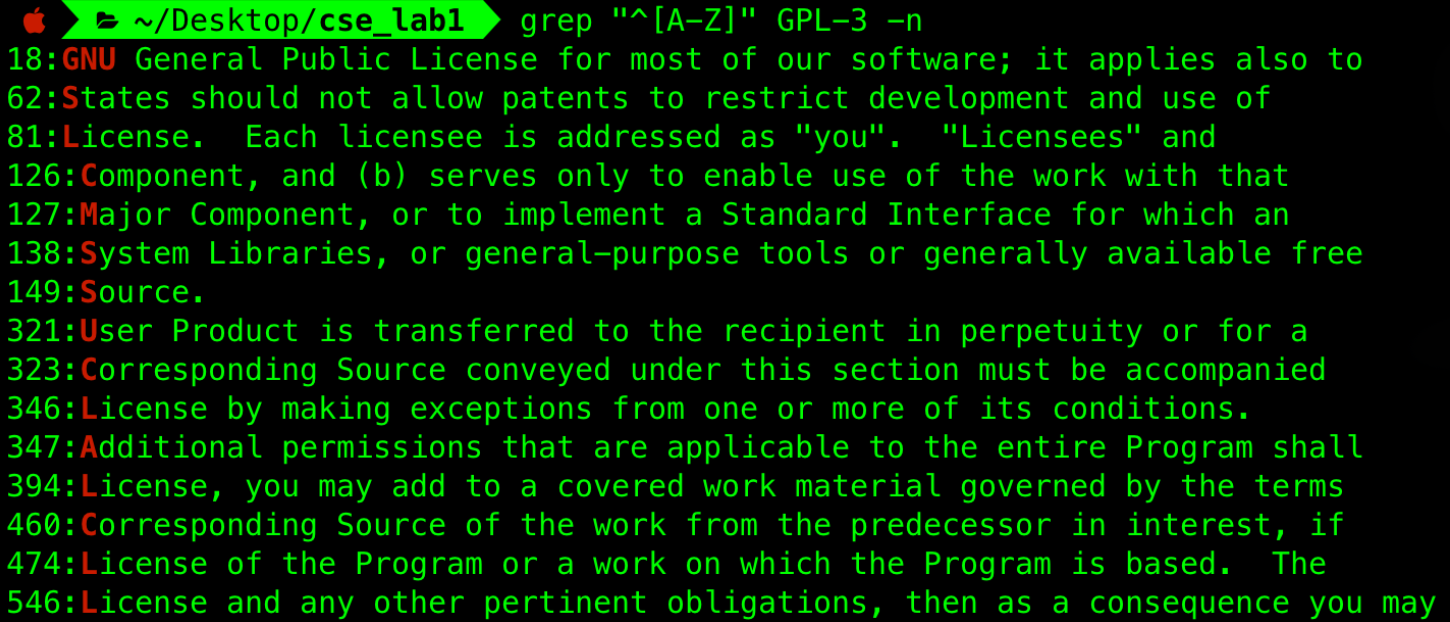
The <string> argument of the grep command can accept regex too, for instance:
grep "^[A-Z]" GPL-3 -n- This search for every line starting with capital letters
You can also pipe the output of a command to the grep command so that you can filter it out. For example, ps -ax will report all running processes in your system (by all users, including your own). If we want to filter some processes by name, we can use grep and pipe to filter the Telegram process: ps -ax | grep -i Telegram

Why do we use the CLI?
Now that we have learned how to execute some commands, it is natural to question why we need to use the command line. What can you do here with CLI that you cannot do through your common graphical user interface?
Well, it depends on your use case. There’s a lot of debate on that, some might say that CLI allows you to do tasks fast, but that depends: depends on how well versed you are in using the CLI.
- If you are just a basic user, i.e: browse, watch your favorite tv series, edit photos, or text your friends then chances are you don’t need to use the command line.
- If you’re a computer science graduate who intends to work in the field then CLI is probably your new best friend.
The most common use of the command line is ”system administration” or, basically, managing computers and servers. Some servers don’t even have a GUI because they’re not intended for everyday usage.
This includes installing and configuring software, monitoring computer resources (manage logs, setup cron jobs, daemons), setting up web servers (renaming or modifying thousands of files), and automating processes (setup databases / servers) on many hosts. Obviously these tasks are repetitive and tedious such that it is impossible to be done manually or one by one via the GUI.
Shell Scripting
In this section, we briefly overview how shell scripts work, eg: .sh, .zsh scripts. A shell script is simply lines of code for the shell to interpret (if you use z/bash shell, you can use z/bash shell script. Since both bash and z are derived from the Bourne shell family, both scripts have similar syntax).
Why do we need to write a shell script?
- Imagine you want to create thousands of text files (using touch).
- You wouldn’t want to type the command one by one, but rather just run a script that does this task in one shot.
Writing shell scripts help us automate repetitive and tedious tasks.
Task 9
TASK 9: Open nano and type the bash script below.
#!/bin/bash

start_time=$(date +%s)

# the following substitute the arguments as a list, without re-splitting them on whitespace
"$@"

end_time=$(date +%s)

echo "Time elapsed: $(($end_time - $start_time)) seconds"
Then, save it with a name run.sh, and change its mode to be executable: chmod +x run.sh. Now you can run any script and time it. For instance, suppose we have the following python script:
import time
print("Loading.....")
time.sleep(2.5)
print("Done")
Running it with our script will time the execution of the python script above:
bash-3.2$ ./run.sh python3 hello.py
Loading.....
Done
Time elapsed: 3 seconds
bash-3.2$
From the task above, you have just created and run a super simple bash script. Note that the first line is the shebang. Similar to coding in any other language, you can use variables, functions, conditional statements, loops, comparisons, etc in your bash script. You can learn more in your own time, and see examples of awesome bash scripts.
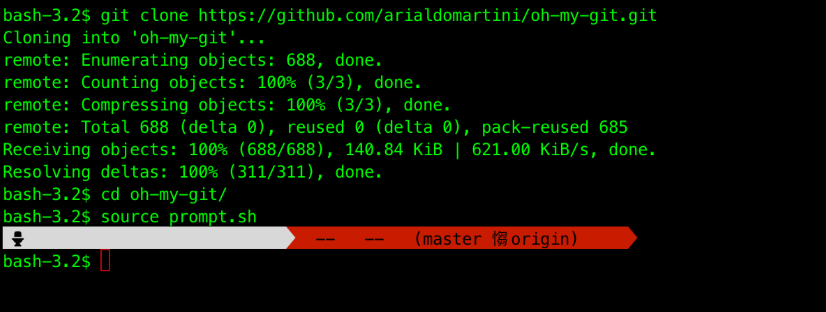
For example, you can customize your prompt in a git repo:
Summary
In this lab, you are exposed to various commands and how to navigate your system using the CLI. It needs time to develop the habit. Perhaps one of the more fun things to do is to decorate and beautify your shell. You may check this out for a beginner-friendly start (macOS/Linux using zsh) and this for Windows (powershell). Zsh users: for a slimmer alternative, you can try Antidote. You can also use another shell entirely, try fish.
Appendix
Simple .zshrc setup
Oh My Zsh is a popular framework (but huge) for managing Zsh configurations, offering a wide array of themes, plugins, and features that enhance the Zsh experience. However, due to its extensive functionality and the sheer number of plugins and themes it provides, some users may find it somewhat bloated, especially if they only need a subset of its capabilities or are using older hardware where performance is a concern.
If you’re looking for alternatives that are lighter or wish to customize Zsh in a more minimalistic manner, here’s a few simple steps to take.
We assume you use Ubuntu as your OS. If you use debian or other OS, please use your package manager accordingly (not apt). For instance, macOS users can use Homebrew.
# run these commands at ~ directory
# update apt
sudo apt update
# install zsh
sudo apt install zsh -y
# set  sudo and user password
sudo passwd
sudo passwd [YOUR_USERNAME]
# change to zsh as your default shell
chsh -s $(which zsh)

# zsh setup at ~
# install useful plugins like syntax highlighting, completions, auto-suggestions, fzf and fzf tab
# install basic theme: spaceship
# please give each git repo a read to understand how to use them
sudo apt install git
mkdir -p ~/.zsh/plugins ~/.zsh/themes
touch ~/.zsh/.zshrc
touch ~/.zsh/.zsh_history
git clone https://github.com/spaceship-prompt/spaceship-prompt.git ~/.zsh/themes/spaceship-prompt
git clone https://github.com/zdharma-zmirror/fast-syntax-highlighting.git ~/.zsh/plugins/fast-syntax-highlighting
git clone https://github.com/zsh-users/zsh-completions.git ~/.zsh/plugins/zsh-completions
git clone https://github.com/zsh-users/zsh-autosuggestions.git ~/.zsh/plugins/zsh-autosuggestions
git clone https://github.com/unixorn/fzf-zsh-plugin.git ~/.zsh/plugins/fzf-zsh-plugin
git clone https://github.com/Aloxaf/fzf-tab.git ~/.zsh/plugins/fzf-tab

# create symbolic link
ln -s ~/.zsh/.zshrc ~/.zshrc
# open ~/.zshrc using nano
nano ~/.zshrc
Now paste the content below:
### ZSH HOME
export ZSH=$HOME/.zsh

### ---- history config -------------------------------------
export HISTFILE=$ZSH/.zsh_history

# How many commands zsh will load to memory.
export HISTSIZE=10000

# How many commands history will save on file.
export SAVEHIST=10000

# History won't save duplicates.
setopt HIST_IGNORE_ALL_DUPS

# History won't show duplicates on search.
setopt HIST_FIND_NO_DUPS

# Immediate Append
setopt INC_APPEND_HISTORY

# Add timestamp
export HISTTIMEFORMAT="[%F %T] "
setopt EXTENDED_HISTORY

### PATH
export PATH=$HOME/bin:/usr/local/bin:/snap/bin:/opt/bin:$PATH

### ---- PLUGINS & THEMES -----------------------------------
source $ZSH/themes/spaceship-prompt/spaceship.zsh-theme
source $ZSH/plugins/fast-syntax-highlighting/fast-syntax-highlighting.plugin.zsh
source $ZSH/plugins/zsh-autosuggestions/zsh-autosuggestions.zsh
source $ZSH/plugins/fzf-zsh-plugin/fzf-zsh-plugin.plugin.zsh
source $ZSH/plugins/fzf-tab/fzf-tab.plugin.zsh
fpath=($ZSH/plugins/zsh-completions/src $fpath)


### --- Spaceship Config ------------------------------------
SPACESHIP_PROMPT_ORDER=(
  user          # Username section
  dir           # Current directory section
  host          # Hostname section
  git           # Git section (git_branch + git_status)
  hg            # Mercurial section (hg_branch  + hg_status)
  exec_time     # Execution time
  line_sep      # Line break
  jobs          # Background jobs indicator
  exit_code     # Exit code section
  char          # Prompt character
)
SPACESHIP_USER_SHOW=always
SPACESHIP_PROMPT_ADD_NEWLINE=false
SPACESHIP_CHAR_SYMBOL="❯"
SPACESHIP_CHAR_SUFFIX=" "
Afterwards, install a few more useful tools:
# exa
sudo apt install eza -y
echo "alias ls=\"eza --long\"" >> ~/.zshrc
echo "alias zr=\"source ~/.zshrc\"" >> ~/.zshrc

# bat
sudo apt-get install bat -y
echo "alias cat=\"batcat\"" >> ~/.zshrc

# jump
wget https://github.com/gsamokovarov/jump/releases/download/v0.51.0/jump_0.51.0_amd64.deb && sudo dpkg -i jump_0.51.0_amd64.deb
echo 'eval "$(jump shell)"' >> ~/.zshrc
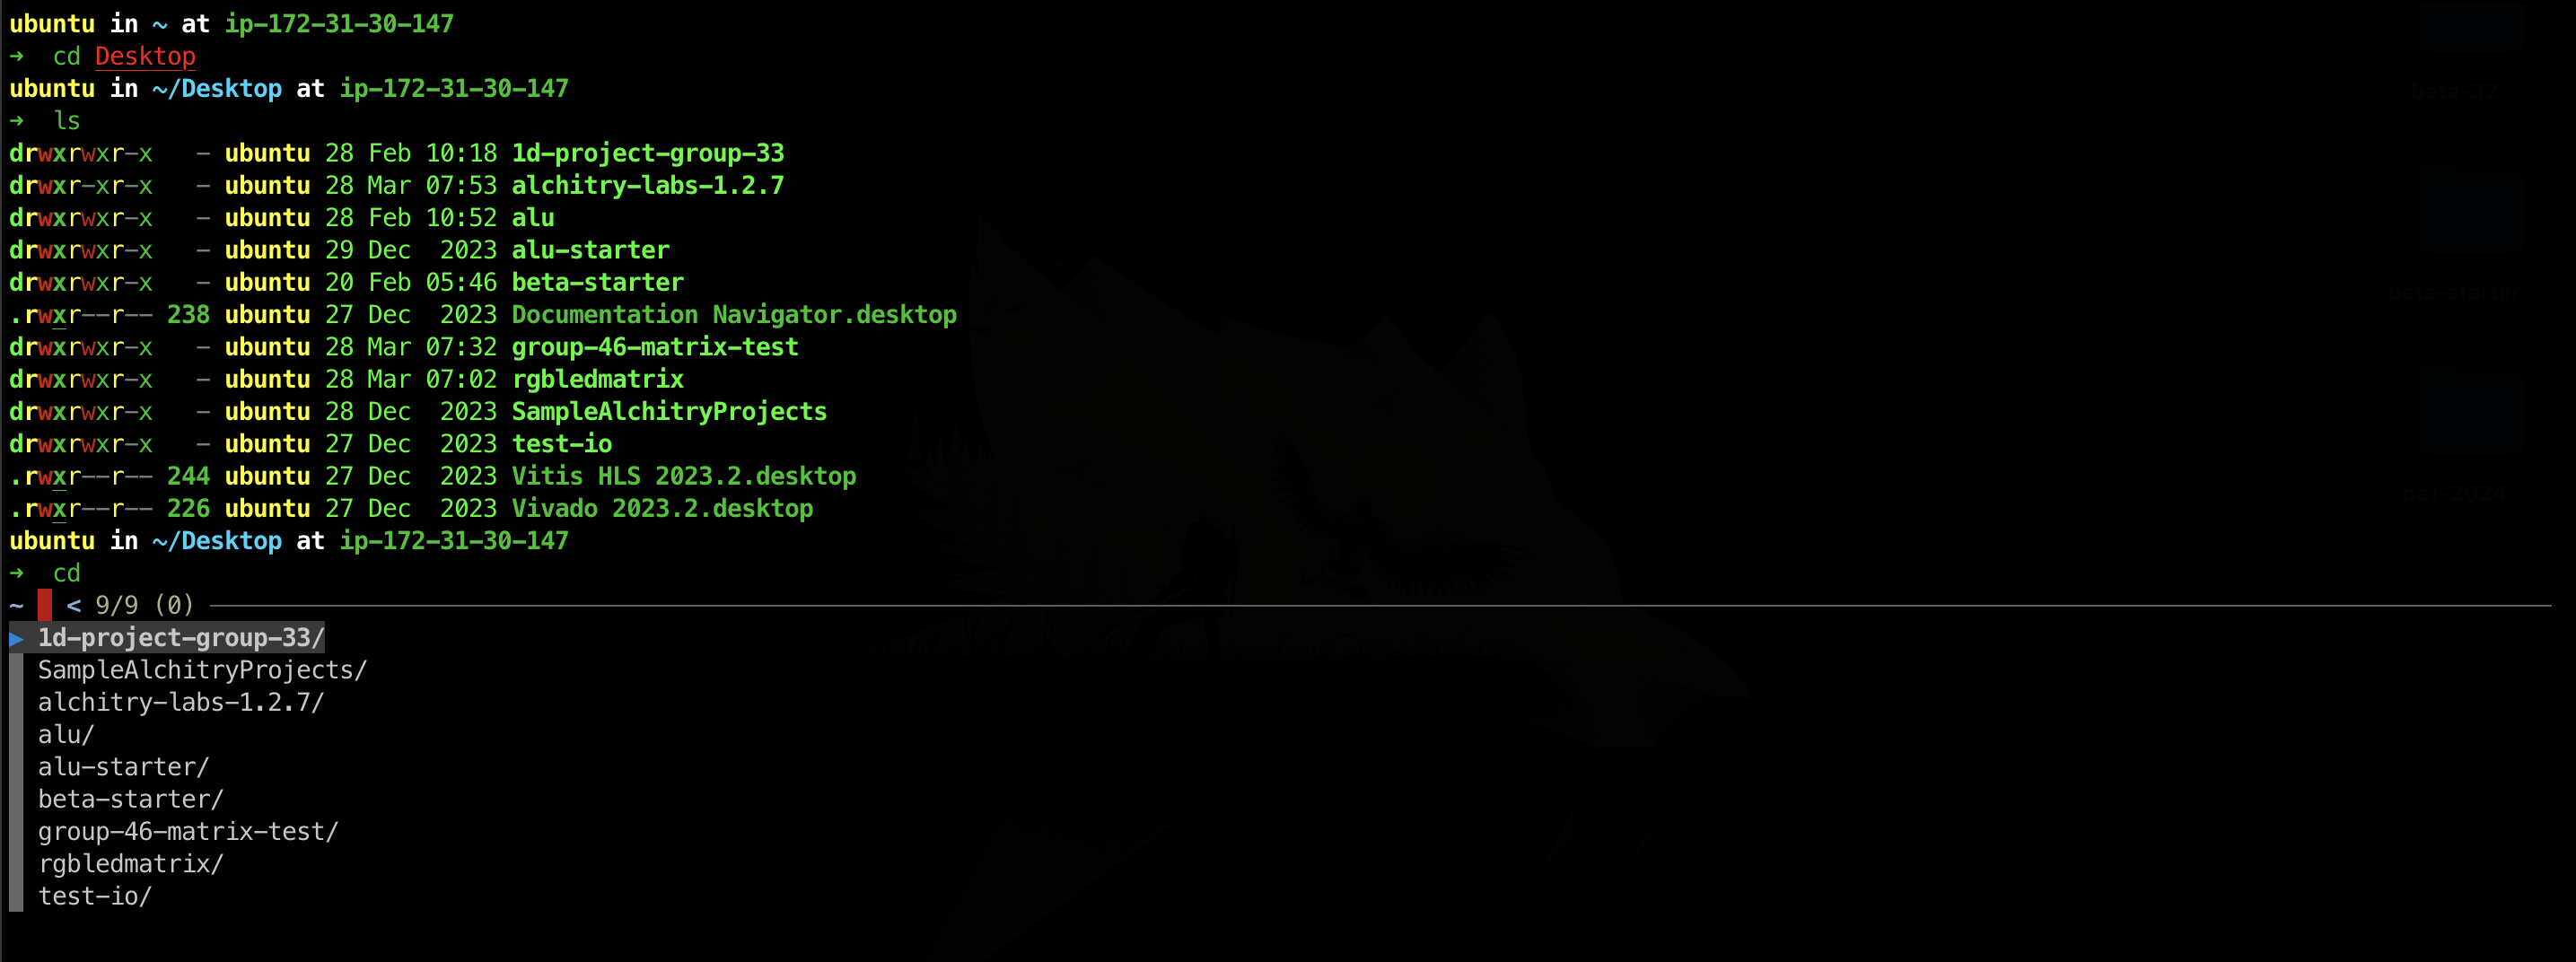
Exit your current shell and reopen. You should use zsh now and have your prompt look as such. Press TAB after a command and you will be faced with nicely rendered choices as shown. Take your time to explore and install new tools as necessary to elevate your CLI usage and navigation experience.
Enabling ssh
SSH
SSH means Secure Shell. It is a way to open a terminal on another machine over the network, securely.
In your VM terminal, run:
sudo apt update && sudo apt install openssh-server -y
Then enable the service:
sudo systemctl enable --now ssh
Check that it’s actually running:
sudo systemctl status ssh
Then find the VM’s private IP address using ifconfig. This is assuming you are using bridged/shared network setting (read below for details):
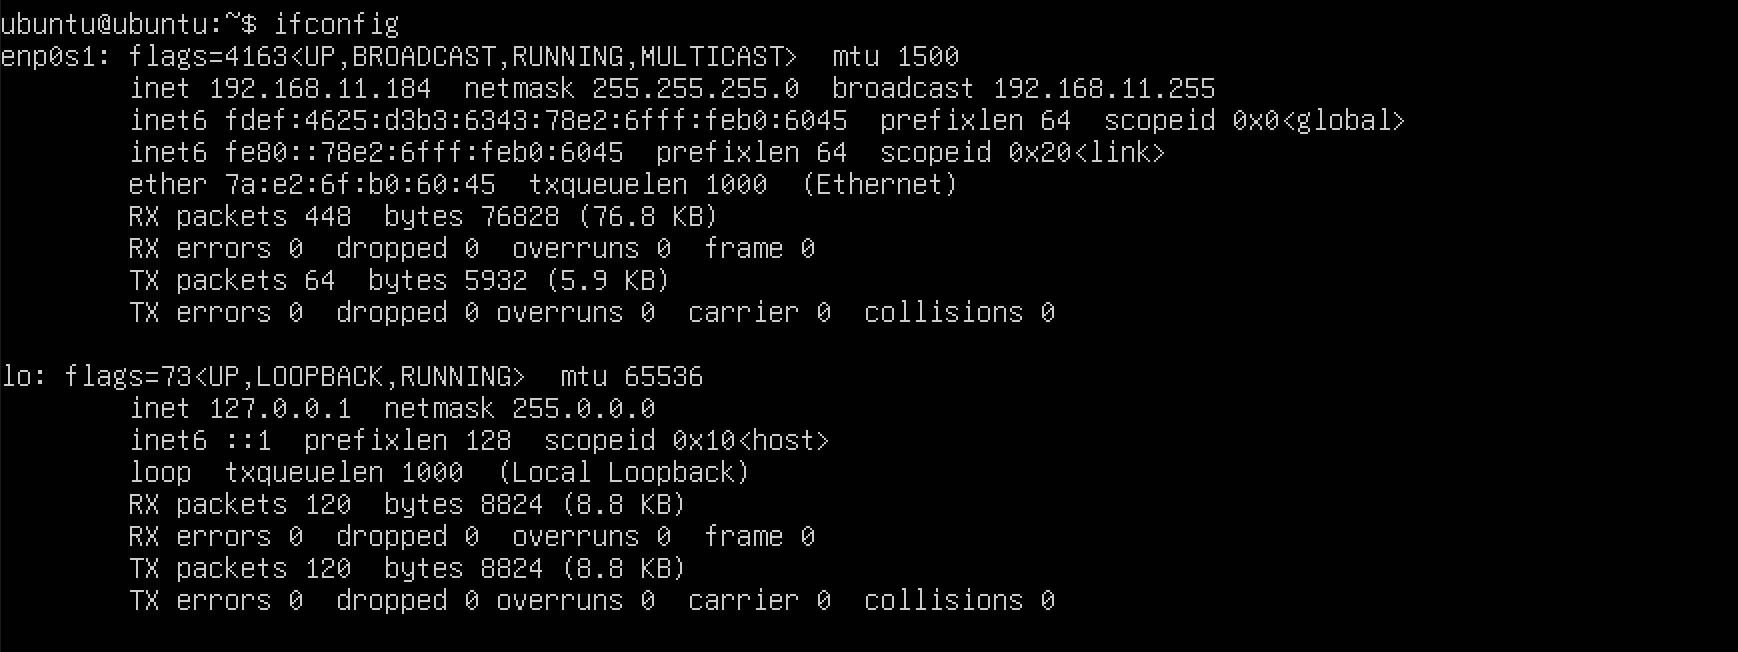
Then from your host machine, simply do:
ssh username@VM_IP_ADDRESS
VM networking modes for SSH
A VM usually needs some kind of virtual network connection before you can SSH into it. The two common modes are bridged networking and shared/NAT networking. Both can work for SSH, but they behave differently. Refer to your VM docs for the specific terms but these two are the most common.
Bridged networking
In bridged mode, the VM joins the same physical network as the host machine. It behaves like a separate computer connected to the same router.
Example:
Host machine:  192.168.1.20
Ubuntu VM:     192.168.1.50
Router:        192.168.1.1
The VM gets its own IP address on the LAN. This means the host can SSH into the VM directly:
ssh username@192.168.1.50
Other devices on the same network may also be able to reach the VM. This is useful if the VM is acting like a small server, or if you want access from multiple machines. The downside is that bridged mode depends on the physical network. Some school, office, hotel, or restricted WiFi networks may block bridged VMs or refuse to give them their own IP address.
Shared / NAT networking
In shared or NAT mode, the VM accesses the network through the host machine. The VM is placed behind a private virtual network managed by the virtualization software, so in other words: the VM accesses the network through the host. The implementation is host-VM specific.
Example:
Host machine:  192.168.1.20
Ubuntu VM:     192.168.64.5
The VM can usually access the internet, but it is not exposed to the whole LAN in the same way as bridged mode. Depending on the virtualization software, the host may still be able to SSH directly into the VM using the VM’s private IP:
ssh username@192.168.64.5
This is often the simplest setup for local development because the VM can access the internet, and the host can still connect to it.
Port forwarding
Port forwarding is used when the VM is behind NAT and you want to expose a VM service through a port on the host machine. You would know that you need this if you cannot simply do despite typing the VM_IP_ADDRESS correctly.
ssh username@VM_IP_ADDRESS
For SSH, the mapping is usually (by “usual” it means “by convention”, not that it’s automatically done for you):
// common mappings, choose one
Host port 22022  →  VM port 22
Host port 2222  →  VM port 22
You must set this through your VM. Here’s the setting using UTM:
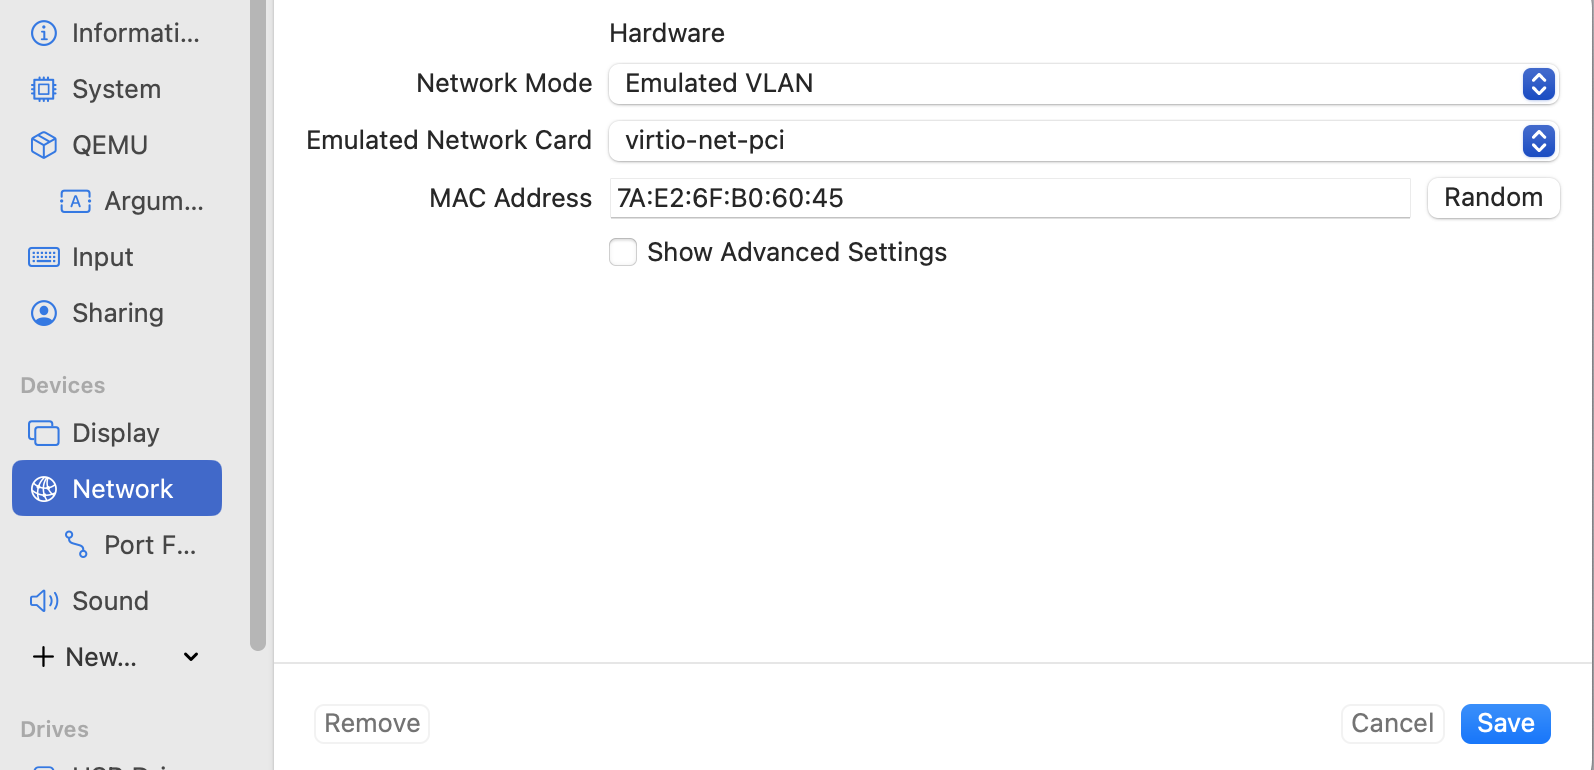
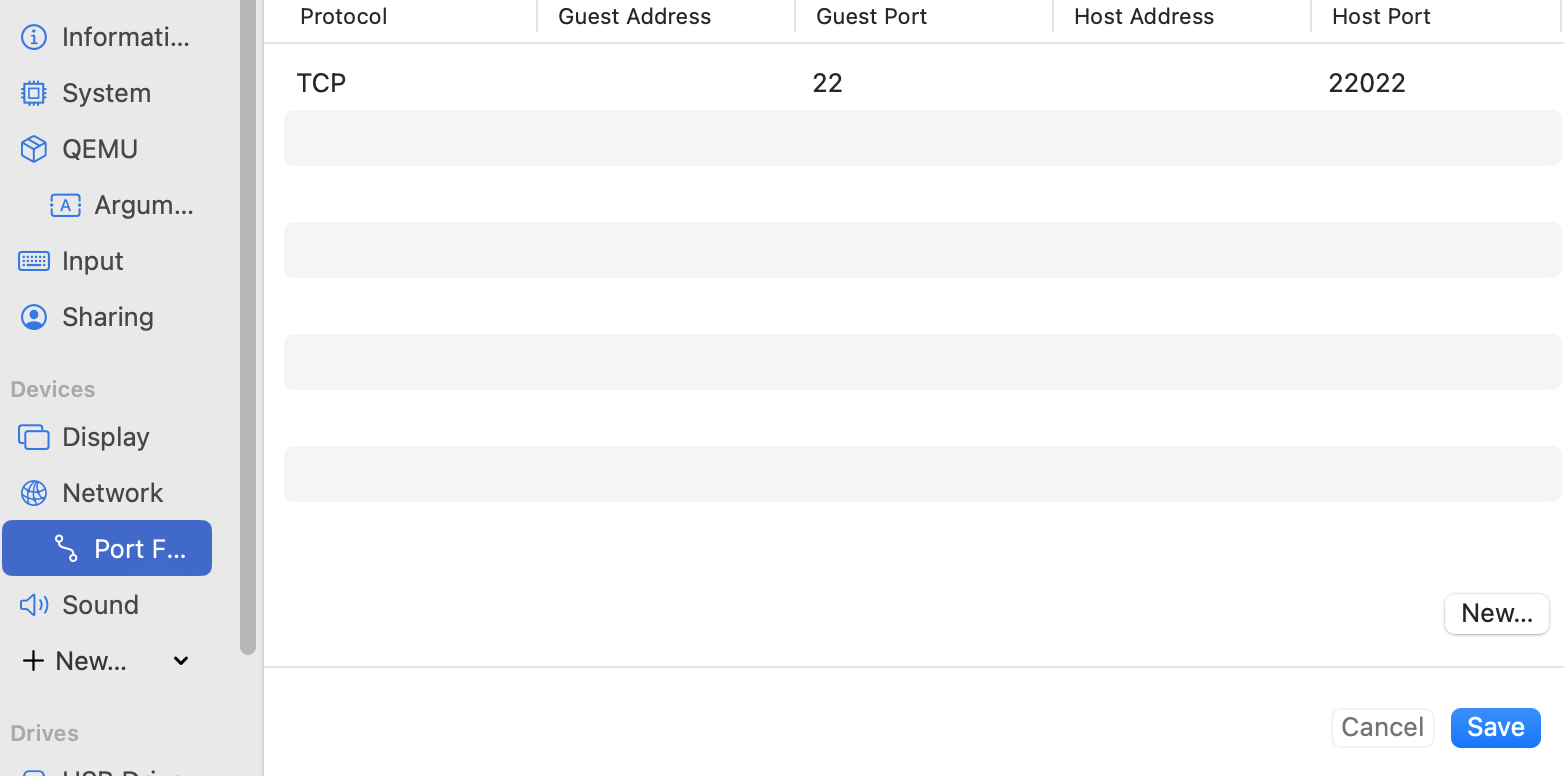
Then from the host machine, you connect using:
ssh -p 22022 username@localhost
This means:
localhost:2222 on the host forwards to port 22 inside the VM
Port forwarding is useful when the VM does not have an IP address that the host can directly SSH into, or when you specifically want a stable localhost-based command.
How Terminal IO Works
This is a full walk-through version with system calls, interrupts, OS, terminal, PTY, shell, stdin/stdout/stderr all connected. You should read this after mastering Week 1 and 2 materials (until OS Services).
The terminal, shell, and running programs do not talk to the keyboard and screen directly. They communicate through the operating system using file descriptors, system calls, and usually a terminal device or pseudo-terminal (PTY).
For an interactive shell, the shell process usually has:
fd 0 = stdin   = input stream
fd 1 = stdout  = normal output stream
fd 2 = stderr  = error output stream
These file descriptors are usually connected to a terminal device. In a modern terminal app, such as Terminal, iTerm, VS Code terminal, or an SSH session, this is usually a PTY (or TTY).
+-------------------+        system calls        +-------------------+
| Terminal app      | <------------------------> | OS kernel         |
| Terminal / iTerm  |                            | PTY driver        |
+-------------------+                            +---------+---------+
                                                            |
                                                            |
                                                    +-------+-------+
                                                    | PTY slave     |
                                                    | /dev/pts/N    |
                                                    +-------+-------+
                                                            |
                                                            |
                                               fd 0 / fd 1 / fd 2
                                                            |
                                                    +-------+-------+
                                                    | Shell process |
                                                    | bash / zsh    |
                                                    +---------------+
Typing a Command
Suppose you type:
ls
The process is roughly:
1. You press a key on the keyboard.
2. The keyboard hardware reports the key event to the computer
3. The OS receives the event through a hardware INTERRUPT or input event system.
4. The OS passes the key EVENT to the terminal app.
5. The terminal app writes the character into the PTY master using a SYSTEM CALL.
6. The OS PTY driver makes that input available on the PTY slave side.
7. The shell is blocked in a read() system call on stdin, fd 0.
8. When input arrives, the OS wakes the shell.
9. The shell receives the characters, parses the command, and decides what to run.
So the shell does not magically know what you typed. It is just reading bytes from stdin.
Perhaps this diagram might illustrate the process better:
Keyboard
   |
   | hardware interrupt / OS input event
   v
OS kernel
   |
   v
Terminal app
   |
   | write() system call
   v
PTY master
   |
   | managed by OS
   v
PTY slave
   |
   | read() system call on fd 0
   v
Shell process
Shell process the command: runs a process
After the shell reads ls, it usually does something like:
fork()   creates a child process
exec()   replaces the child process with the ls program
wait()   waits for the child process to finish
The new ls process usually inherits the same standard streams:
+-------------------+        fork + exec        +-------------------+
| Shell process     | ------------------------> | ls process        |
|                   |                           |                   |
| fd 0 -> terminal  |                           | fd 0 -> terminal  |
| fd 1 -> terminal  |                           | fd 1 -> terminal  |
| fd 2 -> terminal  |                           | fd 2 -> terminal  |
+-------------------+                           +-------------------+
This is why ls output appears in the same terminal. It inherited stdout from the shell.
When the process prints output
When ls wants to print output, it does not draw text on the screen itself. It calls write(), something like this. This triggers a system call.
write(1, "file.txt\n", 9); // 1 means fd 1: stdout
This fires the following events:
1. ls calls write(1, ...).
2. The write() system call enters the OS kernel.
3. The OS sees that fd 1 points to the PTY slave.
4. The OS sends the bytes to the PTY master.
5. The terminal app reads those bytes from the PTY master.
6. The terminal app renders the text in the terminal window.
Again, a simpler diagram to illustrate the sequence of actions:
ls process
   |
   | write(1, "file.txt\n", ...)
   v
OS kernel
   |
   v
PTY slave
   |
   v
PTY master
   |
   | terminal app reads
   v
Terminal app
   |
   v
Screen display
As you can see, the output is OS-managed because (1) the program writes to a stream, then (2) OS moves the bytes, and finally (3) the terminal app displays them.
As long as we have interprocess communication (IPC), we need OS Services. You’ll learn more about it here.
stdin, stdout, and stderr
By default, any interactive program has:
fd 0: stdin   <--- terminal input
fd 1: stdout  ---> terminal output
fd 2: stderr  ---> terminal output
Here’s a visual representation:
                         +-------------------+
                         | Terminal app      |
                         | keyboard/display  |
                         +---------+---------+
                                   |
                                   |
                         +---------+---------+
                         | OS terminal / PTY |
                         +---------+---------+
                                   |
              +--------------------+--------------------+
              |                    |                    |
              v                    v                    v
        stdin fd 0           stdout fd 1          stderr fd 2
              |                    |                    |
              v                    ^                    ^
                         +---------+---------+
                         | Shell / Program   |
                         +-------------------+
stdout and stderr both usually appear on the terminal, but they are separate streams. This is why you can redirect them separately:
program > out.txt 2> err.txt
This means:
stdout fd 1 -> out.txt
stderr fd 2 -> err.txt
Important OS idea
The process does not need to know whether stdin is coming from a keyboard, file, pipe, or another program. It just calls:
read(0, buffer, size);
The process also does not need to know whether stdout is going to a terminal, file, pipe, or another program. It just calls:
write(1, buffer, size);
The OS manages what each file descriptor is connected to. All of these stuffs work using the same basic mechanism (OS Service):
cat file.txt
cat < file.txt
ls > out.txt
ls | grep txt
In each case, the shell sets up the file descriptors before starting the program.
Pipe
For the following, the shell creates a pipe (an IPC mechanism) in the OS:
ls | grep txt
It connects:
ls stdout fd 1  ->  pipe write end
grep stdin fd 0 <-  pipe read end
Here’s a simplified diagram:
+-------------+       pipe managed by OS       +-------------+
| ls process  | -----------------------------> | grep process|
| stdout fd 1 |                                | stdin fd 0  |
+-------------+                                +-------------+
                                                       |
                                                       | stdout fd 1
                                                       v
                                                terminal / PTY
Again, the programs do not directly know much about each other. ls just writes to stdout. grep just reads from stdin. The OS connects the streams.
Summary
The full process illustration from keyboard presses to “something” being displayed as the effect of it in your terminal is:
Keyboard input
   |
   | interrupt / OS input event
   v
OS kernel
   |
   v
Terminal app
   |
   | write() to PTY master
   v
PTY managed by OS
   |
   | shell read() from stdin fd 0
   v
Shell process
   |
   | fork(), exec()
   v
Program process
   |
   | write() to stdout fd 1 or stderr fd 2
   v
PTY managed by OS
   |
   | terminal app read()
   v
Terminal display
Processes make system calls using read() and write(). The OS manages file descriptors and stream connections. The shell interprets commands after receiving the input via read(). The terminal app provides the visible text interface. The PTY connects the terminal app to the shell/programs.