User Interface
The most basic UI that a game typically has is score, time, lives (HP), and buttons for users to interact (exit game, start game, restart game). We will learn more about various UI components in a game (diegetic, spatial, etc) in the later weeks during lecture hours.
TextMeshPro
The TextMeshPro GameObject is used to display texts, which is a part of many UI components including buttons and dropdowns. Create a new GameObject >> UI >> Text - TextMeshPro as follows:
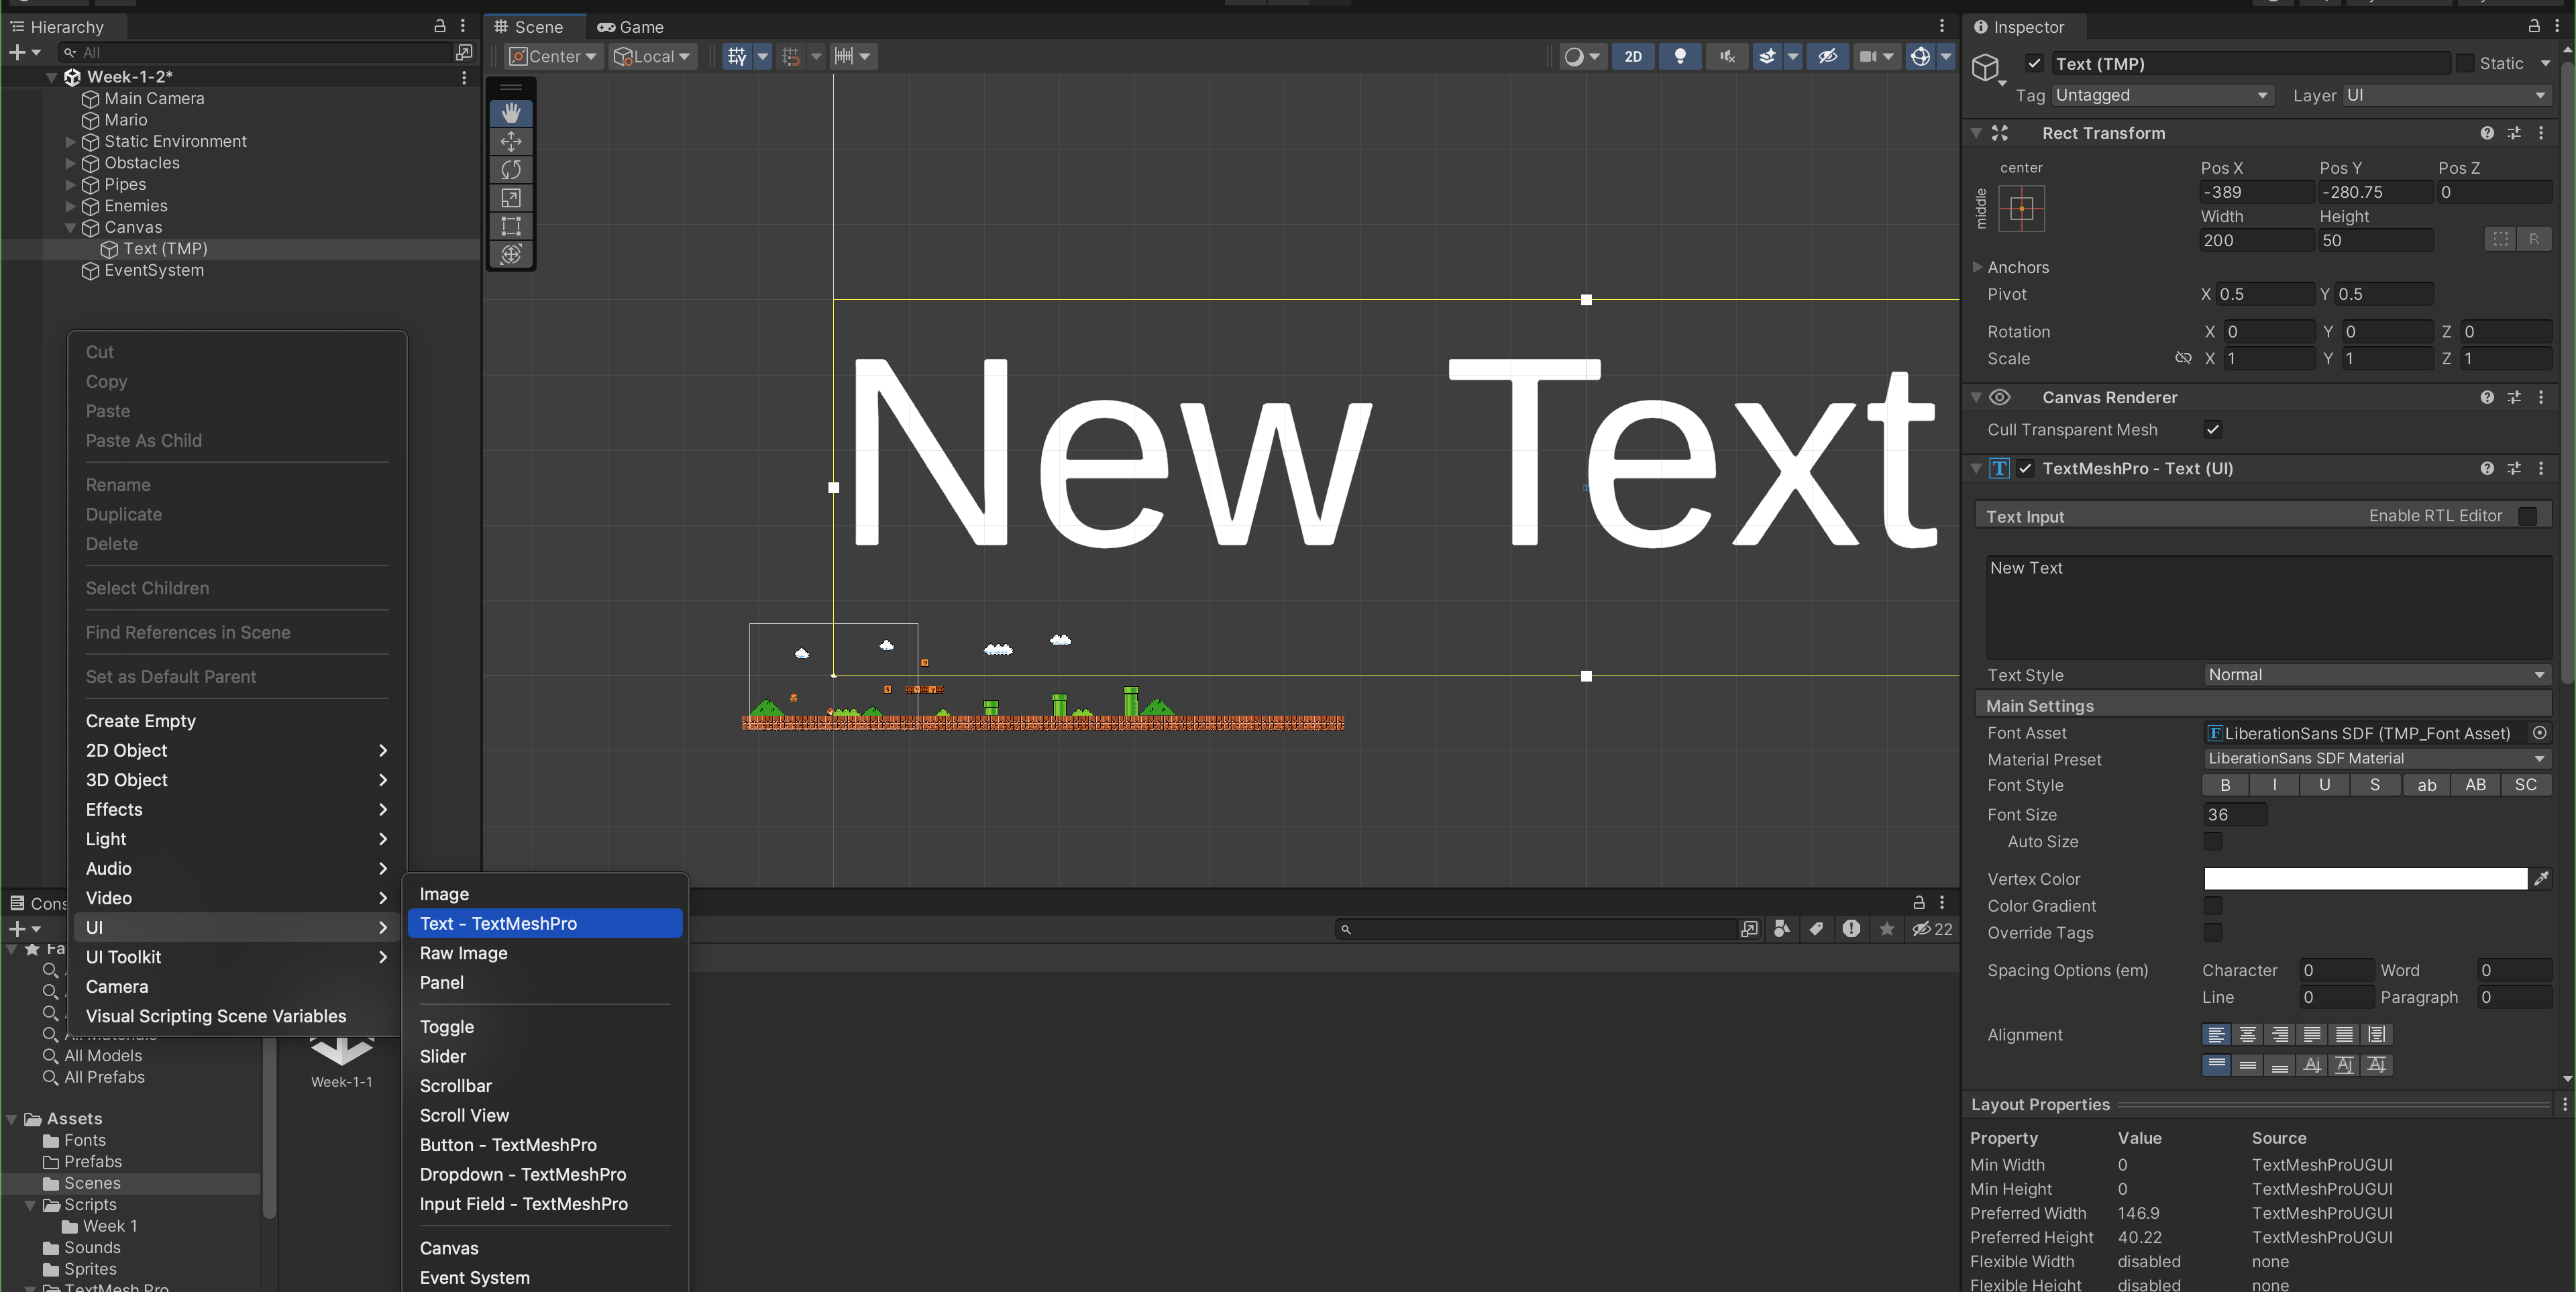
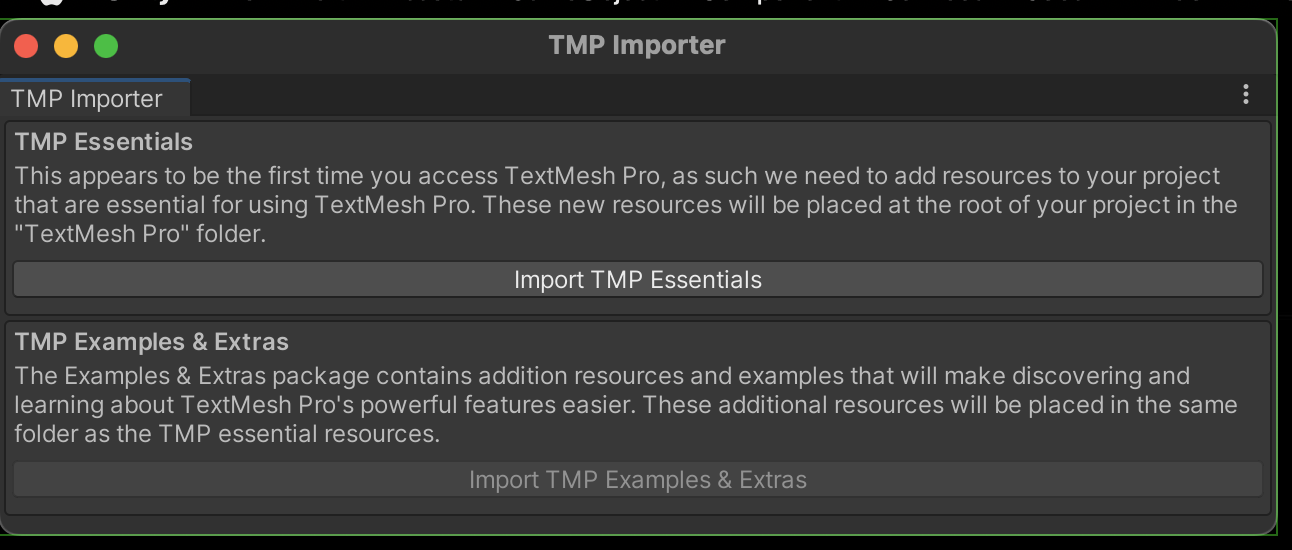
Three things will be created automatically for you: Canvas, Text(TMP), and EventSystem. You might be prompted to install TextMeshPro (TMP) Essentials, Examples, and Extras. Import both.
TMP Font Asset
We have given you font asset: Assets/Fonts/prstart.ttf. To be able to use it, you need to create a new TMP Asset. Right click at prstart.ttf in your Project Window, and create new TMP Font Asset (SDF). You should end up with Assets/Fonts/prstart SDF.asset.
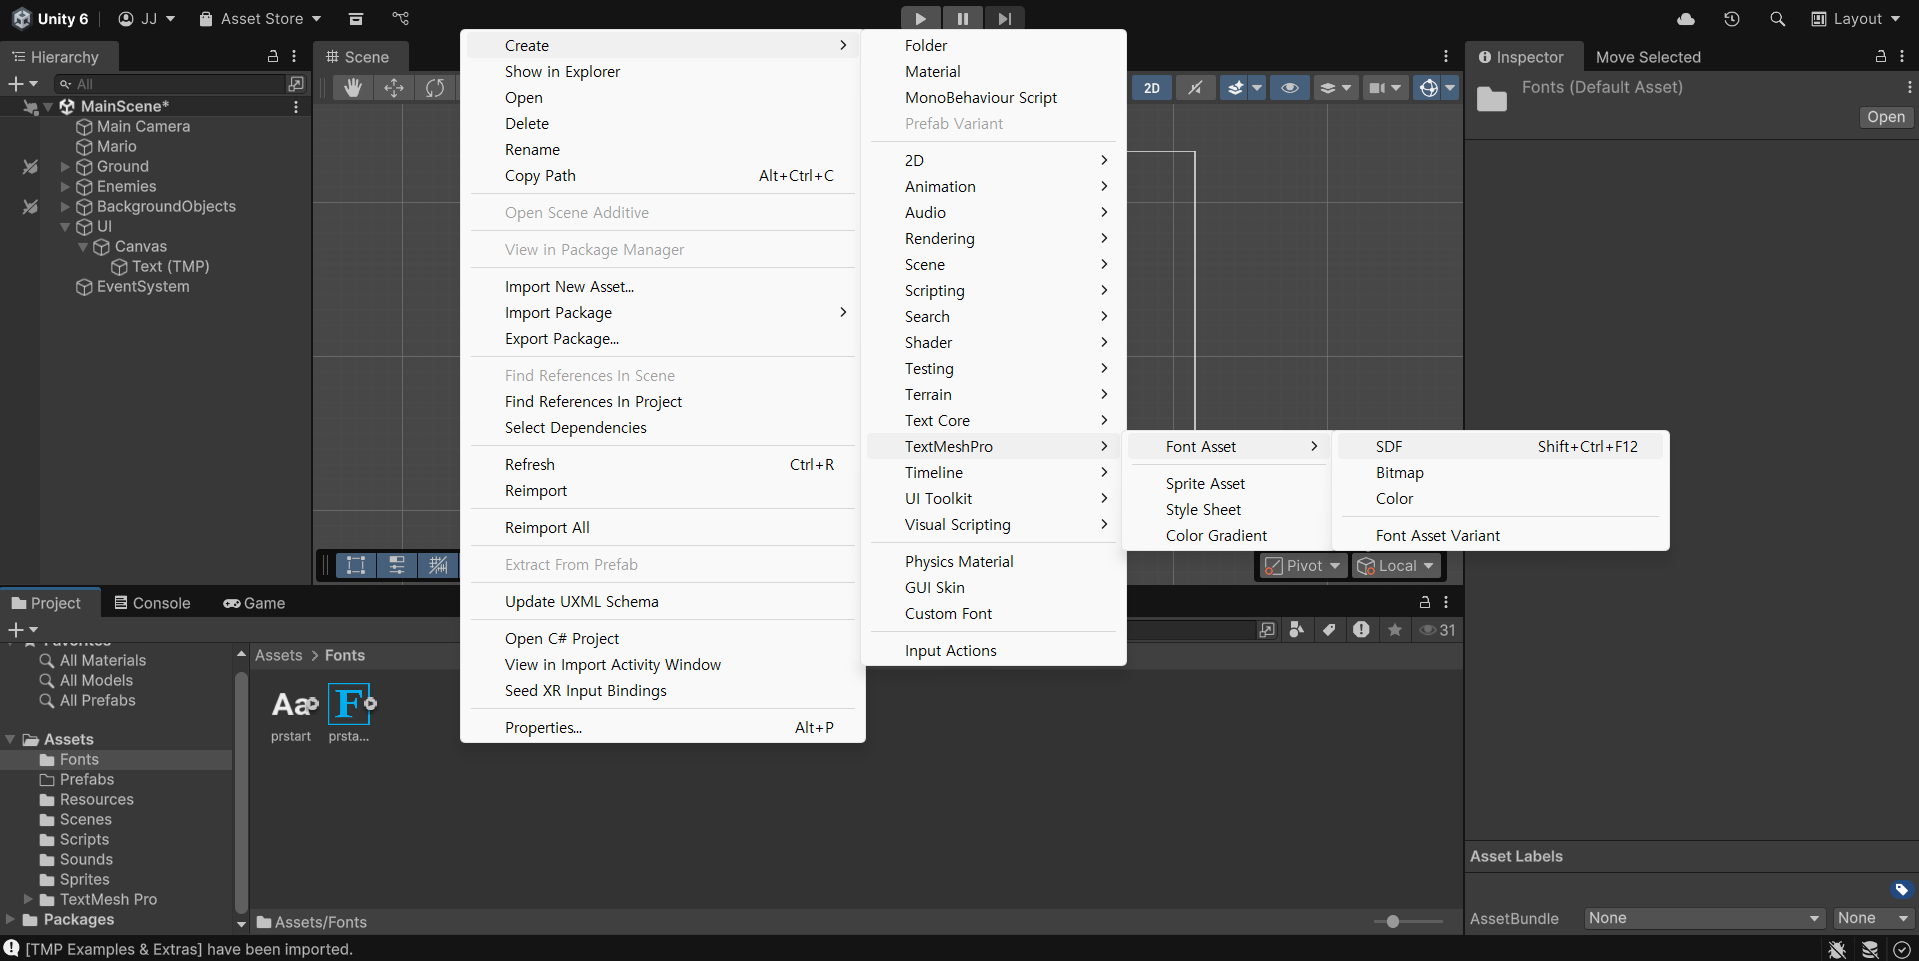
Then, go to the newly created Text GameObject, and change its Font Asset property under TMP - Text(UI) element into this newly created asset (prstart SDF) to use it.
The Canvas
The Canvas might look rather huge right now in the Scene view, and that's fine. That is because the canvas Render Mode is at Screen Space - Overlay, meaning it's like HUD style and does not depend on the World coordinate. Play around with its properties to understand more how it works.
Button (TMP)
Next, add a Button UI GameObject to the scene (UI >> Legacy >> Button). Get some button sprite in .png format and drag it to your Assets/Sprite folder, and change the button's Source Image property on its Image element. You can position the button and the Text GameObject you set earlier as shown:
You can dictate how it looks like when user interact with it by changing all properties under Transition in the Button element of the Button GameObject.
At this point, it's worth naming your GameObject intuitively, as shown. Then proceed with making the desired effect on the button.
Scoring System
Now that we have all of our UI Elements, it's time to do three things:
- Update the score whenever Mario "scored" something
- Stop the game whenever Mario "dies"
- Restart the game
One way to “count” a score is to count how many times Mario has successfully jumped over Goomba. To do this, we need to know where Goomba is at all times, and of course the reference to the ScoreText GameObject so we can set its FieldValue dynamically at runtime. We also need to know if Mario is on the ground or not. We did it before in PlayerMovement.cs, but sadly there's no state management of any kind as of now, and we need to compute it again here.
Let's use another method: Physics2D.BoxCast. The idea is to cast a small box from Mario downwards, and see if there's any Colliders that's being hit. The layerMask can be used to detect objects selectively only on certain layers (this allows you to apply the detection only to enemy characters, for example).
Create a new script called JumpOverGoomba.cs, and implement the FixedUpdate method (yes, not Update because we want to run the instruction once each time the Physics Engine computes):
using System.Collections;
using System.Collections.Generic;
using UnityEngine;
using TMPro;

public class JumpOverGoomba : MonoBehaviour
{
    public Transform enemyLocation;
    public TextMeshProUGUI scoreText;
    private bool onGroundState;

    [System.NonSerialized]
    public int score = 0; // we don't want this to show up in the inspector

    private bool countScoreState = false;
    public Vector3 boxSize;
    public float maxDistance;
    public LayerMask layerMask;
    // Start is called before the first frame update
    void Start()
    {

    }

    // Update is called once per frame
    void Update()
    {


    }

    void FixedUpdate()
    {
        // mario jumps
        if (Input.GetKeyDown("space") && onGroundCheck())
        {
            onGroundState = false;
            countScoreState = true;
        }

        // when jumping, and Goomba is near Mario and we haven't registered our score
        if (!onGroundState && countScoreState)
        {
            if (Mathf.Abs(transform.position.x - enemyLocation.position.x) < 0.5f)
            {
                countScoreState = false;
                score++;
                scoreText.text = "Score: " + score.ToString();
                Debug.Log(score);
            }
        }
    }

    void OnCollisionEnter2D(Collision2D col)
    {
        if (col.gameObject.CompareTag("Ground")) onGroundState = true;
    }


    private bool onGroundCheck()
    {
        if (Physics2D.BoxCast(transform.position, boxSize, 0, -transform.up, maxDistance, layerMask))
        {
            Debug.Log("on ground");
            return true;
        }
        else
        {
            Debug.Log("not on ground");
            return false;
        }
    }
}
Then, go to Ground GameObject (where Mario rests), and add the Layer Ground (create it):
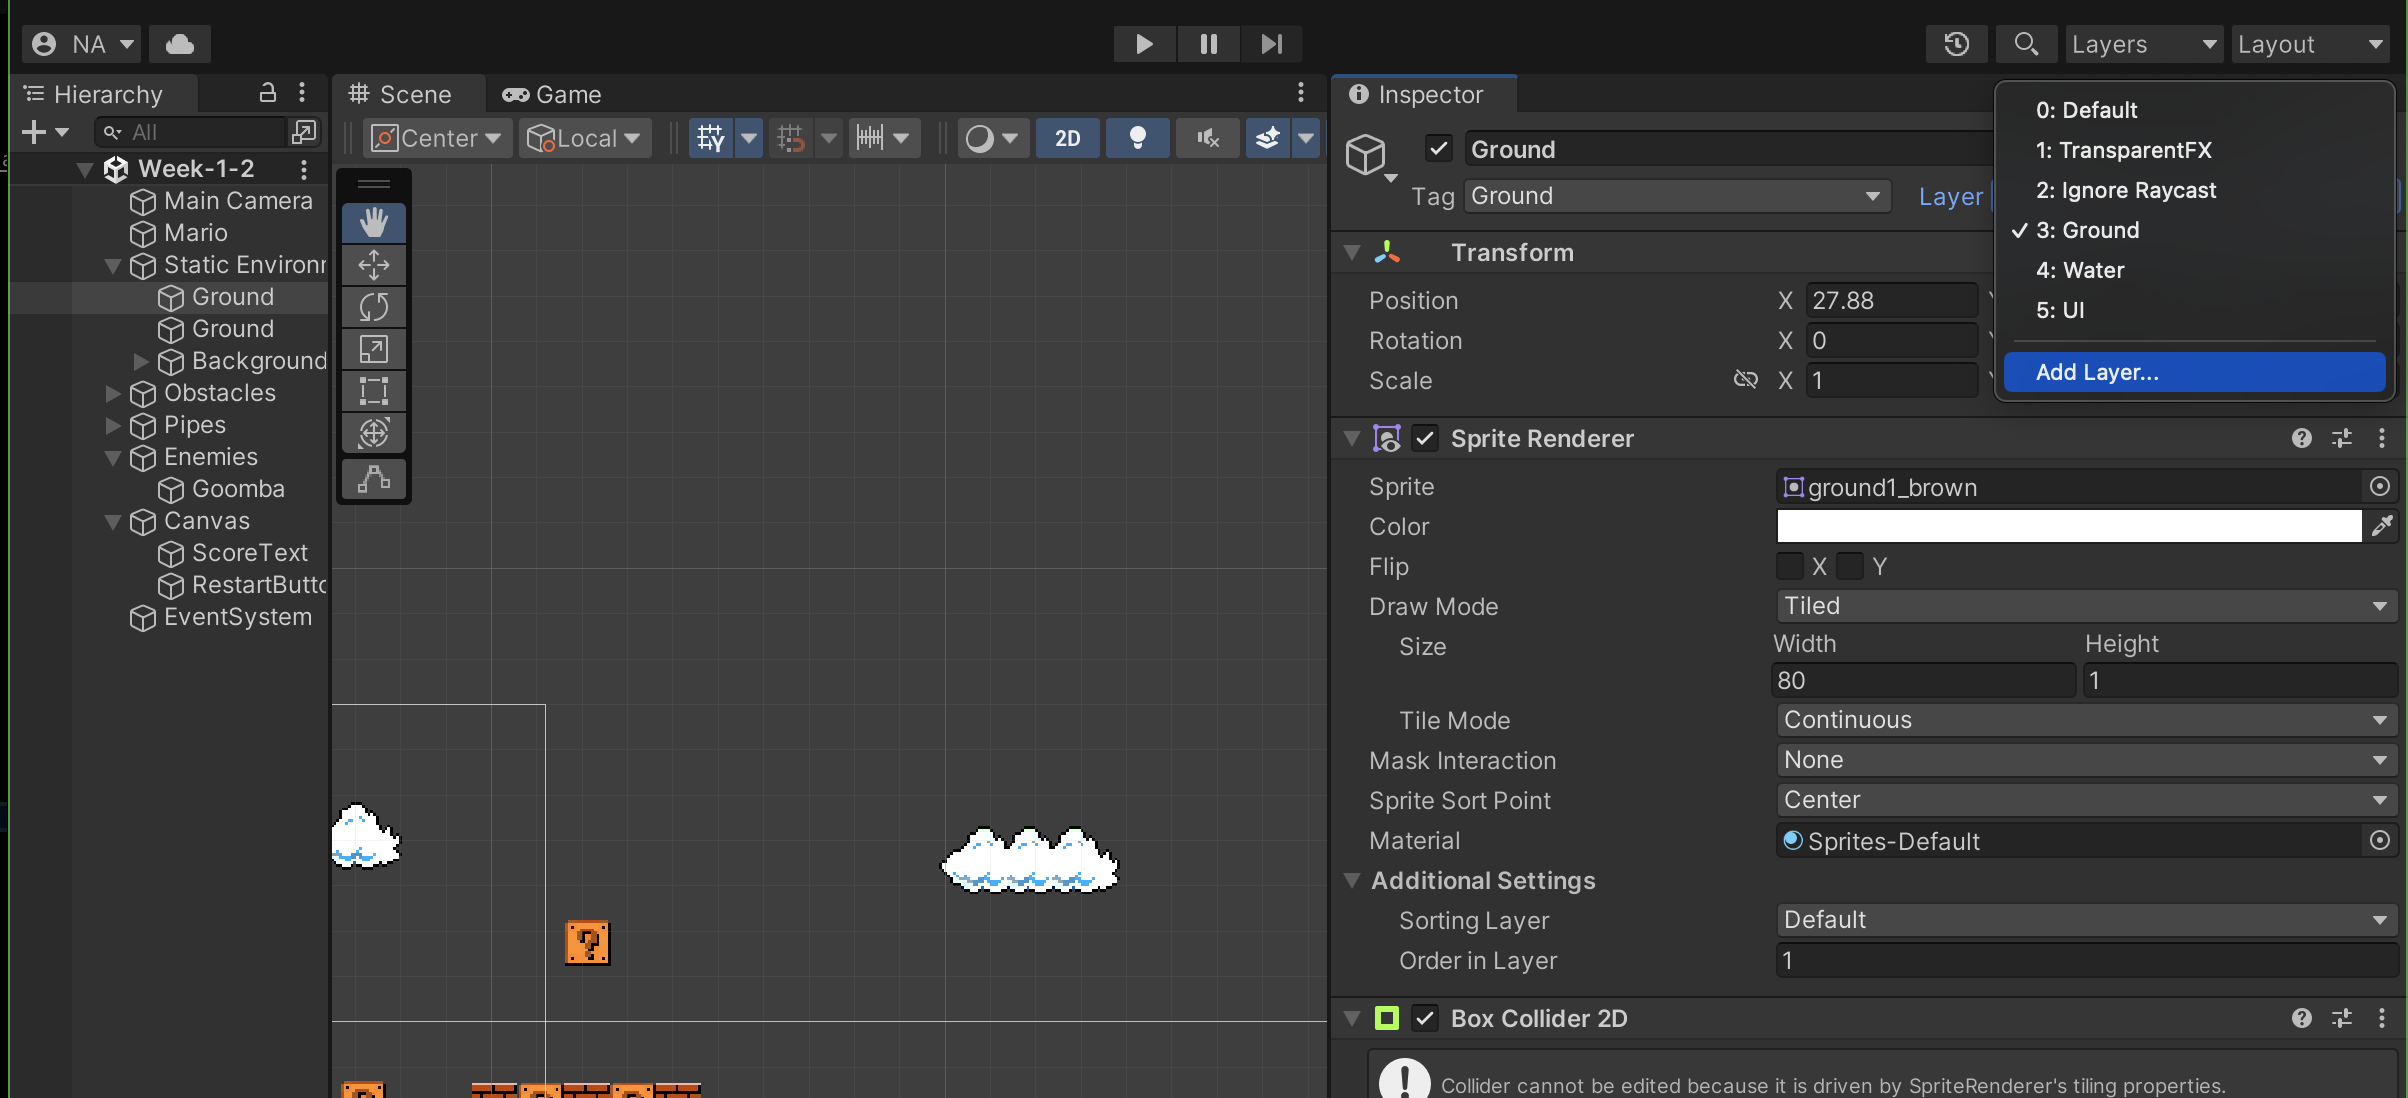
Layer is very useful to dictate what to render and which other object collisions we should care about. Read the docs here.
Attach the JumpOverGoomba script onto Mario, and fill the appropriate properties. You can drag Goomba and ScoreText GameObject straight to Script Component of Mario field. Then, you make Mario jump and observe the log.
Gizmos
You might wonder what is boxSize and how it looks like. To do this, we can utilize Gizmos.
Add the following code to JumpOverGoomba.cs:
    // helper
    void OnDrawGizmos()
    {
        Gizmos.color = Color.yellow;
        Gizmos.DrawCube(transform.position - transform.up * maxDistance, boxSize);
    }
With this, you can see how big the box that we are about to cast is. Ensure that it can sufficiently touch the ground. Also, adjust the gravity value of Mario's Rigidbody to make it drop more naturally. You need to adjust the boxSize until the log shows onGround when Mario jumps off the ground for the first time.
Game Resolution
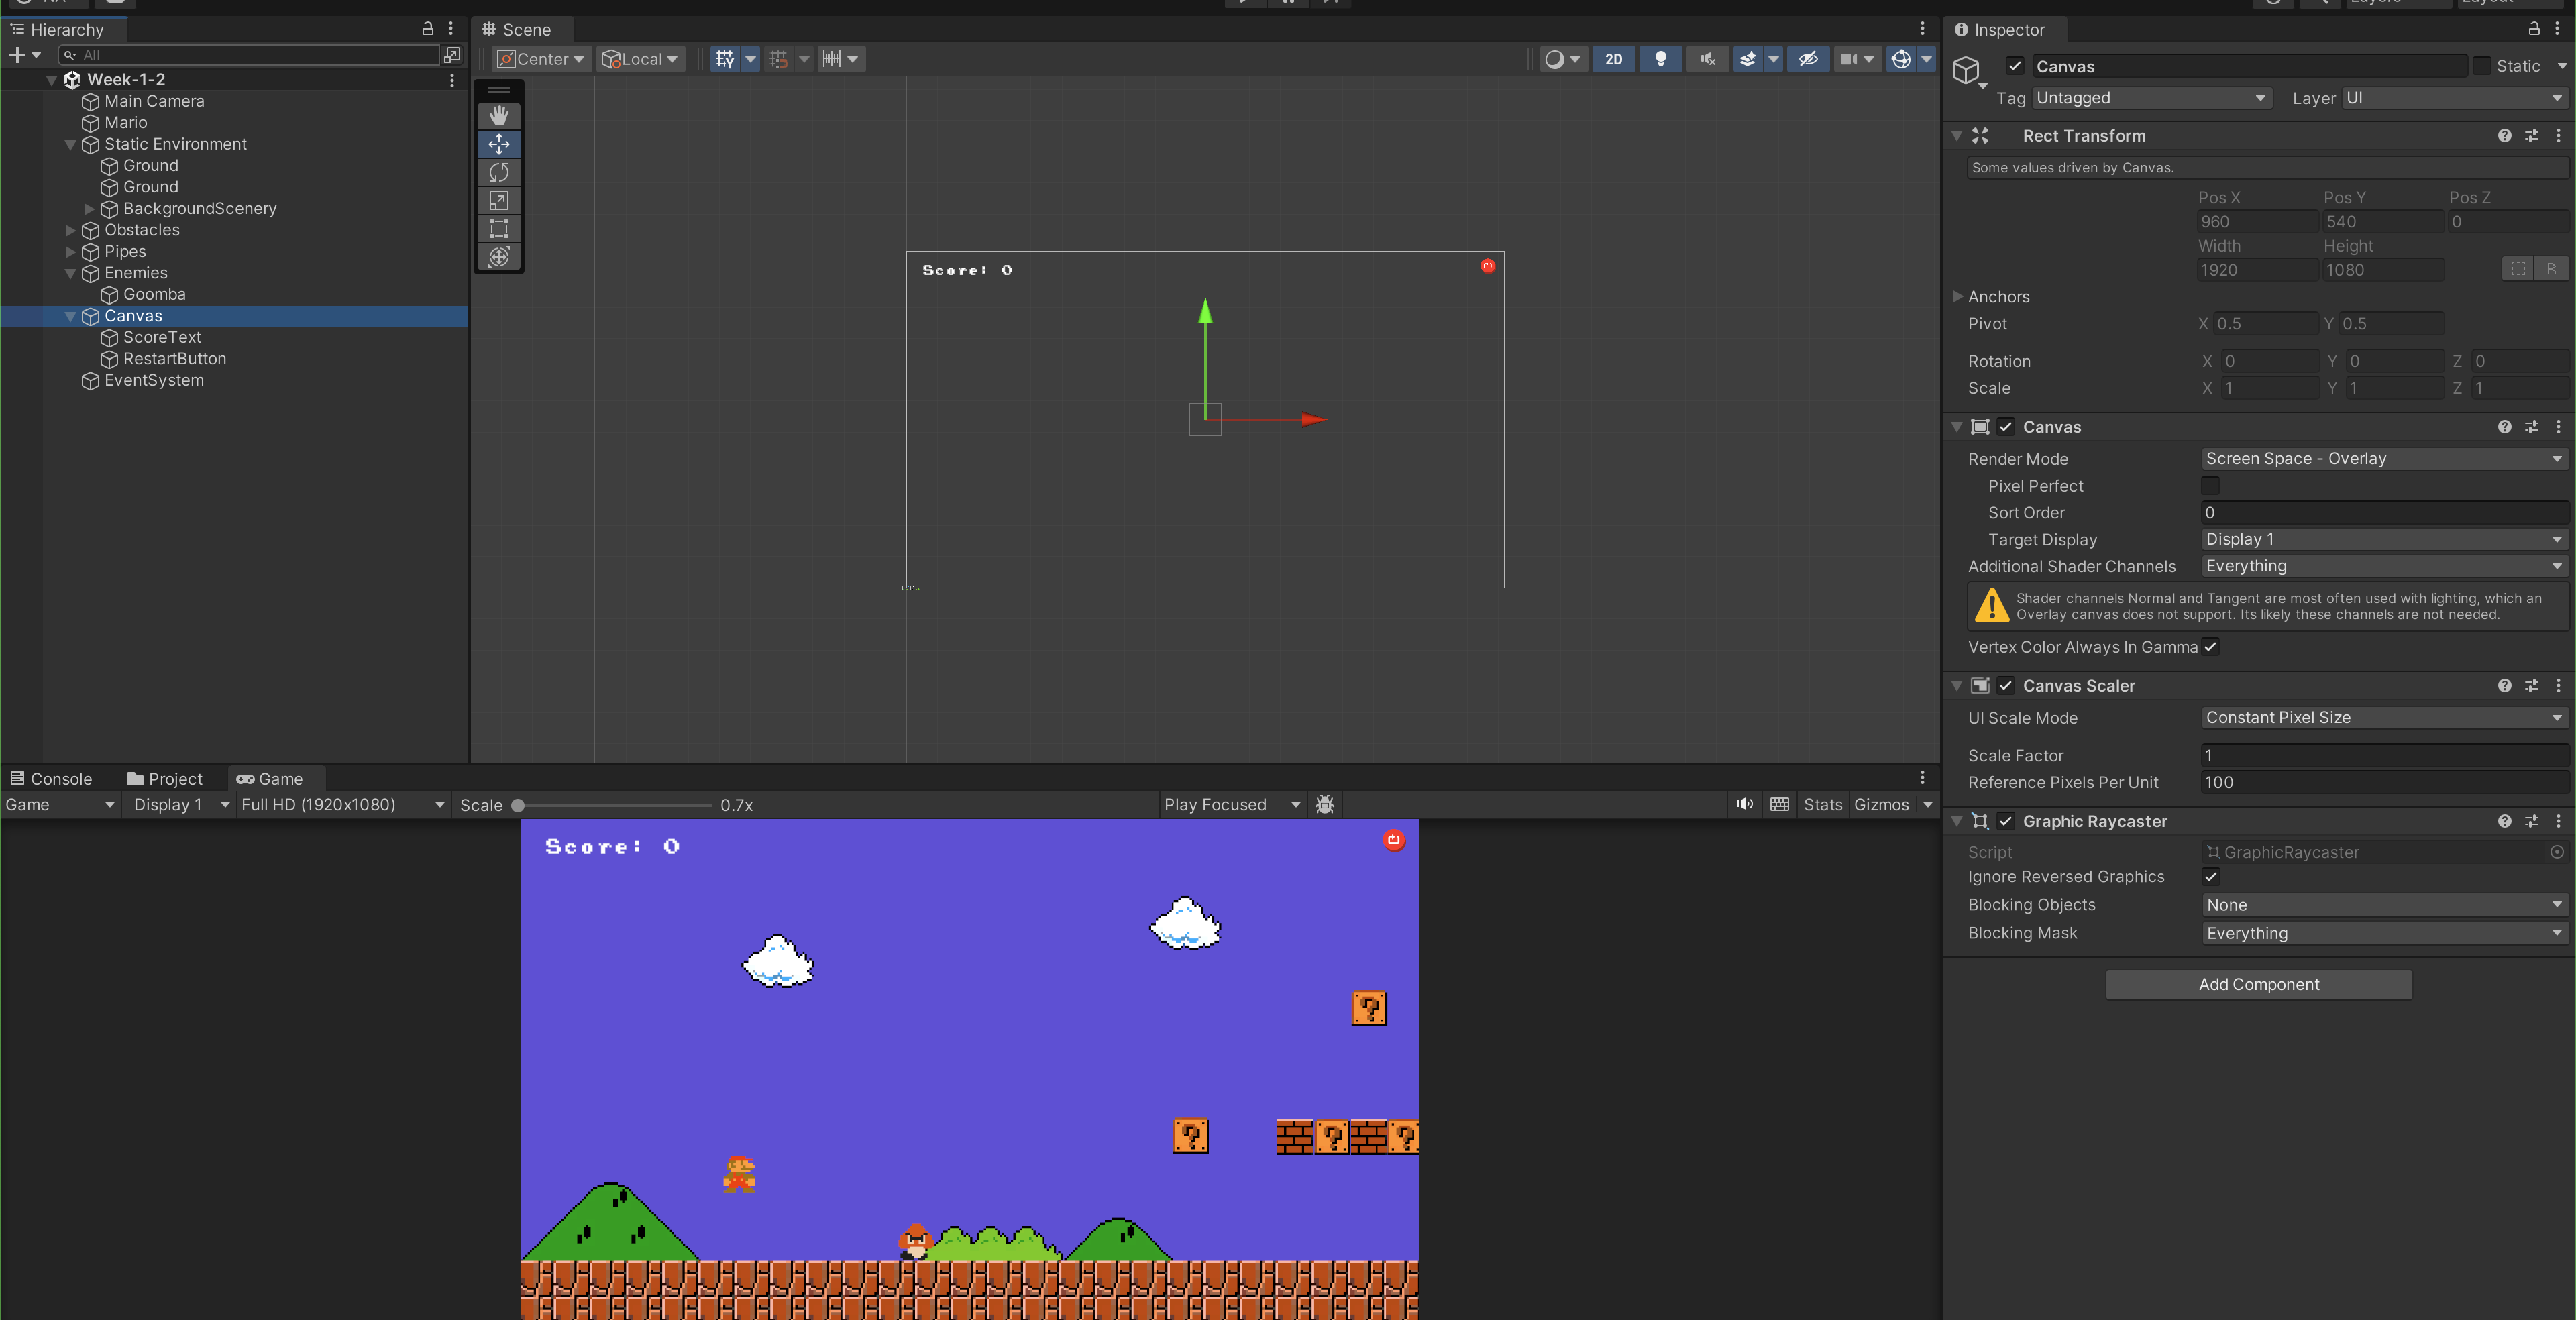
Over at your Game Window, set your resolution to something that's more common, like Full HD. You might need to readjust the position of ScoreText and RestartButton to match the screenshot below. This allows you to work with the Canvas more consistently and not have your UI elements moving everywhere each time.
Game Over Condition
To "stop" the game when Mario collides with Goomba, add the following code to PlayerMovement.cs:
    void OnTriggerEnter2D(Collider2D other)
    {
        if (other.gameObject.CompareTag("Enemy"))
        {
            Debug.Log("Collided with goomba!");
            Time.timeScale = 0.0f;
        }
    }
We actually didn't really stop the game, but freezes time. You can still press "a" or "d" and observe Mario flipping around.
Button Callback
Now we want to play the game again when the RestartButton is clicked. Implement a callback function with the following signature (public void with 0 or 1 argument) in PlayerMovement.cs. We also need to implement some sort of ResetGame method to reset everything back into the beginning of the game when the restart button is pressed:
- PlayerMovement.cs
- EnemyMovement.cs
using System.Collections;
using System.Collections.Generic;
using UnityEngine;
using TMPro;

public class PlayerMovement : MonoBehaviour
{

    // other variables
    public TextMeshProUGUI scoreText;
    public GameObject enemies;
    // other methods

    public void RestartButtonCallback(int input)
    {
        Debug.Log("Restart!");
        // reset everything
        ResetGame();
        // resume time
        Time.timeScale = 1.0f;
    }

    private void ResetGame()
    {
        // reset position
        marioBody.transform.position = new Vector3(-5.33f, -4.69f, 0.0f);
        // reset sprite direction
        faceRightState = true;
        marioSprite.flipX = false;
        // reset score
        scoreText.text = "Score: 0";
        // reset Goomba
        foreach (Transform eachChild in enemies.transform)
        {
            eachChild.transform.localPosition = eachChild.GetComponent<EnemyMovement>().startPosition;
        }

    }
}
public class EnemyMovement : MonoBehaviour
{

    private float originalX;
    private float maxOffset = 5.0f;
    private float enemyPatroltime = 2.0f;
    private int moveRight = -1;
    private Vector2 velocity;
    private Rigidbody2D enemyBody;

    public Vector3 startPosition = new Vector3(0.0f, 0.0f, 0.0f);

    // other methods
}
Now to put everything together, attach the RestartButtonCallback method as callback in the RestartButton GameObject. You should be able to now restart the game. The following recording shows the entire process of stopping the game and restarting the game:
Note that we don't actually utilise parameter input in RestartButtonCallback. We only put it there for demonstration purposes.
Transform.localPosition
Note that there's a difference between transform.position (refers to Global coordinate), and transform.localPosition. In the example above, we set Goomba's local position to be (0,0,0) with respect to its parents Enemies.
Button Navigation
Unity's EventSystem handles user input, such as mouse clicks, keyboard presses, and controller inputs, particularly when interacting with UI elements (e.g., buttons, sliders, toggles). When you select or interact with a UI element (like clicking a button), it becomes the currently selected GameObject in the EventSystem. After a button is clicked, you might want to clear its focus or disable UI navigation completely to prevent unintended reactivation when using controllers or the keyboard .
There exist a property called Navigation under Button element. You should set its Navigation to None.
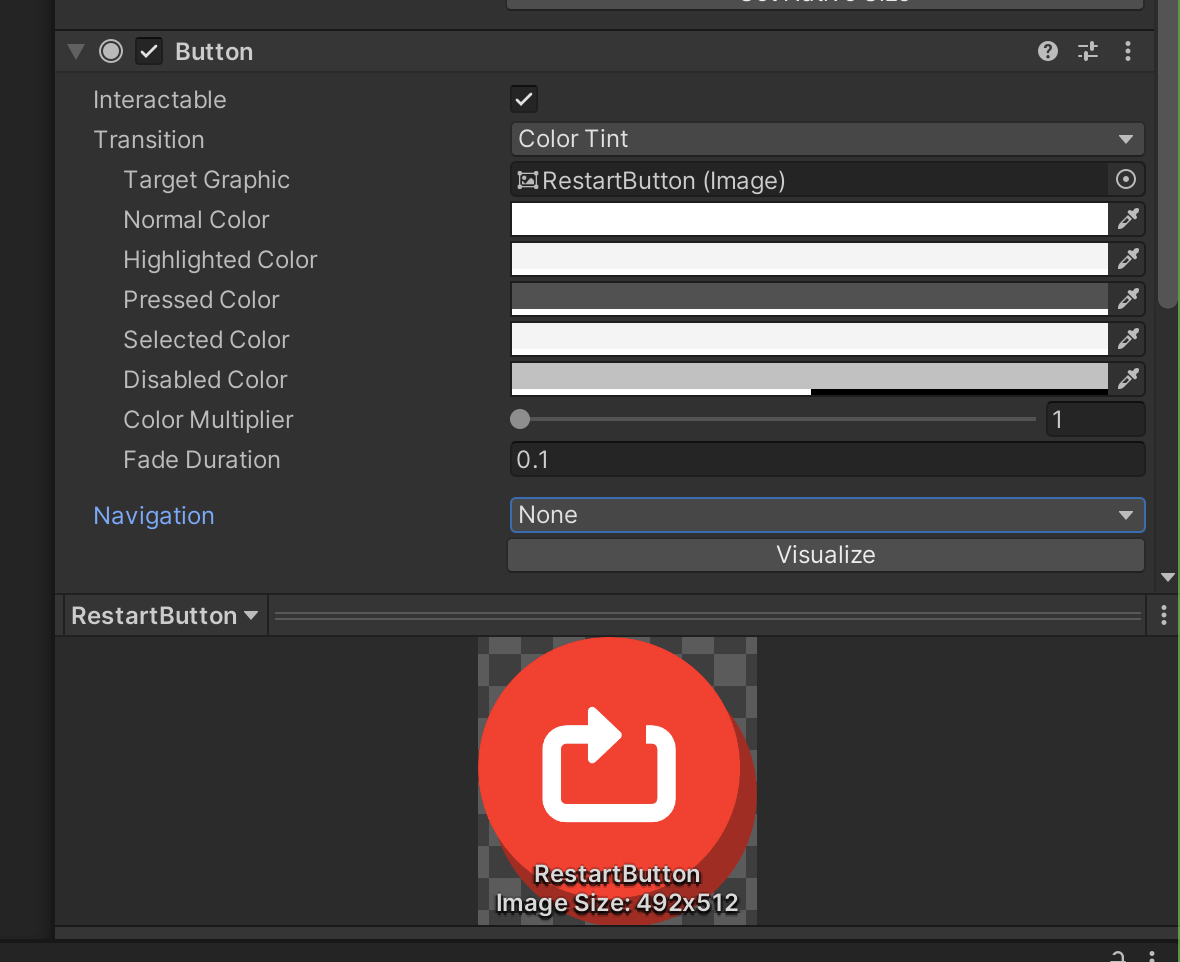
This ensures that after you click on the Button once, pressing spacebar does NOT trigger the restart button again. You can read the docs on Navigation Options further here.
Otherwise, you can manually clear the current focus or selection of a UI element in the Event System as follows. This clears the currently selected UI and yet still allows UI navigation for other purposes.
using UnityEngine.EventSystems;

EventSystem.current.SetSelectedGameObject(null);
Reset Score
You might have noticed from the recording above that the score is reset to 0, but the actual score value in JumpOverGoomba.cs is not reset, resulting in the score being 2 after we reset the game and jump over Goomba for the second time. To fix this, you need to somehow refer to score in JumpOverGoomba.
    public JumpOverGoomba jumpOverGoomba;

    public void ResetGame()
    {
        // reset position
        marioBody.transform.position = new Vector3(-5.33f, -4.69f, 0.0f);
        // reset sprite direction
        faceRightState = true;
        marioSprite.flipX = false;
        // reset score
        scoreText.text = "Score: 0";
        // reset Goomba
        foreach (Transform eachChild in enemies.transform)
        {
            eachChild.localPosition = eachChild.GetComponent<EnemyMovement>().startPosition;
        }
        // reset score
        jumpOverGoomba.score = 0;
    }
Link up JumpOverGoomba in Mario's PlayerMovement inspector. You should see the score being reset properly:
Script Execution Order
We have three scripts in the scene so far: PlayerMovement.cs, JumpOverGoomba.cs, and EnemyMovement.cs. We can tell Unity which scripts to execute first, that is Unity will call the Awake() functions it needs to invoke in the order that you want, and then repeatedly call Update() in the same order.
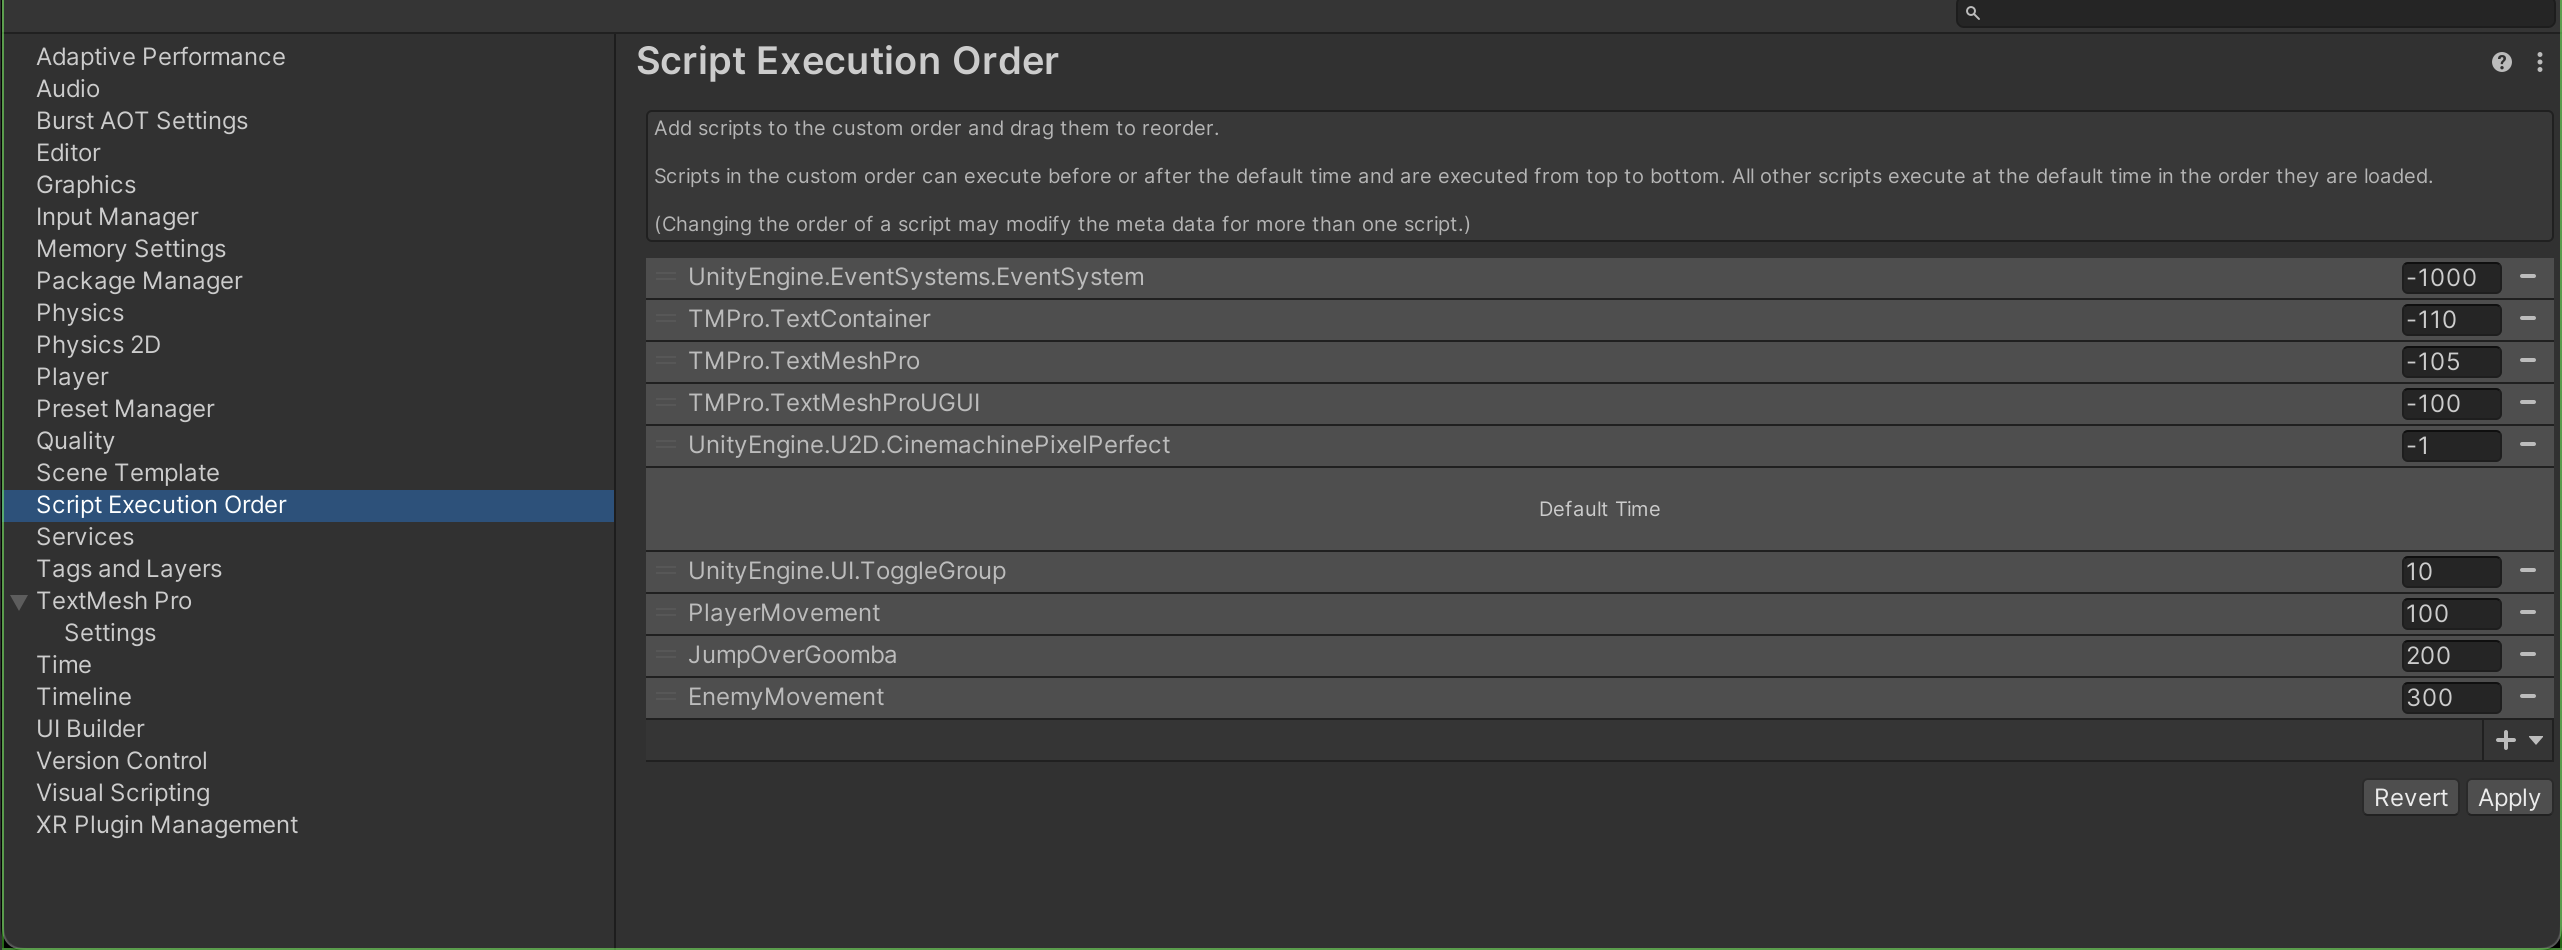
Go to Edit » Project Settings then select the Script Execution Order category. You may choose to add any script you want and define its order of execution (higher number means it will be run later, you can use any positive integer. Unity will only care about its relative value).
In the screenshot below, we want the PlayerMovement script to be run first before the other two.
Unity is single threaded, but you do not want to rely too much on script execution order to ensure consistency in your output. Use it for simple things like reducing unnecessary computation (e.g: run a particular check before heavy computation first), or dependent components (e.g: GameObject A must be initialised before GameObject B).