Super Mario Bros

Yes, this classic game. Who doesn't know this game? Mario, our favourite plumber!
The overarching goal of our labs is to recreate basics this classic platform game: Super Mario Bros step by step while learning Unity's features along the way. We will try to rebuild World 1-1 as closely as possible, although due to constraints of time, some features may be omitted. We then discuss a few technical details in depth: such as game and asset management, events, and callbacks.
If you've never played this game before, give it a try before proceeding.
The lab handout uses Super Mario Bros as assets to demonstrate certain Unity features and functionalities. You are free to follow along and submit it for checkoff, OR you can also create an entirely new project to demonstrate the requested feature(s).
The requirement(s) for the lab checkoff can be found here.
Unity Basics: The Scene
GameObject
Everything you see on the game scene is a GameObject. It is the base class of all entities in the Unity Scene.
Let’s add Mario to the scene. Right click in the Hierarchy tab and create a 2D Object with Sprite component (doesn't matter which shape you select). Change its name to “Mario”. Right now Mario doesn't seem like much. We need to do these later:
- Add Mario Sprite (image) to it, so it looks like Mario
- Control it (move it around): left, right, jump, down (enter pipe)
- Add some basic animations and sound effects
Camera
Every scene has one Main Camera. The Main Camera renders what the player "see" in the Game window. If you place Mario GameObject at Position (0,0,0), the Camera can "see" it if it's placed at some Z-distance away from Mario, as follows:
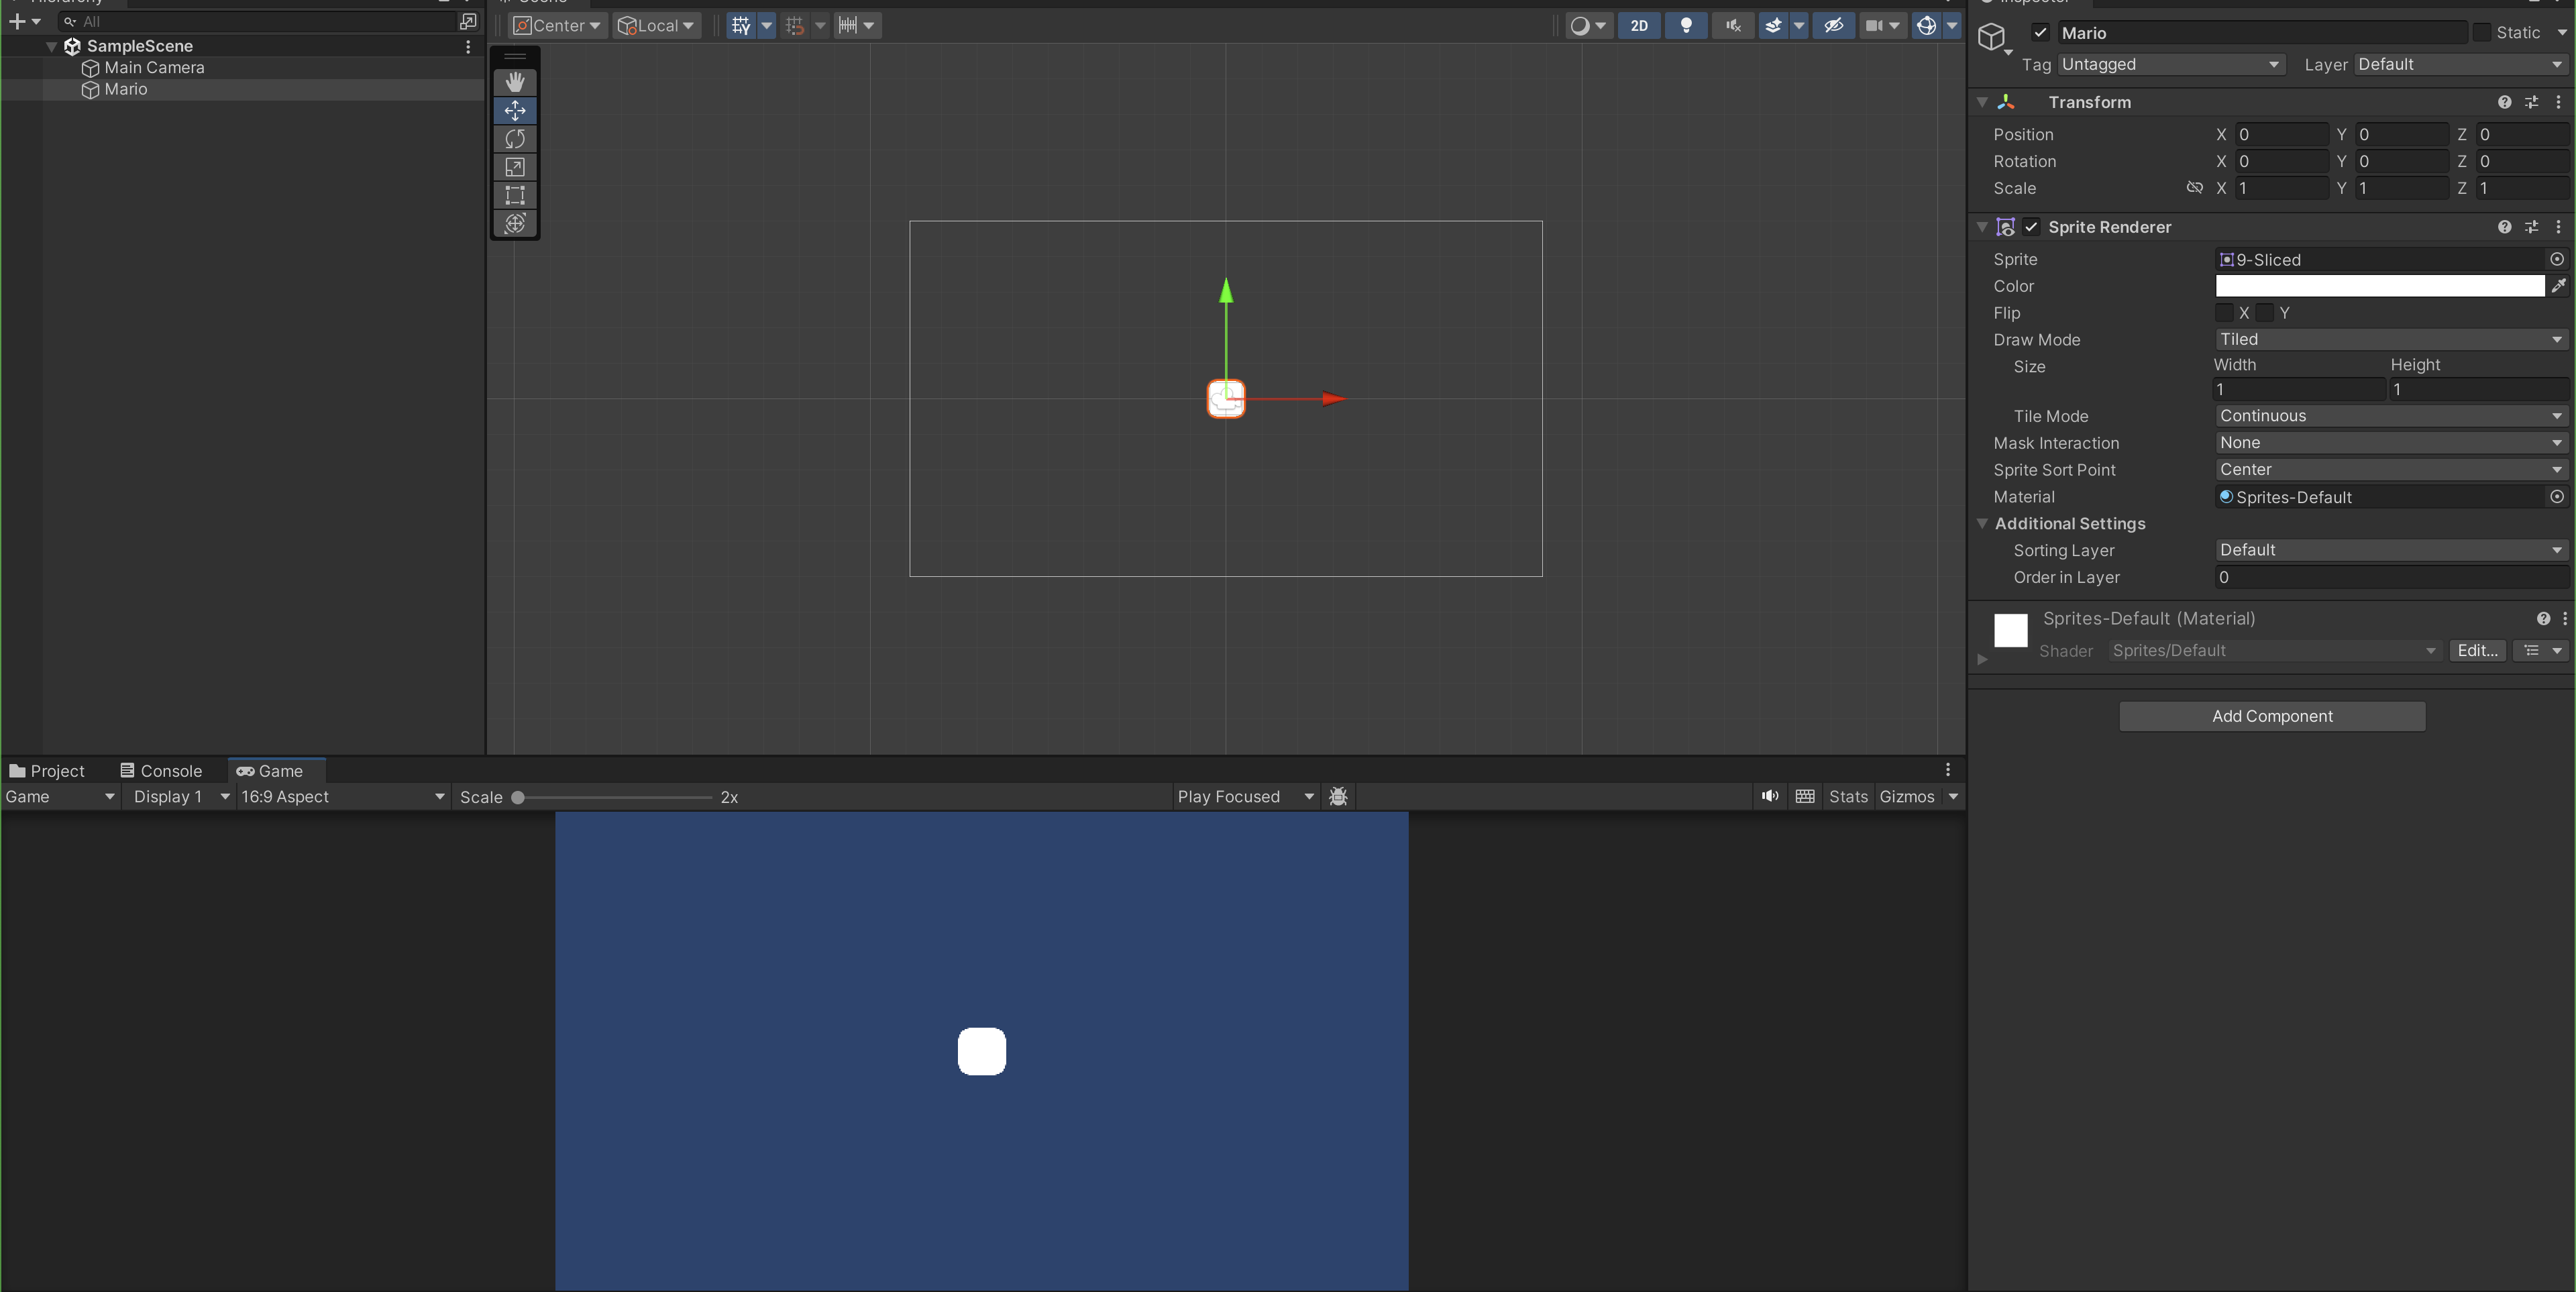
You can move the x, and y Transform Position of Mario GameObject and notice how the view at the Game window changes.
Toggle the 2D to 3D view in the Scene and familiarise yourself with navigation around the Scene. This is your Game World.
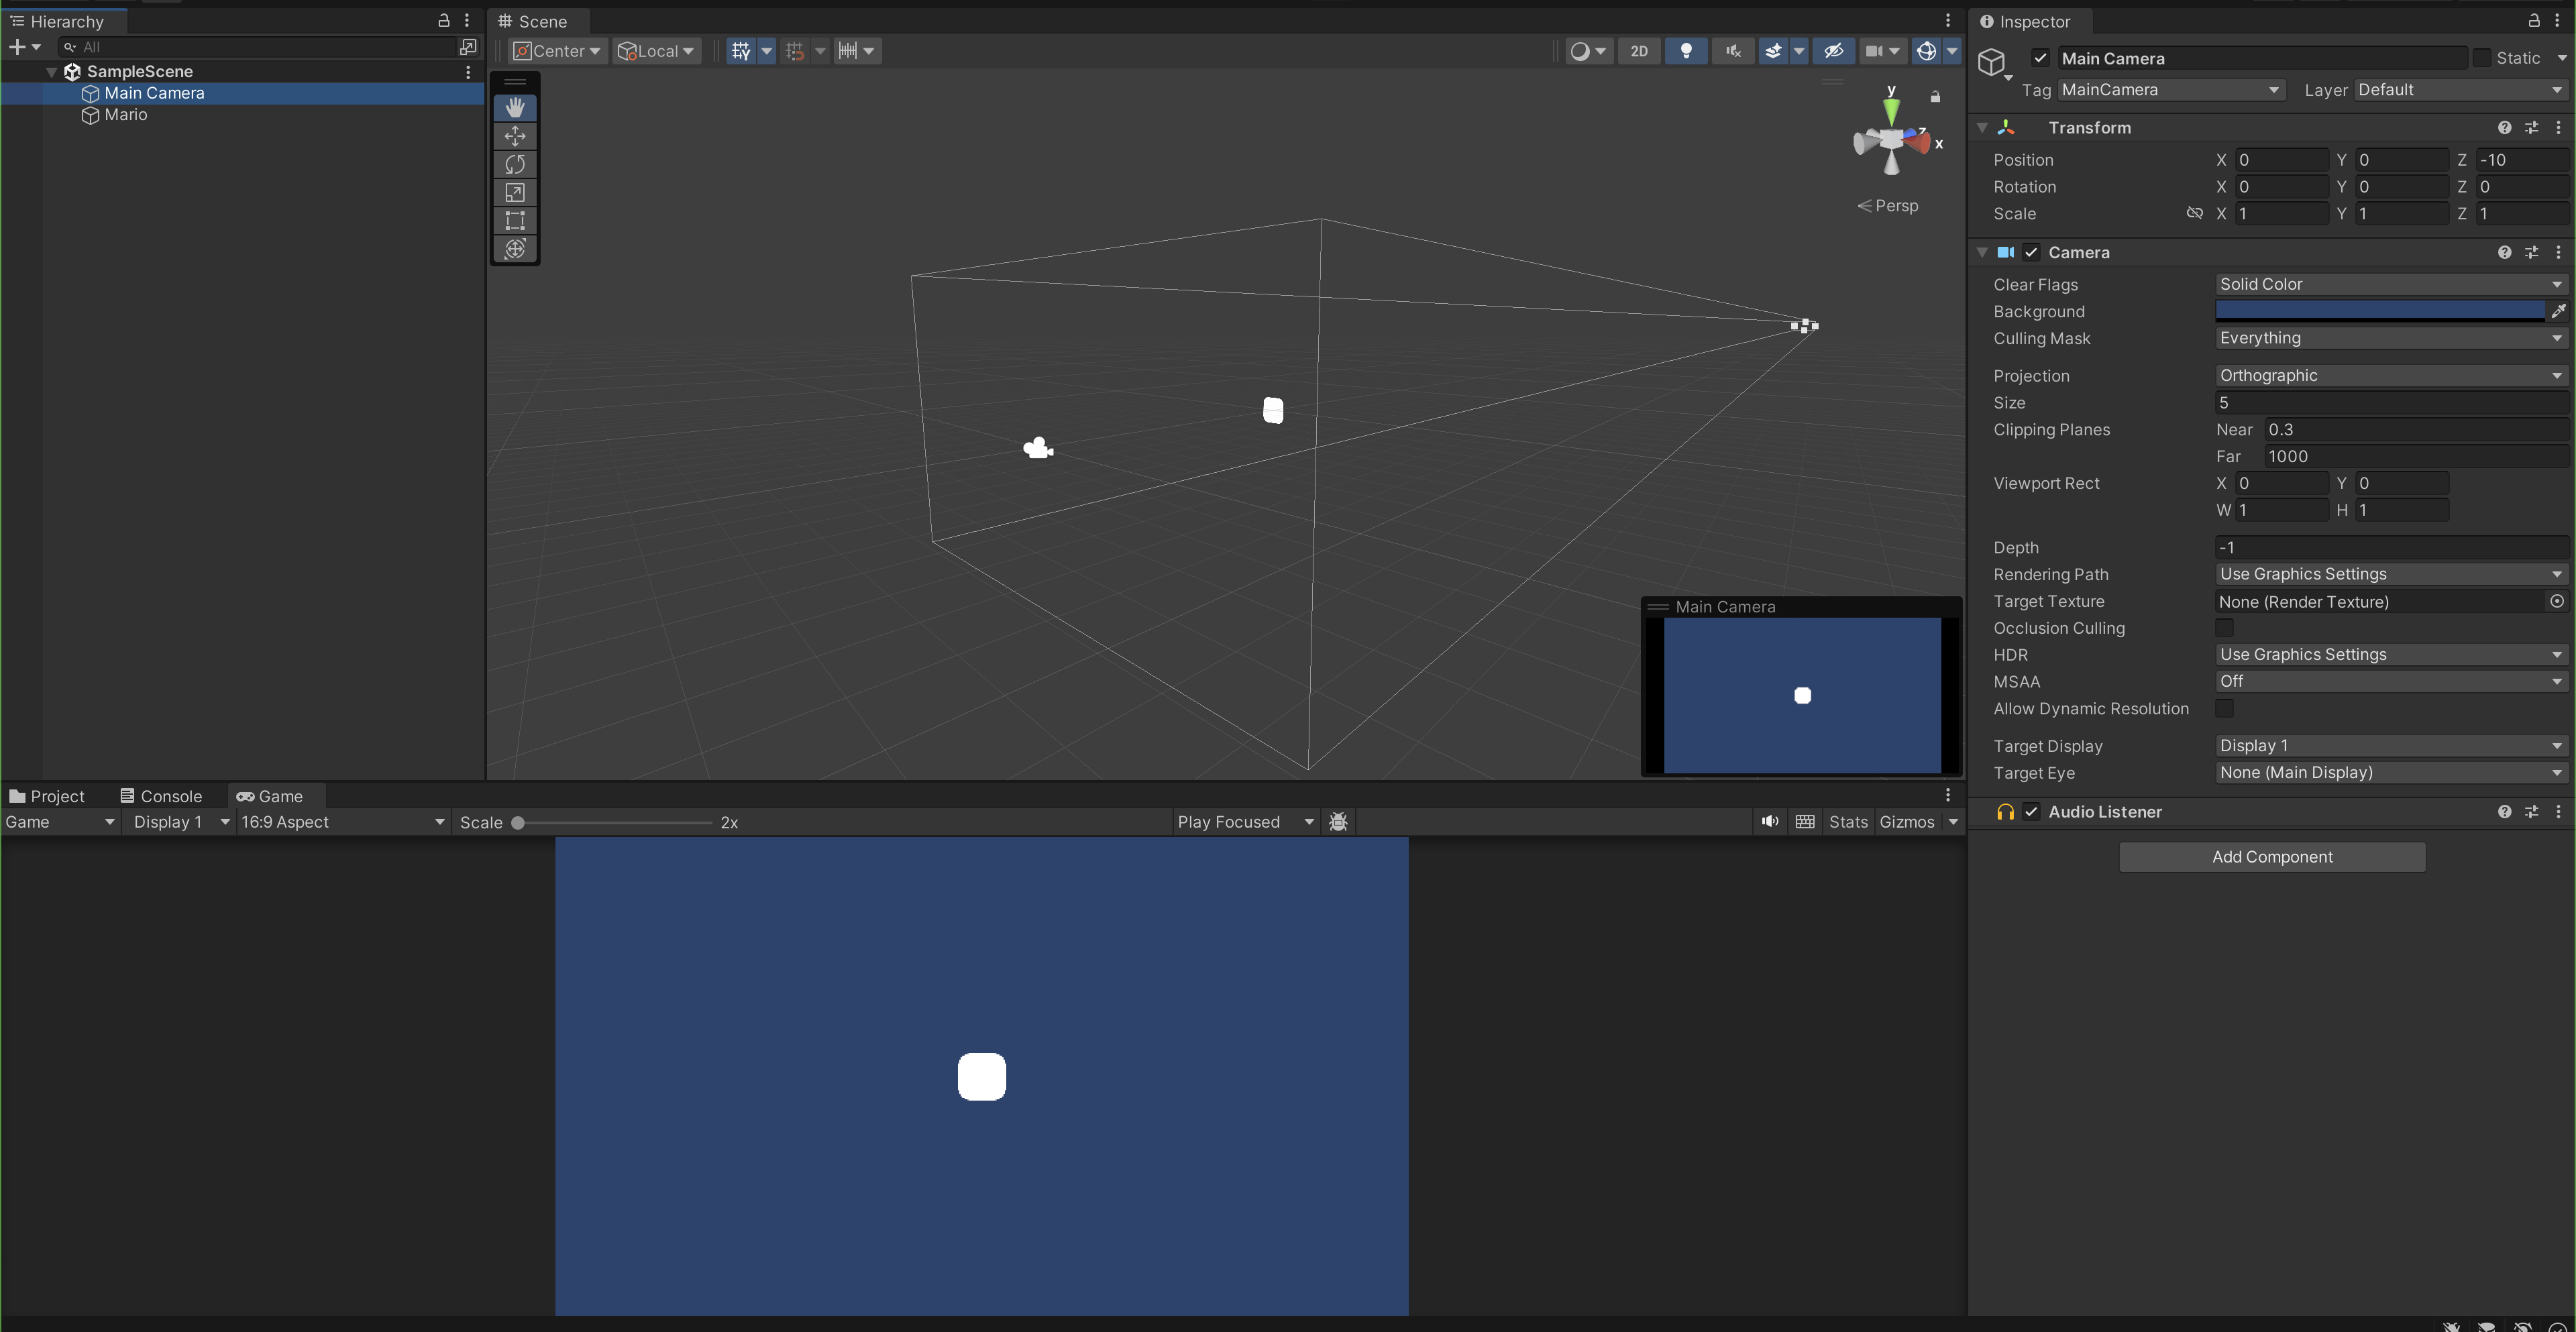
Notice that over at the Inspector Area, there are three components attached at the MainCamera GameObject: Transform (to place the object in the Scene), Camera, and Audio Listener. The title pretty much explains itself.
Background
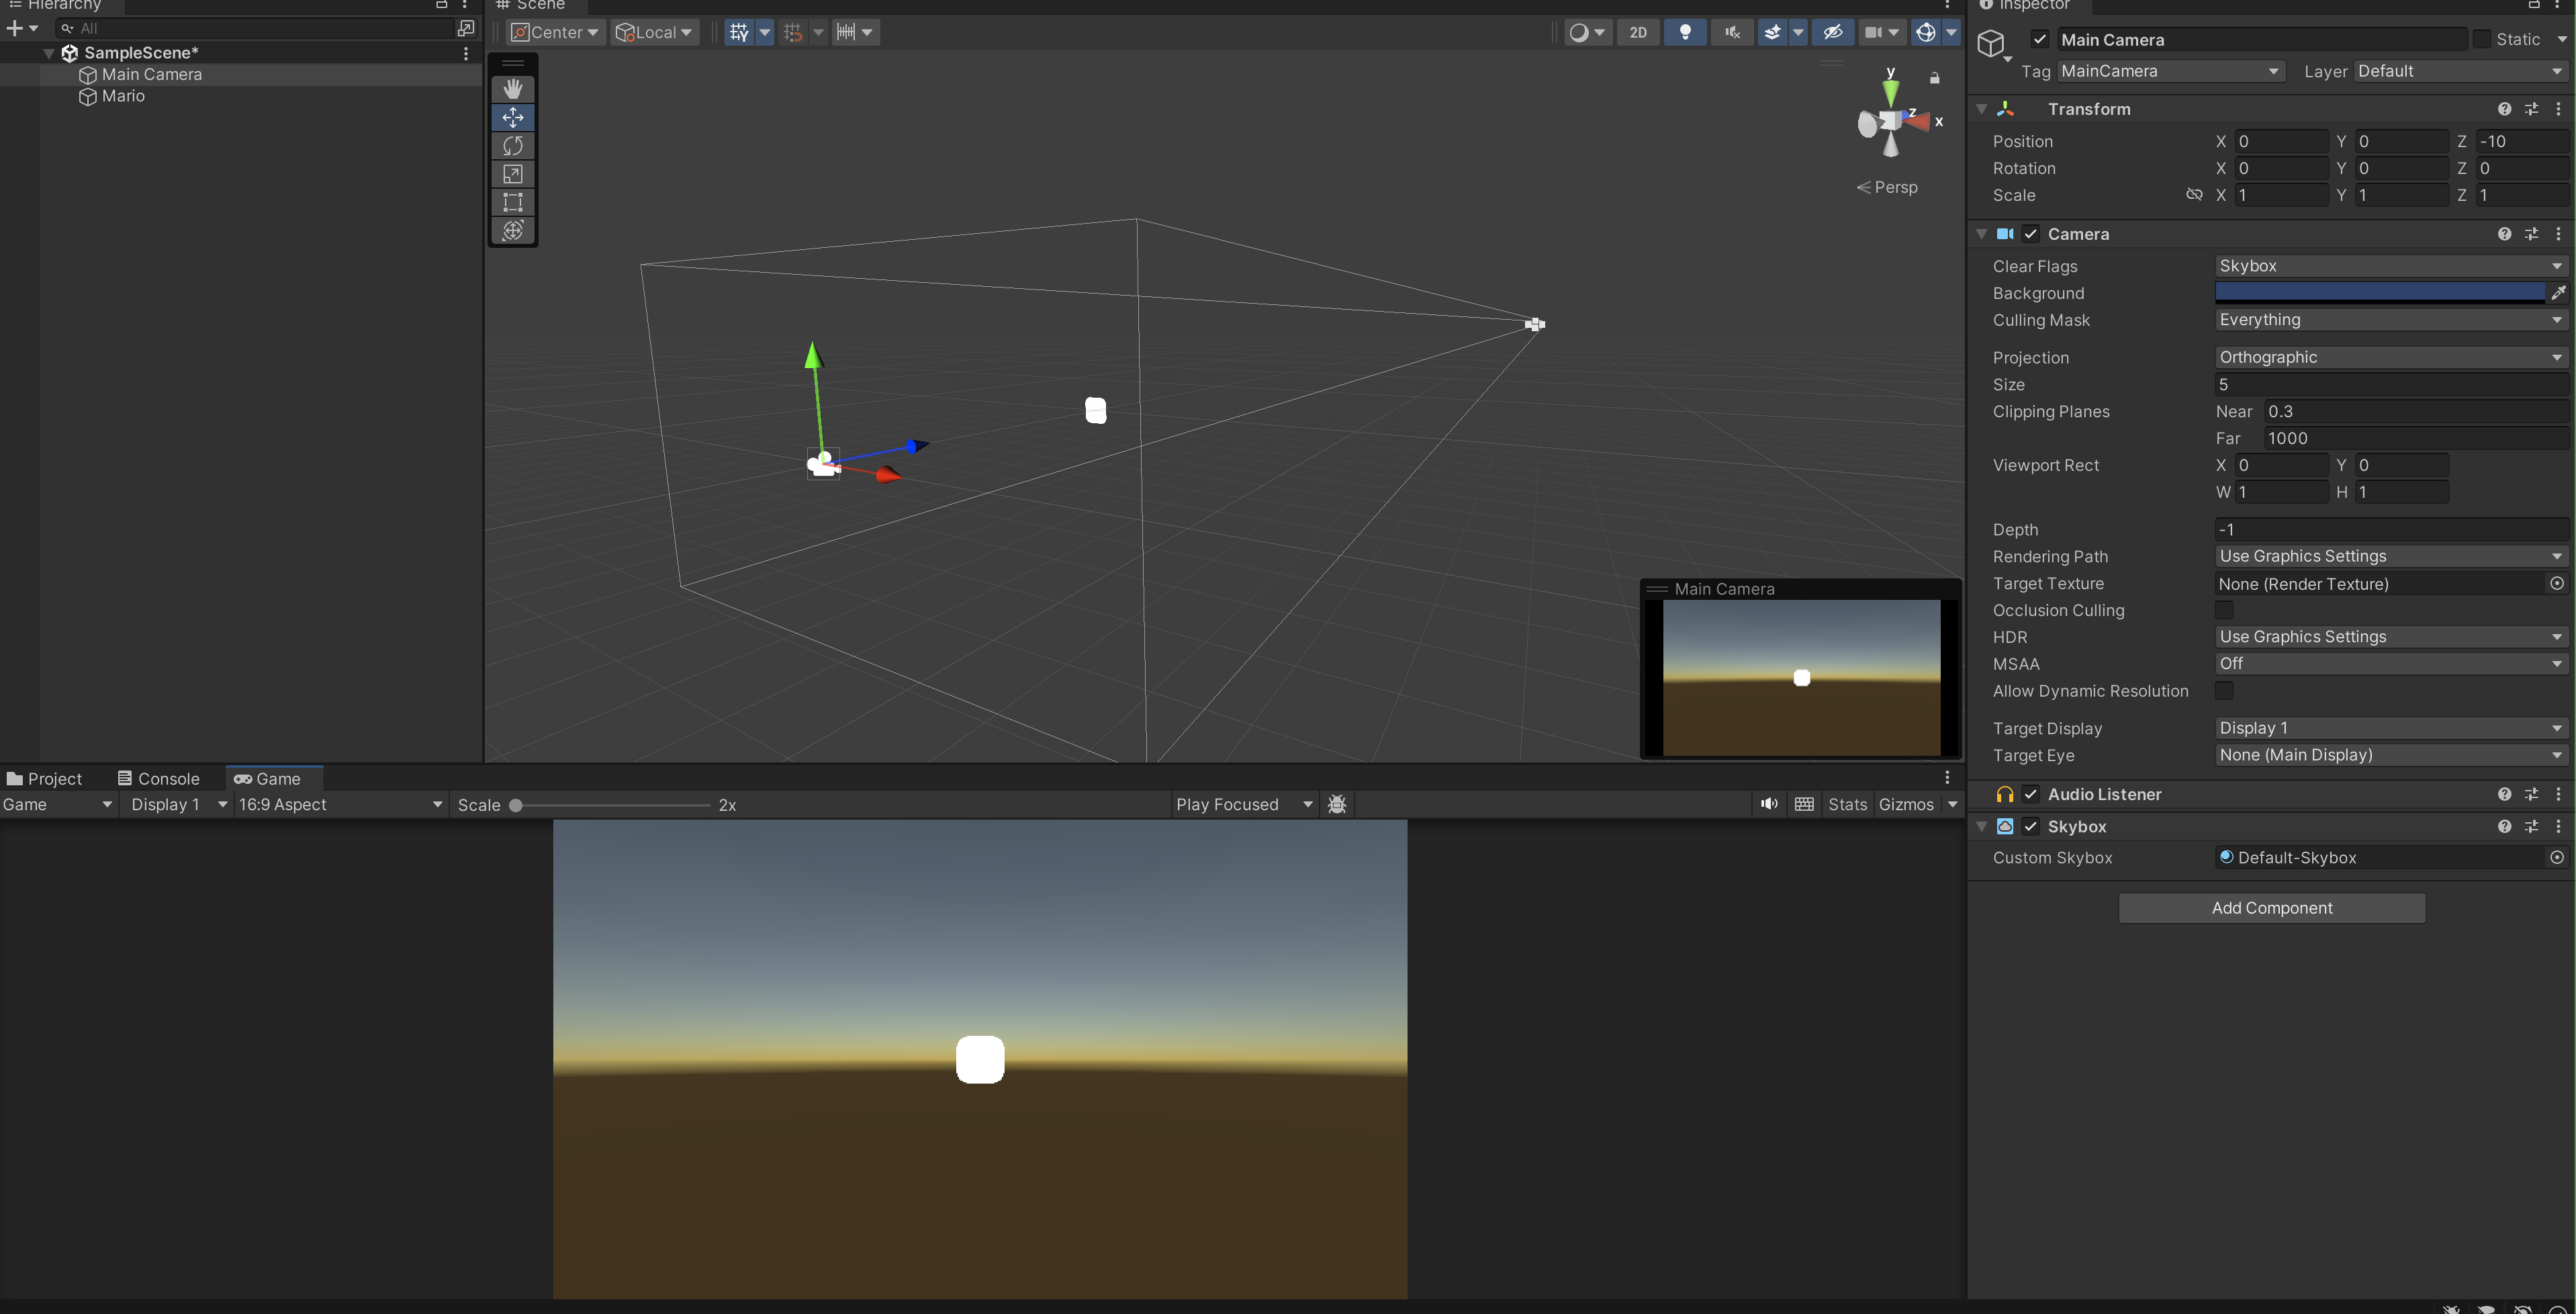
Right now we only have one "Mario" GameObject in the scene and that's what the Game window shows. The blue color comes from the Background property of the Camera. You can set it to any other solid color if you want, or a Skybox.
A skybox is a cube with a different texture on each face. When you use a skybox to render a sky, Unity essentially places your Scene inside the skybox cube. Unity renders the skybox first, so the sky always renders at the back. Read more about it here.
Projection
There are two types of camera projection: Orthographic and Perspective, the name explains itself. Since we are working with a 2D side-scrolling platform game for these labs, we stick with orthographic projection.
Game Window
It is worth noting that you might want to set the Game aspect ratio under the Game tab.
- Click the drag-down menu as shown and select the option that you’re most comfortable with.
- E.g: selecting “Free Aspect” means that your window size will affect the camera “view”.
Mario Sprite
Open Assets >> Sprites and notice that we have provided you with various spritesheets: characters, enemies, mario, misc-3, and title.
A sprite sheet is a bitmap image file that contains several smaller graphics in a tiled grid arrangement.
Now click on Mario's sprite, change its Sprite Mode to Multiple, and launch the Sprite Editor. Notice that the sprites are blurry. Go back to the inspector and change the Filter Mode to Point (no filter) to disable smoothing and get clean edges for the sprites. This is something to keep in mind when you work with pixel art.
Afterwards, in the Sprite Editor, you can define sections of the sprite that you want manually, or automatically. In the case of our Mario sprite, they're not placed in regular spacing, so slicing them automatically will not work. We need to manually slice each Sprite as such:
Yes, it's tedious. Don't worry, we will give you pre-sliced sprites later.
Setting up Inputs
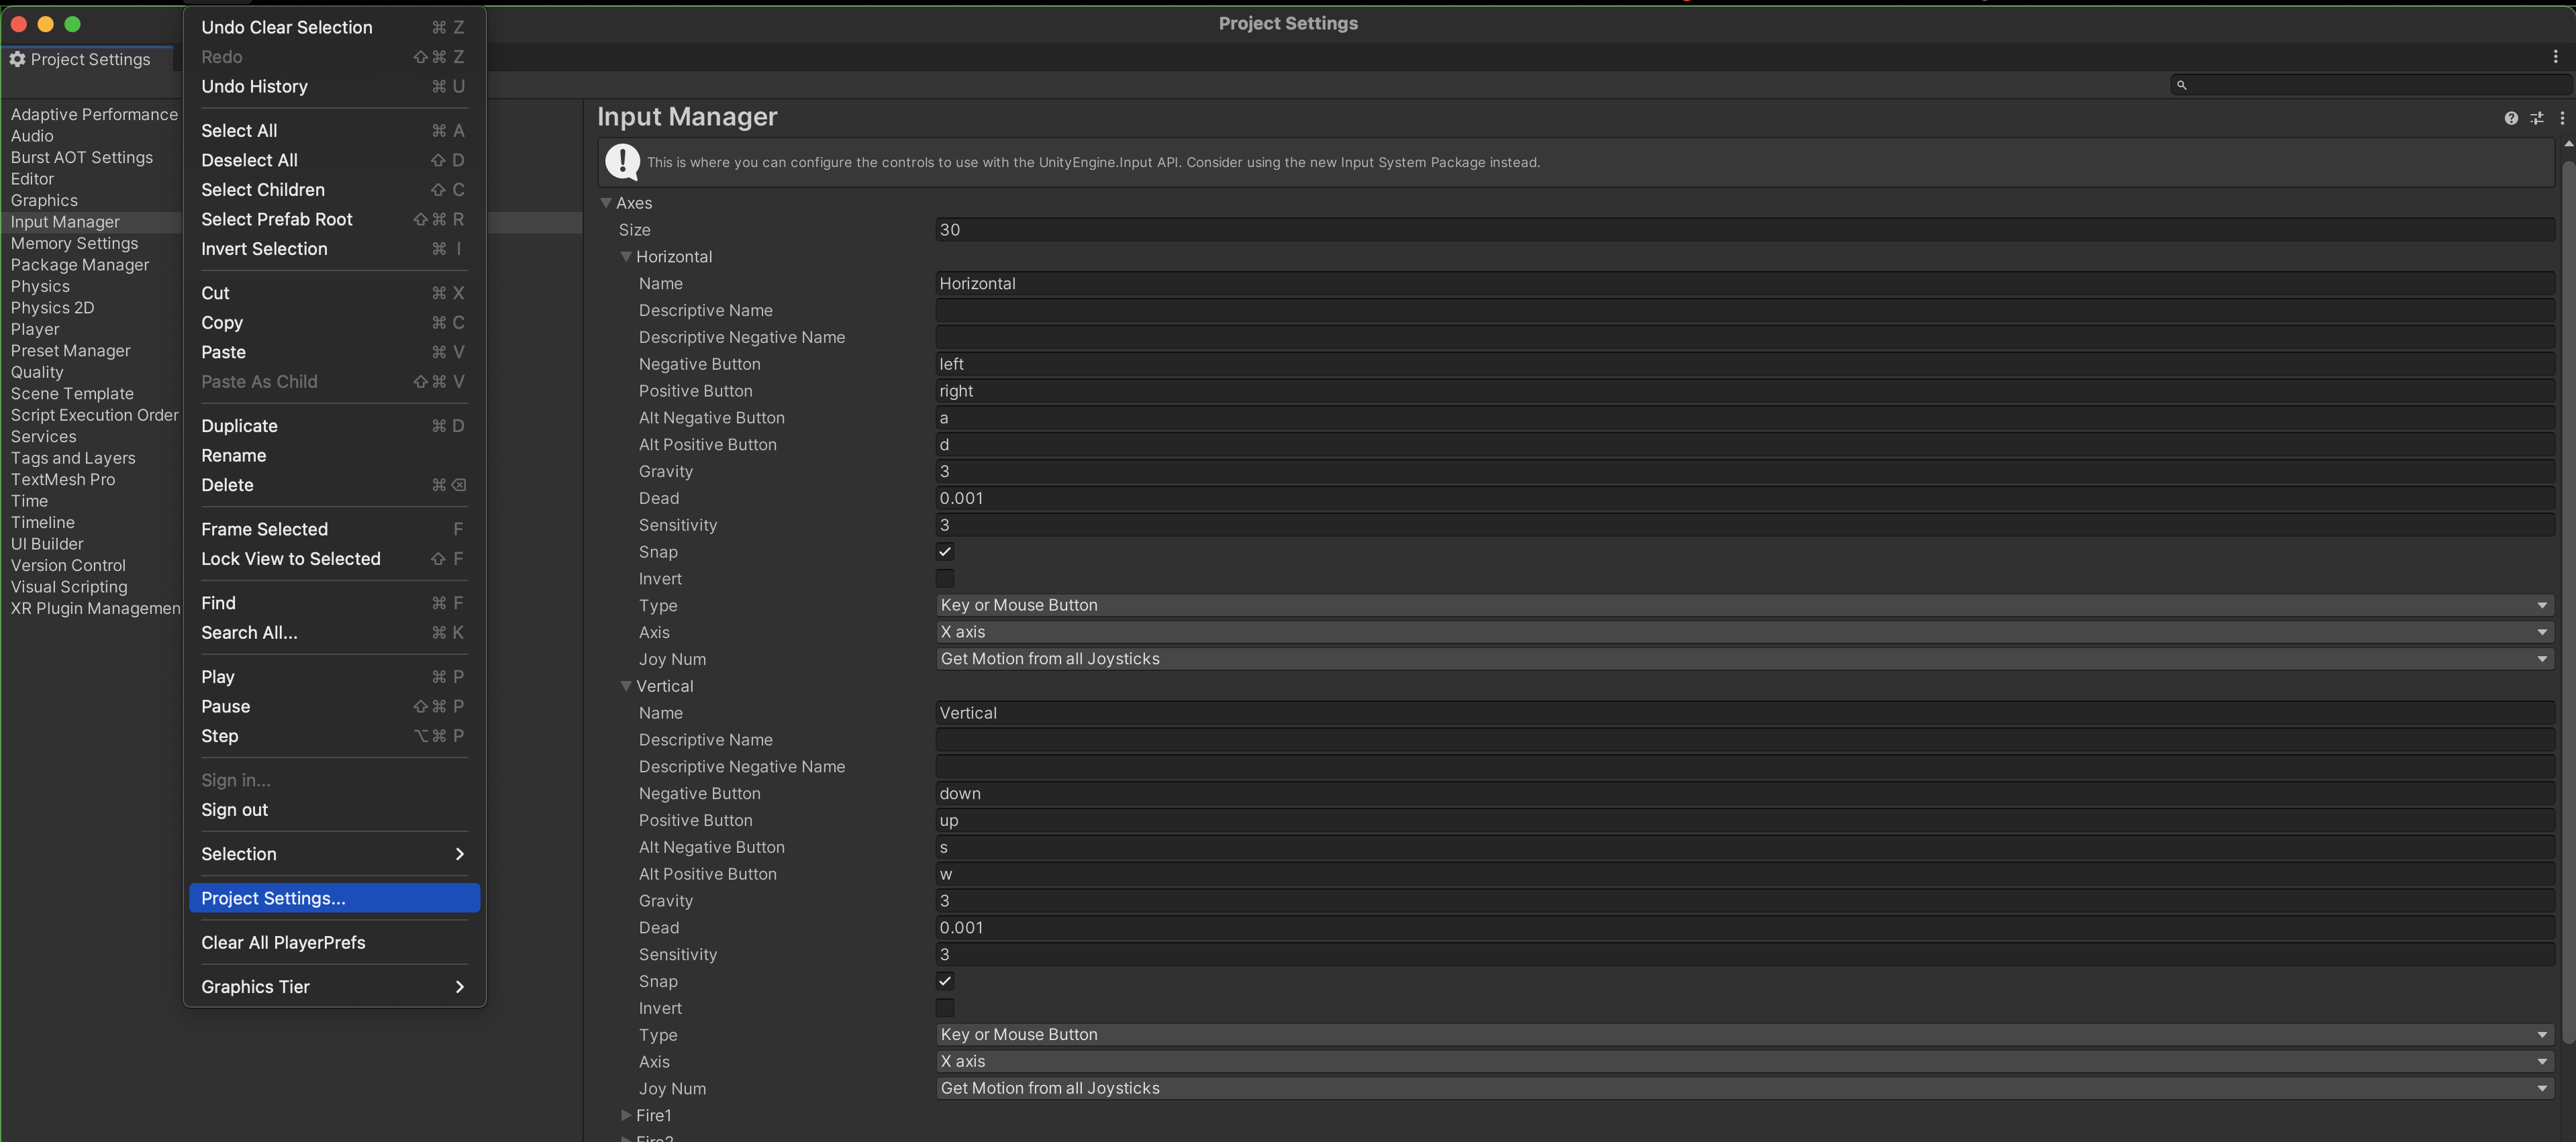
Go to Edit >> Project Settings and click on Input Manager.
We want to test if we can control the movement of Mario using the keys a and d for movement to the left and right respectively.
- Check if the setting of “horizontal” axis is correct as per the screenshot below.
- You can also add your own key bindings here and give it your own name.
- Later in the script, you can decide what to do if a certain named key is pressed.
Scripting
Creating a Script
Right click inside the Scripts folder in the Project window, create a new C# script PlayerMovement.cs. Here we will programmatically control Mario. Open the script with an editor of your choice.
Here, we use VSCode.
You will see that there are two methods pre-made for you: Start and Update, and that your instance inherits MonoBehaviour:
using System.Collections;
using System.Collections.Generic;
using UnityEngine;

public class PlayerMovement : MonoBehaviour
{
    // Start is called before the first frame update
    void Start()
    {

    }

    // Update is called once per frame
    void Update()
    {

    }
}
Unity Order Execution of Event Functions.
We can implement the event functions in the script that’s attached to a particular GameObject. Notice that in the script we created,
- It inherits from MonoBehaviour, the base class from which every Unity script derives. It offers some life cycle functions that make it easier for us to manage our game.
- It comes with two starting functions for you to implement if you want:
Start()andUpdate().
Start() is always called once in the beginning when the GameObject is instantiated, and then Update() is called per frame. This is where you want to implement your game logic. The diagram below shows the order of execution of event functions.
These event functions run on a single Unity main thread. Please read the official documentation.
Usually we don’t implement all of them. One of the more common ones to implement are: Start, Update, FixedUpdate, LateUpdate, OnTrigger, OnCollision, OnMouse, OnDestroy, and some internal animation state machines if you use AnimationControllers. We will learn that in the next series.
Unity 2D Physics Engine
Move Mario
Let's attempt to move Mario via the script. Firstly, Add Rigidbody2D component in the Inspector and set:
Gravity Scaleto0,Linear Dampingto3BodyTypetoDynamic
We can then control this component from the script. Add the following code inside PlayerMovement.cs:
using System.Collections;
using System.Collections.Generic;
using UnityEngine;

public class PlayerMovement : MonoBehaviour
{
    public float speed = 10;
    private Rigidbody2D marioBody;

    // Start is called before the first frame update
    void Start()
    {
        // Set to be 30 FPS
        Application.targetFrameRate =  30;
        marioBody = GetComponent<Rigidbody2D>();

    }

    // Update is called once per frame
    void Update()
    {

    }

    // FixedUpdate is called 50 times a second
    void  FixedUpdate()
    {
        float moveHorizontal = Input.GetAxisRaw("Horizontal");
        Vector2 movement = new Vector2(moveHorizontal, 0);
        marioBody.AddForce(movement * speed);
    }
}
Add the script to Mario: Add Component >> Script >> PlayerMovement.
You can test run that now Mario can be moved to the left and to the right using the keys “a” and “d” respectively. You can change the value of speed in Mario's Inspector under Script component.
However, this may not feel quite right. We will fix this later but first, let's learn about Unity event functions.
RigidBody2D Setting
The problem: Mario seems to be sliding. We would expect him to stop the moment we lift the key, wouldn’t we?
Setting the BodyType to Dynamic allows the physics engine to simulate forces, collisions, etc on the body. Since we’re adding Force to Mario’s body, it will obviously “glide” until the drag forces it to stop. We need to fix this.
Setting BodyType to
Kinematicallows movement under simulation but under very specific user control, that is you want to compute its behavior yourself: simulating Physics under your own rule instead of relying on Unity's Physics engine. Read the documentation here.
Stop Mario
To prevent this “sliding” feature that’s not very intuitive for platform game like this, we need to
- Reduce Mario's velocity as much as possible, even near
0when key “a” or “d” is lifted up - Clamp his speed to a maximum value so he doesn’t run faster and faster when we hold that “a” or “d” button.
Add the global variable maxSpeed and implement FixedUpdate() in PlayerMovement.cs.
You might see Mario not stop when lifting "a" or "d". This is because Input.GetKeyUp is in FixedUpdate, which may not run on every frame and cause the input event to be missed. We will go through this in the lab review.
    public float maxSpeed = 20;

    // FixedUpdate may be called once per frame. See documentation for details.
    void FixedUpdate()
    {
        float moveHorizontal = Input.GetAxisRaw("Horizontal");

        if (Mathf.Abs(moveHorizontal) > 0){
            Vector2 movement = new Vector2(moveHorizontal, 0);
            // check if it doesn't go beyond maxSpeed
            if (marioBody.linearVelocity.magnitude < maxSpeed)
                    marioBody.AddForce(movement * speed);
        }

        // stop
        if (Input.GetKeyUp("a") || Input.GetKeyUp("d")){
            // stop
            marioBody.linearVelocity = Vector2.zero;
        }
  }
Make Mario Jump
Let’s make him jump to a fixed height whenever we press the Spacebar key once. We can leverage on the physics engine for this, but we need to enable gravity. Otherwise, we have to make the Kinematics computation ourselves.
Nobody’s stopping you to do that, but due to time constraints let’s not reinvent the wheel.
Enable Gravity
In Mario's Inspector, set RigidBody2D property GravityScale to 1.
If you press play now, Mario will fall to oblivion.
Collider2D
We need to add some sort of a “floor” to prevent him from falling down (via collision). A GameObject will not collide with each other unless they have the Collider component attacked to it.
-
Create a new 2D Sprite GameObject and name it Ground.
-
Add
BoxCollider2Dcomponent to it:- Enable
Auto Tilingproperty - This allows the Collider to follow the SpriteRenderer's tiling properties
- Enable
-
Add a
TagcalledGround- Make a new tag by Inspector >> Tag >> Add Tag... >>
+under Tags
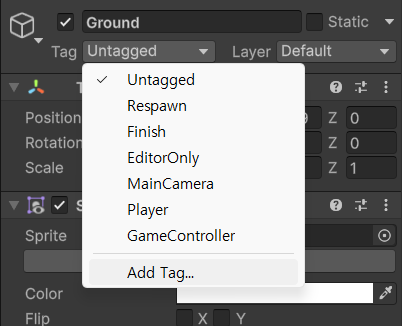
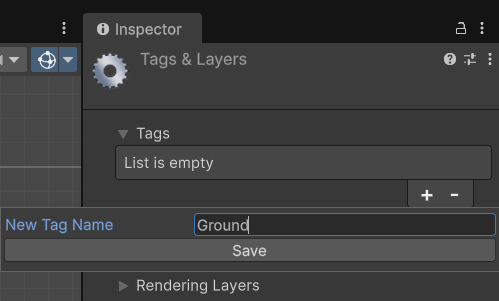
- Make a new tag by Inspector >> Tag >> Add Tag... >>
-
Set its
Transformto:- Rotation (0,0,0)
- Scale (1,1,0)
- Position: Anywhere below y-axis of Mario
Now we want some sort of Ground Sprite first, so you can go and edit misc-3 Sprite and extract a little Ground sprite from it. Name it "Ground Brown". Then, set the following properties on misc-3 Texture:
When we drag .png files into
Assets/Spritefolder, it is automatically converted into Textures. We will learn more about it later, but give the docs a read. TheWrap Modeproperty allows us to automatically "repeat" the ground tiles as we scale the Ground GameObject.
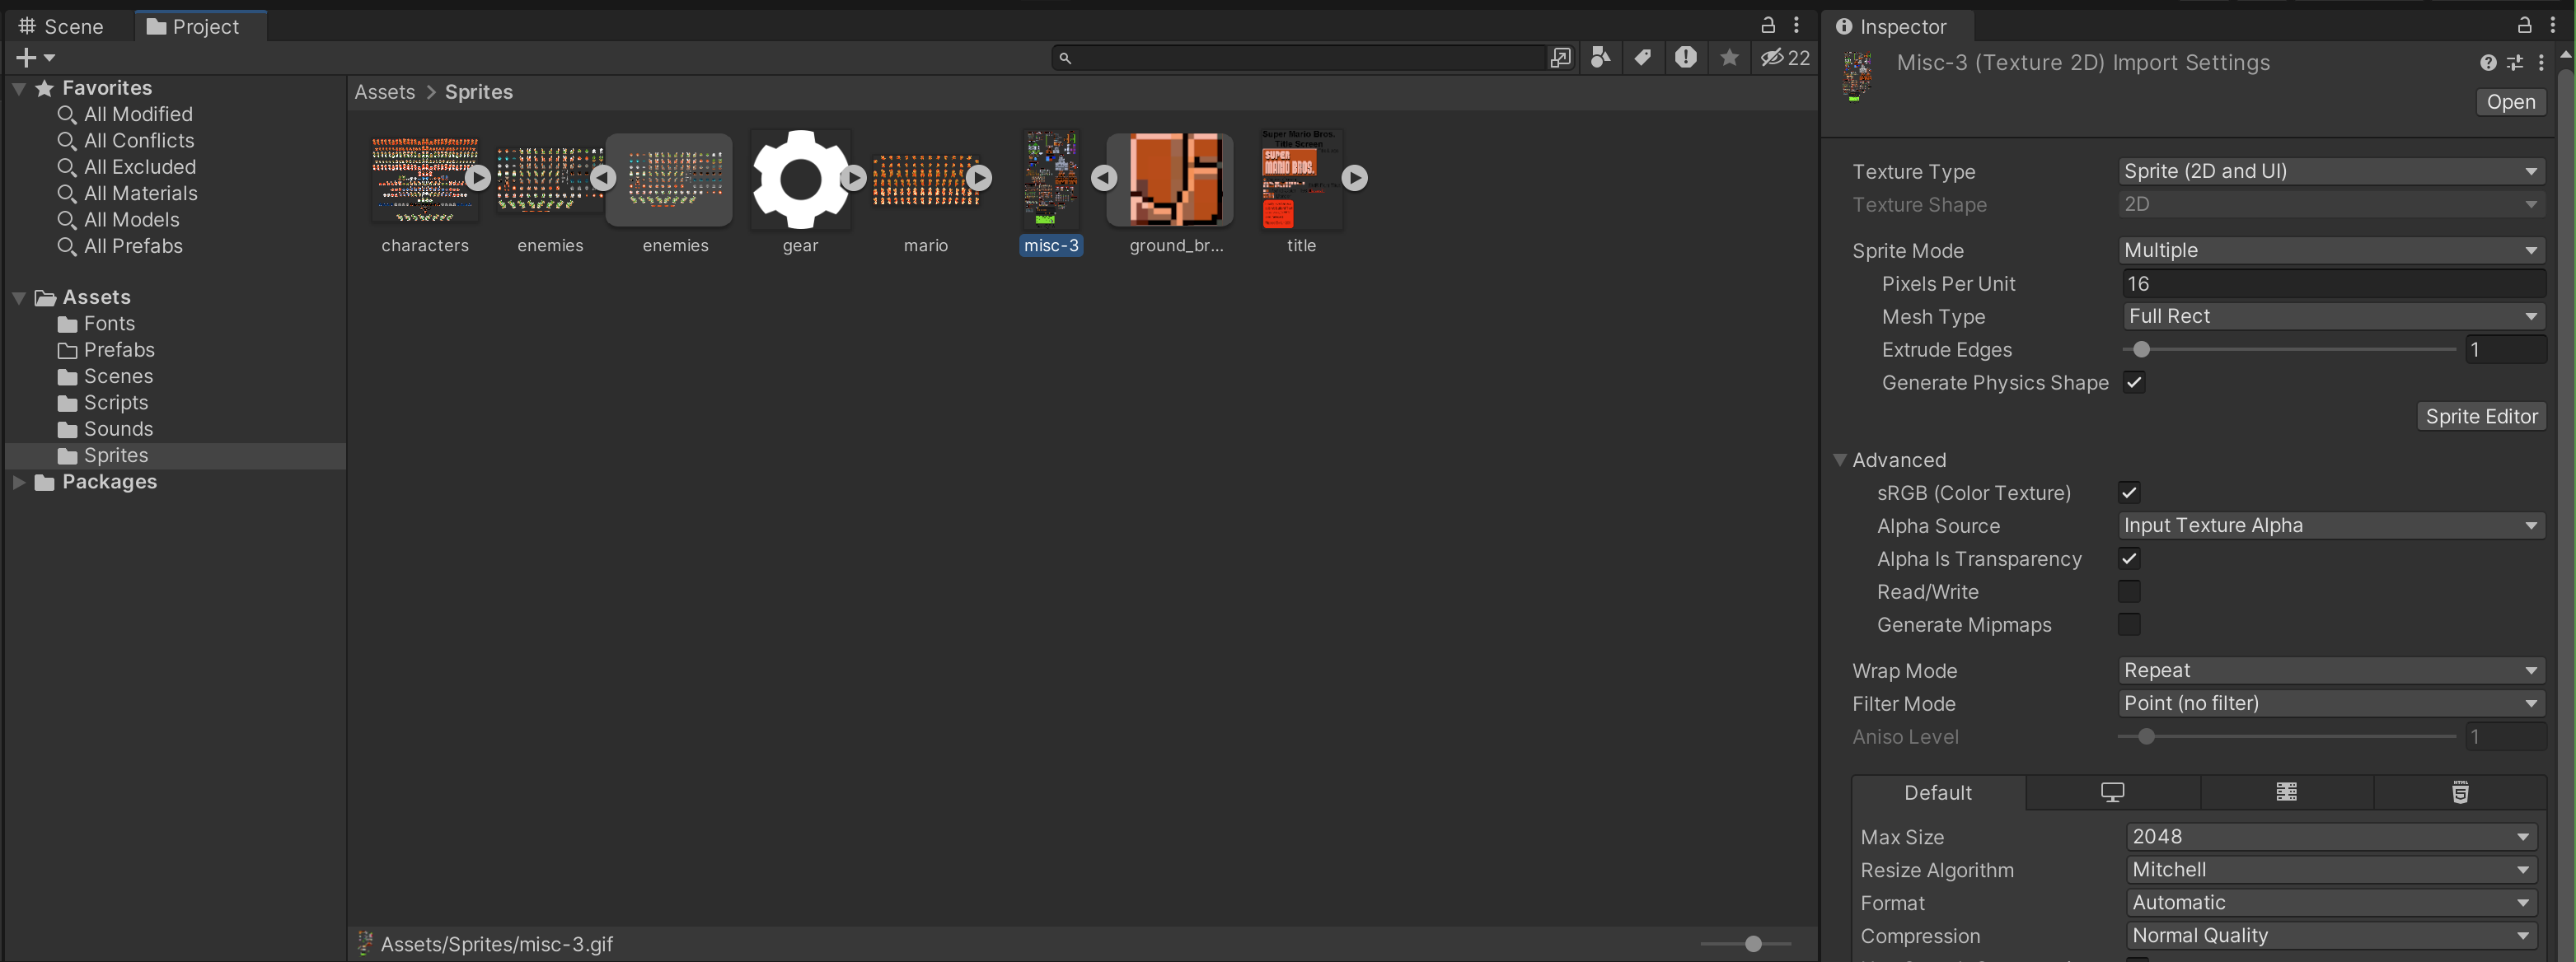
Go back to the Sprite Renderer component of Ground GameObject, and set the following properties:
- Draw Mode:
Tiled - Size: Width of
20
Use the Size property of Sprite Renderer if you want to adjust the Ground's width or height. Do NOT use Transform's scale. Otherwise, the Collider2D will not be able to properly tell the boundaries of the GameObject.
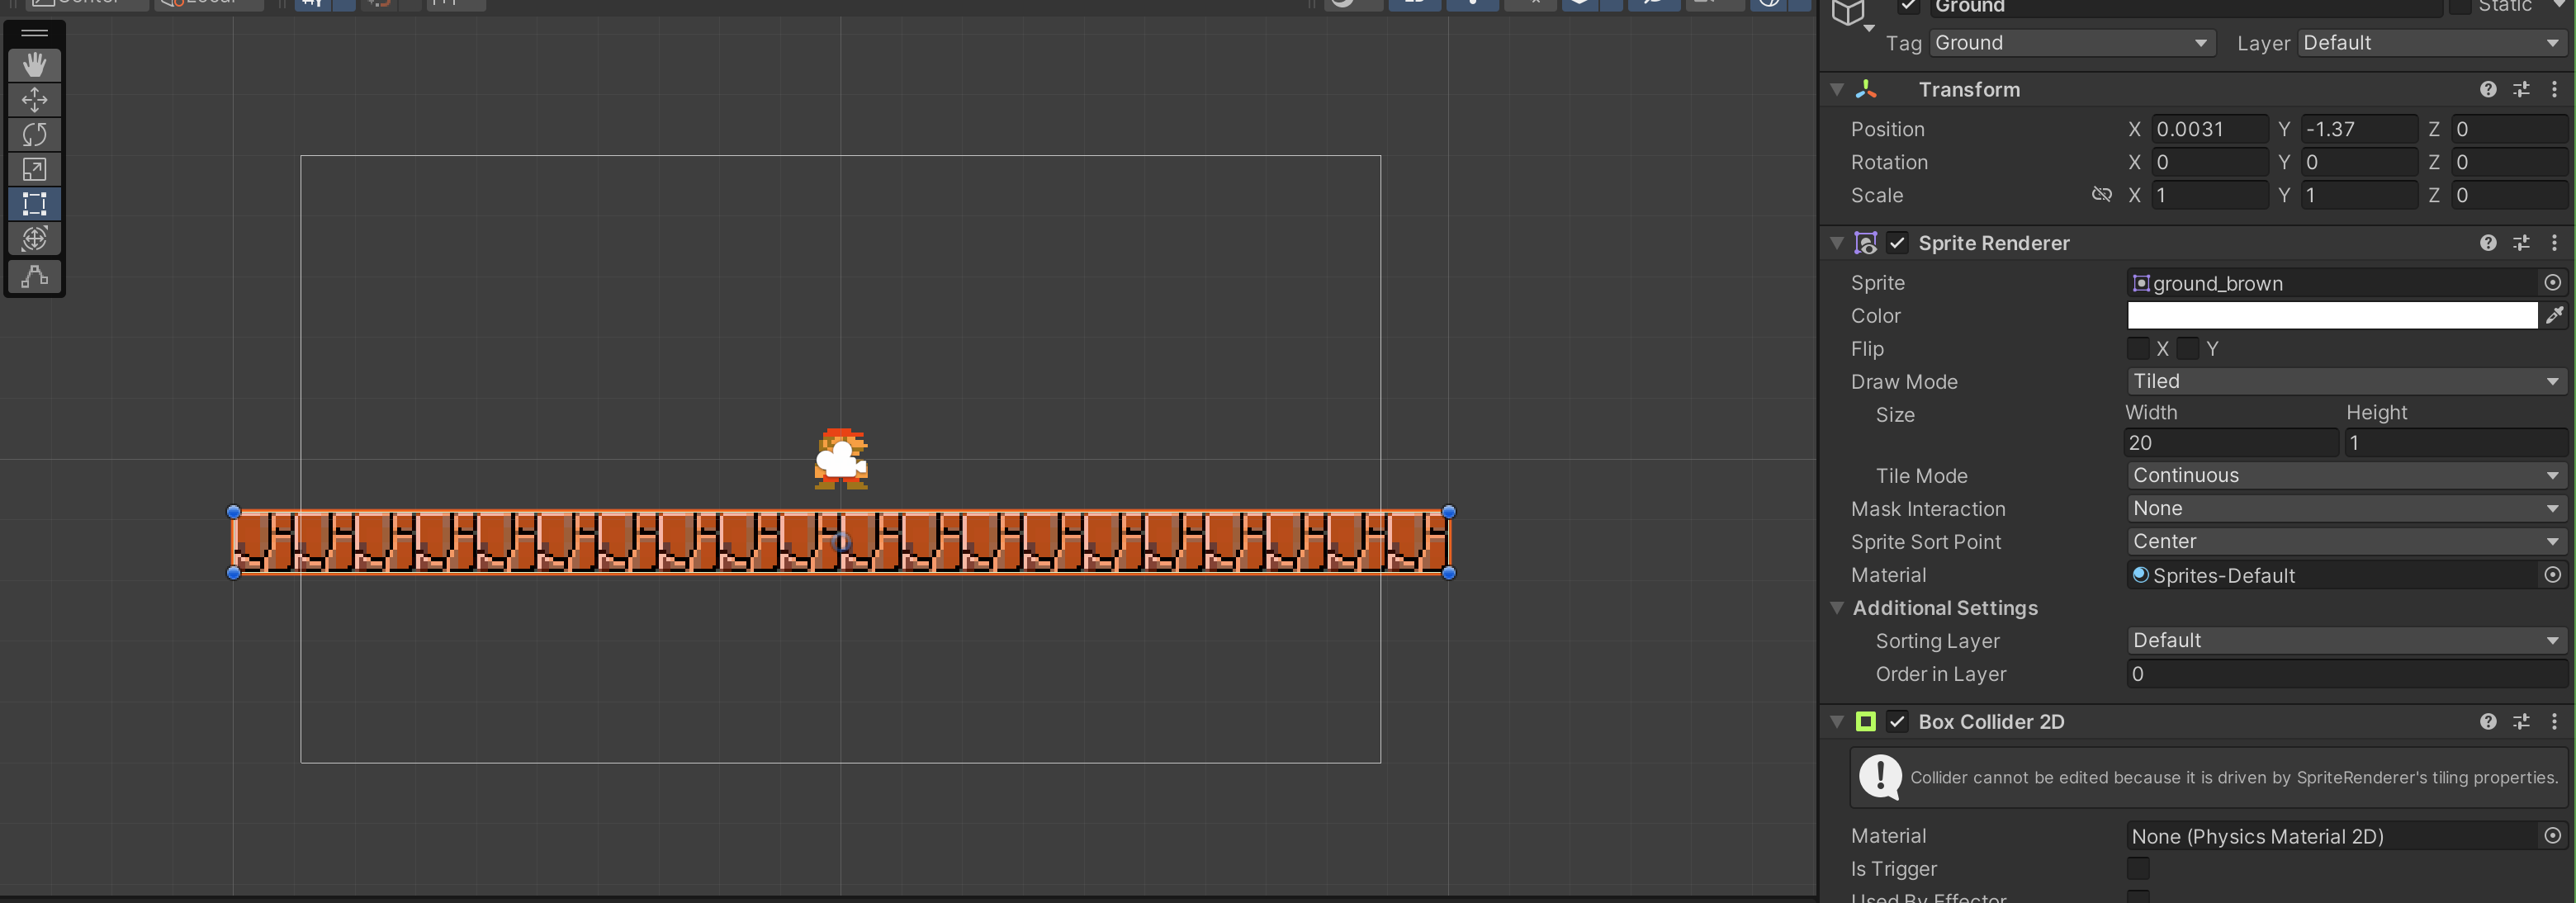
Finally, also add a BoxCollider2D to Mario so that they can "collide" and prevents him from falling to oblivion. You can press Edit Collider in the component of Mario gameobject to adjust the collider edges to match Mario's sprite.
Test it and you should see Mario not falling to oblivion anymore.
OnCollision2D and Double Jump
Now we implement the Collider callback function called OnCollision2D in PlayerMovement.cs. The idea is that if Mario is on the ground, and if spacebar is pressed, we will add an Impulse force upwards. Pressing spacebar again should not cause Mario to double jump.
We need to have some kind of state variable for this, and an upward "speed". Add the following code to PlayerMovement.cs:
  public float upSpeed = 10;
  private bool onGroundState = true;

  void OnCollisionEnter2D(Collision2D col)
  {
      if (col.gameObject.CompareTag("Ground")) onGroundState = true;
  }

  void FixedUpdate()
  {
    // other instructions

    if (Input.GetKeyDown("space") && onGroundState){
        marioBody.AddForce(Vector2.up * upSpeed, ForceMode2D.Impulse);
        onGroundState = false;
    }
  }
Test your jumping Mario. You should have something like this.
You can improve the controls and adjust the parameters: speed, upSpeed, and maxSpeed accordingly to get the right “feel”. It can take quite a lot of time to get the kinesthetics right, but it is an important part of your journey in making a good game.
Focus more on these details instead of “expanding” your game. We don’t require you to create a 1-hour long game, but rather a short and well designed game. Invest your time wisely.
Beautify
The following shows a simple screenshot of World-1-1 of Super Mario Bros. Let's try to recreate a part of it as much as possible before advancing.

We need the following Sprites. You can slowly slice and create them all from misc-3 Sprite:
- Big Hill, small hill
- 3-shrubs, 1-shrub
- 1, 2, and 3 clouds
- Pipe head, pipe body
- Goombas
- Brick
- Question Blocks
- Magic Mushroom
- Coin
- Brick
A Shortcut
You can download the texture metadata from here. Then, paste all these .meta files under Assets/Sprites. Don't forget to set Texture's Mesh Type and Wrap Mode as above to enable tiling.
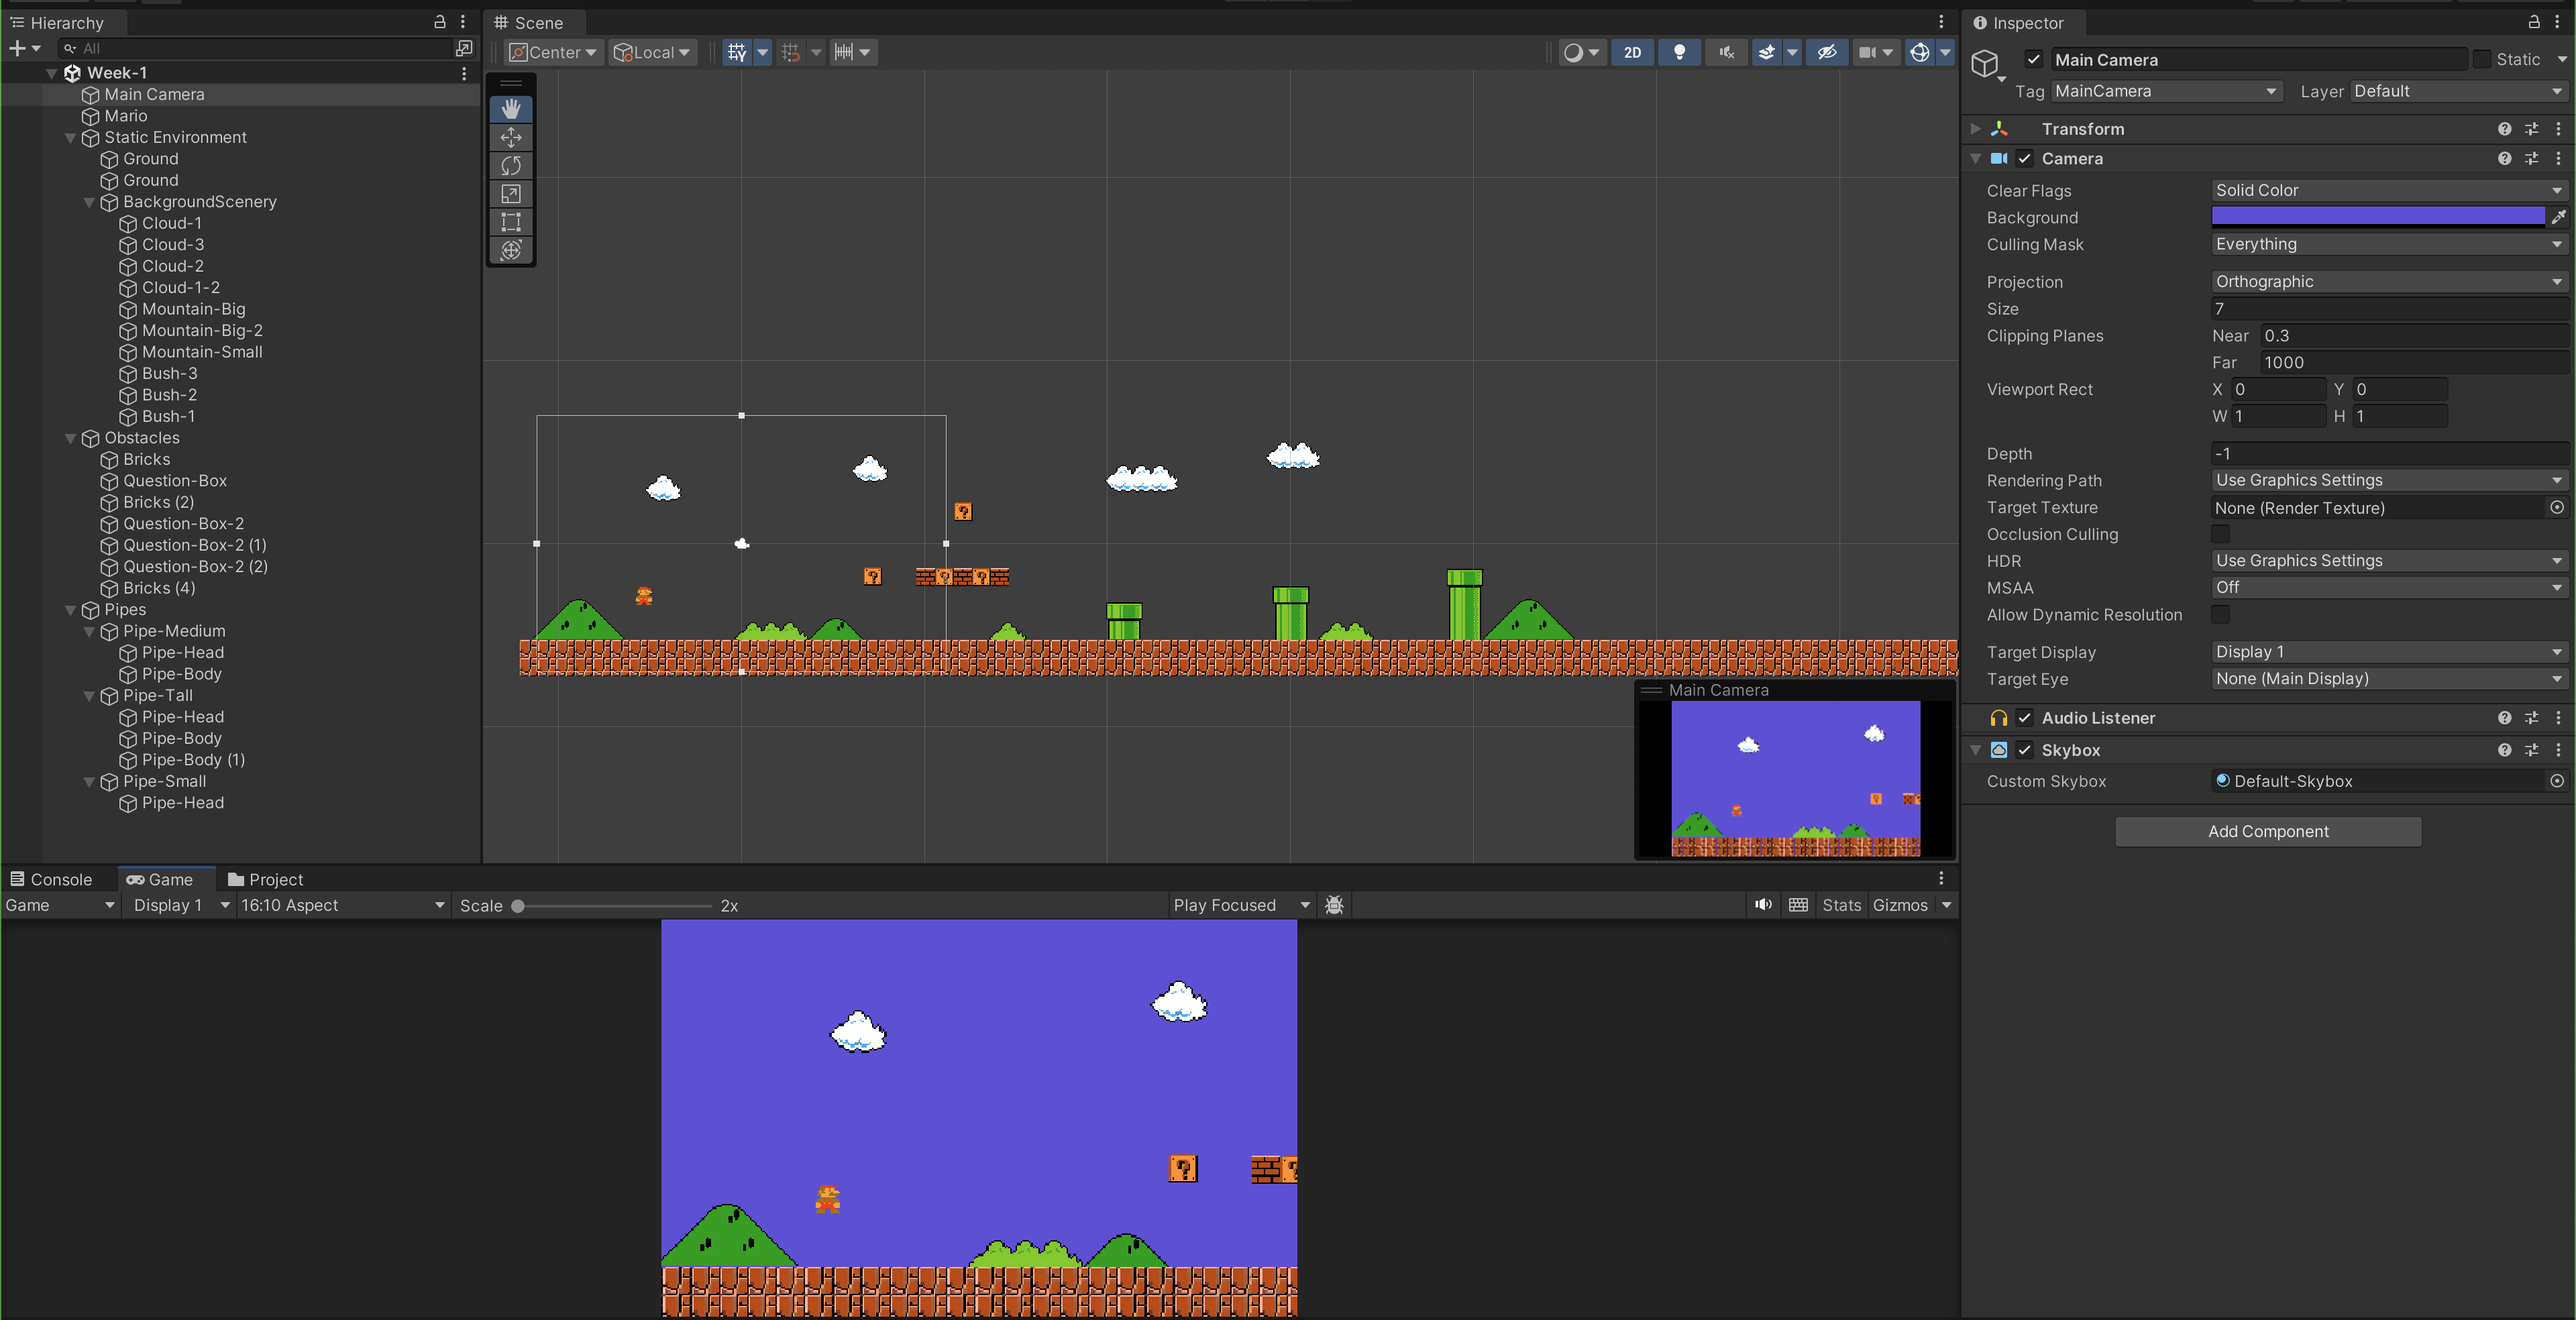
We shall have this before proceeding:
Housekeeping Tips
You might want to set the Ground Gameobject's Sprite Renderer >> Additional Settings >> Order in Layer property to 1 (instead of 0) so that static assets like Mountains, Shrubs, etc can be "behind" the ground.

You might also want to group related GameObjects together as shown in the Screenshot's Hierarchy.
Also, you can "drag" and move GameObjects together in the scene.
Here's a speedup recording demonstrating all of the above:
Flip Mario
Now let’s fix Mario’s facing. If he is going to the left, he should be facing the left side and vice versa. The direction he’s facing should conform to the last pressed key.
We can do this by enabling the flipX property of its SpriteRenderer whenever key “a” is pressed, and disabling it whenever key “d” is pressed. We also have to control the SpriteRenderer component via the script. You can pretty much get any component via GetComponent<type>() method in the script attached to the game object.
Add the following changes to PlayerMovement.cs:
    // global variables
    private SpriteRenderer marioSprite;
    private bool faceRightState = true;

    void Start(){
        marioSprite = GetComponent<SpriteRenderer>();

        // other instructions
    }

    void Update(){
              // toggle state
      if (Input.GetKeyDown("a") && faceRightState){
          faceRightState = false;
          marioSprite.flipX = true;
      }

      if (Input.GetKeyDown("d") && !faceRightState){
          faceRightState = true;
          marioSprite.flipX = false;
      }

      // other instructions
    }
We do not implement the flipping of Sprite under FixedUpdate since it has nothing to do with the Physics Engine.
Your Mario will now face left and right accordingly as "a" or "d" key is pressed.
Add Obstacles
There are many obstacles that can be added to a game: enemies, physical obstacles, etc.
Goombas
Now it's time to create the Enemy.
- Create an empty GameObject onto the scene, name it
Enemies - Create a child GameObject under
Enemy, name it Goomba:- add
SpriteRendererComponent,- Set
Order in Layeras2because we want it to be in front of the static background images and the ground.
- Set
- add
Rigidbody2DandCollider2DComponents
- add
- Put
brown_goomba_1as its sprite, edit itsTransformso it is placed beside Mario
Move Goomba
Now we want Goomba to patrol left and right up to a certain offset X from its starting position. Create a new script called EnemyMovement.cs with the following content:
using System.Collections;
using System.Collections.Generic;
using UnityEngine;

public class EnemyMovement : MonoBehaviour
{

    private float originalX;
    private float maxOffset = 5.0f;
    private float enemyPatroltime = 2.0f;
    private int moveRight = -1;
    private Vector2 velocity;

    private Rigidbody2D enemyBody;

    void Start()
    {
        enemyBody = GetComponent<Rigidbody2D>();
        // get the starting position
        originalX = transform.position.x;
        ComputeVelocity();
    }
    void ComputeVelocity()
    {
        velocity = new Vector2((moveRight) * maxOffset / enemyPatroltime, 0);
    }
    void Movegoomba()
    {
        enemyBody.MovePosition(enemyBody.position + velocity * Time.fixedDeltaTime);
    }

    // note that this is Update(), which still works but not ideal. See below.
    void Update()
    {
        if (Mathf.Abs(enemyBody.position.x - originalX) < maxOffset)
        {// move goomba
            Movegoomba();
        }
        else
        {
            // change direction
            moveRight *= -1;
            ComputeVelocity();
            Movegoomba();
        }
    }
}
The idea is to allow the enemy to patrol up to 5.0 units to the left and to the right, and change direction accordingly when the max offset distance is reached. We also want to control its speed:
Ifgoomba isn’t too far away from its starting position yet, move it to the designated directionElse, flip direction
We can compute the required velocity by dividing supposed distance travelled with time, and then compute the position at each Time.fixedDeltaTime. Then, we can move the enemy to the calculated position: original_position_vector + velocity_vector * delta_time
Finally, since we do not need to perform a full-blown physics simulation on the enemy, we can set its RigidBody2D BodyType to Kinematic. We are simply moving it to patrol around desired location, and later on to detect “collision”.
Make sure to place Goomba nicely above the Ground. Gravity does not apply to it anymore.
Now is a good time to test. Notice how the Goomba "pushes" Mario. That's because both objects have colliders in it.
Update() vs FixedUpdate()
While the above script works, we should've placed the movement logic inside FixedUpdate():
// Version A: Update
void Update() {
    transform.position += velocity * Time.deltaTime;
}

// Version B: FixedUpdate
void FixedUpdate() {
    enemyBody.MovePosition(enemyBody.position + velocity * Time.fixedDeltaTime);
}
Here are a few points to think about.
Frame vs Physics timestep
- Update runs once per rendered frame (variable rate).
- FixedUpdate runs on the physics timestep (fixed rate, default 50 Hz). What happens if the framerate is 30 fps vs 120 fps?
DeltaTime mismatch
- In Update, you should use
Time.deltaTime - In FixedUpdate, you should use
Time.fixedDeltaTimeWhat happens if you use the wrong one?
Collision accuracy
- Moving a kinematic Rigidbody via transform.position or MovePosition in Update doesn’t line up with the physics solver Will a fast-moving bullet always detect hitting this object? Or might it “miss”?
Jitter & interpolation
- At high or low frame rates, motion applied in Update can look smooth, but physics interactions (dynamic bodies colliding with it) may jitter
Why do moving platforms sometimes feel “slippery” when coded in
Update?
When Update is OK
- For purely visual movement (ghost enemies, cutscene props, non-colliding objects). Can you think of a case where physics accuracy doesn’t matter?
Collision between Goomba and Mario
We want Mario to be “damaged” when it collides with Goomba, and we do not need the two bodies to push each other or simulate Physics. The way to do this is to set the collider attached at the enemy’s GameObject as a Trigger.
Tick that
IsTriggeroption inBoxCollider2Delement. Also, change Goomba's Tag toEnemy(create it).
If a Collider collides with another Collider that is a Trigger, then “collision effect” will not be computed, and rather the callback OnTriggerEnter will be invoked (on both GameObject).
Implement the callback function OnTriggerEnter2D in PlayerMovement.cs, and EnemyMovement.cs:
- PlayerMovement.cs
- EnemyMovement.cs
  void OnTriggerEnter2D(Collider2D other)
  {
      if (other.gameObject.CompareTag("Enemy"))
      {
          Debug.Log("Collided with goomba!");
      }
  }
  void OnTriggerEnter2D(Collider2D other)
  {
     Debug.Log(other.gameObject.name);
  }
When you test it, you will see the following printout in the Console. When the game starts, Goomba printed Ground because it collided with the Ground. Notice how this is only printed once (upon initial collision and not continuously). Then, both OnTriggerEnter2D methods are called when Mario and Goomba collides.
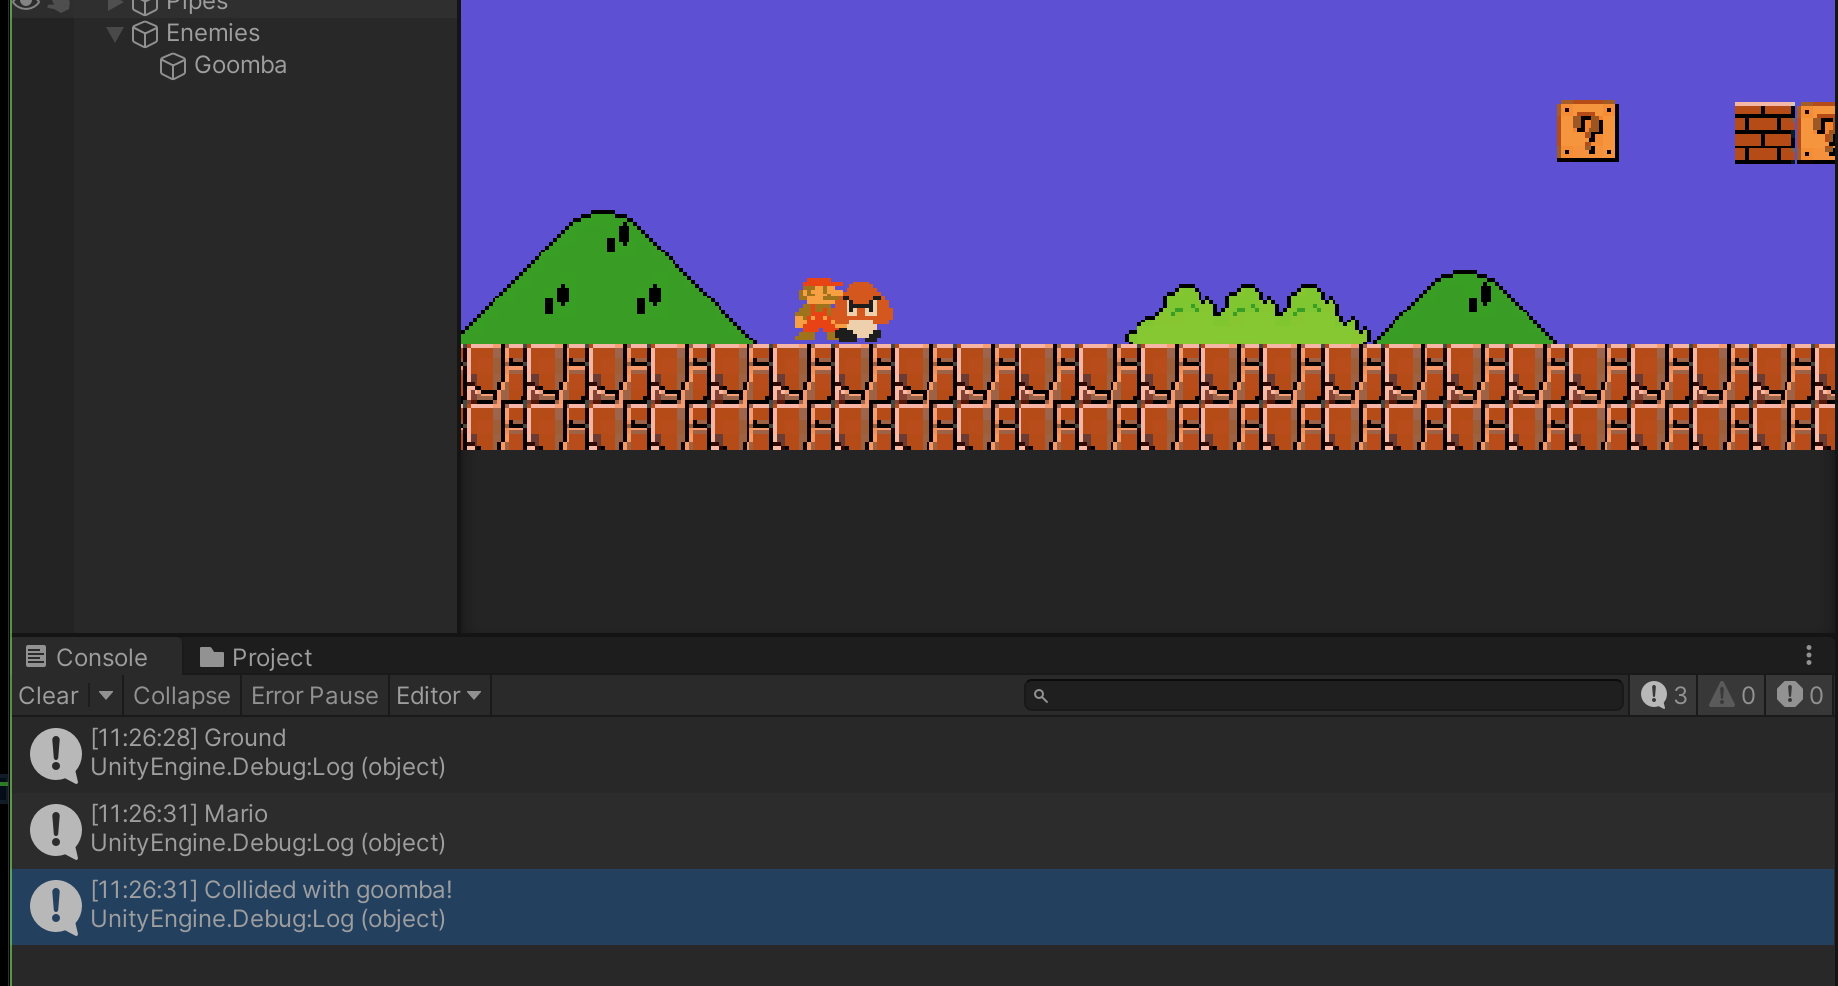
Eventually, this collision will cause Mario to lose lives or game to be over. Technically, you can implement this logic once in any of the two scripts, but since it affects Mario (and not Goomba), it makes more sense to do it on PlayerMovement.cs instead. We now need some sort of UI elements to indicate score or HP or "Game Over" text. Let's venture into how UI Element works.