The Input System
The lab handout uses Super Mario Bros as assets to demonstrate certain Unity features and functionalities. You are free to follow along and submit it for checkoff, OR you can also create an entirely new project to demonstrate the requested feature(s).
The requirement(s) for the lab checkoff can be found here.
The main purpose of this Lab is to introduce a few tools that can be used to manage the game better. For example, right now we have game states spread all over various scripts, audio source spread everywhere on each object, hard-to-read game logic, etc. We can improve the structure of the game better with the help of AudioMixer, ScriptableObject, Unity Event, and a few other C# basics like Coroutines, Async functions, Singletons, and many more.
At the time of this writing, we are using Input System v1.6.3.
The Input System is a newer system offered by Unity to manage your game's user input in an easier way. The old is called the Input Manager, and that's one that we heave briefly touched (GetKeyUp, GetKeyDown, etc). This Input System package is a newer, more flexible system, which allows you to use any kind of Input Device to control your Unity content, define specific actions, watch for specific interactions, process the actions, and give an overall pleasant management of the user input.
Let's say we have a different input bindings during the gameplay and in the main menu of the game. With The Input System, we can define Action Maps for different scenes, while with the old system, we need to manually manage that within our scripts. There also exist other alternatives (e.g: paid assets, using ScriptableObjects) to manage user input.
Note that The Input System is simply an alternative, and you can definitely utilise both Input Manager and The Input System in the same project,
Installation
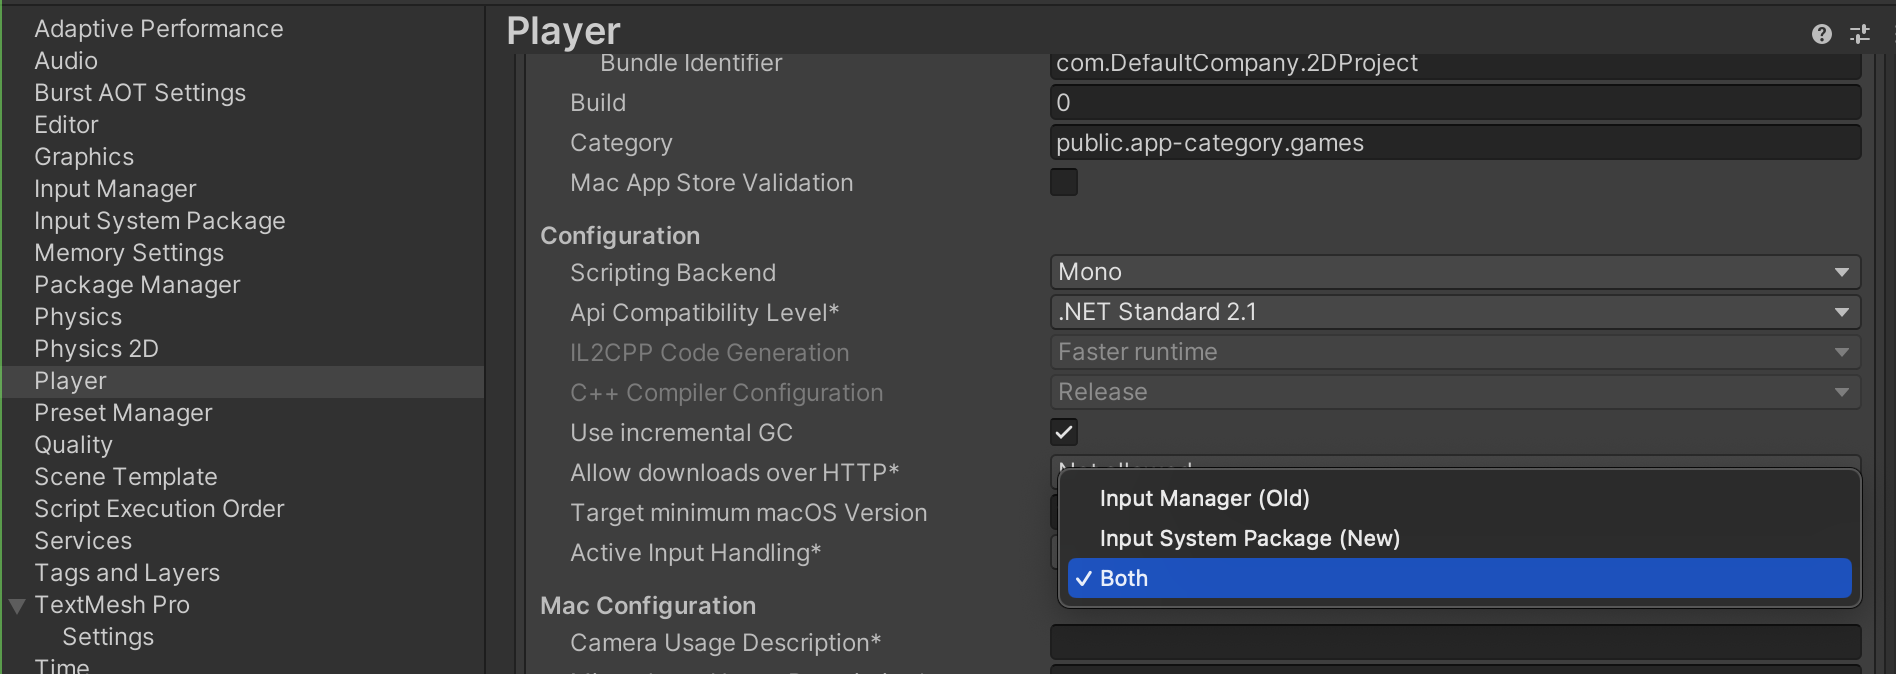
Your project does not come with The Input System by default, only the Input Manager. Please proceed to read its official installation documentation here before proceeding.
You can enable both systems so to not immediately break your game. This can be found under Project Settings >> Player >> Other Settings:
Mario's Control
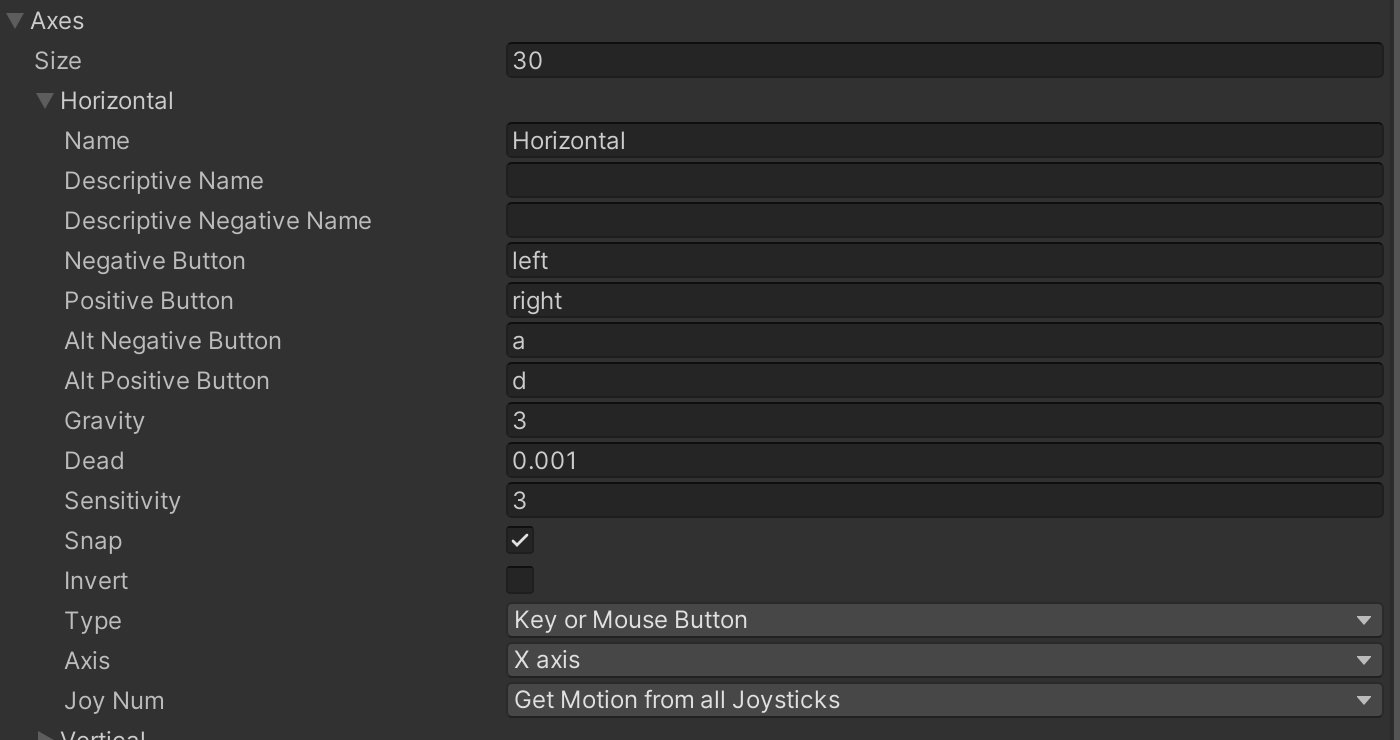
Right now our Mario can move (left and right, with a or d) key, and jump (with a spacebar). We can also control Mario using the arrow keys to move left and right but the sprite won't flip (because we only check for keys a and d manually), while the Input Manager bind a and left arrow key to cause negative horizontal movement (similarly with positive horizontal movement).
Suppose we also want to allow Mario to jump higher if we hold the spacebar button down, like this:
We would need to manually determine what constitutes as a "tap" and what constitutes as a "hold" manually in the script, or create a helper script to do that. The Input System however can watch for that interaction (tap or hold or both) for you and execute a callback.
Create InputActions and PlayerInput Component
Create a new directory called InputSystem in Assets. Then, create a new InputActions that will be used to define actions for this game inside Assets/InputSystem directory. Name it MarioActions. Ignore the C# script for now, it will be autogenerated later.
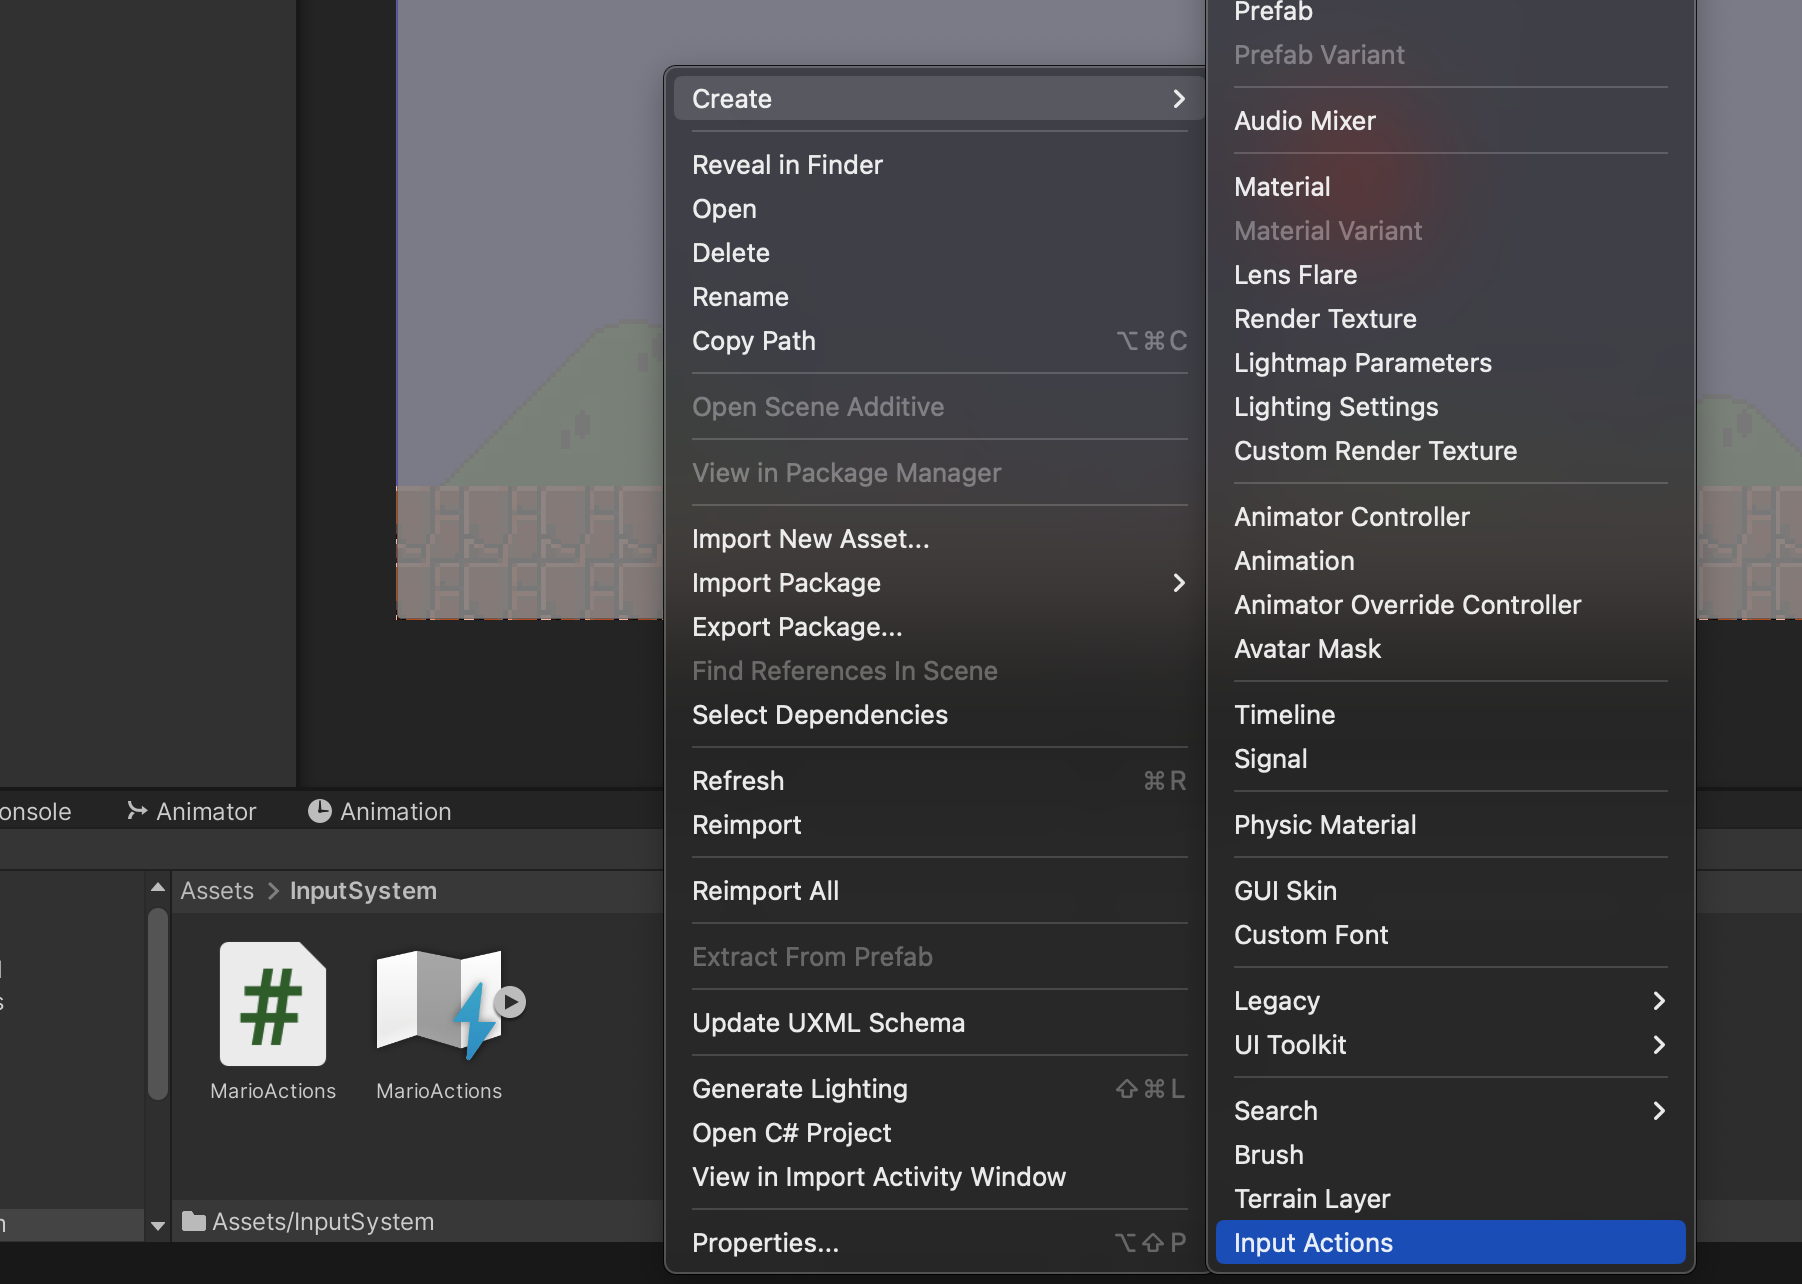
Now click on the newly created asset, and over at the inspector you can tick the Generate C# Class property and then click on Apply. Afterwards, open the Asset window by pressing Edit Asset. Edit the asset window to follow exactly as shown in the video below:
Then over at Mario's GameObject, add the PlayeInput component and link up the Input Actions Asset you just created there.
InputActions Asset Editor
Let's break down each section of the asset editor one by one.
Action Maps
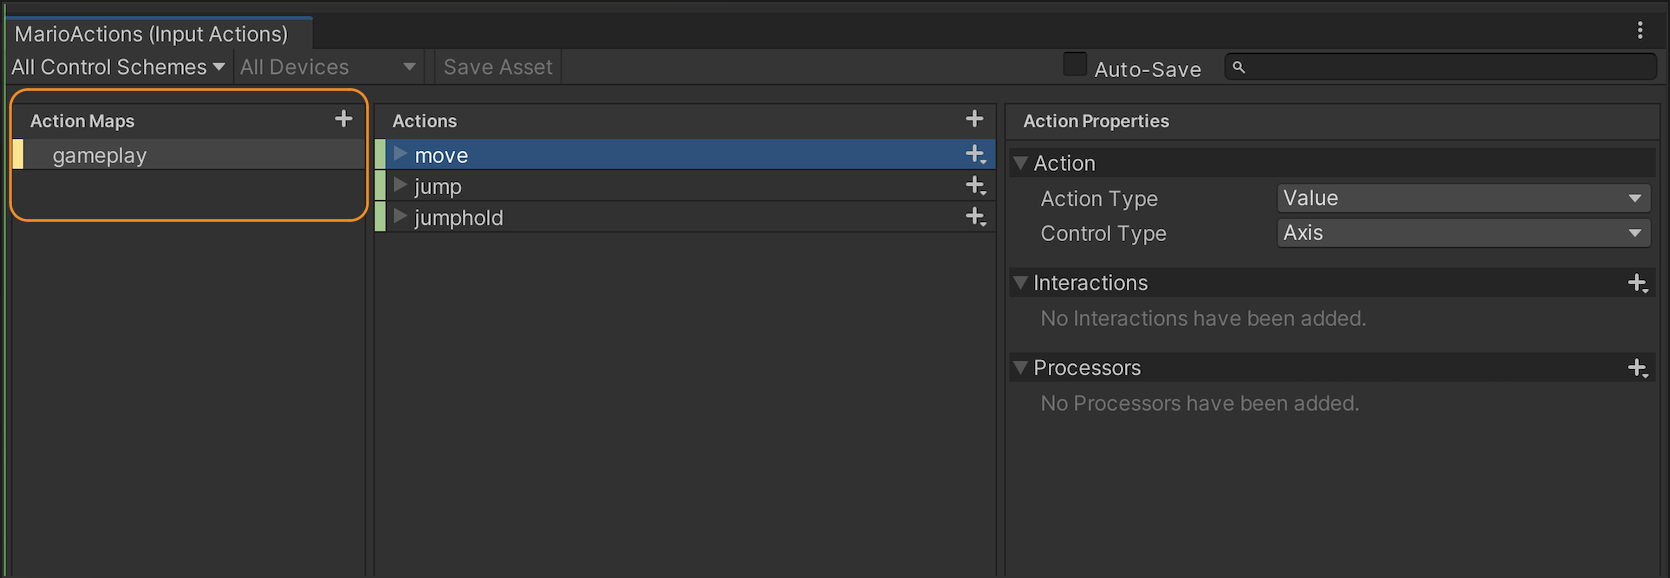
Over at the leftmost pane, we can define our Action Maps, that is the entire set of keys that we typically want to use for different stages in the game or different characters in the game. For instance: gameplay or main menu, shooter or swordsman.
Actions
At the middle pane, we can add our Actions. This is what Mario can do. The name of the actions are typically matched to the actual capability of the player that can perform that actions, such as jump, move, crouch, run, etc.

Action Binding
For each action, we can add a binding by clicking the + button. A binding is a connection defined between an Action and one or more Controls. For example, if we want our Mario to move to the left (negative 1D axis) by pressing either left arrow or key A, then we can add one more 1D Axis binding to move action:

Action Properties
Action Types
There are three types of action types: value, button, pass through. This defines the callbacks that we implement in the script. For instance, those with action type of value expects some kind of InputValue parameter defined in the callback, whereas button is not. For example, here's the expected callback for jump action:
    public void OnJump()
    {
        // TODO
    }
And here's the expected callback for move action (you can also define OnMove without any argument too, but that defeats the purpose):
    public void OnMove(InputValue input)
    {
        // TODO
    }
Notice how the callbacks are written with the format On[action-name]. This depends on how you register the callbacks: via script or via inspector. More on this later.
Interactions
You can apply interactions on an Action, or on a Binding. Applying Interactions directly to an Action is equivalent to applying them to all Bindings for the Action. This is particularly useful if you want an automatic detection of different kinds of action interactions: tap, multi tap, hold, slow tap, etc. There are four stages of the behavior: waiting, started, performed, cancelled, of which you can tie up to different callbacks via the script if you wish. Here's a short example on how to register a callback once a hold interaction is performed:
    public PlayerInput playerInput;
    private InputAction jumpHoldAction;

    void Start()
    {
        // must match the actions name
        jumpHoldAction = playerInput.actions["jumphold"];
        jumpHoldAction.performed += OnJumpHoldPerformed;
    }

    void OnJumpHoldPerformed(InputAction.CallbackContext context)
    {
        // TODO
    }
Please consult the documentation to find out more details about more advanced feature like Processors and Bindings with one or two modifiers.
Workflows (to Use InputAction)
There are four different workflows that are provided in the documentation. We will discuss two ways out of the four to use InputActions: via Action Asset + Script, or via the PlayerInput Component.
Registering callbacks via the script + Action Asset
This method allows us to define actions, properties, and interactions via the GUI as shown above, and then instantiate and register callbacks via the script attached to the GameObject we want to control. The documentation related to this section is here.
This method utilizes the generated C# script. The generated script: MarioActions.cs from the Action Asset can be instantiated it directly in the code under Start, then enable it. Then we can address the actions directly via marioActions as follows and register the callbacks we want. The callback must have the signature: return value void and receive one argument of type: InputAction.CallbackContext.
// this is a sample code in another script attached to Mario or relevant character for instance
    public MarioActions marioActions;

    void Start()
    {
        marioActions = new MarioActions();
        marioActions.gameplay.Enable();
        marioActions.gameplay.jump.performed += OnJump;
        marioActions.gameplay.jumphold.performed += OnJumpHoldPerformed;
        marioActions.gameplay.move.started += OnMove;
        marioActions.gameplay.move.canceled += OnMove;
    }

    void OnJump(InputAction.CallbackContext context)
    {
        // TODO
    }

    void OnMove(InputAction.CallbackContext context)
    {
        if (context.started)
        {
            Debug.Log("move started");
        }
        if (context.canceled)
        {
            Debug.Log("move stopped");
        }

        float move = context.ReadValue<float>();
        Debug.Log($"move value: {move}"); // will return null when not pressed

        // TODO
    }
We can read the context's value using ReadValue<T>, where T depends on the action type and control type. For instance, move has an action type of Value with control type of Axis. Thus, we can read its value with float. You can read more about Control Types here.
Using PlayerInput Component with SendMessage or BroadcastMessage Behavior
If we don't want too much boilerplates in setting up callbacks for each action, we can use the Player Input component and automatically register callbacks. The documentation related to this section is here.
Firstly, attach Player Input component at Mario and select MarioActions as the Actions asset. Select the scheme as Keyboard and Default Map as gameplay (because this is how we control Mario). Then, set the behavior to Send Messages. This means that it will automatically find scripts attached to Mario that implements the following methods shown in the Inspector below and call them. The name of the methods is simply On[actions-name], with return type void and parameter depending on the Control type of the action.

The component must be on the same GameObject if you are using Send Messages, or on the same or any child GameObject if you are using Broadcast Messages.
We can now create a script that implements these methods and attach it at Mario. In the example below, we wrote test callbacks inside another script called ActionManager.cs, which is attached as a component on Mario.
    // triggered upon performed interaction (default successful press)
    public void OnJump()
    {
        Debug.Log("OnJump called");
        // TODO
    }

    // triggered upon 1D value change (default successful press and cancelled)
    public void OnMove(InputValue input)
    {
        if (input.Get() == null)
        {
            Debug.Log("Move released");
        }
        else
        {
            Debug.Log($"Move triggered, with value {input.Get()}"); // will return null when released
        }
        // TODO
    }

    // triggered upon performed interaction (custom successful hold)
    public void OnJumphold(InputValue value)
    {
        Debug.Log($"OnJumpHold performed with value {value.Get()}");
        // TODO

    }
Here's what should be printed out in the console (ignore Mario's movement for now, you have not linked it up. This is for demo only):
Do not assume that each callback will be called exactly once. It depends on the interaction you specify, as well as the Action Type of the action, e.g: button or value or pass through.
If you do not specify any interactions to the action, consult the documentation on default interaction. This tells you what kinds of callbacks can occur.
If you use Send Messages behavior on your PlayerInput Component will trigger the corresponding callback on performed state (e.g: when button is pressed, not released) for Button type.
However on Value type, the callback will be called twice: upon press and release. This is what happens with OnMove for Move action.
Read more on differences between Button, Value, and Pass Through here. It's likely that you will need to use Button and Value only for most use cases, and not Pass Through.
Using PlayerInput Component with UnityEvents Behavior
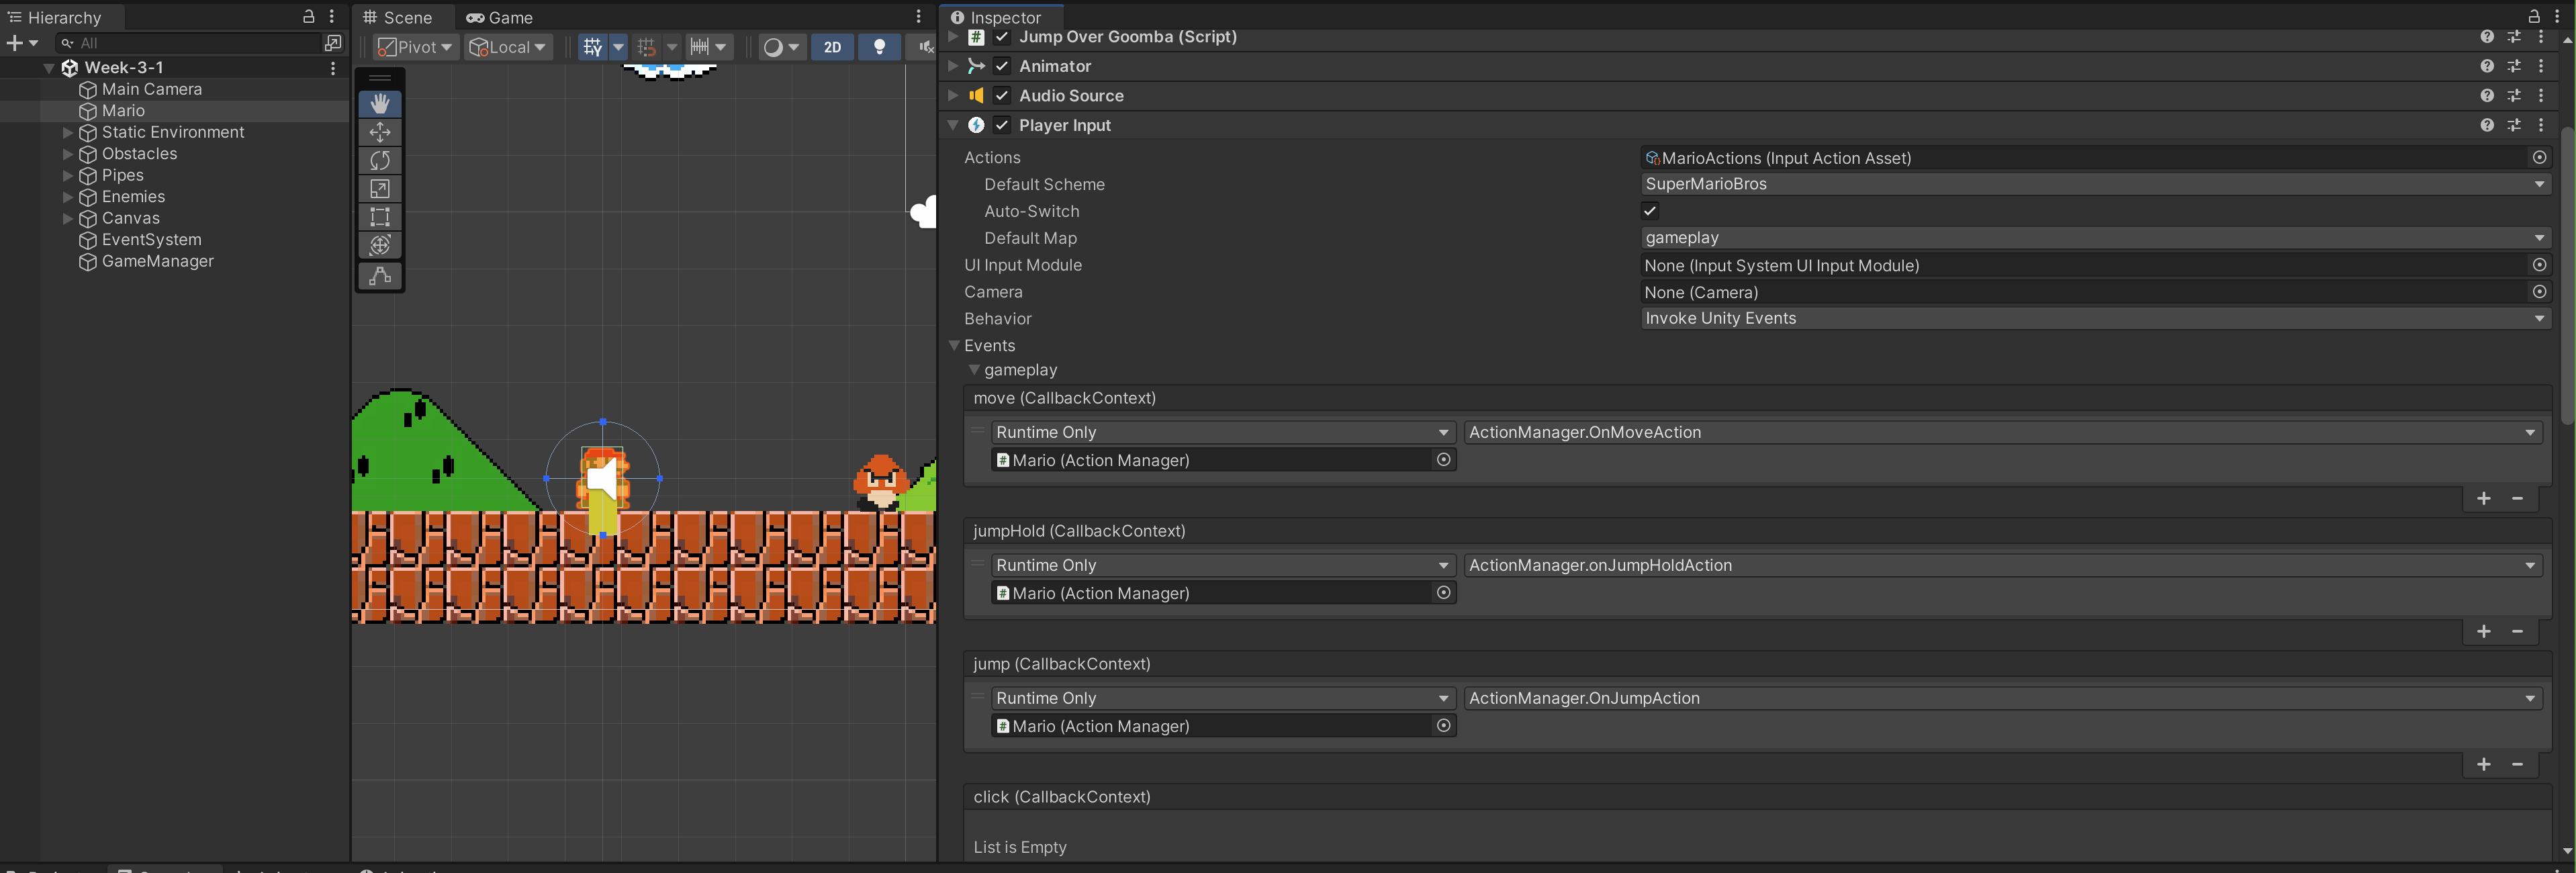
We can also use another behavior: Unity Events instead of send/broadcast messages. The pros from this method is that you can have control in the callback naming convention and which method handles what, but the cons is that it is not "automatic", lots of manual work to do.
There's some chatter that send/broadcast message may result in slight performance hit because it goes over all scripts attached to the GameObject or its children looking for the corresponding methods. However, if you don't feel any performance hit (which shouldn't matter because you're making a small prototype now), then stick with whichever you like.
To do this, simply modify the Behavior into "Invoke Unity Events", and hook up the callbacks via the Inspector.
    public void OnJumpHoldAction(InputAction.CallbackContext context)
    {
        if (context.started)
            Debug.Log("JumpHold was started");
        else if (context.performed)
        {
            Debug.Log("JumpHold was performed");
        }
        else if (context.canceled)
            Debug.Log("JumpHold was cancelled");
    }

    // called twice, when pressed and unpressed
    public void OnJumpAction(InputAction.CallbackContext context)
    {
        if (context.started)
            Debug.Log("Jump was started");
        else if (context.performed)
        {
            Debug.Log("Jump was performed");
        }
        else if (context.canceled)
            Debug.Log("Jump was cancelled");

    }

    // called twice, when pressed and unpressed
    public void OnMoveAction(InputAction.CallbackContext context)
    {
        if (context.started)
        {
            Debug.Log("move started");
            float move = context.ReadValue<float>();
            Debug.Log($"move value: {move}"); // will return null when not pressed
        }
        if (context.canceled)
        {
            Debug.Log("move stopped");
        }
    }
Here's what should be printed out in the console with this new technique (ignore Mario's movement for now, you have not linked it up. This is for demo only):
Notice how more stuffs are printed out: that each state change triggers On[actionName]Action callbacks and you need to read the context's state to determine what to do. This is different from SendMessage behavior where the callbacks are only triggered upon performed interaction. We also get the context that triggered that callback and we can do more things with that context given.