Audio Management
Audio (background music, sound effects, sound cues) is an integral part of a good game. Unity's audio system can import most audio file formats (.mp3, .wav), emulate sounds in 3D space, and apply filters (lowpass, highpass, etc) during runtime. There can be many audio sources in the scene, but only one AudioListener per scene can be active.
AudioListener
The MainCamera is usually the standard object that has AudioListener component attached to it (for single-player games). Even for split-screen games where we have two cameras, we can only activate one AudioListener in either cameras or in another GameObject entirely.
There are plenty of workarounds in the AssetStore though, be sure to check them out!

AudioMixer
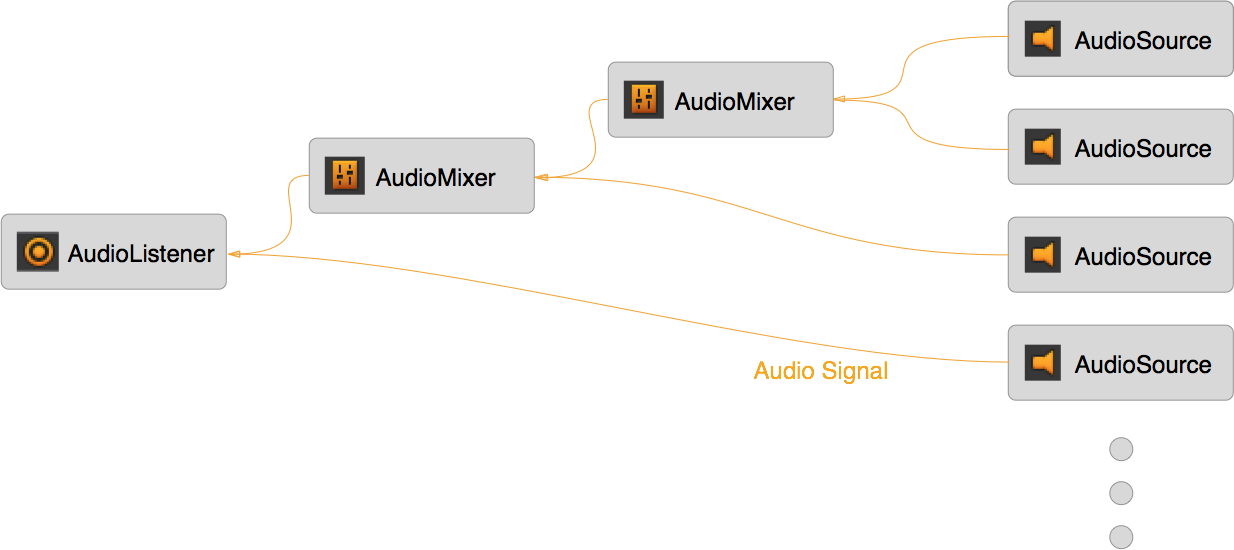
Unity AudioMixer allows you to route each AudioSource output in your scene, mix, apply effects on any of them and perform mastering. You can apply effects such as volume attenuation and pitch altering for each individual AudioSource. For example, you can reduce the background music of the game when there’s a cutscene or conversation. We can mix any number of input signals from each AudioSource, and have exactly one output in the Scene: the AudioListener usually attached to the MainCamera. The figure below illustrates this scenario, taken from the Official Unity AudioMixer Documentation:
We will not be going in depth about DSP concepts in Audio, and we assume that it is your job to find out which effects are more suitable for your project. However, we will still be picking a few examples to illustrate how to utilize the AudioMixer. They include: lowpass and highpass, pitch shifting, reverb, and duck volume.
Click Window » Audio » AudioMixer to have the AudioMixer tab open. Create a new Mixer called "SuperMarioBros".
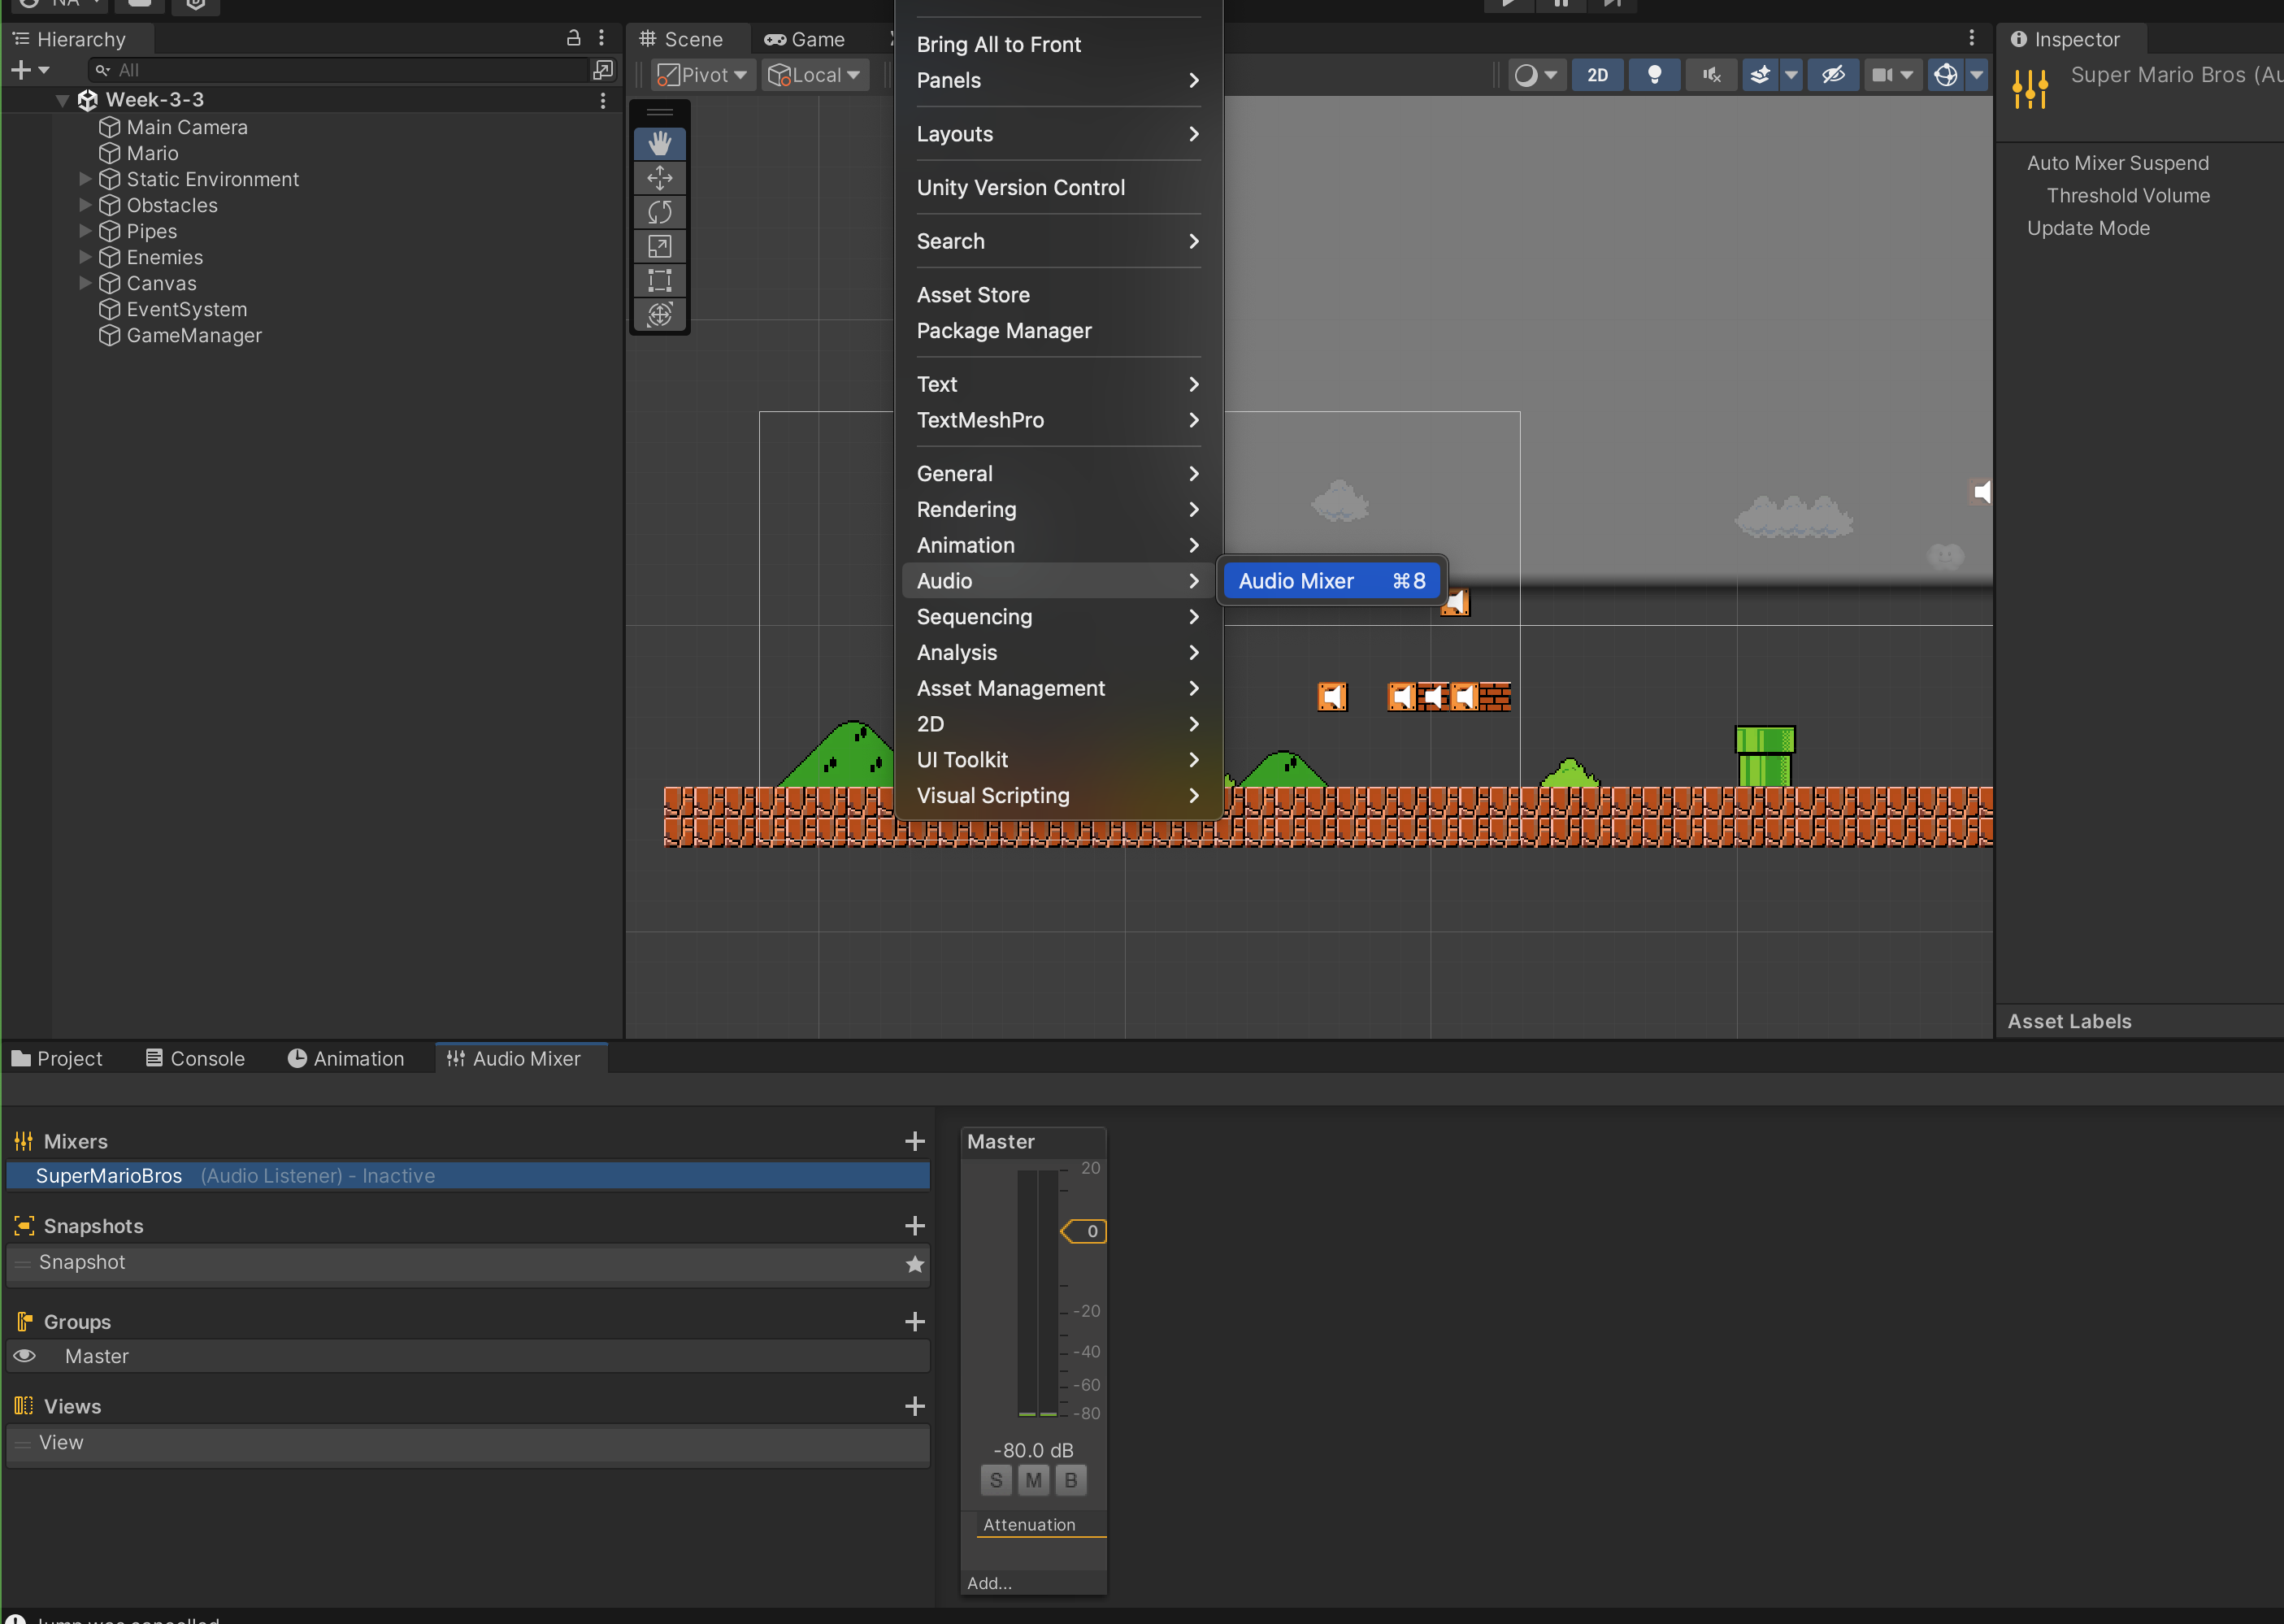
On the left of the AudioMixer window, there are four sections: Mixers, Groups, Snapshot, and Views. The first section is called Mixers, and they contain the overview of all AudioMixers in your Project. The output of each mixer is routed to a Scene’s default Audio Listener typically attached on the Main Camera. You can also route the output of one AudioMixer to another AudioMixer if your project is complex. Specifics can be found in the official documentation. The right region of the AudioMixer Window is called the strip view. There's only one "bus" called Master right now.
On the third section, there’s Groups. You can create several AudioMixer groups and form a hierarchy. Each group creates another bus in the Audio Group strip view:
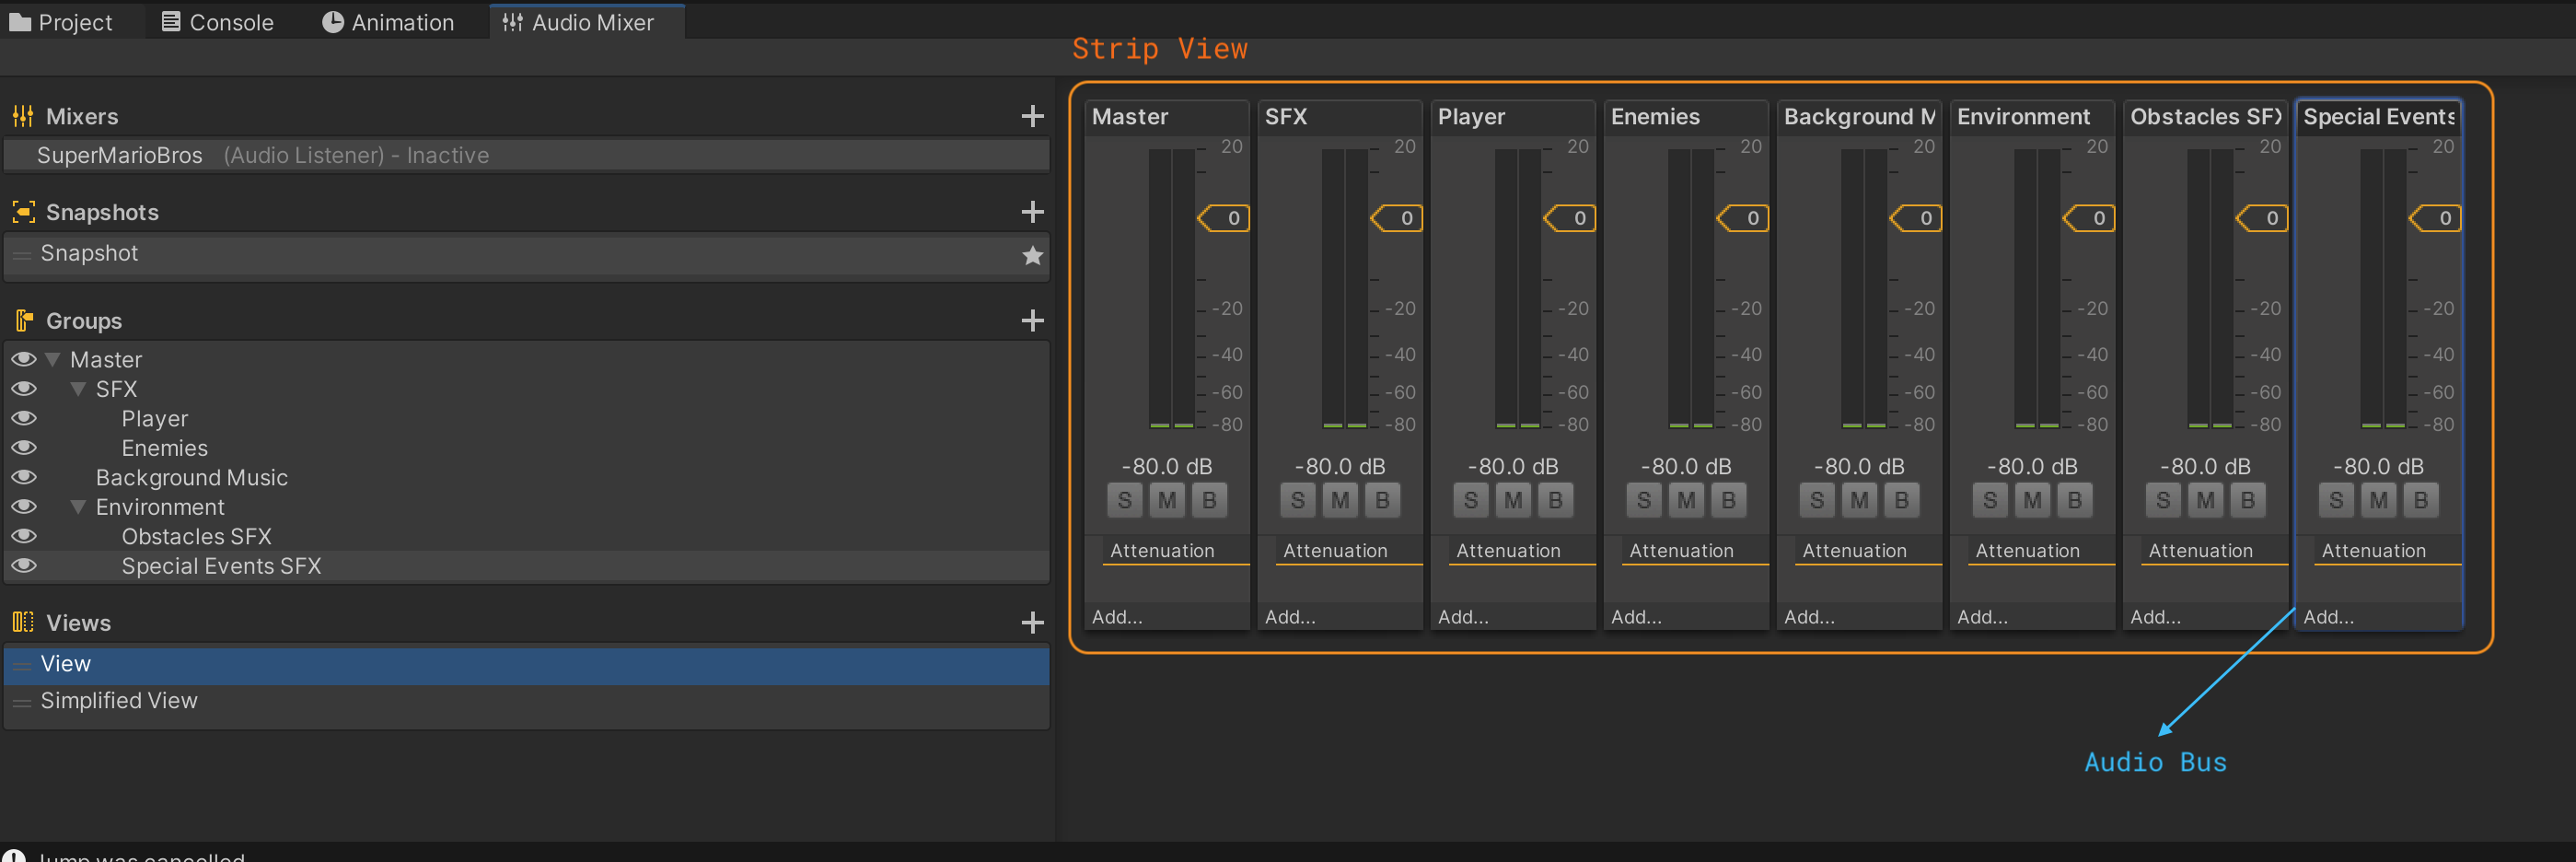
The purpose of having these groups is so that the output of each AudioSource can be routed here, and effects can be applied. Effects of the parent group is applied to all the children groups. Each group has a Master group by default, which controls the attenuation (loudness) of all children Audio groups.
Create audio groups as shown in the screenshot above. You will only have Attenuation effect applied on each of them in the beginning, set at 0 dB. The attenuation is simply relative to one another, applied on a relative unit of measurement decibels.
If you have sound group A at 0 dB, sound group B at 1 dB and sound group C at -2 dB, that means sound group B is the loudest among the three. How much louder is sound group B as compared to A? It depends on your perception. A change of 10 dB is accepted as the difference in level that is perceived by most listeners as “twice as loud” or “half as loud”
Effects
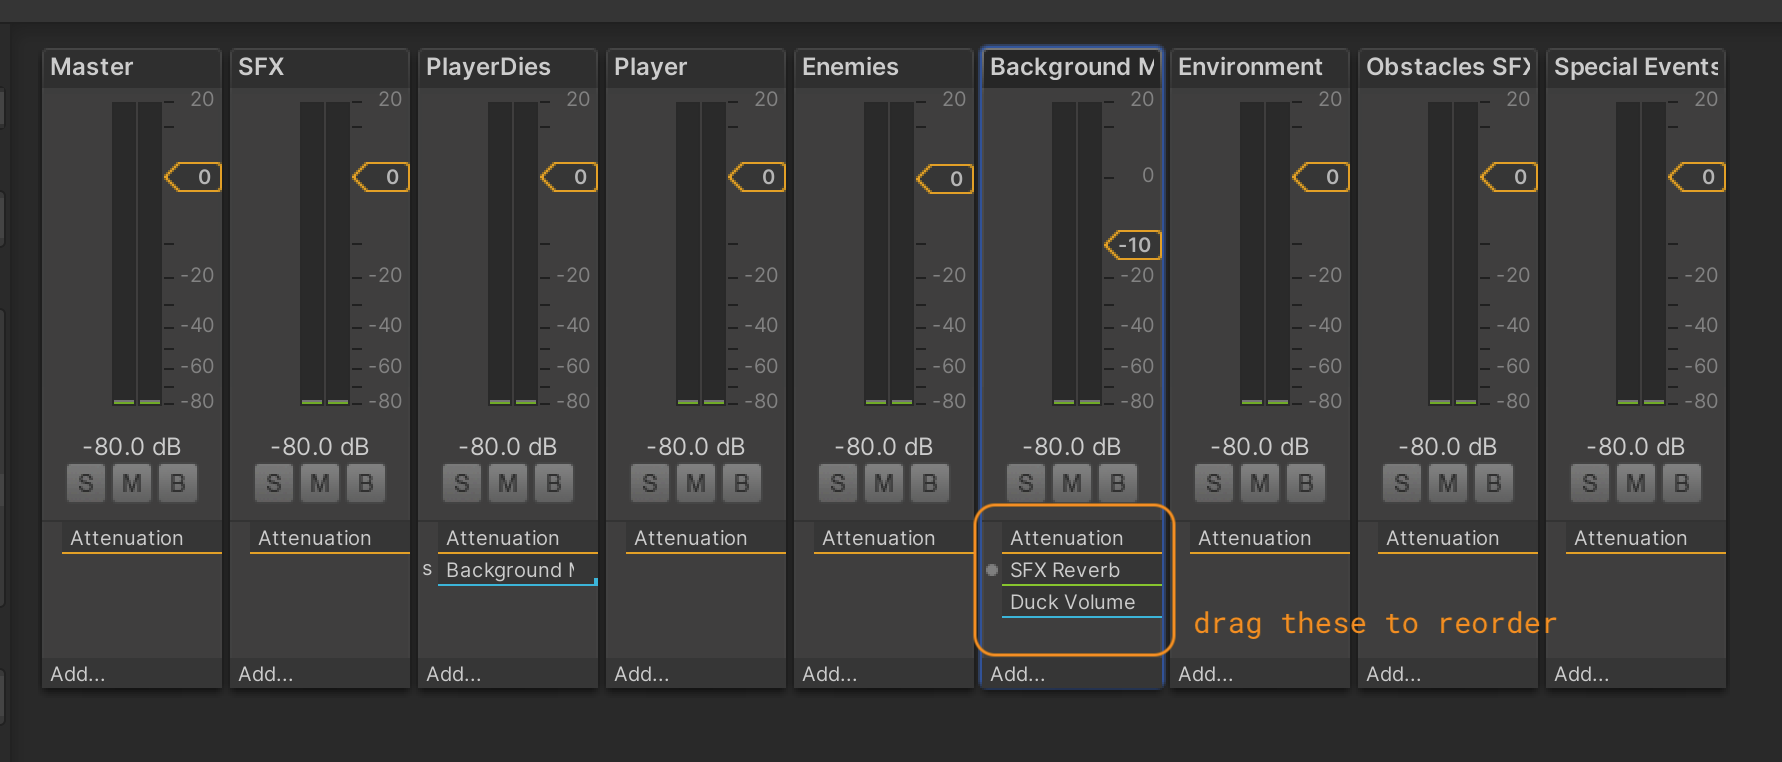
You can apply various effects within each audio group. The effects are applied from top to bottom, meaning the order of effects can impact the final output of the sound. You can drag each effect in the strip view to reorder them.
Lowpass and Highpass Effect
You can set two properties in Lowpass and Highpass effect:
- Cutoff frequency
- Resonance
The cutoff frequency indicates the frequency that is allowed to pass the filter, so the output will contain range of frequencies from zero up to this cutoff frequency. As for resonance, you can leave the value as 1.00 unless you’re familiar with it. It dictates how much the filter’s self-resonance is dampened.
Higher lowpass resonance quality indicates a lower rate of energy loss, that is the oscillations die out more slowly.
An audio with lowpass filter effect applied will sound more dull and less sharp, for example it is ideal for effects where the game character throw blunt objects around.
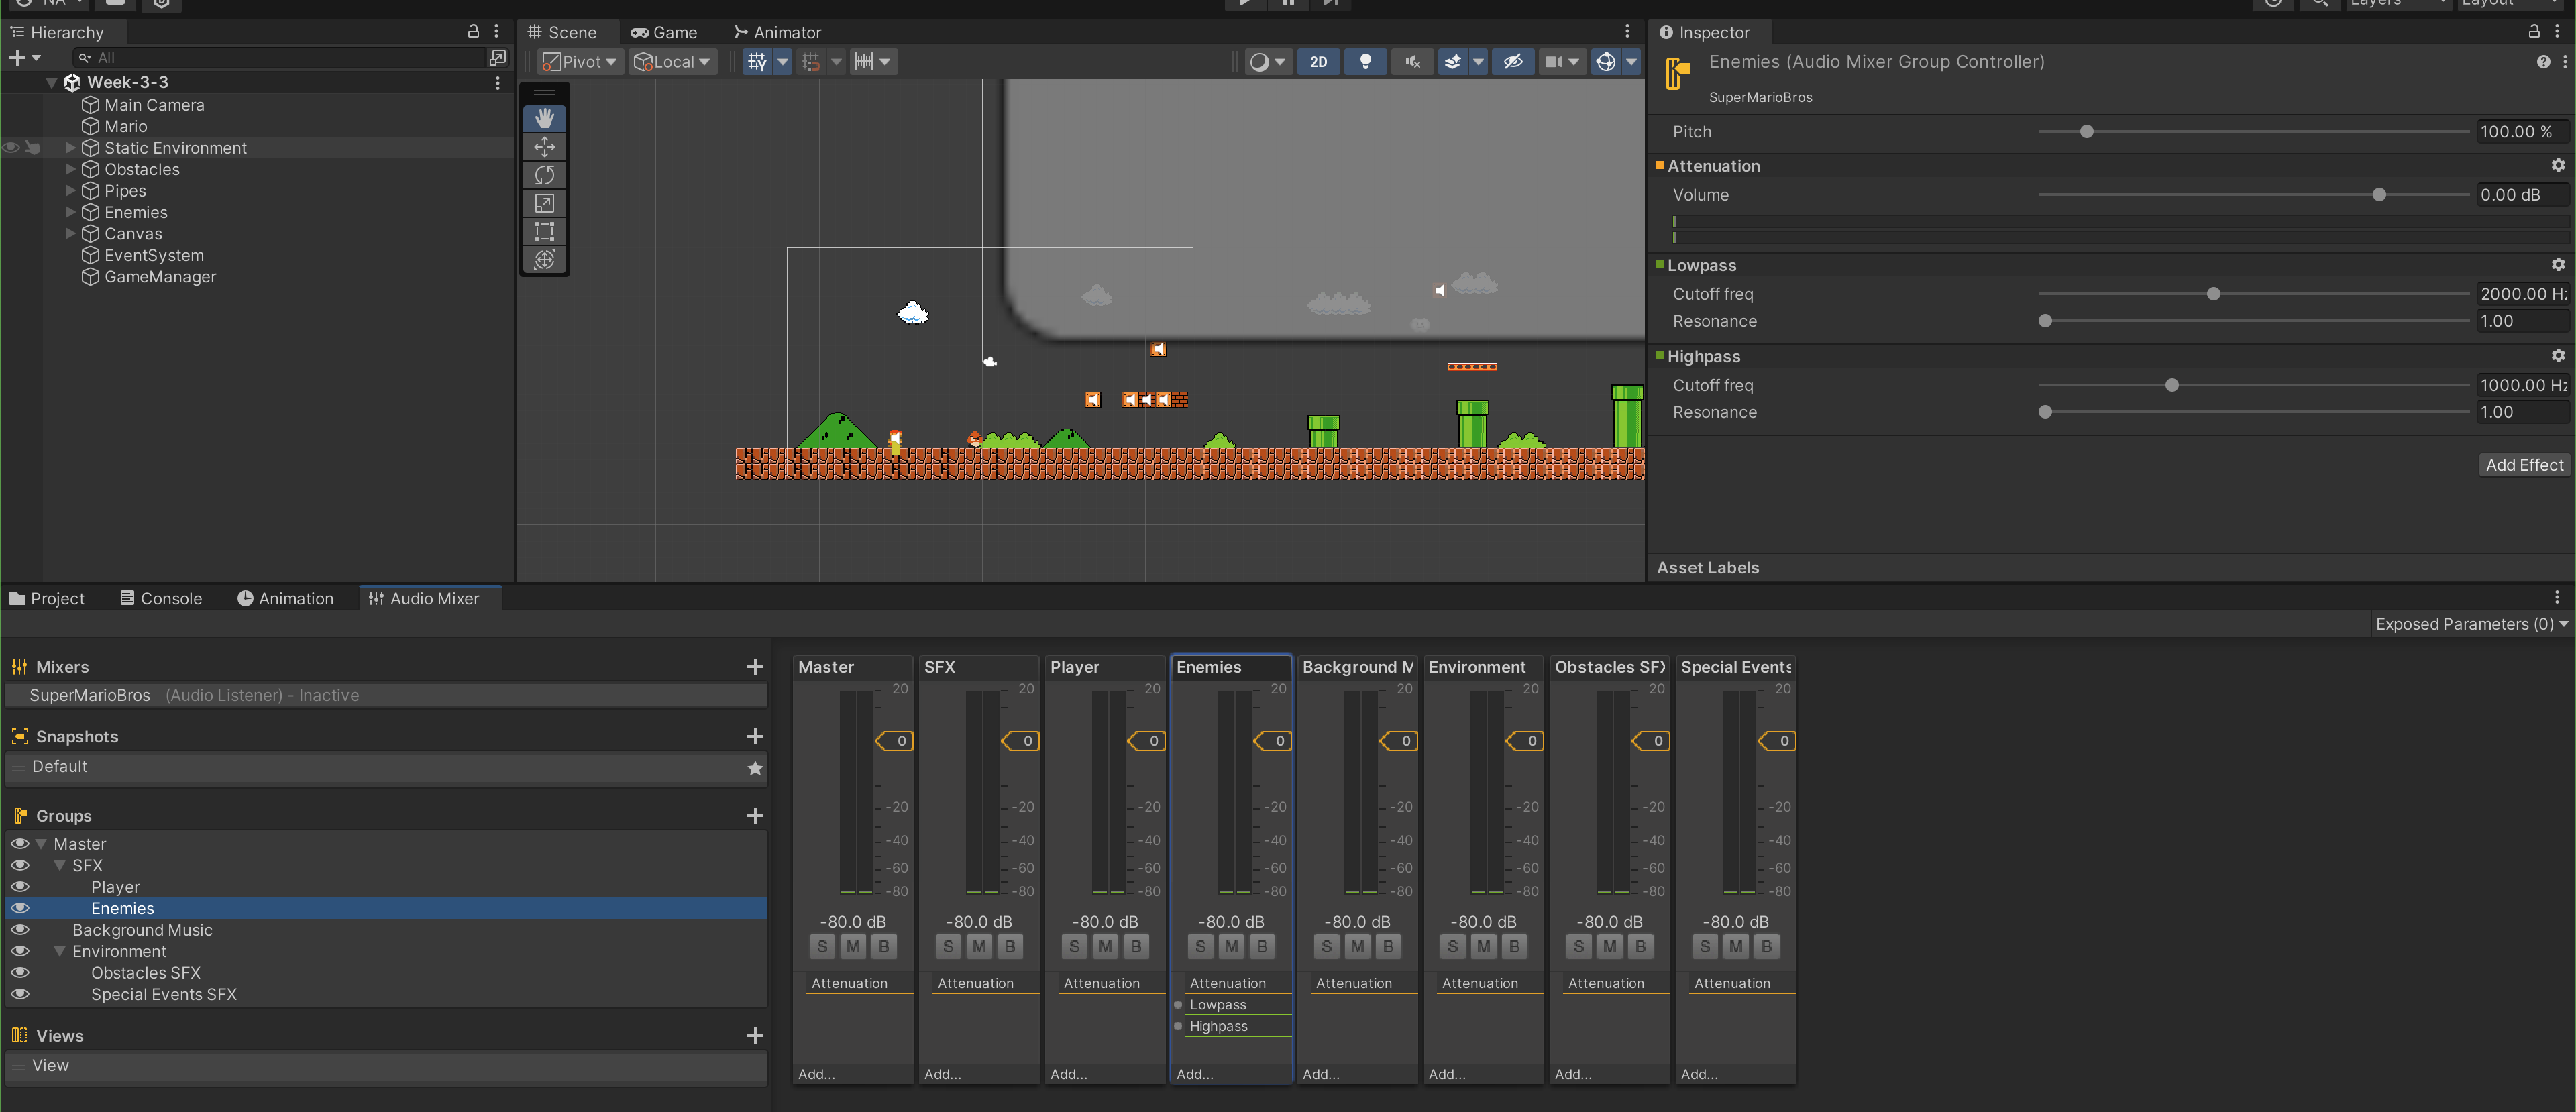
On the contrary, Highpass effect allows us to pass any frequency above the cutoff. If you’d like to pass through certain bands, let’s say between 1000 Hz to 5000 Hz, then you can apply a lowpass at 5000Hz, and then a highpass at 1000Hz. The order doesn’t matter in this case, as long as you set the right frequency cutoff for each type of effect.
The following example allows frequencies between 1000 to 2000 Hz to pass through:
Pitch Shifter
The pitch shifter effect allows you to change the pitch of the group without causing the output to sound sped up or slowed down. This is formally called as pitch scaling.
The process of changing audio pitch without affecting its speed. It is commonly used in games to improve the game feel by making sound effects less repetitive and by helping to convey information to the player.
Usage examples:
- Collision information: the speed, material of items colliding
- Importance of events
- Response to player inputs and actions
This pitch shifter effect different from the pitch slider located at the top of the group inspector. The regular pitch slider changes the pitch of the audio file by manipulating the sampling frequency of the audio output.
If the system’s sampling rate was set at 44.1 kHz and we used a 22.05 kHz audio file, the system would read the samples faster than it should. As a result, the audio would sound sped up and higher-pitched. The inverse also can happen. Playing an audio file slower than it should will cause it to sound slowed down and lower-pitched.
The Pitch Shifter effect has the following properties:
- Pitch: adjust this slider to determine the pitch multiplier
- FFT size, Overlap, and Max Channels: parameters of the Fast Fourier Transform algorithm as real-time pitch shifting is done using FFT.
You’re not required to know the details behind pitch shifting DSP. If you’re interested in the details of such implementation, you may refer to the Python implementation here. Since Unity is not open source, we do not know the exact implementation of these effects, but we can certainly learn to implement our own pitch shifter or any other audio effects by reading other research papers online.
SFX Reverb
This effect causes the sound group to be as if it is played within a room, having that complex "blurry", "dreamy" effect. Each room sounds differently, depending on the amount of things that exist in a room, for example listening to music in the bathroom (high reverb) sounds different than listening to the same music in an open field. Routing all audio output through the same reverb filter has the effect as if each of the audio files are played in the same room.
This is particularly handy if you have different sections in your game, e.g: cave, open field, wooden houses, etc. For example, the player’s footsteps will sound different in each scenario, despite having the same audio file for footsteps.
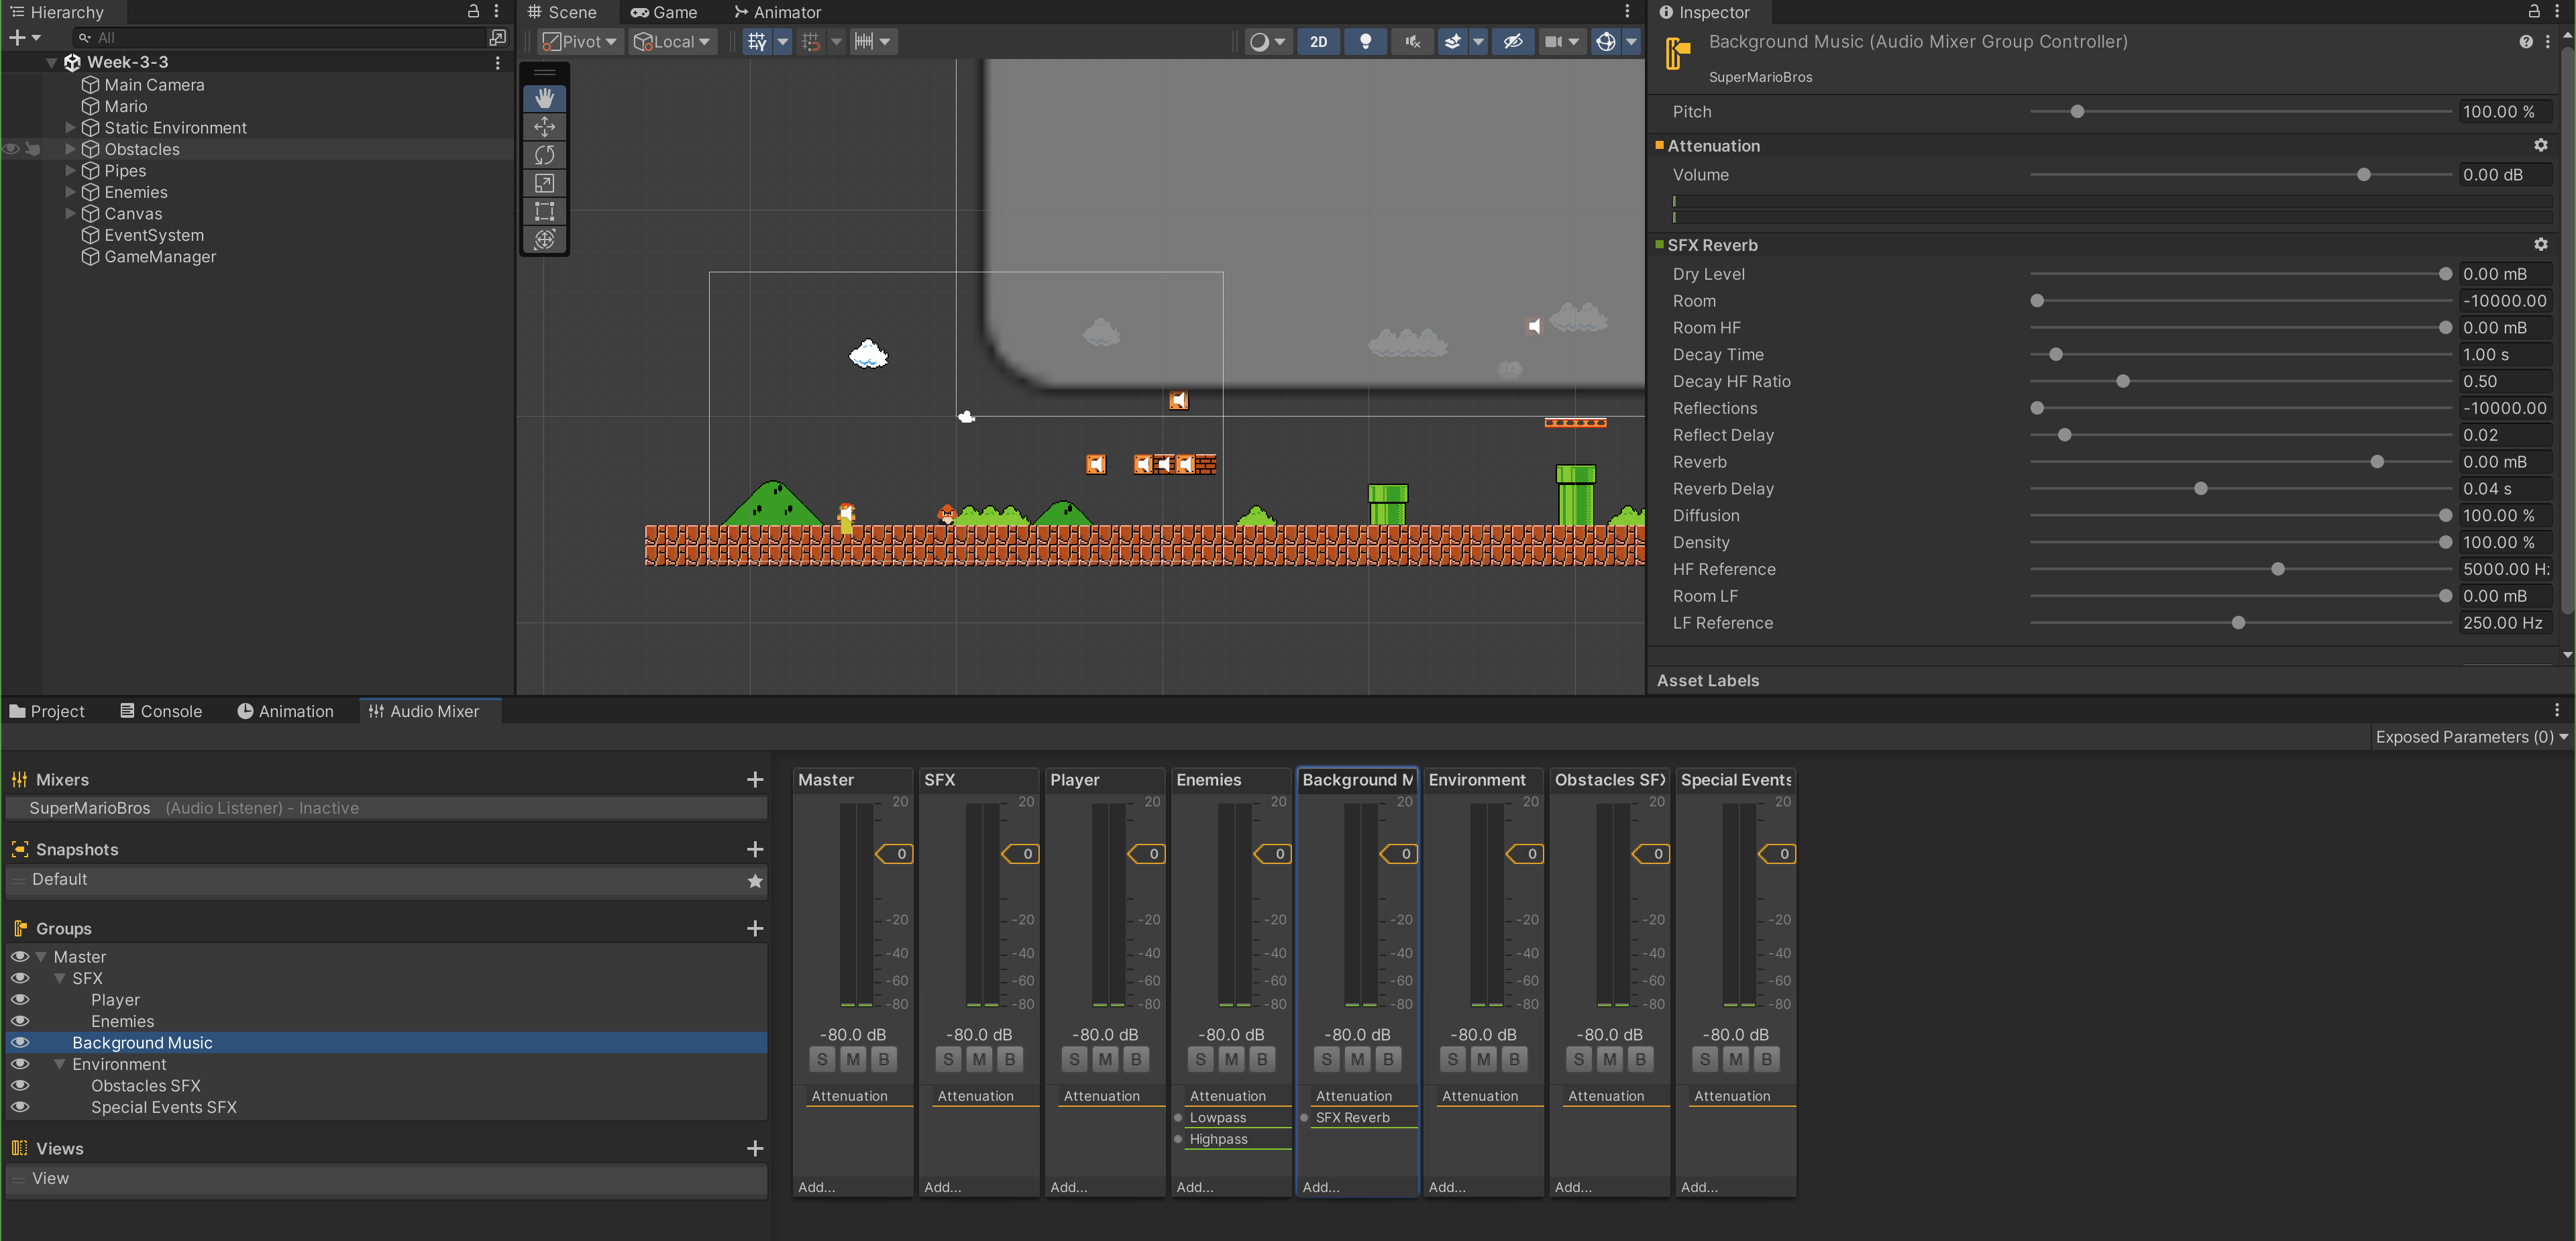
SFX Reverb has many properties, and it is best if you find presets online to get the room effect that you want without going into the details. The official documentation provides a brief description of each property, but it doesn’t seem like much help for beginners who aren’t familiar with the term.
Duck Volume
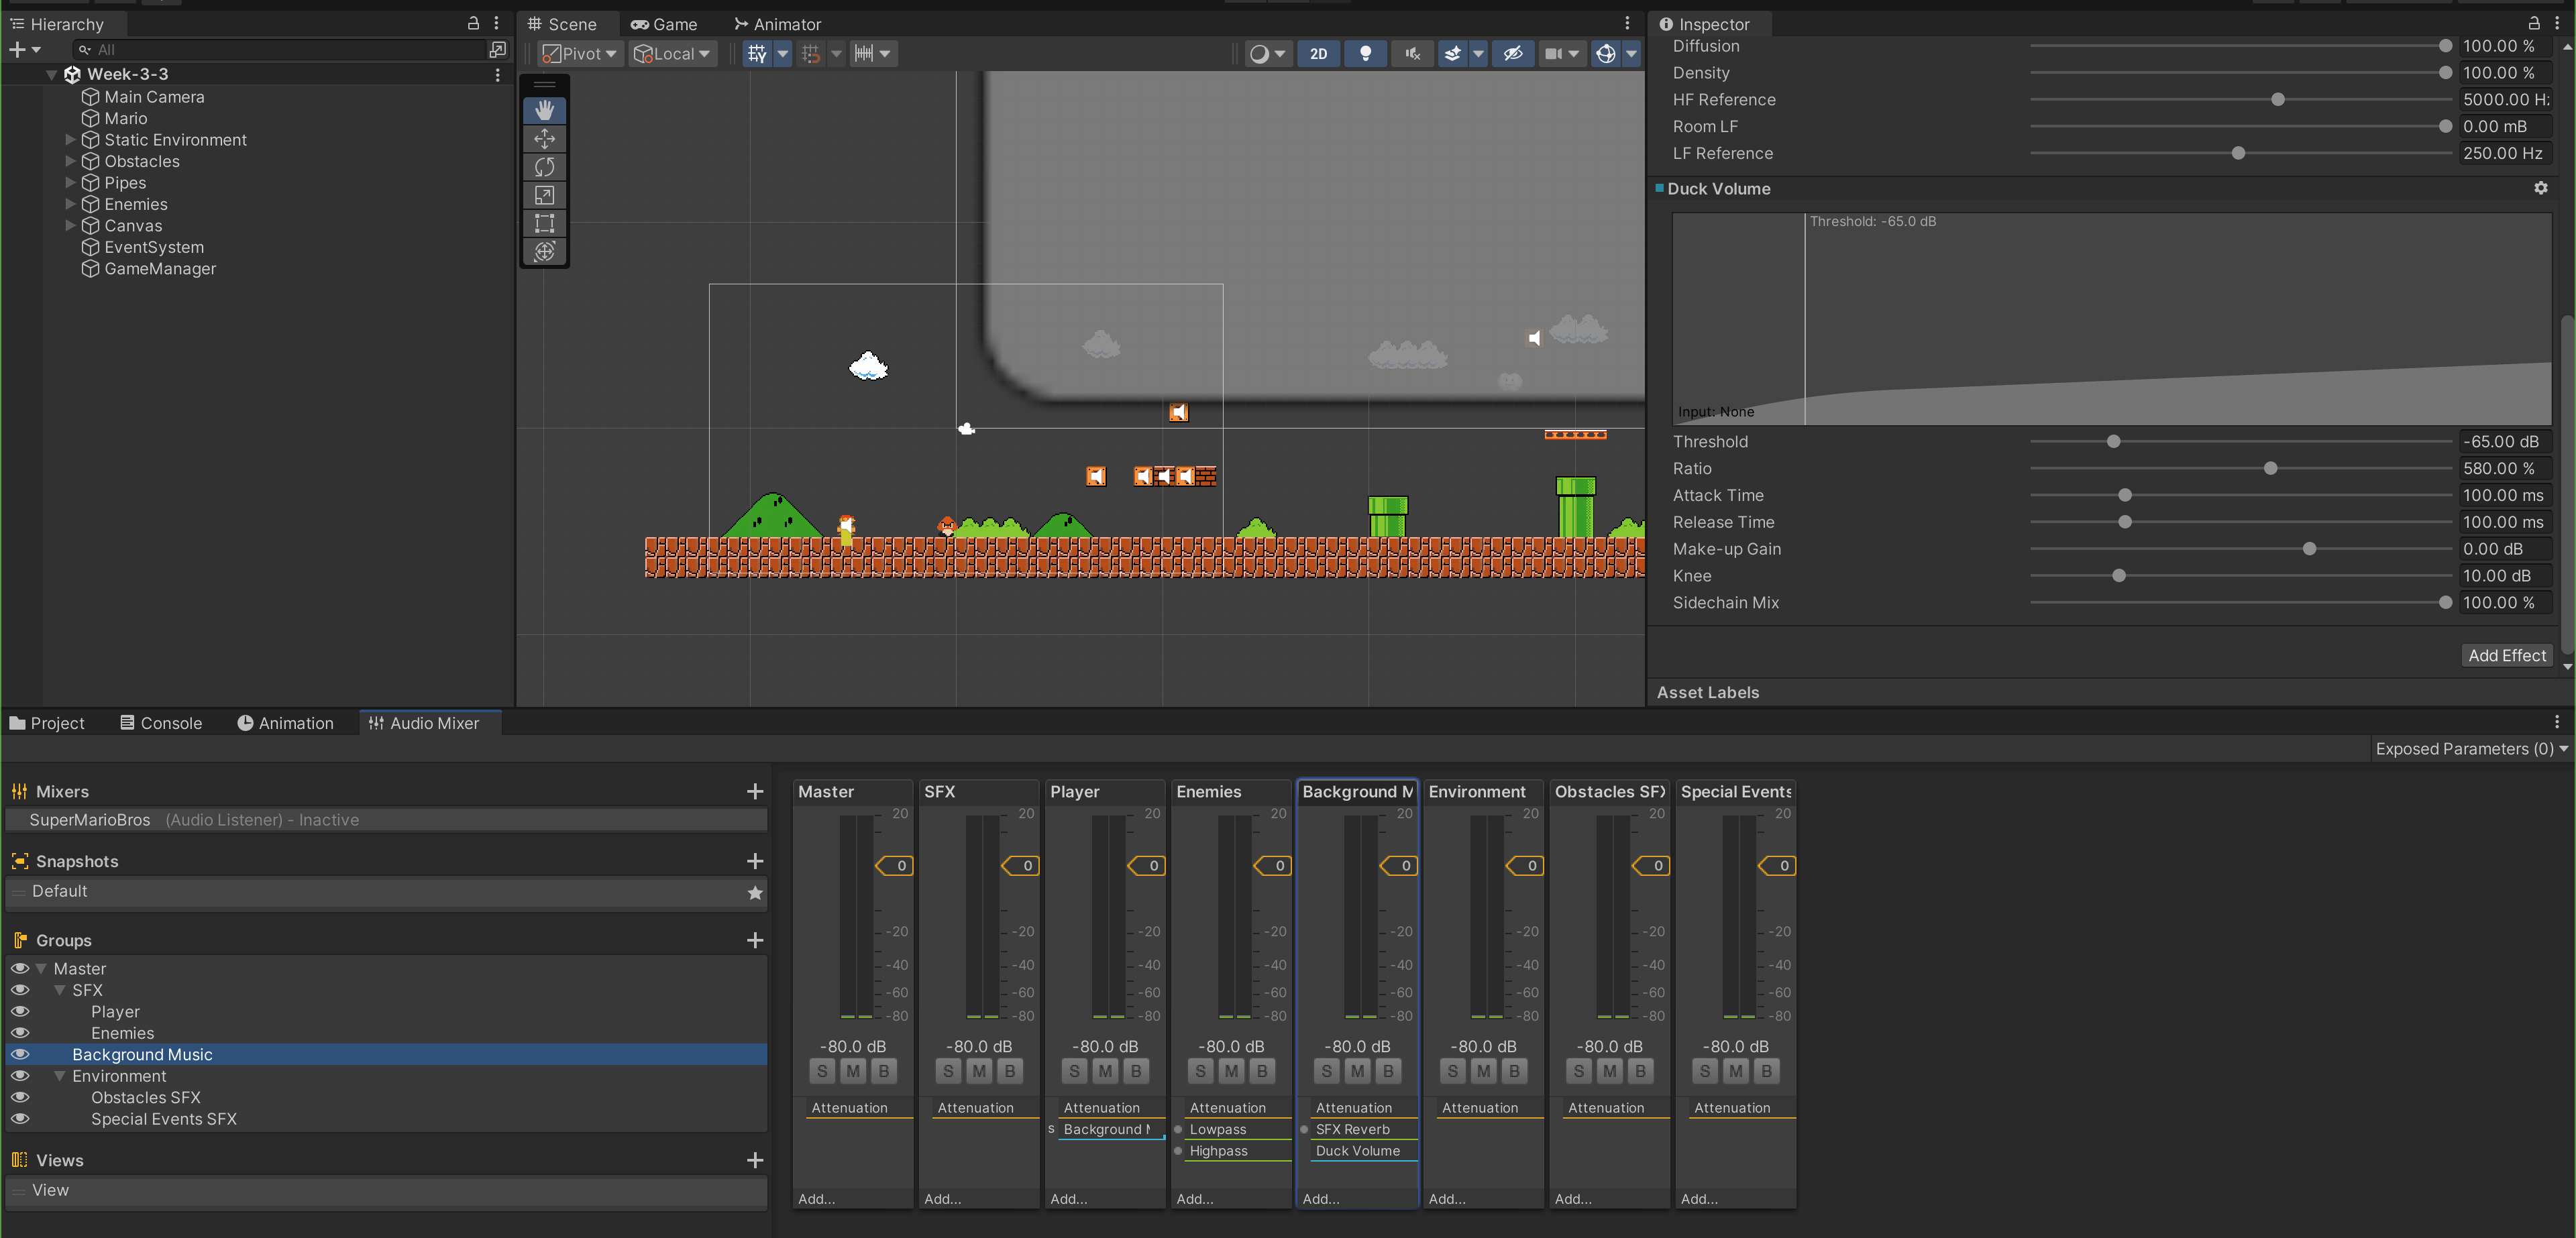
Another very useful effect to know is duck volume. This allows the group’s volume to automatically reduce when something else is playing above a certain threshold. For example, if we want to reduce the background music whenever the player is jumping, we add a Duck Volume effect in Background Sound group, and set its threshold to be -65 dB:
This configuration means:
- Any input over -65db will cause the volume to go down (Threshold)
- The volume will go down by quite a high amount (Ratio)
- The volume will go down very quickly (Attack time) at 100 ms and,
- After the alert has gone below -25db, the background music should go back to normal somewhat quickly (Release time).
Leave the other properties as is unless you know what they mean. Right now we do not need it, and we are confident that you can learn them independently next time when you need it.
Send Effect
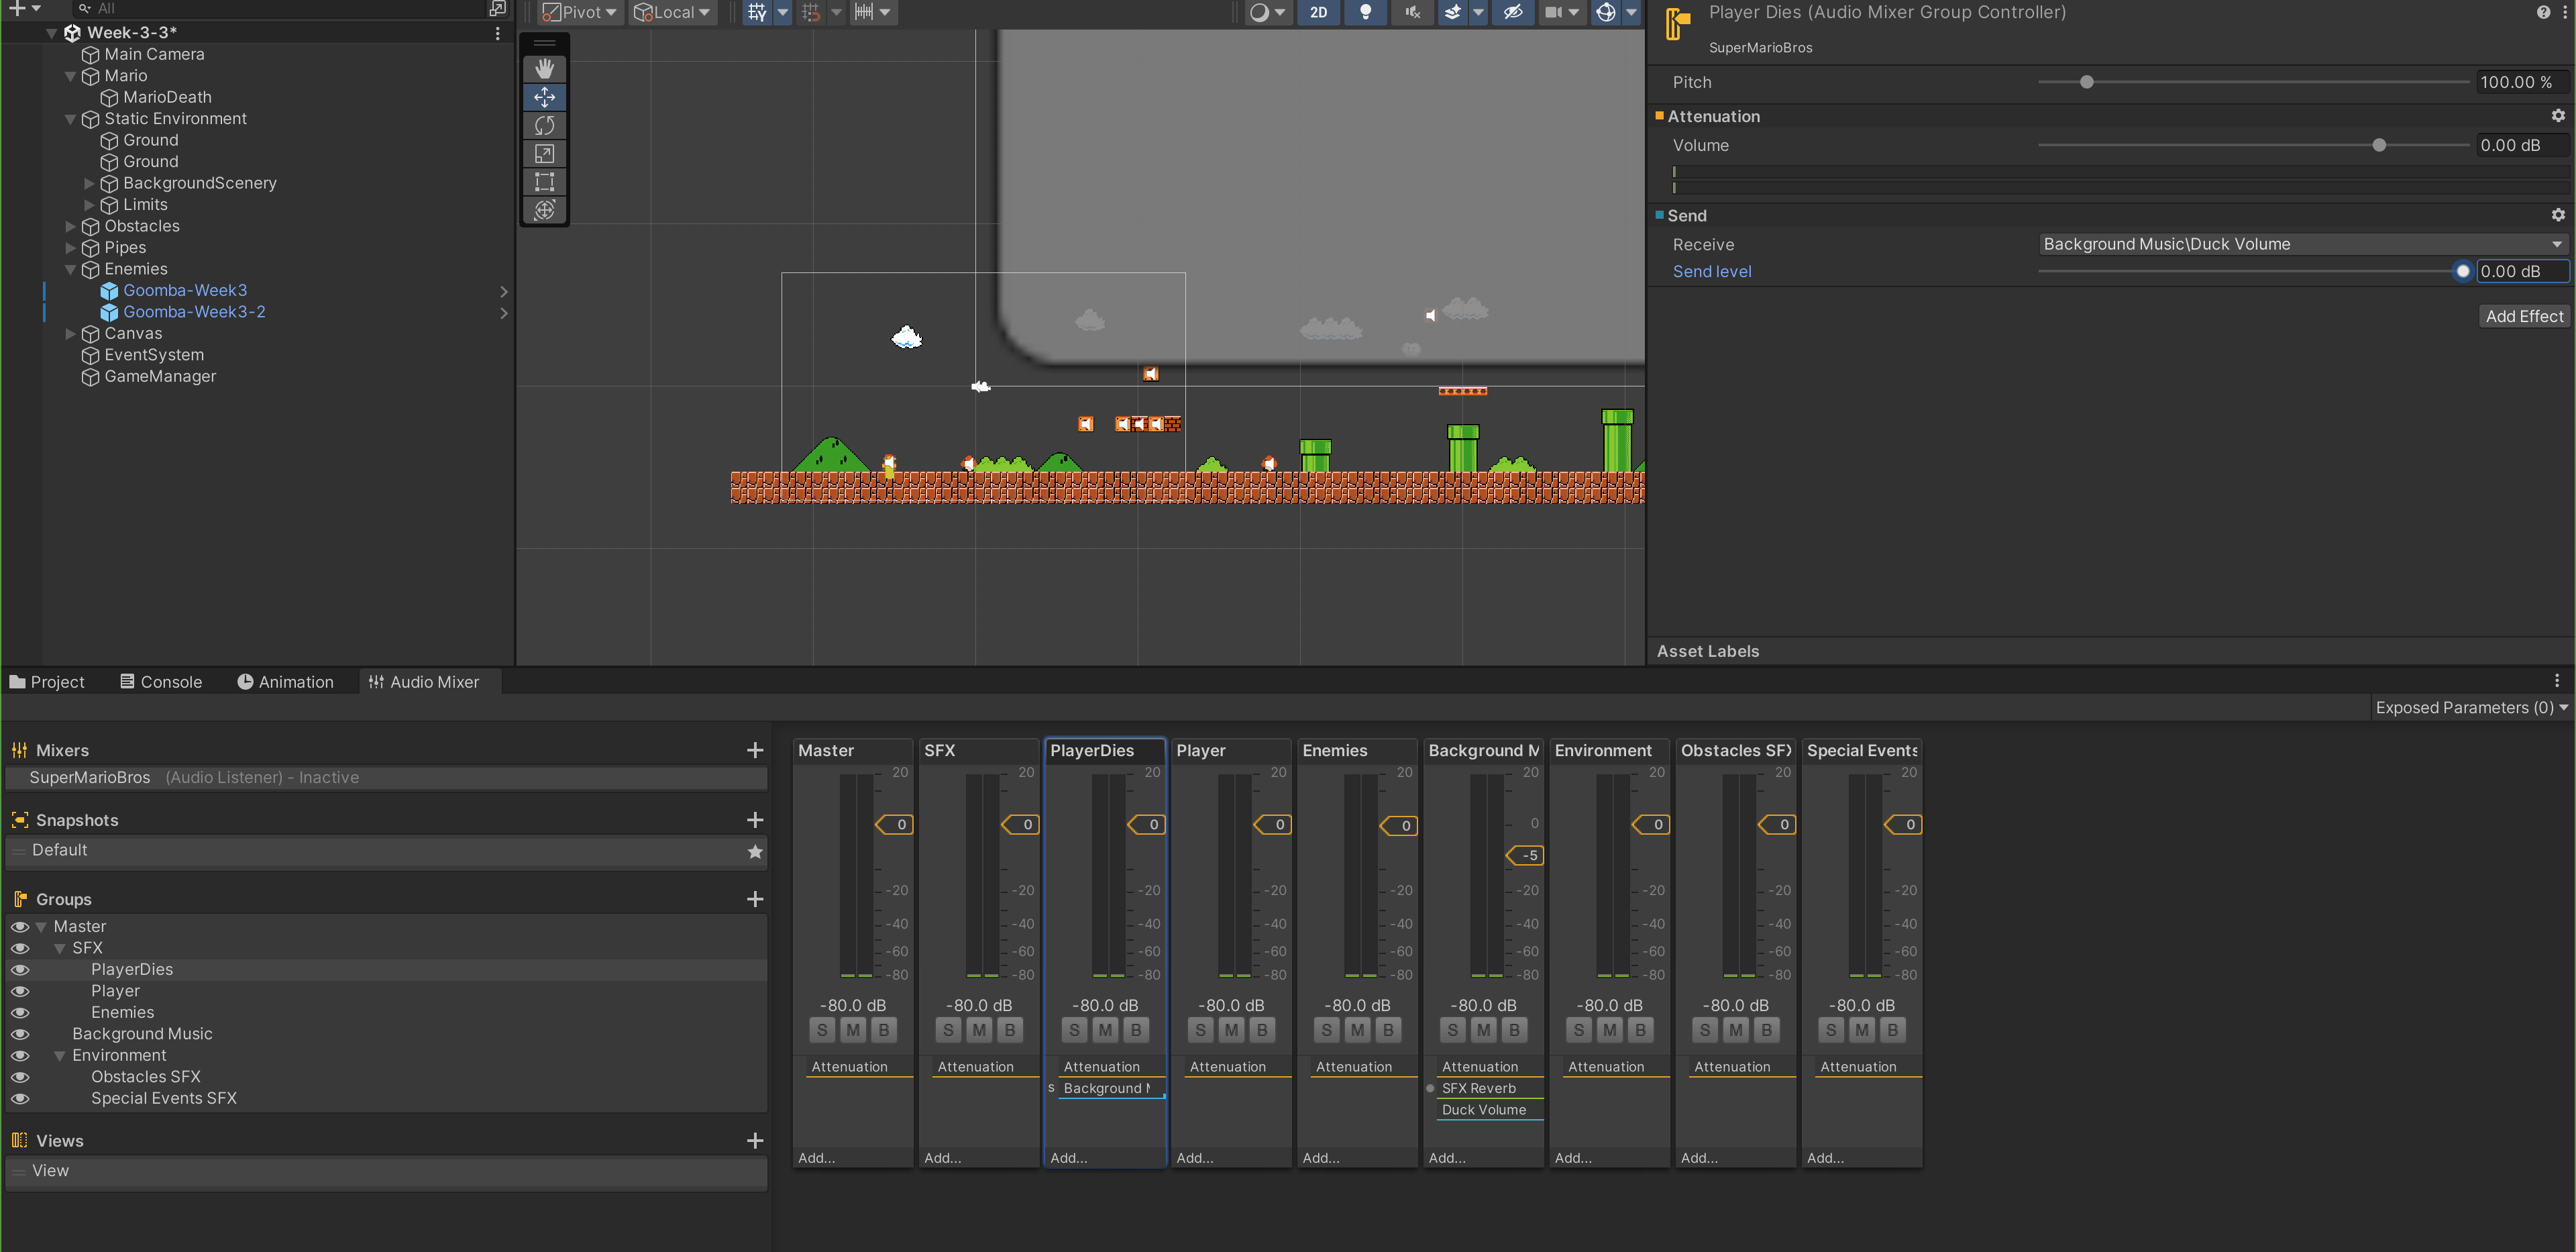
Now the final thing to do is to Send an input to this Duck Volume effect, which is the source that can cause this audio group’s volume to duck. Add a new group called Player Dies under SFX and add the Send effect. Select Background Sound as its Receive target and set its send level to 0.00 dB (so the background sound unit can receive the full amount of Player Dies SFX output).
Routing AudioSource Output To AudioMixer Group
Now go back to your scene and click on every type of AudioSource present in your scene, and set the output to each group accordingly. You can also create new ones whenever we deem appropriate. In this example, we simply have 3 used groups: Player, Player Dies, and Background Music.
- Background Music in general is not as loud as SFX (Player), so we adjust its attenuation
- We want to ensure that the background music ducks when the player-death sound effect (gameover sound) is played, and the background music gradually comes back as we are seeing the restart screen
- For convenience sake, we create another GameObject under GameManager to simply hold the gameover sound effect audio source, which will be routed to PlayerDies audio group, caused the duck-volume effect on Background Music to be triggered when Mario Dies
Test that you can run the game and that all our sound effects are applied as desired.
Snapshots and View
For management purposes, we can create snapshots and views. Snapshot is a saved state of your Audio Mixer, a great way to define moods or themes of the mix and have those moods change as the player progresses through the game. For example, we might want to the parameters of Reverb filter depending on the location of the player. It is more convenient than manually changing all SFX Reverb parameters one by one during runtime through scripts.
You can create a new View by clicking the + button, rename the view and then click to focus on it. Then you can start hiding some groups that you don’t want to see within this view. For example, we want to have "SFX Only" View that show only SFX related audio groups, and hide all other groups:
The following shows how to create Snapshots and Views, and color code your group:
You can change between snapshots programmatically as follows:
private AudioMixerSnapshot snapshot;
public AudioMixer mixer;

// instantiate somewhere in the code
snapshot = mixer.FindSnapshot("[snapshot_name]");

// then transition
snapshot.TransitionTo(.5f); //transition to snapshot
We already have one snapshot by default, the one with the ★ symbol. This is our starting snapshot (the state that will be used when we start the game).
Snapshot won’t work with new effects or new group within the Mixer, only the parameters. If you create or delete groups or effects, it will be reflected on all Snapshots.