Finite State Machine
A pluggable state machine implemented as a ScriptableObject in Unity is a powerful way to create flexible and reusable state-based logic for your game objects. It allows you to define custom data structures and behaviors that can be shared across multiple game objects.
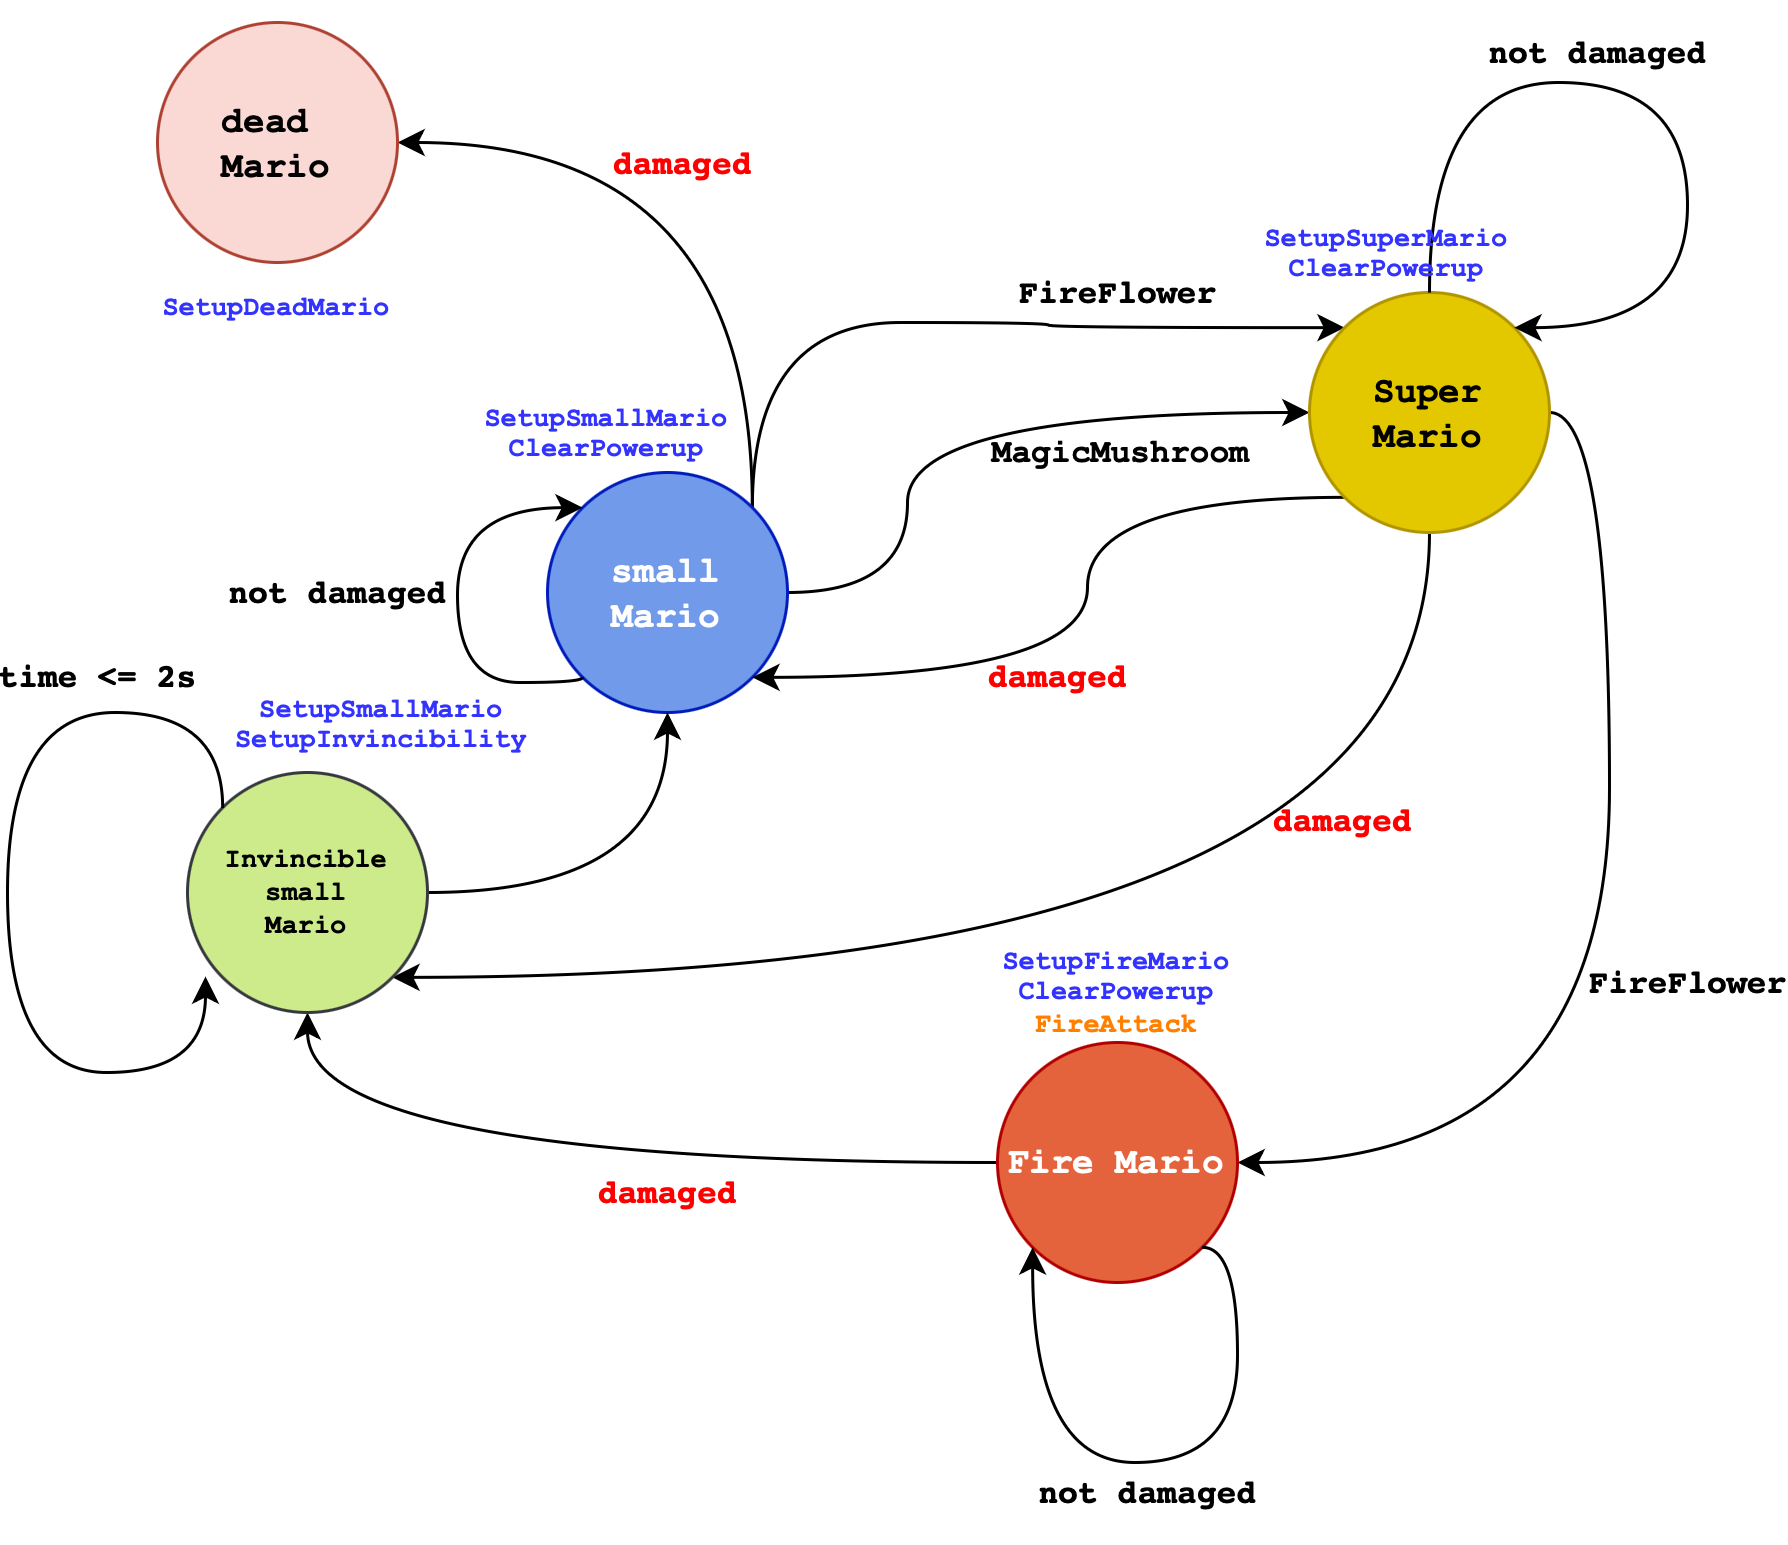
We begin by creating a State, Action, and Transition SO. The State SO describes a list of actions that have to be done in that state, and takes in a list of transitions to determine the next state that we can go to. Then we need to create a StateMachineController to be attached to the GameObject we want to control with the state machine. In this part of the lab, we will create a simple FSM to control Mario's state upon receiving different types of Powerups and Buffs. There will be two FSMs: one that will control Mario's regular state (appearance), and another one to control its Buffs.
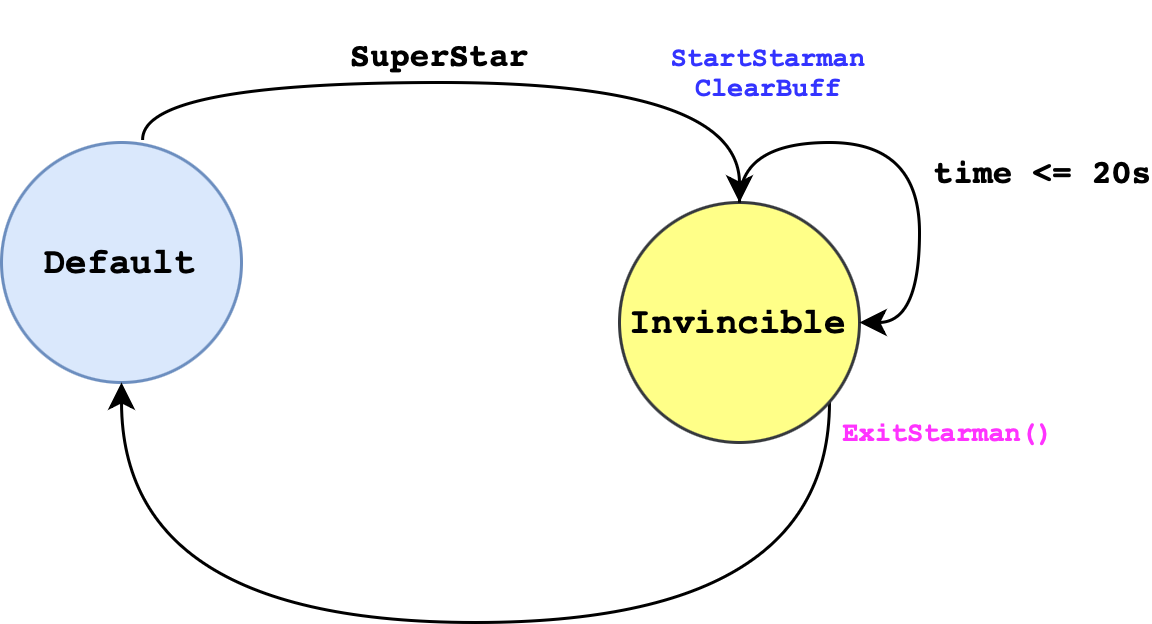
We will follow the this basic idea for Mario's state:

As for Buffs, we have this simple construct:
The Pluggable FSM Architecture
State
A state inherits SO, and is implemented as follows:
using System;
using UnityEngine;

[CreateAssetMenu(menuName = "PluggableSM/State")]
public class State : ScriptableObject
{
    public Action[] setupActions;
    public Action[] actions;
    public EventAction[] eventTriggeredActions;
    public Action[] exitActions;
    public Transition[] transitions;

    // for visualisation at the Scene
    public Color sceneGizmoColor = Color.grey;

    /********************************/
    /* REGULAR METHODS */
    // these regular methods cannot be overriden
    public void UpdateState(StateController controller)
    {
        DoActions(controller);
        CheckTransitions(controller);
    }

    protected void DoActions(StateController controller)
    {
        for (int i = 0; i < actions.Length; i++) actions[i].Act(controller);
    }
    public void DoSetupActions(StateController controller)
    {
        for (int i = 0; i < setupActions.Length; i++) setupActions[i].Act(controller);
    }
    public void DoExitActions(StateController controller)
    {
        for (int i = 0; i < exitActions.Length; i++) exitActions[i].Act(controller);
    }

    public void DoEventTriggeredActions(StateController controller, ActionType type = ActionType.Default)
    {
        // cast all actions that matches given type
        foreach (EventAction eventTriggeredAction in eventTriggeredActions)
        {
            if (eventTriggeredAction.type == type)
            {
                eventTriggeredAction.action.Act(controller);
            }
        }
    }

    protected void CheckTransitions(StateController controller)
    {
        controller.transitionStateChanged = false; //reset
        for (int i = 0; i < transitions.Length; ++i)
        {
            //check if the previous transition has caused a change. If yes, stop. Let Update() in StateController run again in the next state.
            if (controller.transitionStateChanged)
            {
                break;
            }
            bool decisionSucceded = transitions[i].decision.Decide(controller);
            if (decisionSucceded)
            {
                controller.TransitionToState(transitions[i].trueState);
            }
            else
            {
                controller.TransitionToState(transitions[i].falseState);
            }
        }
    }
    /********************************/

}
It mainly contains regular methods (cannot be overriden) with the following functionality:
UpdateState: called at every frame update by the state controller, we cast our actions and check for possible transitions- Action-related methods: there are four types of actions:
- Exit and Setup Actions: to be done exactly once: when we first arrive at this state and when we leave this state
- Actions: called at every frame update by
UpdateState. This is particularly useful if you have bots or NPCs, but not so much in the case of player-controlled Mario - Event Triggered Actions: actions that should be executed whenever the controller wishes to cast it, could be due to certain events such as keyboard pressed or collision with other gameObjects
CheckTransitions: goes through every single transition listed undertransitions. Some decision resulted in a different state, while some results in the same state. If the gameObject has changed its state, webreak(stop checking for more transitions)
Action
An Action class also inherits SO. The exact implementation of each action differs depending on the action, and so we leave its method as abstract:
using UnityEngine;

public abstract class Action : ScriptableObject
{
    public abstract void Act(StateController controller);
}
EventAction
An EventAction is simply a struct containing an Action and its type. This is to allow the State to loop through each registered EventAction and cast an Action whose Type matches the user-defined type accordingly should a particular event occur:
public enum ActionType
{
    Attack = 0,
    Default = -1
}

[System.Serializable]
public struct EventAction
{
    public Action action;
    public ActionType type;
}
Decision
A Decision class also inherits SO, and similarly we declare its method as abstract first since its implementation varies greatly:
using UnityEngine;

public abstract class Decision : ScriptableObject
{
    public abstract bool Decide(StateController controller);

}
Transition
A Transition is simply a struct to hold a Decision, and two State depending on whether that decision returns true or false:
[System.Serializable]
public class Transition
{
    public Decision decision;
    public State trueState;
    public State falseState;

}
State Controller
This script should be attached to the game object you wished to be the state machine. You can use it to manage buffs and powerups for your main character or to control NPCs or AI bots.
using UnityEngine;

public abstract class StateController : MonoBehaviour
{
    public State startState;
    public State previousState;
    public State currentState;
    public State remainState;
    public bool transitionStateChanged = false;
    [HideInInspector] public float stateTimeElapsed;

    public bool isActive = true;

    public virtual void Start()
    {
        OnSetupState(); // setup when game starts
    }

    public virtual void OnSetupState()
    {
        if (currentState)
            currentState.DoSetupActions(this);
    }

    public virtual void OnExitState()
    {
        // reset time in this state
        stateTimeElapsed = 0;
        if (currentState)
            currentState.DoExitActions(this);
    }

    // for visual aid to indicate which state this object is currently at
    public virtual void OnDrawGizmos()
    {
        if (currentState != null)
        {
            Gizmos.color = currentState.sceneGizmoColor;
            Gizmos.DrawWireSphere(this.transform.position, 1.0f);
        }
    }

    /********************************/
    // Regular methods
    // no action should be done here, strictly for transition
    public void TransitionToState(State nextState)
    {
        if (nextState == remainState) return;

        // The following two methods only happens once if nextState != remainstate
        OnExitState(); // cast exit action if any,

        // transition the states
        previousState = currentState;
        currentState = nextState;
        transitionStateChanged = true;

        OnSetupState(); // cast entry action if any
    }

    // default method to check if we've been in the state long enough
    // this method assumes that you will call this once per update frame
    // Time.deltaTime: the interval in seconds from the last frame to the current one (Read Only).
    public bool CheckIfCountDownElapsed(float duration)
    {
        stateTimeElapsed += Time.deltaTime;
        return stateTimeElapsed >= duration;
    }

    public void Update()
    {
        if (!isActive) return; // this is different from gameObject active, allow for separate control

        currentState.UpdateState(this);
    }
    /********************************/


}
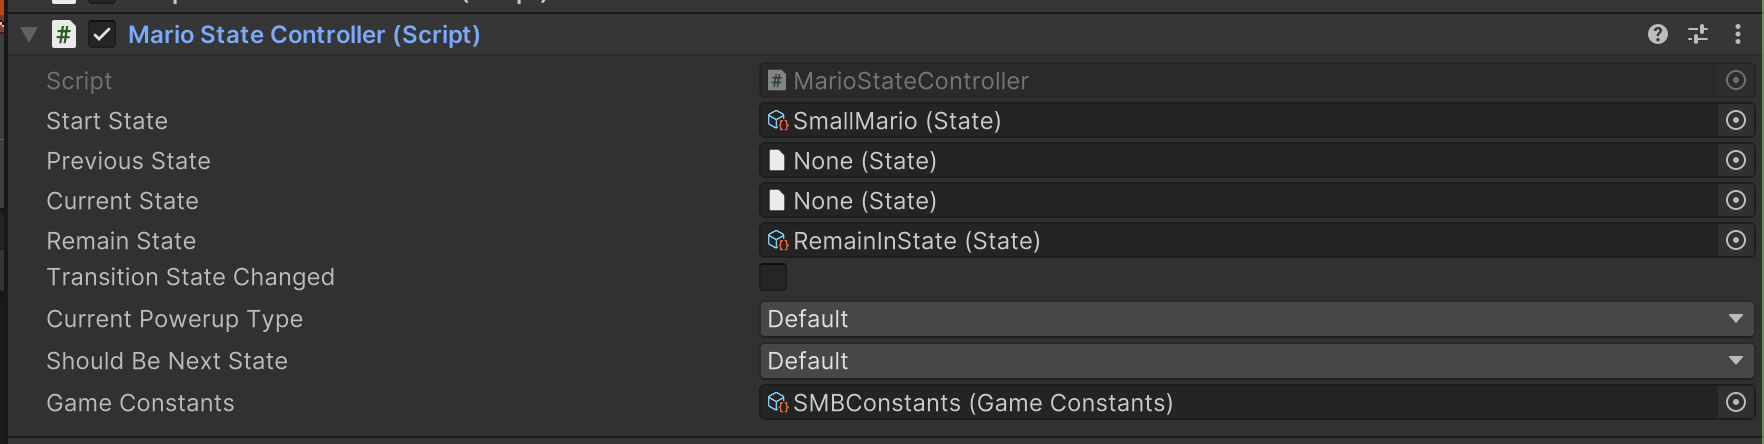
You will need to inherit the StateController to suit your own needs. There are three regular methods that you should not modify, and for virtual methods which you can override. Dont forget to call base.[method]() if you want to invoke the parent's implementation as well. Take your time to read how things work in StateController.
Create Mario State Controller
MarioStateController is a script that we will attach to Mario to control its powerup effect. You can extend this class however you like, but we shall start by inheriting the base class StateController:
using System;
using System.Collections;
using System.Collections.Generic;
using UnityEngine;

public class MarioStateController : StateController
{
    public PowerupType currentPowerupType = PowerupType.Default;
    public MarioState shouldBeNextState = MarioState.Default;


    public override void Start()
    {
        base.Start();
        GameRestart(); // clear powerup in the beginning, go to start state
    }

    // this should be added to the GameRestart EventListener as callback
    public void GameRestart()
    {
        // clear powerup
        currentPowerupType = PowerupType.Default;
        // set the start state
        TransitionToState(startState);
    }

    public void SetPowerup(PowerupType i)
    {
        currentPowerupType = i;
    }

}
To make life easier, we use an Enum to define MarioState:
public enum MarioState
{
    Default = -1,
    SmallMario = 0,
    SuperMario = 1,
    FireMario = 2,
    InvincibleSmallMario = 3,
    DeadMario = 99
}
Create Action Scripts
Since Action and Decision are highly specific to our use cases, we need to create scripts that describe what we should do. Let's start with actions first, there are three categories of actions from this FSM diagram we had above:
- Regular Action:
FireAttackAction - Setup Action:
SetupAnimatorAction,ClearPowerupAction,InvincibleAction
SetupAnimatorAction
This script swaps Mario's current animator to be the other. It will only be done once, for example when entering SuperMario state, or when entering FireMario state. This entirely changes how Mario looks:
using System.Collections;
using System.Collections.Generic;
using UnityEngine;


[CreateAssetMenu(menuName = "PluggableSM/Actions/SetupAnimator")]
public class SetupAnimator : Action
{
    public RuntimeAnimatorController animatorController;
    public override void Act(StateController controller)
    {
        controller.gameObject.GetComponent<Animator>().runtimeAnimatorController = animatorController;
    }
}
The method Act receives a StateController parameter, which you can use to access the gameObject it is attached to and access its components using GetComponent.
ClearPowerupAction
This action removes the current powerup registered as member in MarioState controller.
using UnityEngine;

[CreateAssetMenu(menuName = "PluggableSM/Actions/ClearPowerup")]
public class ClearPowerupAction : Action
{
    public override void Act(StateController controller)
    {
        MarioStateController m = (MarioStateController)controller;
        m.currentPowerupType = PowerupType.Default;
    }
}
Since the method Act accepts StateController parameter, we need to cast it to MarioStateController first before being able to access the member currentPowerupType.
To make life easier, we use an Enum to define our PowerupType. Use this to label each Powerup present in the game.
public enum PowerupType
{
    Coin = 0,
    MagicMushroom = 1,
    OneUpMushroom = 2,
    StarMan = 3,
    FireFlower = 4,
    Damage = 99,
    Default = -1
}
Note how Damage is some kind of "PowerupType" too. You will need to make further modifications to make this work.
FireAttackAction
This action is called whenever the key 'Z' is pressed and whenever Mario is at FireMario state as follows:
using UnityEngine;

[CreateAssetMenu(menuName = "PluggableSM/Actions/FireAttack")]
public class FireAttackAction : Action
{
    public int maxPrefabInScene = 3;
    public float impulseForce = 1;
    public float degree = 45;
    public GameObject attackPrefab;
    // a scriptable object updated by PlayerMovement / PlayerController to store current Mario's facing
    public BoolVariable marioFaceRight;

    public override void Act(StateController controller)
    {
        GameObject[] instantiatedPrefabsInScene = GameObject.FindGameObjectsWithTag(attackPrefab.tag);
        if (instantiatedPrefabsInScene.Length < maxPrefabInScene)
        {
            // instantiate it where controller (mario) is
            GameObject x = Instantiate(attackPrefab, controller.transform.position, Quaternion.identity);

            // Get the Rigidbody component of the instantiated object
            Rigidbody2D rb = x.GetComponent<Rigidbody2D>();
            // Check if the Rigidbody component exists
            if (rb != null)
            {
                // compute direction vector
                Vector2 direction = CalculateDirection(degree, marioFaceRight.Value);
                // Apply a rightward impulse force to the object
                rb.AddForce(direction * impulseForce, ForceMode2D.Impulse);
            }

        }

    }

    public Vector2 CalculateDirection(float degrees, bool isFacingRight)
    {
        // Convert degrees to radians
        float radians = degrees * Mathf.Deg2Rad;

        // Calculate the direction vector
        float x = Mathf.Cos(radians);
        float y = Mathf.Sin(radians);

        // If the object is facing left, invert the x-component of the direction
        if (!isFacingRight)
        {
            x = -x;
        }

        return new Vector2(x, y);
    }
}
When Act is called, we instantiate a prefab attackPrefab and spawn it based on the direction that Mario is facing, 45 degrees upwards with an initial impulseForce. We added some little constraint to prevent spamming of this prefab by limiting only 3 prefabs on the scene at a time.
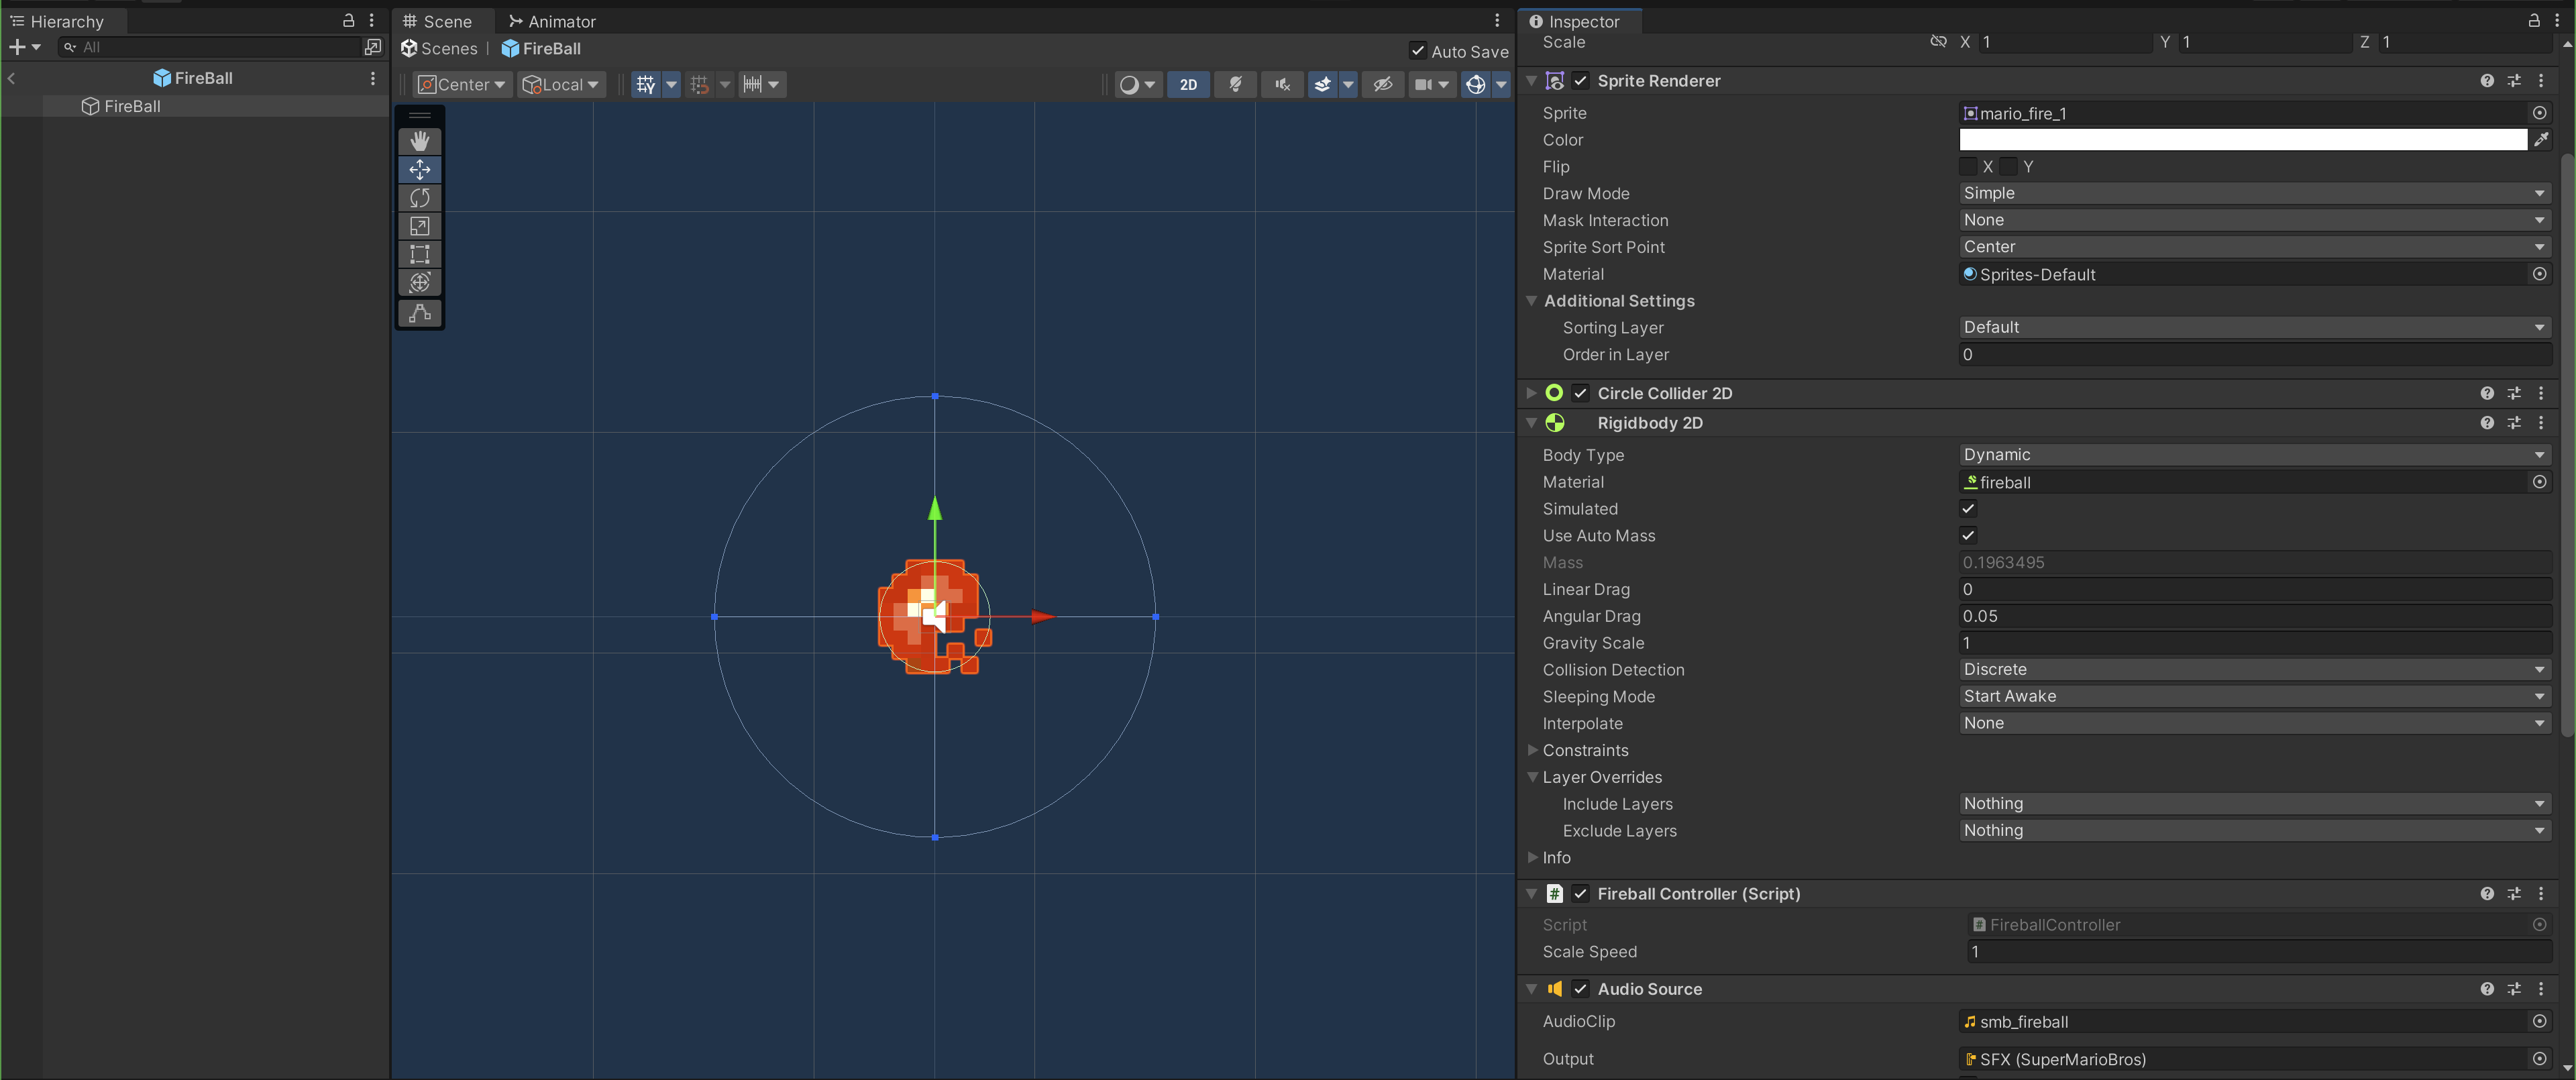
Fireball Prefab
You are free to create your own custom fireball prefab, but here's how we implement it with a Coroutine so that it only lasts for about 2.5 seconds and destroys itself when colliding with Enemy:
using System.Collections;
using System.Collections.Generic;
using System.Threading.Tasks;
using UnityEngine;

public class FireballController : MonoBehaviour
{
    // Start is called before the first frame update
    [SerializeField] private float scaleSpeed = 1.0f;

    void Start()
    {
        StartCoroutine(ScaleAndDestroyCoroutine());
        GetComponent<AudioSource>().Play();
    }

    private IEnumerator ScaleAndDestroyCoroutine()
    {
        // Wait for 2 seconds
        yield return new WaitForSecondsRealtime(2);
        // Gradually scale down the GameObject
        while (transform.localScale.x > 0.01f)
        {
            transform.localScale -= Vector3.one * scaleSpeed * Time.deltaTime;
            yield return null;
        }

        // Ensure the GameObject is completely scaled down
        transform.localScale = Vector3.zero;

        // Destroy the GameObject
        Destroy(gameObject);
    }

    void OnCollisionEnter2D(Collision2D collision)
    {
        if (collision.gameObject.tag == "Enemy")
        {
            // destroy self
            Destroy(gameObject);
        }
    }
}
To create the prefab, simply add the following components and attach the script above to it:
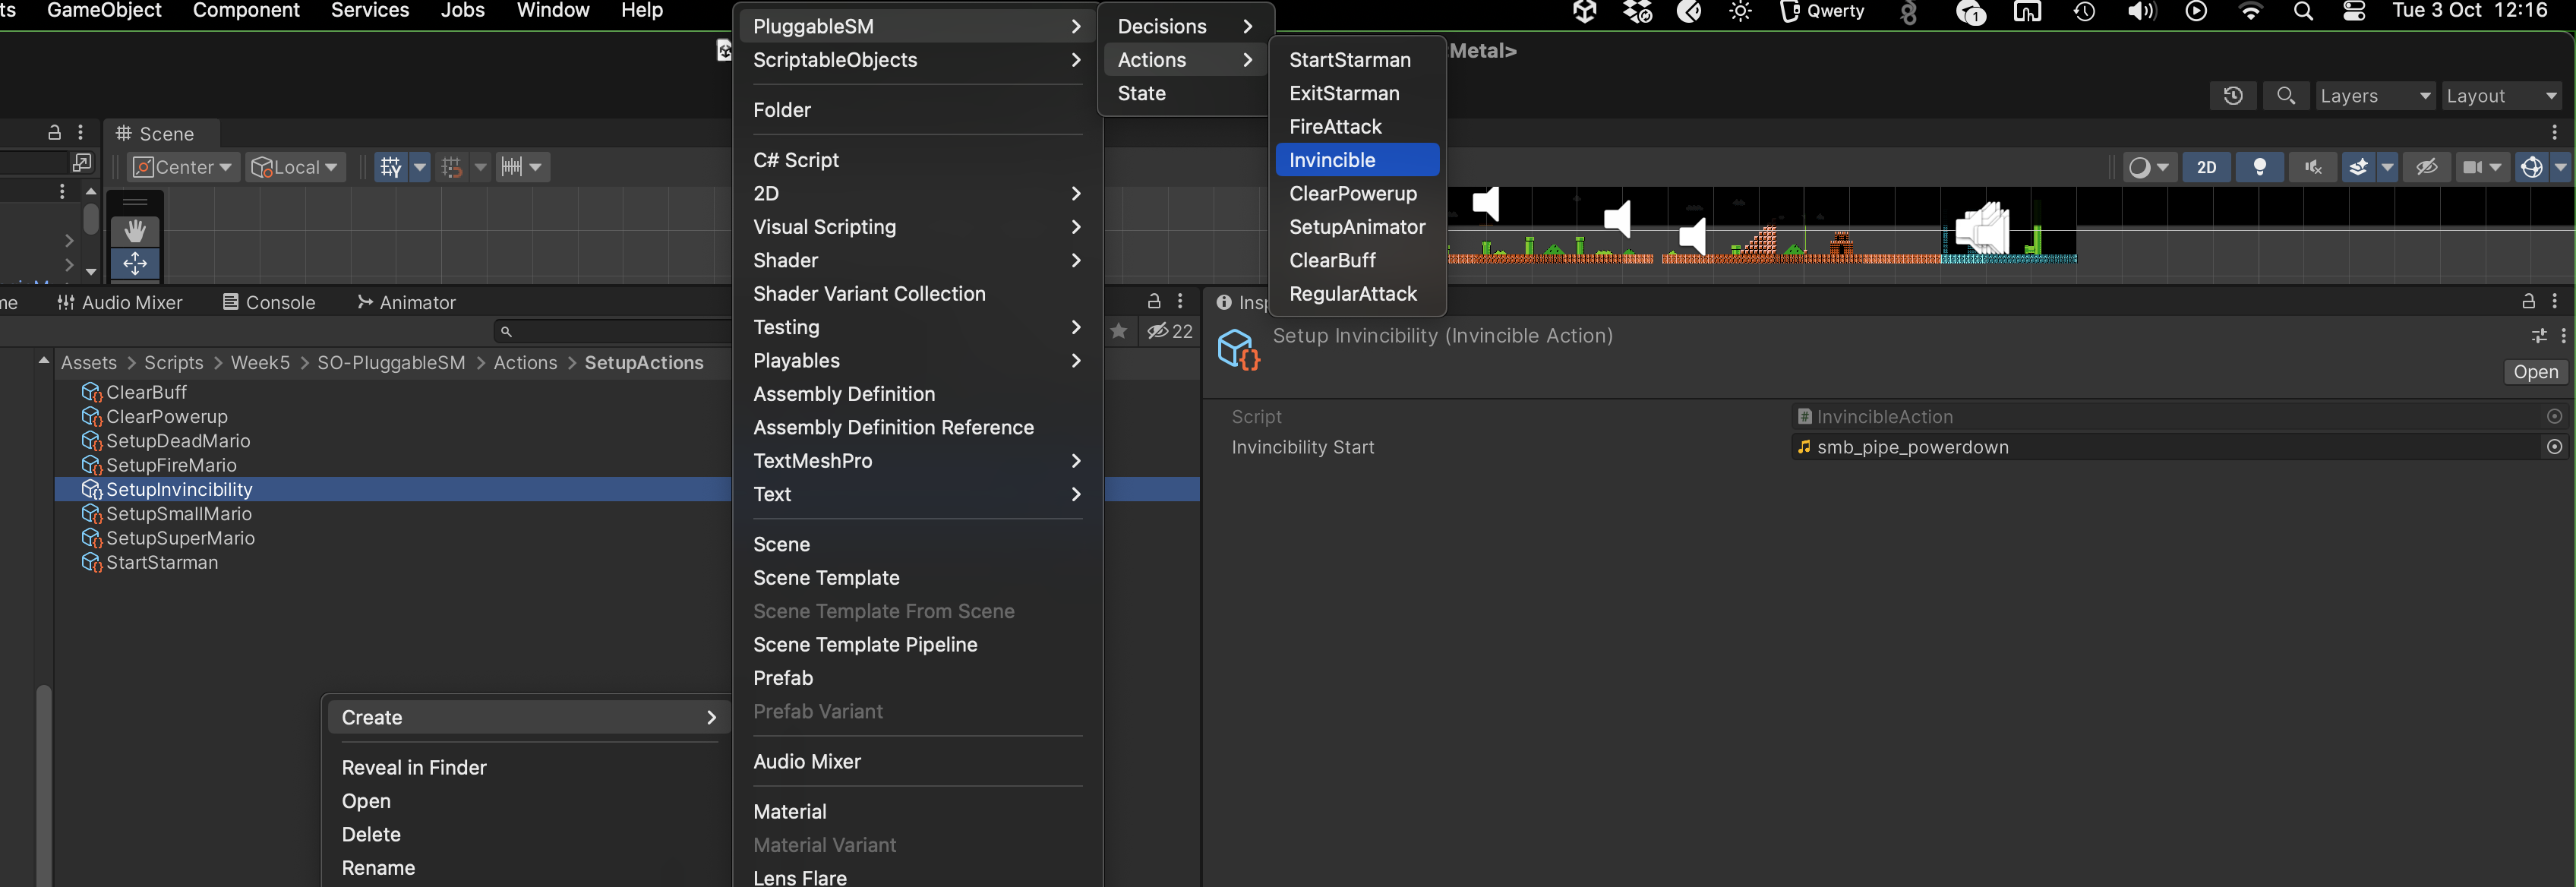
InvincibleAction
This action happens when SuperMario or FireMario collides with Goomba. We need to rapidly enable and disable Mario's SpriteRenderer (flicker) until Mario's state is no longer InvincibleSmallMario. Since InvincibleAction is a ScriptableObject, we cannot utilise Coroutines. As such the actual implementation of Mario's flickering sprite should be implemented within MarioStateController. The InvincibleAction simply calls that method.
- InvincibleAction.cs
- MarioStateController.cs
using System.Collections;
using System.Collections.Generic;
using UnityEngine;

[CreateAssetMenu(menuName = "PluggableSM/Actions/SetupInvincibility")]
public class InvincibleAction : Action
{
    public AudioClip invincibilityStart;
    public override void Act(StateController controller)
    {
        MarioStateController m = (MarioStateController)controller;
        m.gameObject.GetComponent<AudioSource>().PlayOneShot(invincibilityStart);
        m.SetRendererToFlicker();
    }
}
using System;
using System.Collections;
using UnityEngine;

public class MarioStateController : StateController
{
    private SpriteRenderer spriteRenderer;

    // other methods
    public void SetRendererToFlicker()
    {
        spriteRenderer = GetComponent<SpriteRenderer>();
        StartCoroutine(BlinkSpriteRenderer());
    }
    private IEnumerator BlinkSpriteRenderer()
    {
        spriteRenderer = GetComponent<SpriteRenderer>();
        while (string.Equals(currentState.name, "InvincibleSmallMario", StringComparison.OrdinalIgnoreCase))
        {
            // Toggle the visibility of the sprite renderer
            spriteRenderer.enabled = !spriteRenderer.enabled;

            // Wait for the specified blink interval
            yield return new WaitForSeconds(gameConstants.flickerInterval);
        }

        spriteRenderer.enabled = true;
    }

}
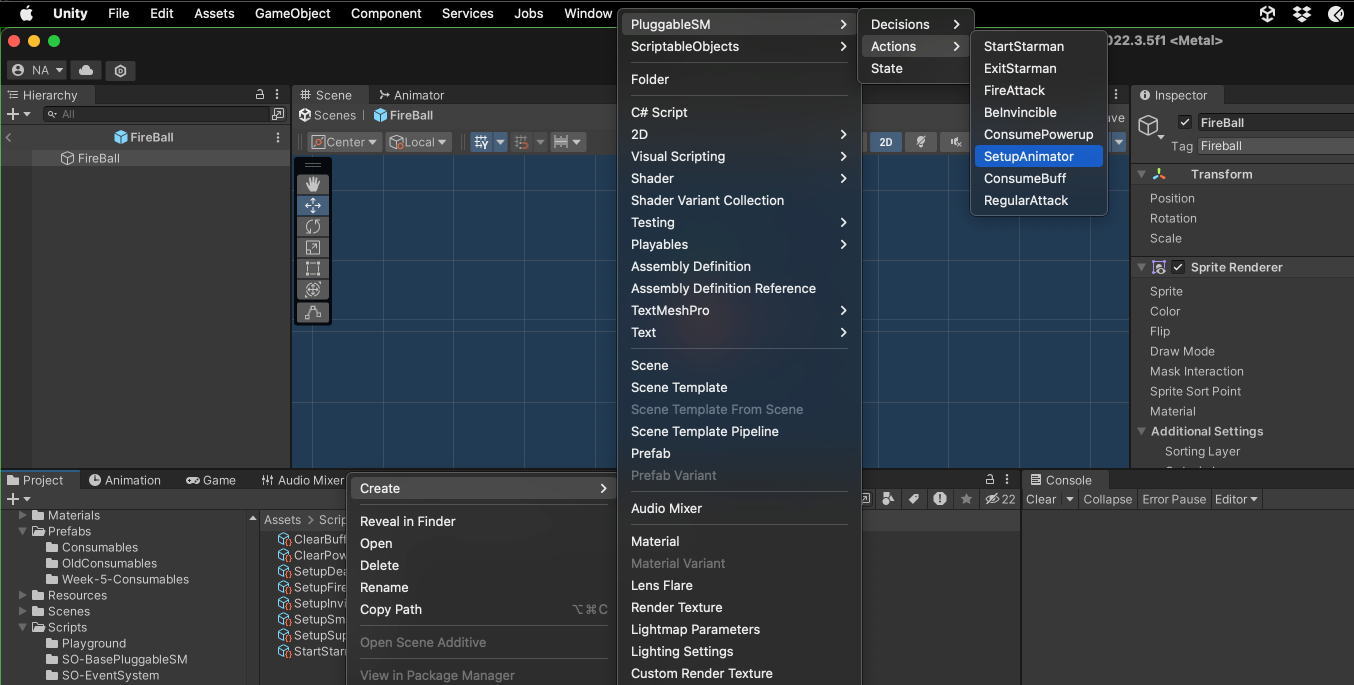
Create Action Scriptable Objects
SetupAnimatorAction
We now instantiate these actions accordingly. Right click at the Project window and select SetupAnimator Action:
Name it SetupSmallMario, and attach Mario animator in the Animator Controller field:
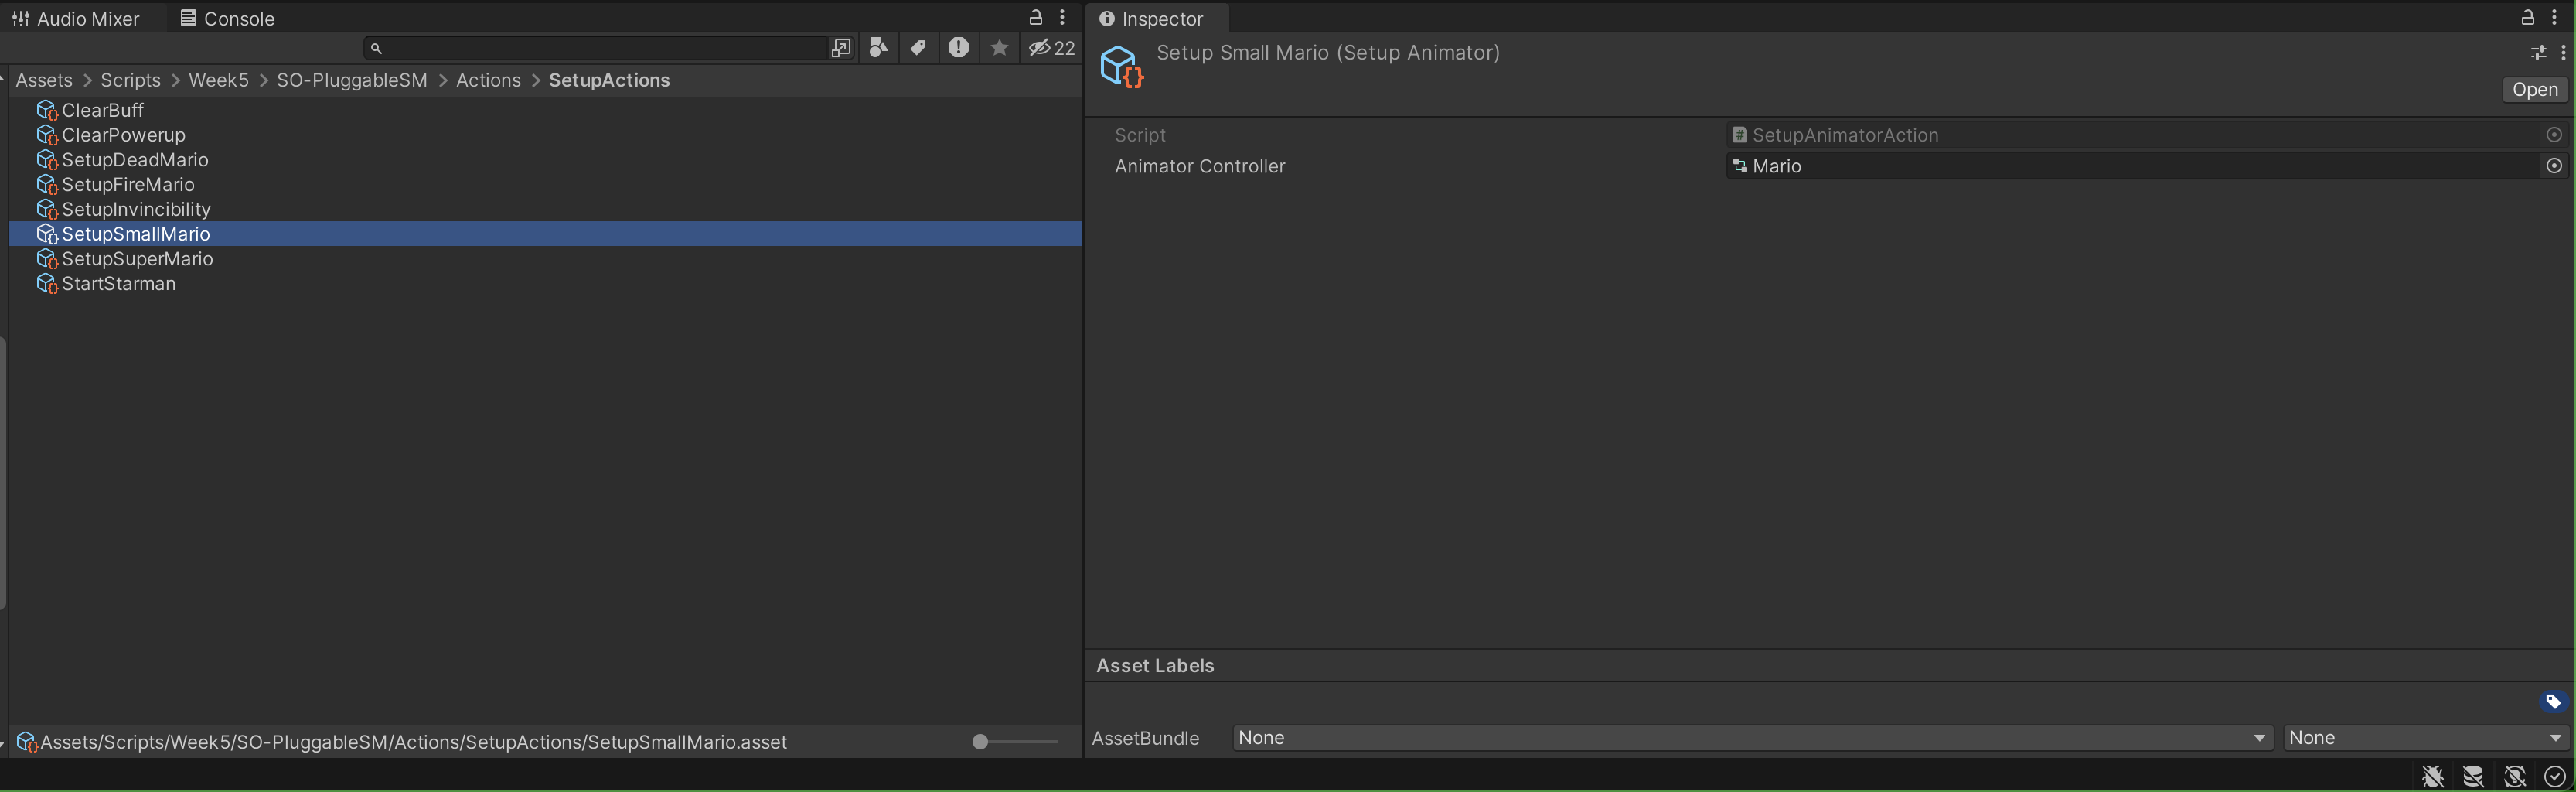
Now you need to create DeadMario, SuperMario and FireMario Animators as well, and then create three more SetupAnimator Action, name it SetupDeadMario, SetupSuperMario and SetupFireMario. Here's a preview of the animators required:
Animation Event on Animators not Attached to gameObject
Note that if you want to call an Animation Event from mario-die animation clip, you can attach it to Mario first and set up necessary functions as per normal from such function dropdown at the inspector:

When you switch Mario's animator to other animator, DeadMario animator and clips becomes standalone (not associated with any object). The event will work just fine, but notice how they're matched based on name:
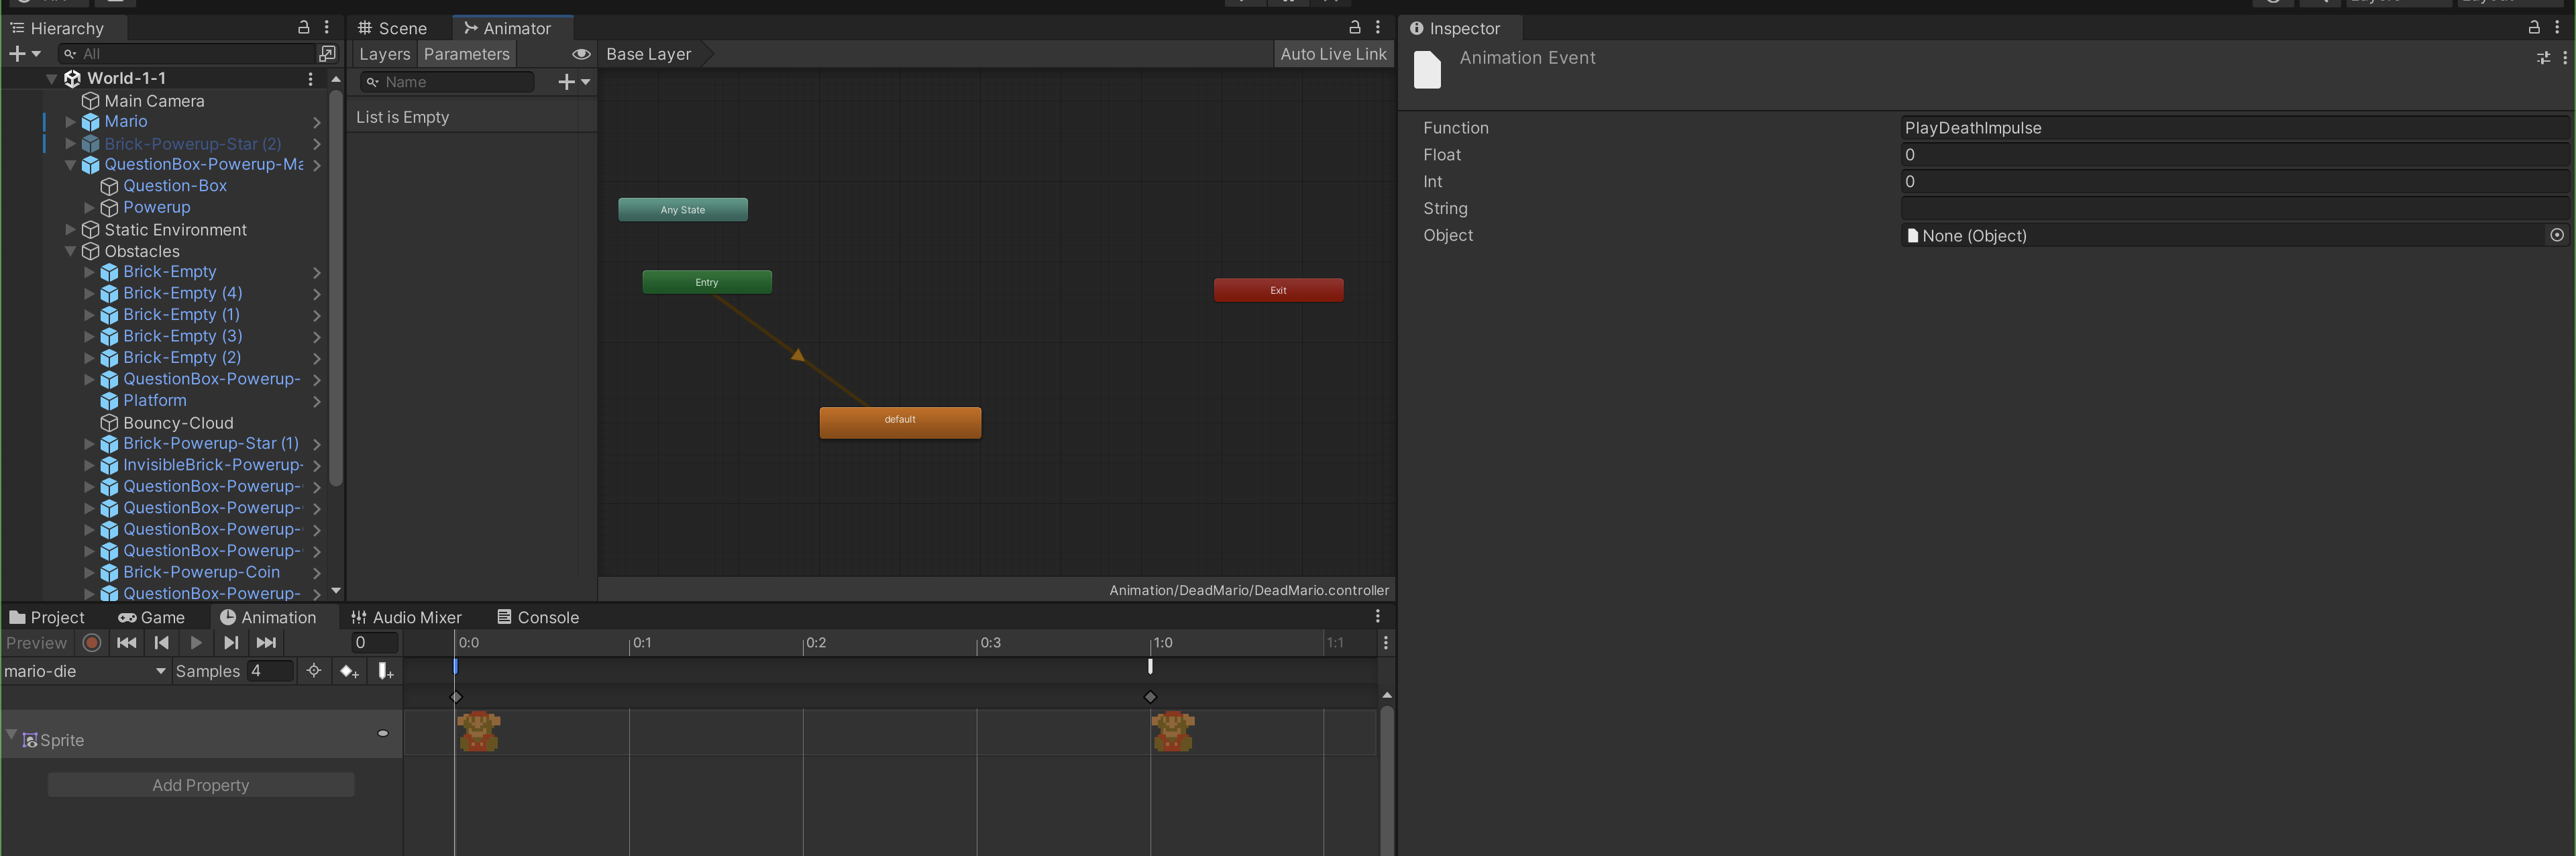
Hence next time you attach DeadMario as Mario's animator, it will find a function called PlayDeathImpulse in any of Mario's attached script.
By now you should have four setup actions: SetupSmallMario, SetupSuperMario, SetupFireMario, and SetupDeadMario.
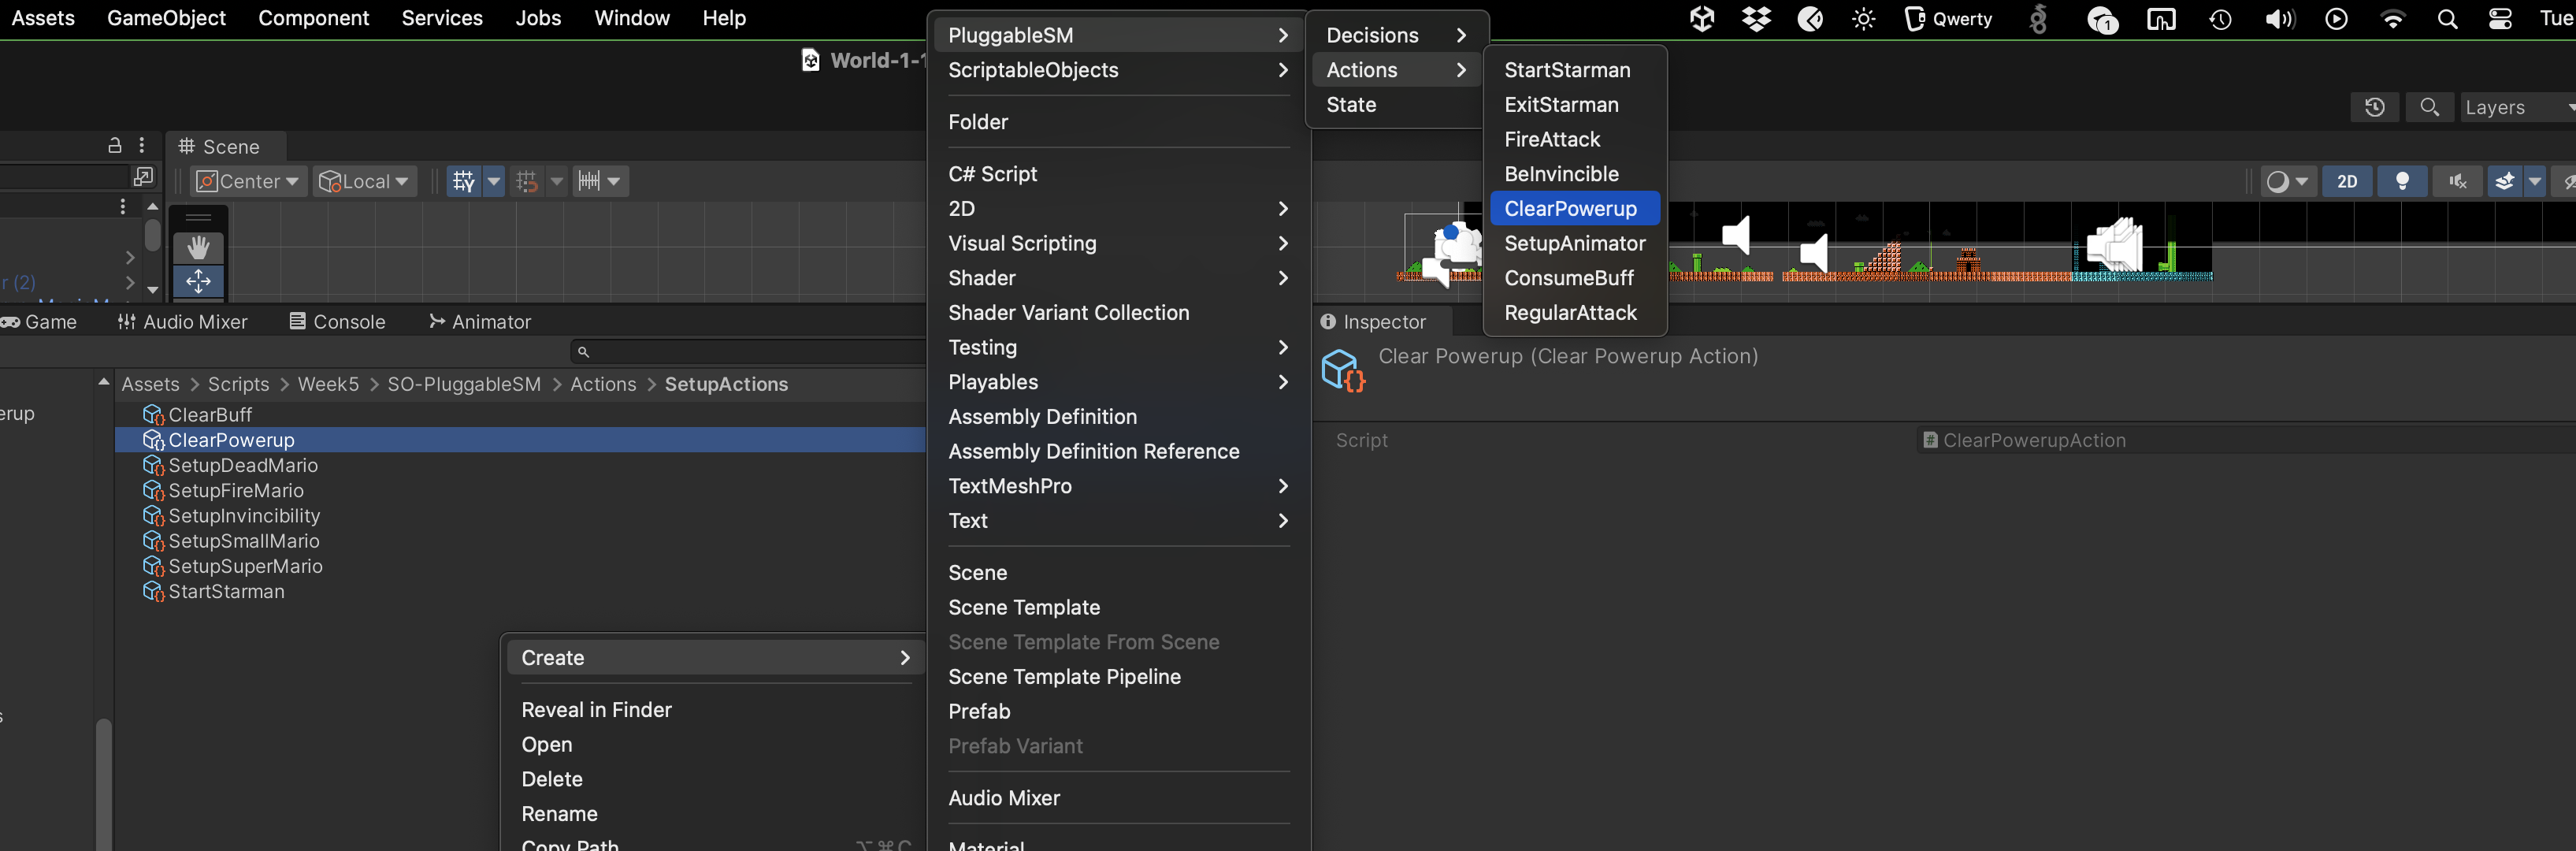
ClearPowerupAction
There's nothing to set up for this action, simply instantiate it and name it ClearPowerup:
FireAttackAction
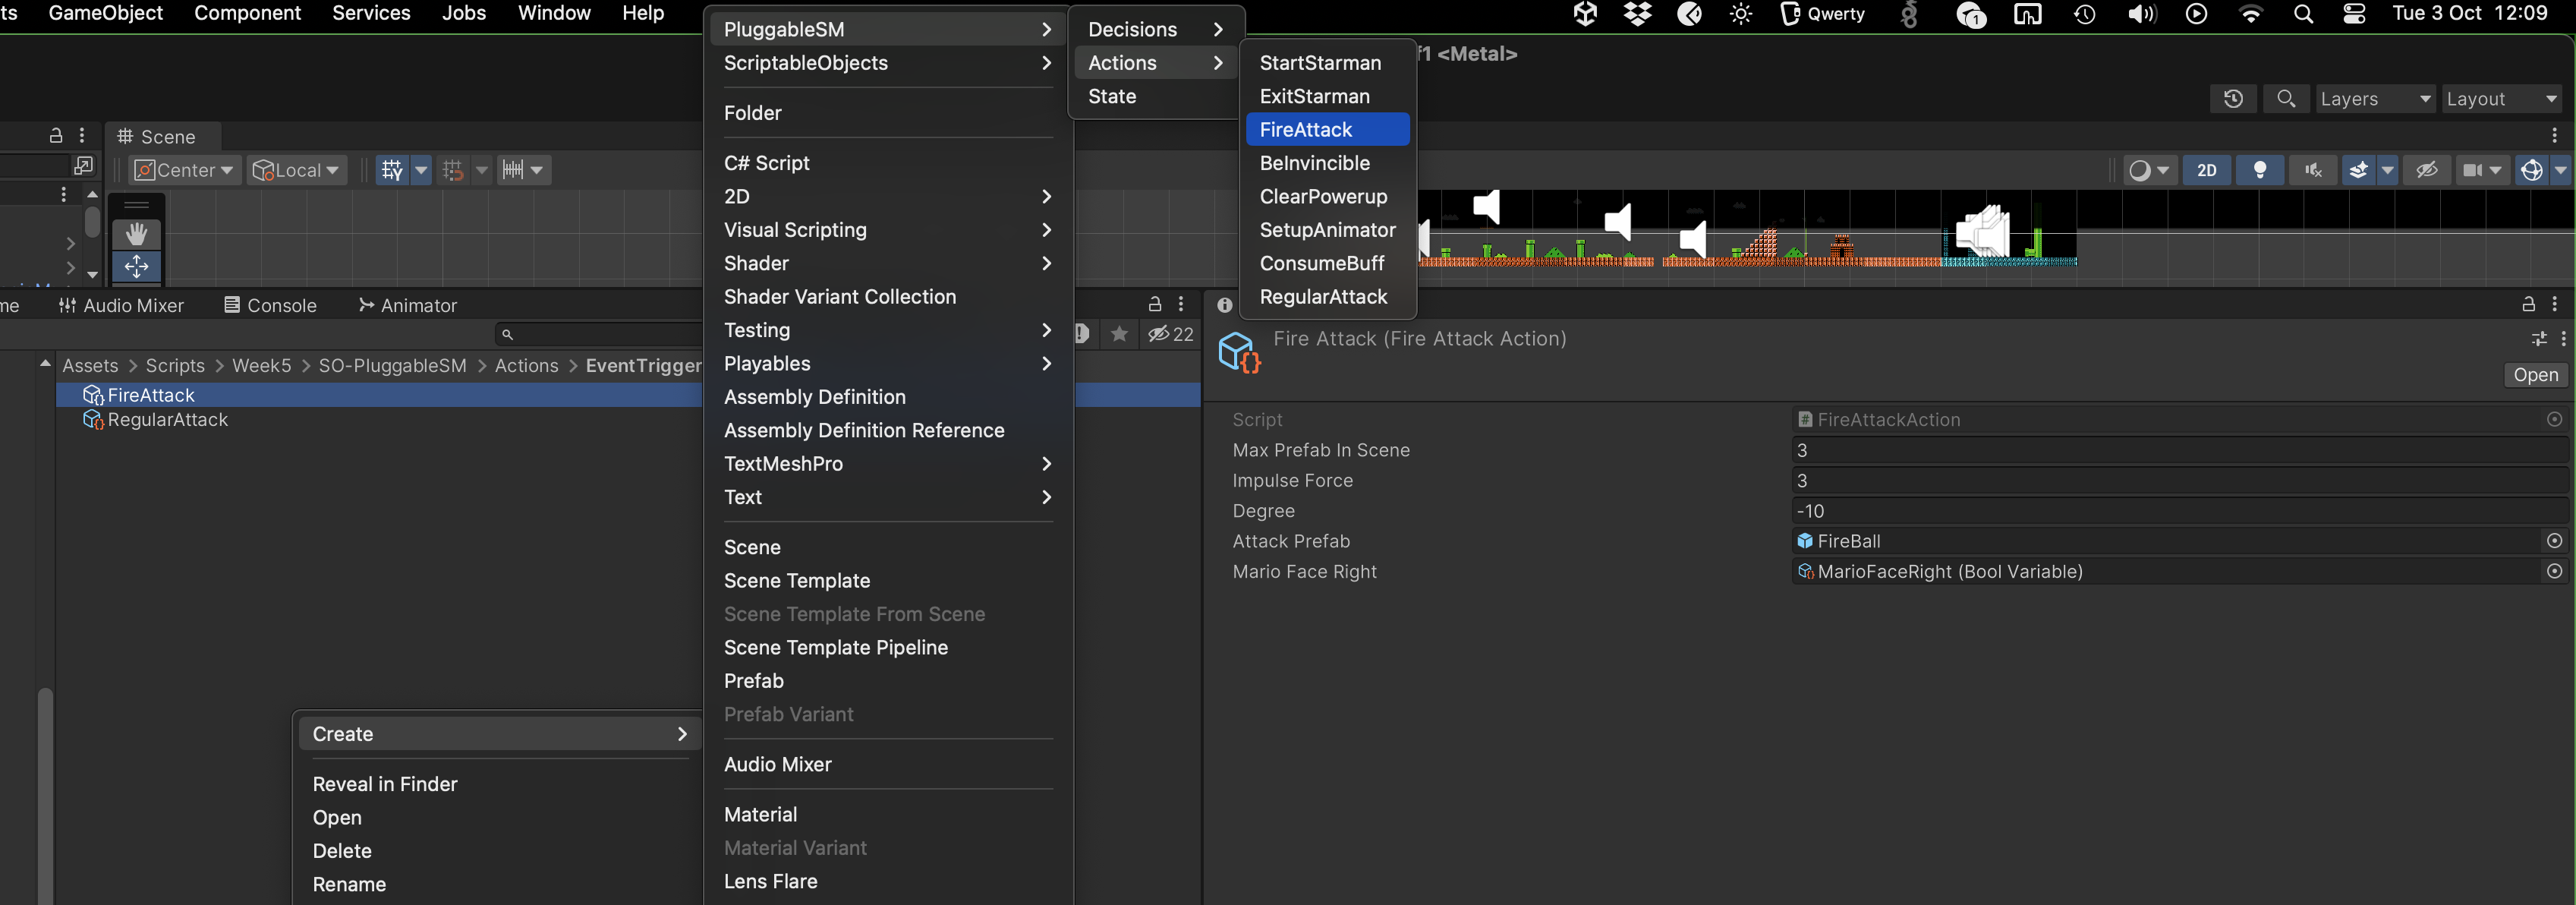
Create this action and name it FireAttackAction, link up the necessary values in the inspector:
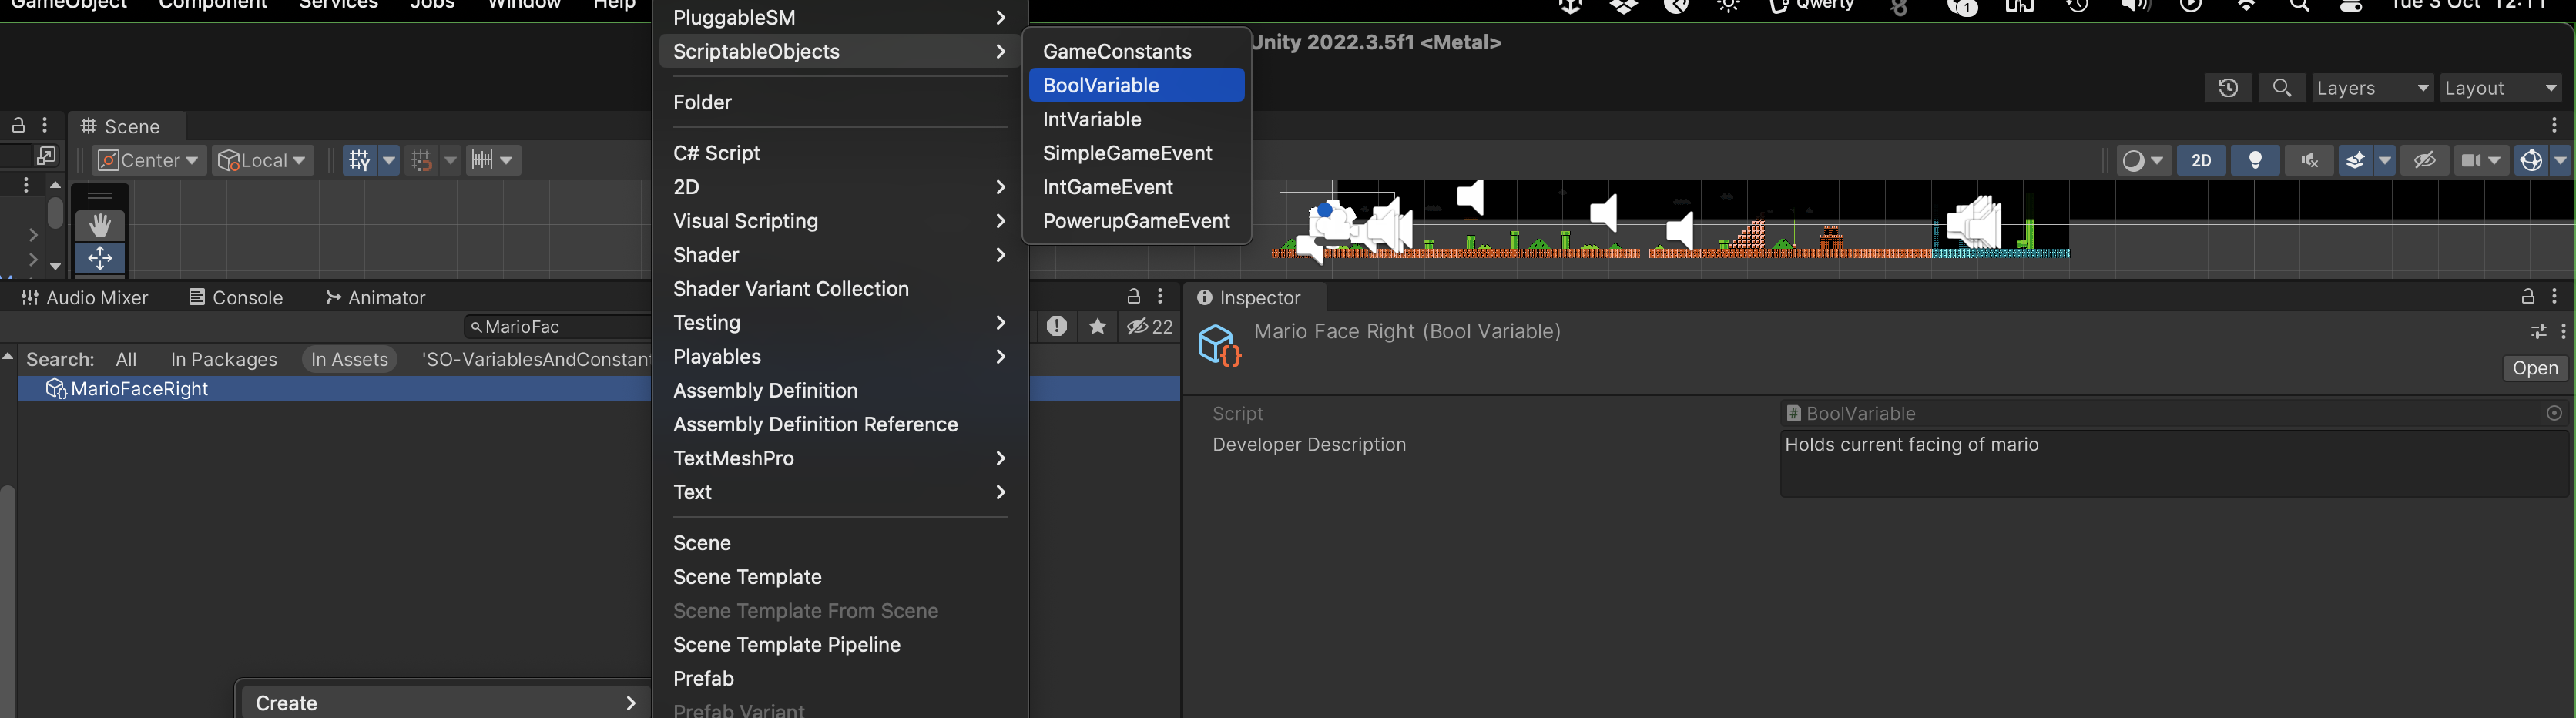
BoolVariable
Although not explicitly stated, you should know that BoolVariable is a scriptable object containing a boolean value:
using UnityEngine;

[CreateAssetMenu(fileName = "BoolVariable", menuName = "ScriptableObjects/BoolVariable", order = 2)]
public class BoolVariable : Variable<bool>
{

    public override void SetValue(bool value)
    {
        _value = value;
    }

    // overload
    public void SetValue(BoolVariable value)
    {
        SetValue(value.Value);
    }

    public void Toggle()
    {
        _value = !_value;
    }

}
We instantiate it and named it MarioFaceRight:
Then we manipulate its value in PlayerController.cs:
public class PlayerControllerWeek5 : MonoBehaviour, IPowerupApplicable
{
    public BoolVariable marioFaceRight;

    void FlipMarioSprite(int value)
    {
        if (value == -1 && faceRightState)
        {
            updateMarioShouldFaceRight(false);
            marioSprite.flipX = !faceRightState;
            if (marioBody.linearVelocity.x > 0.05f)
                marioAnimator.SetTrigger("onSkid");

        }

        else if (value == 1 && !faceRightState)
        {
            updateMarioShouldFaceRight(true);
            marioSprite.flipX = !faceRightState;
            if (marioBody.linearVelocity.x < -0.05f)
                marioAnimator.SetTrigger("onSkid");
        }
    }

    private void updateMarioShouldFaceRight(bool value)
    {
        faceRightState = value;
        marioFaceRight.SetValue(faceRightState);
    }

}
This way we can know whether to cast the fireball to the right or to the left depending on Mario's current facing.
InvincibleAction
For this action, there's nothing much you need to do except to instantiate it and give it the desired Audio Clip to play when this action starts:
Create Decision Scripts
These scripts inherit the Decision class, and must implement one method Decide which returns a boolean value.
TransformDecision
This decision determines whether we should transform into another state given the current state and the current powerup:
using UnityEngine;
using System;
[CreateAssetMenu(menuName = "PluggableSM/Decisions/Transform")]
public class TransformDecision : Decision
{
    public StateTransformMap[] map;

    public override bool Decide(StateController controller)
    {
        MarioStateController m = (MarioStateController)controller;
        // we assume that the state is named (string matched) after one of possible values in MarioState
        // convert between current state name into MarioState enum value using custom class EnumExtension
        // you are free to modify this to your own use
        MarioState toCompareState = EnumExtension.ParseEnum<MarioState>(m.currentState.name);

        // loop through state transform and see if it matches the current transformation we are looking for
        for (int i = 0; i < map.Length; i++)
        {
            if (toCompareState == map[i].fromState && m.currentPowerupType == map[i].powerupCollected)
            {
                return true;
            }
        }

        return false;

    }
}

[System.Serializable]
public struct StateTransformMap
{
    public MarioState fromState;
    public PowerupType powerupCollected;
}
EnumExtension.cs
This is a custom class to easily convert between the string or integer representation of an enum to the enum:
using System;

public static class EnumExtension
{
    public static T ParseEnum<T>(string input) where T : struct
    {
        // return the enum value given a string
        T enumValue;
        if (Enum.TryParse(input, true, out enumValue))
        {
            return enumValue;
        }
        return default(T);
    }

    public static int ParseEnumToInteger<T>(string input) where T : struct
    {
        // return the integer enum given a string
        T enumValue = ParseEnum<T>(input);
        if (Enum.IsDefined(typeof(T), enumValue))
        {
            return Convert.ToInt32(enumValue);
        }
        return -1;
    }

}
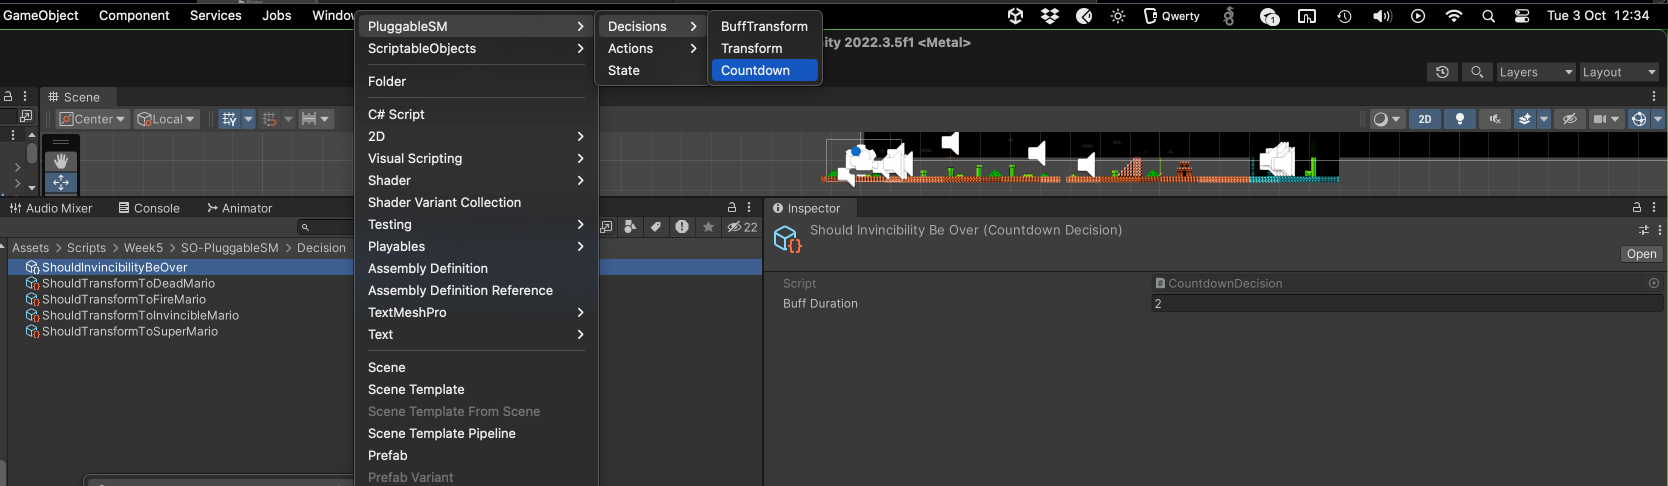
CountdownDecision
Another decision that we can create is to detect if we have been in the current state longer than a stipulated duration by calling the state controller's CheckIfCountdownElapsed regular method:
using System;
using System.Collections;
using System.Collections.Generic;
using UnityEngine;

[CreateAssetMenu(menuName = "PluggableSM/Decisions/Countdown")]
public class CountdownDecision : Decision
{
    public float buffDuration;
    public override bool Decide(StateController controller)
    {
        return controller.CheckIfCountDownElapsed(buffDuration);
    }
}
Create Decision Scriptable Objects
Transform Decision
We have several decisions that we have to make depending on which MarioState we want to transform to:
ShouldTransformToSuperMarioShouldTransformToFireMarioShouldTransformToDeadMarioShouldTransformToInvincibleMario
We create various Transform Decision SO and hard-code the decision we are looking for in that instance:
- The idea is that the method
Decidewill returntrueif current state and powerup matches what's described in theDecision. - For example,
ShouldTransformToSuperMariohas one of itsMapelementfromStatevalue set toSmallMarioandpowerupCollectedvalue value set toMagicMushroom. - Hence, if the controller's current state name is
SmallMarioand current Powerup collected isMagic Mushroom, thenShouldTransformToSuperMarioshould returntrue
Countdown Decision
The countdown decision is fairly straightforward, you are free to set the value of buffDuration:
Create State Scriptable Objects
Now that we have all our actions and decisions ready, it is time to create the states. As per the fsm diagram, we need five states:
DeadMarioFireMarioInvincibleSmallMarioSmallMarioSuperMario
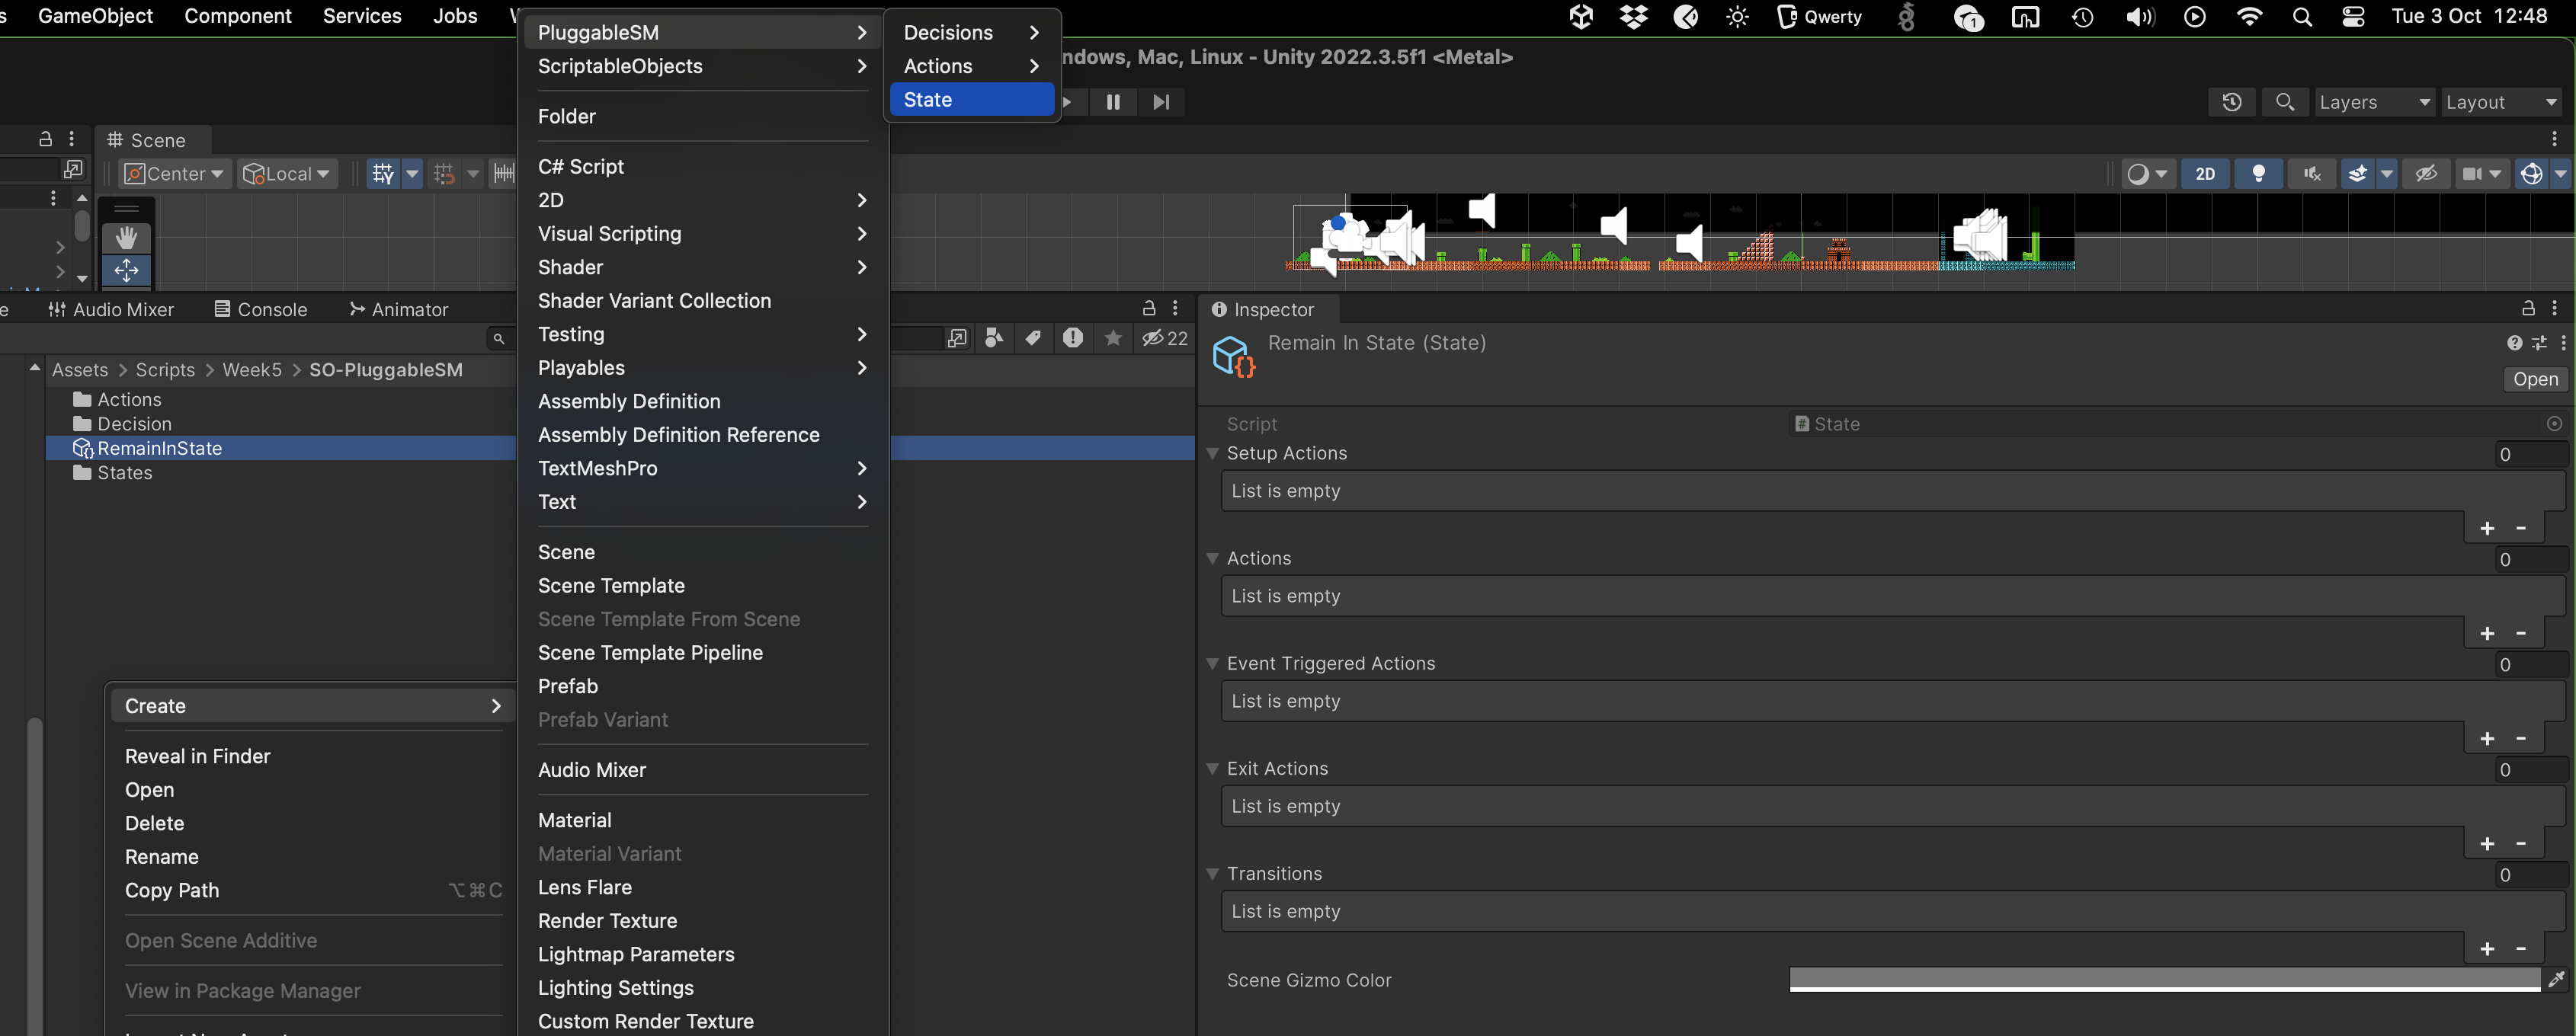
RemainInState
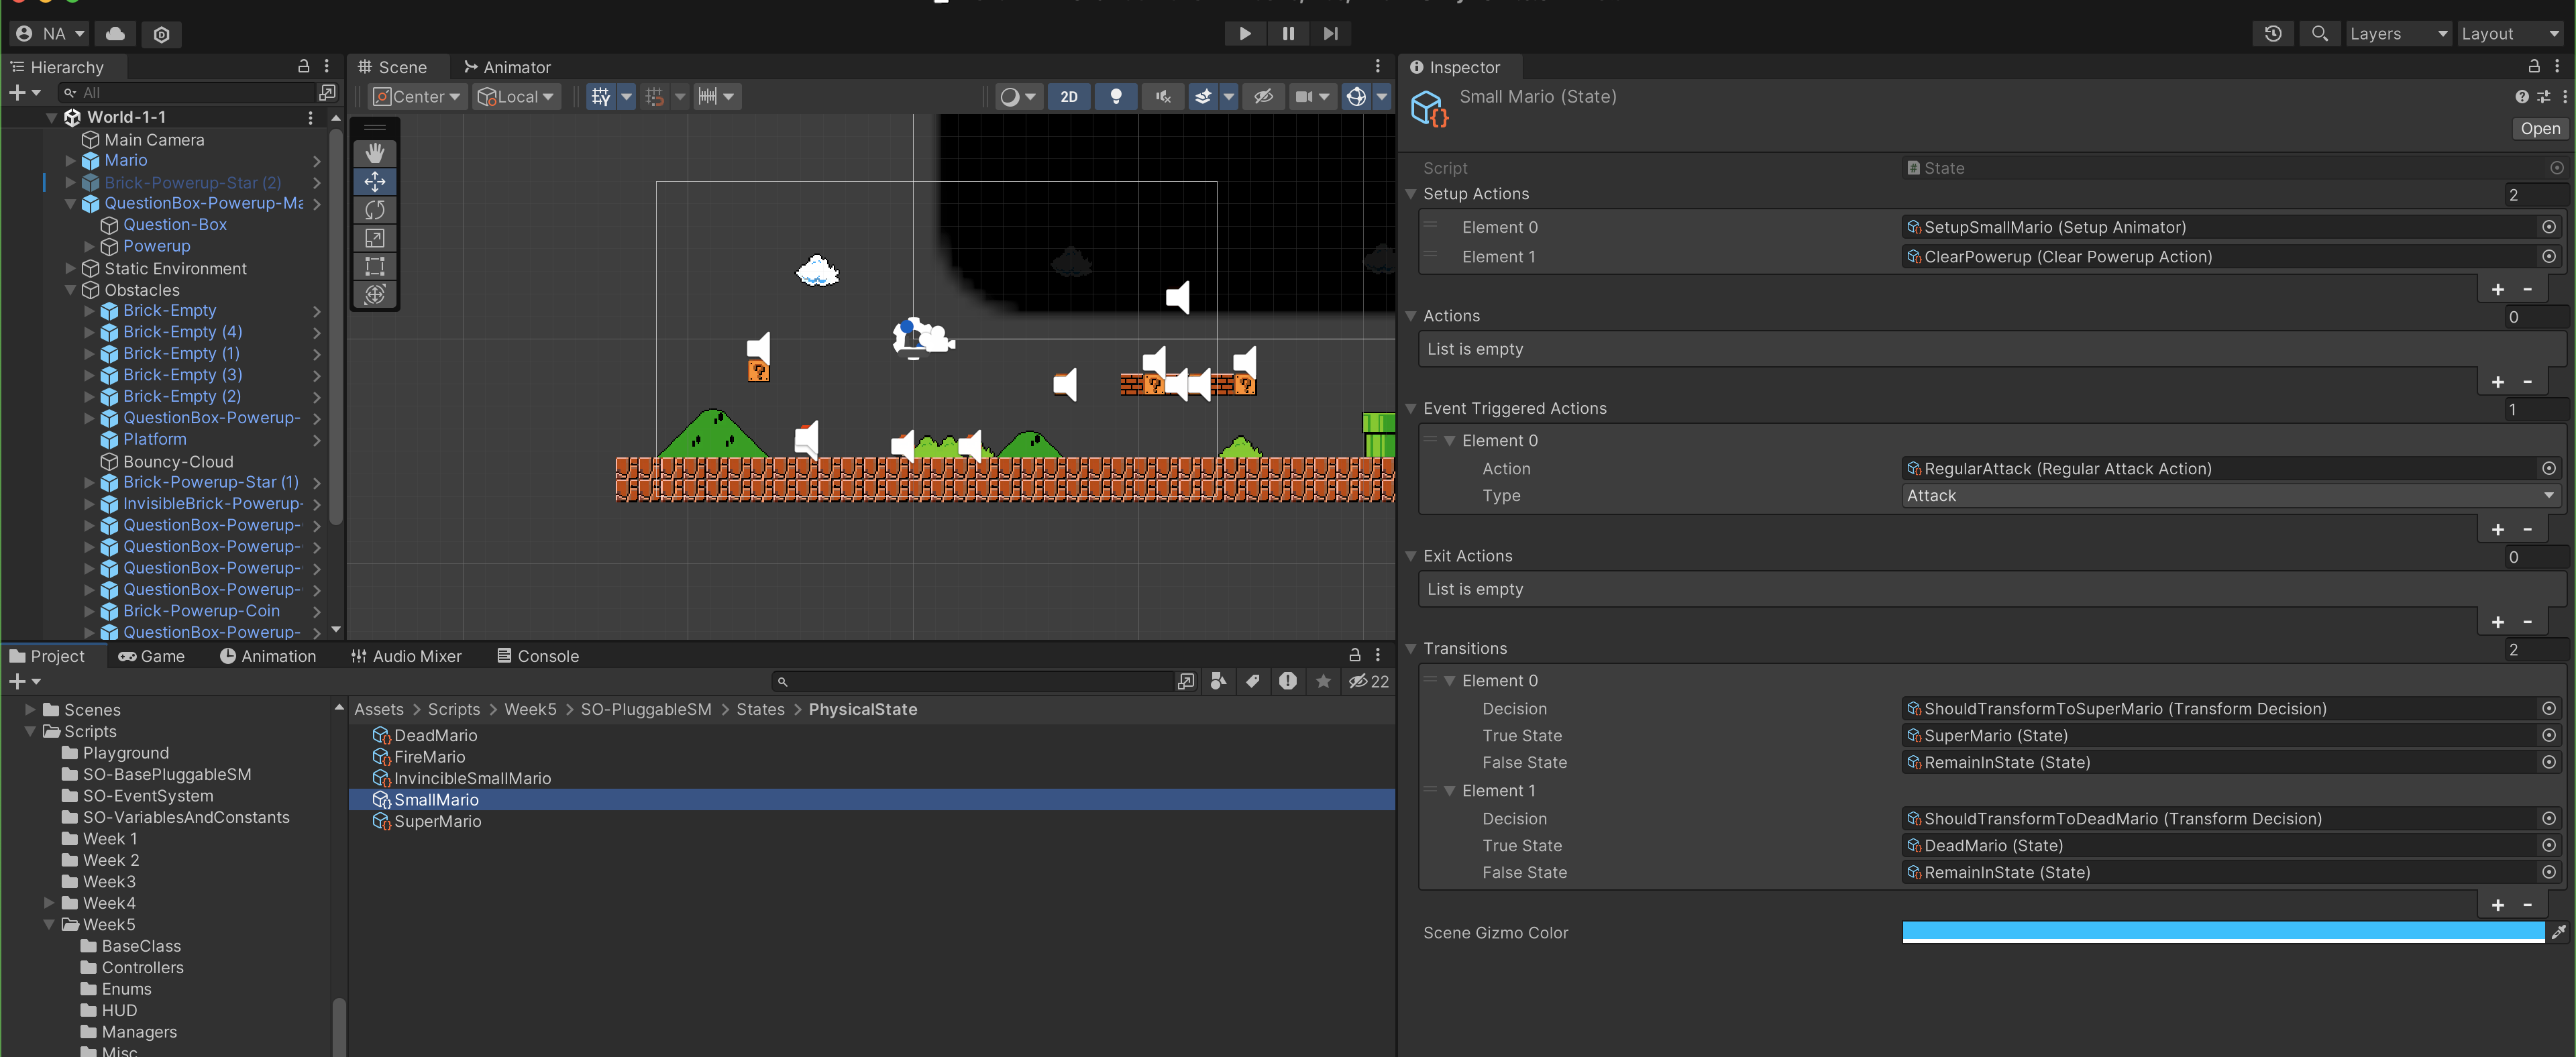
We need a "dummy" state to indicate that we remain in state. Create this dummy state first and leave the inspector empty:
Mario States
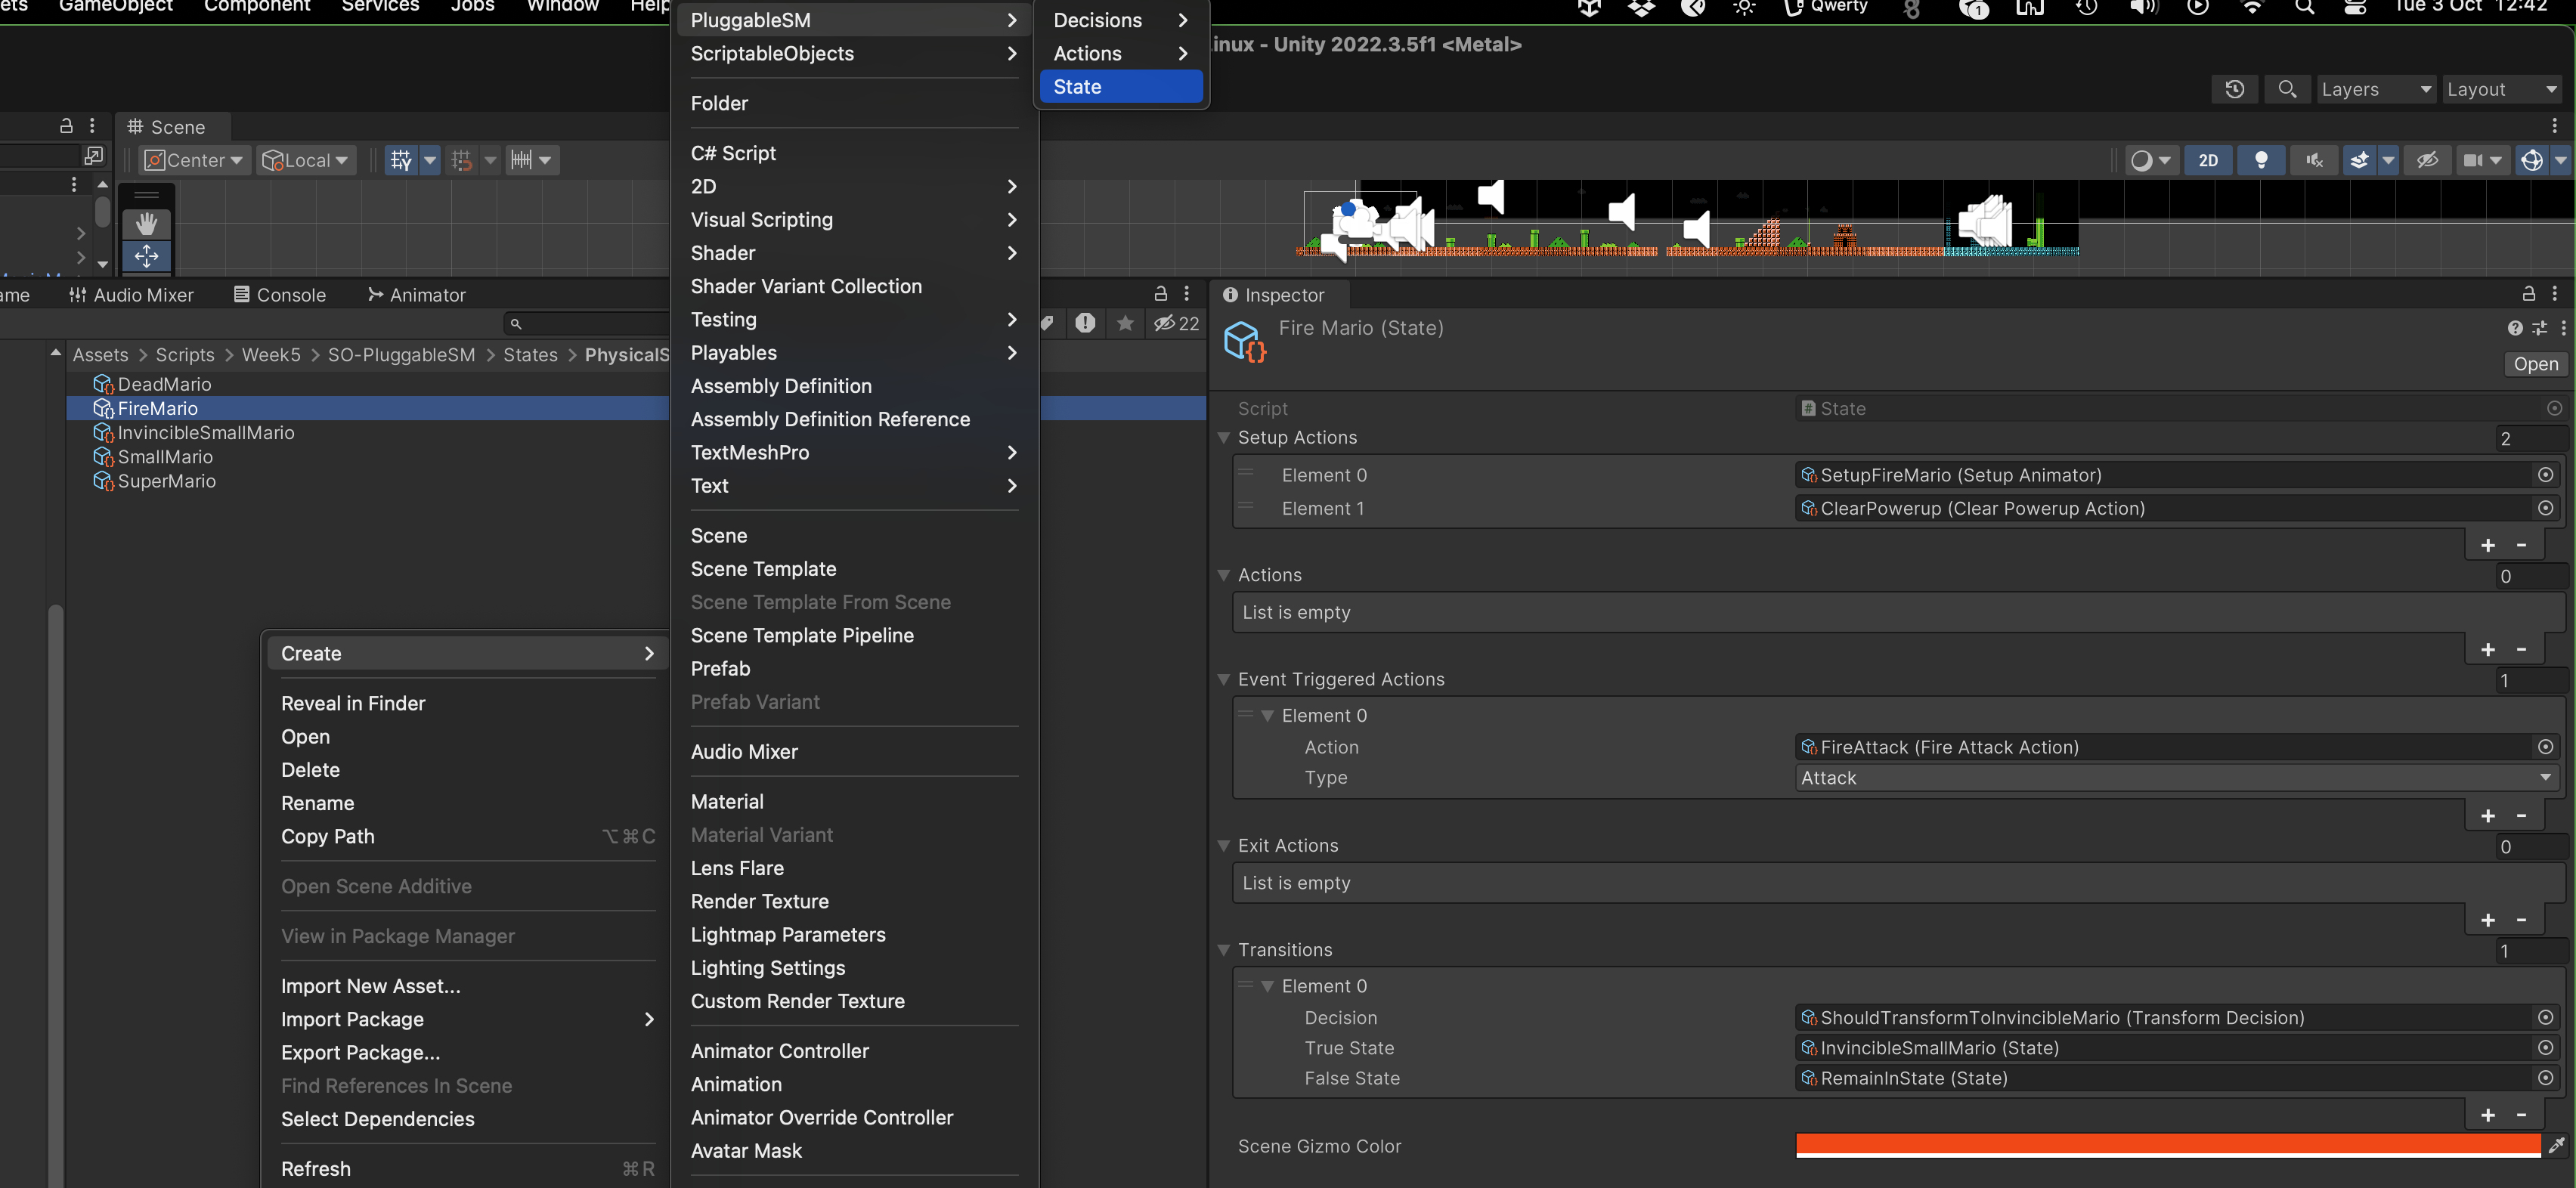
Now create five more state instances and name them accordingly. You will then need to modify its members in the inspector. Here's the specs of FireMario:
- There exist two setup actions: setup fire mario animator and clear the powerup in
MarioStateController - There exist also one event-triggered action:
FireAttackofActionType.Attack(enum defined inEventAction.cs). It will not be called every frame, but rather only whenZkey is pressed. We will explicitly call this later inMarioStateController. - There's also only one transition to consider: which determines whether it should go to
InvincibleSmallMariostate orRemainInState(our dummy state).
Recall that in StateController.cs, we keep track of RemainState State. This is useful for detecting whether we transition between different states or stay in the same state.
Of course you may skip this functionality and use some name matching to check if
currentState.name == previousState.nameto determine whether you state has transitioned, but plain old string matching isn't fun 🥹.
public abstract class StateController : MonoBehaviour
{
    public State startState;
    public State previousState;
    public State currentState;

    public State remainState;

    public void TransitionToState(State nextState)
    {
        if (nextState == remainState) return;
        // other instructions
    }

    // other methods

}
Update MarioStateController to Trigger EventAction
The last thing that we need to do is to update our MarioStateController script to launch FireAttack when key 'Z' is pressed. Add a new public void method called Fire:
    public void Fire()
    {
        this.currentState.DoEventTriggeredActions(this, ActionType.Attack);
    }
This will calls the Act method of all registered event-triggered actions in this state whose type matches ActionType.Attack. You should link up this method to whatever ActionManager script which sanitises the input from Input System.
Attach MarioStateController to Mario
The final step is to attach MarioStateController script to Mario:
- Set its
StartStatetoSmallMario - Set
RemainStateasRemainInState(our dummy state) - If you utilise
GameConstants, you need to link it up here
Modify how "Damage" Works
When Mario collides with Goomba, there has to be a way for us to set MarioStateController's current powerup member to PowerupType.Damage. One suggested way is to modify your existing "damage player" callback in PlayerController:
    public void DamageMario()
    {
        // GameOverAnimationStart(); // last time Mario dies right away

        // pass this to StateController to see if Mario should start game over
        // since both state StateController and MarioStateController are on the same gameobject, it's ok to cross-refer between scripts
        GetComponent<MarioStateController>().SetPowerup(PowerupType.Damage);

    }
We assume the above is the callback you use when listening to OnPlayerDamaged event:

The Update() method of MarioStateController will always re-run the Decisions registered under SmallMario state at each frame:
As a result, the moment we collide with Goomba whilst in SmallMario state will trigger MarioStateController to switch Mario's state into DeadMario, and the default animation clip on DeadMario will play (which calles PlayDeathImpulse and GameOverScene methods in Mario's scripts respectively):
Modify how Powerup Works
Each powerup script needs to set MarioStateController's currentPowerupType whenever a powerup is collected. If you have been following the lab closely, you can modify the ApplyPowerup method in each class inheriting BasePowerup class as follows:
- MagicMushroomPowerup.cs
- FireFlowerPowerup.cs
    public override void ApplyPowerup(MonoBehaviour i)
    {
        base.ApplyPowerup(i);
        // try
        MarioStateController mario;
        bool result = i.TryGetComponent<MarioStateController>(out mario);
        if (result)
        {
            mario.SetPowerup(this.powerupType);
        }
    }
Changing MarioStateController's currentPowerupType member will trigger state transition depending on its currentState. When small Mario obtains the magic mushroom, he transforms to super Mario. If he is damaged by Goomba, he will enter invincible small Mario state where he can't be damaged by Goombas.