The CLI accepts commands (the first word, e.g. ps, that you type into the CLI is the command), entered line by line and it will be executed sequentially. There are two types of commands in general, commands with and without options or arguments.
Basic Commands
Without Options
Task 2
TASK 2: Try the following basic commands in sequence date, cal, pwd, who, clear:
- E.g: date and press enter. You should see today’s date given to you, for example:
bash-3.2$ date
Thu May  5 14:08:51 +08 2022
bash-3.2$
- Do the same thing with
cal, pwd, who, clear.- Figure out what each command does using
man - You can use
man <command>and pressqto quit anytime.
- Figure out what each command does using
With Options
The commands you have typed above are those that do not require options or more arguments (although they do accept these too). Some commands require more input arguments.
For example, the command ps shows the list of processes for the current shell, while ps -x shows all processes that are owned by the current user even when it doesn’t have a controlling terminal.
bash-3.2$ ps
  PID TTY           TIME CMD
61581 ttys000    0:01.80 /bin/zsh -l
61605 ttys000    0:00.00 /bin/zsh -l
61652 ttys000    0:00.00 /bin/zsh -l
61653 ttys000    0:00.04 /bin/zsh -l

bash-3.2$ ps -x
  PID TTY           TIME CMD
  393 ??         0:02.43 /System/Library/Frameworks/LocalAuthentication.framework/Support/coreauthd
  394 ??         1:29.34 /usr/sbin/cfprefsd agent
  398 ??         0:00.05 /System/Library/Frameworks/ColorSync.framework/Versions/A/XPCServices/com.app
  399 ??        25:02.92 /usr/libexec/UserEventAgent (Aqua)
  401 ??         2:06.64 /usr/sbin/distnoted agent
  403 ??         0:12.27 /System/Library/PrivateFrameworks/CloudServices.framework/Helpers/com.apple.s
  404 ??         2:02.15 /usr/libexec/knowledge-agent
  405 ??         0:06.55 /usr/libexec/lsd
  406 ??         3:05.55 /usr/libexec/trustd --agent
  407 ??        15:44.58 /usr/libexec/secd
  409 ??         0:02.05 /System/Library/CoreServices/sharedfilelistd
  410 ??        40:41.61 /System/Library/PrivateFrameworks/CloudKitDaemon.framework/Support/cloudd
  411 ??         0:00.19 /System/Library/CoreServices/backgroundtaskmanagementagent
  412 ??         0:05.30 /System/Library/PrivateFrameworks/TCC.framework/Resources/tccd
  413 ??        12:36.92 /usr/libexec/nsurlsessiond
Some commands accept single hyphen (-) as options, and some other accepts double hyphens (–), or no hyphen at all. It really depends on convention, so be sure to read the manual properly.
For example, the command: git commit -v -a --amend stands for:
- Use git to stage new changes (
commit) - Automatically stage all files that have been modified/deleted (
-a) - Do it in a verbose way, with detailed message highlighting all diff (
-v) - Replace the tip of the current branch by creating a new commit (
--amend)
Path
Basics of Directory
The file system has many directories, starting from the ROOT (symbolised as a single forward slash /) and you can have directories within a directory thus forming a hierarchy of directories. Each “level” is separated by the forward slash symbol.
For instance,
/Users/natalie_agus/Downloads simply look like this in the window:

If your directory has spaces in its name, you need to use the backslash) to indicate that it is part of the string, eg:
/Users/natalie_agus/Google\ Drive
Task 3
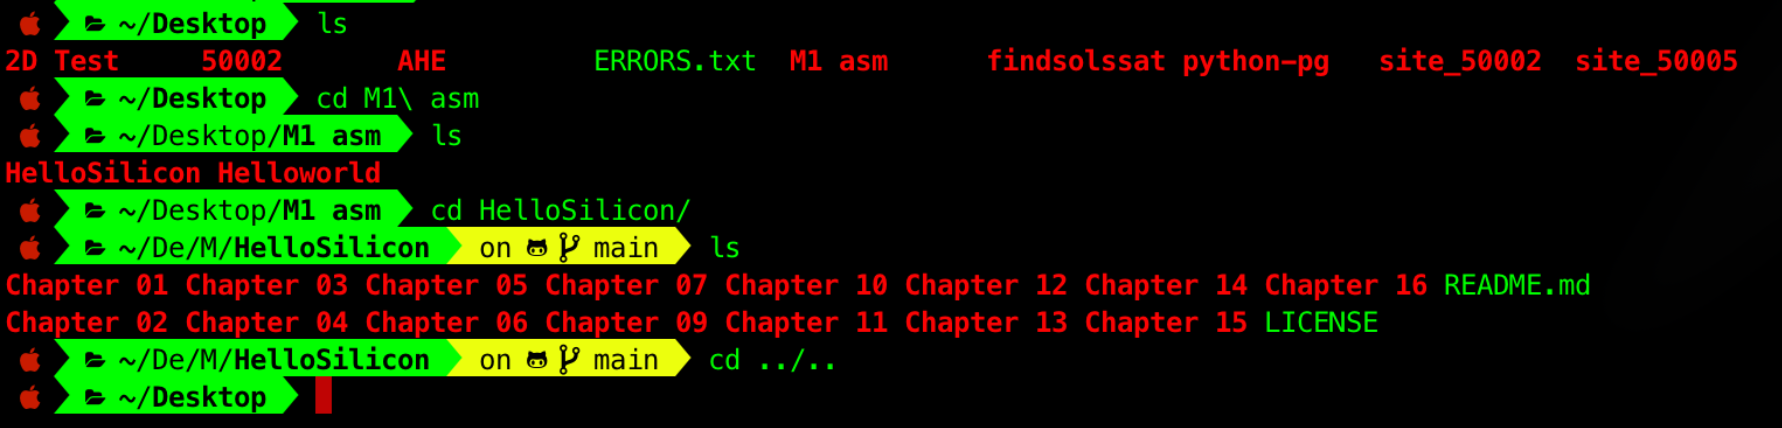
TASK 3: Find your starting context by running the command pwd, followed by ls:
- The command
lslists all files that exist in this context, which is the Desktop directory in the example above (/Users/natalie_agus/Desktop) - When you run the command ls by itself, it uses your current directory as the context, and lists the files that are in the directory you are in.
- You can use the
lscommand to list the files in a directory that’s not your current directory, e.g:ls /Users/natalie_agus/Downloads
Now try another command called cd to change the current working directory:
- Change the current working directory into any directory that’s accessible from the current context
- The command cd is analogous to double clicking a folder in the GUI
- You can go “back” to one previous directory level using the command
cd ..(or you can chain it to go two levels up for instance,cd ../..
Environment Variables
Another way of providing context is through something called environment variables. Tryout the command: cd $HOME
- The
$HOMEpart is a reference to the HOME variable, and is replaced by the path to your home directory when the command is run. - In other words, running cd
$HOMEis the same as runningcd <actual path to your home>, orcd ~(~ is a default shell variable that points to the current User’s home directory, and it also has other usages that you can read if you’re free). - To checkout what the value of your
$HOMEvariable is, type the command: echo$HOME
To find out about your current environment variables, you can enter the command env. Look at the values of common variables such as HOME and PATH. You can also create your own environment variables using the command export.
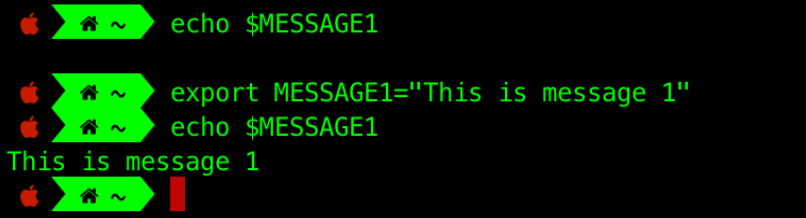
For example:
- Run the command:
export MESSAGE1="This is message 1" - You can now execute
echo $MESSAGE1and observe get the string output
In the example below, the environment variable $MESSAGE1 initially did not exist. After we export it, we can now print the environment variable $MESSAGE1.
$PATH Variable
One of the most important environment variables you’ll work with on the command line is $PATH.
- This is the key to how our shell knows which file to execute for commands like cd or echo or other built-in or installed programs.
- The PATH variable provides the additional context that the command line needs to figure out where that particular file is in the system.
- Hence, if you have installed an app (e.g: Telegram) and tried to execute the binary from the command line and met with the error
command not found, it simply means you haven’t added the path where that binary is to the$PATHenvironment variable.
For example, you can add the binary of the Telegram app onto the $PATH using the command export, and now you can simply execute it from anywhere (a new Telegram window is opened on the second Telegram command):

Task 4
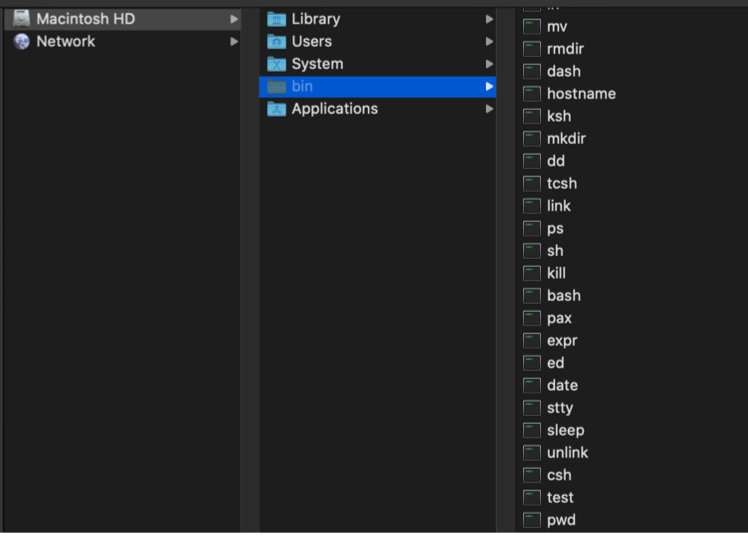
TASK 4: Examine the value for $PATH in your system.
Open that folder (from your Desktop GUI) and navigate to that path. You may need to enable viewing of hidden files. If you are using WSL, you need to cd to this path as there’s no GUI. The screenshot below shows the content of /bin/ directory where some default system programs like ps, date, pwd, echo, etc reside:
Configuring a Terminal Session
The command export that modifies the environment variable is only valid for this session. For instance, the Telegram command above will not work anymore if a user opens a new Terminal session (need to export again).
To avoid this hassle, there exists a setup script (unique to each shell) that is run whenever a new session starts. This script is typically placed in the user’s home directory. For instance, .bashrc (yes, with this exact name) is a Bash shell script that Bash runs whenever it is started interactively. For Z-shell, this script is called .zshrc.
In short, it initialises an interactive shell session. You can put any command that you could type at the command prompt in that file. It works by being run each time you open up a new terminal, window or pane.
Task 5
TASK 5: Adding Desktop to your $PATH environment variable permanently.
- Go to your home directory:
cd $HOME - Create a new file called .bashrc:
touch .bashrc - Open the file with any text editor, eg:
nano .bashrc - Type:
PATH="$HOME/Desktop:$PATH" - Save the file by pressing CTRL+X, and then follow the instruction and press
Enter - Restart your session by typing
exec bash - Print your
$PATHusingecho $PATHcommand and notice how Desktop is now part of your environment variable
bash-3.2$ cd $HOME
bash-3.2$ touch .bashrc
bash-3.2$ nano .bashrc
bash-3.2$ echo $PATH
/Users/natalie_agus/Desktop:...
bash-3.2$
Common Commands
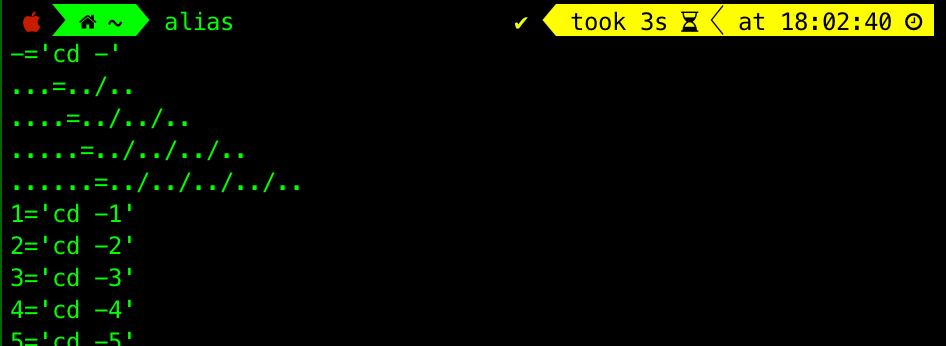
Shortcut: alias
An alias lets you create a shortcut name for a command, file name, or any shell text. By using aliases, you save a lot of time when doing tasks you do frequently. You can see current aliases using the alias command:
Or create an alias:
alias name=’command’- Example:
alias gst=’git status’
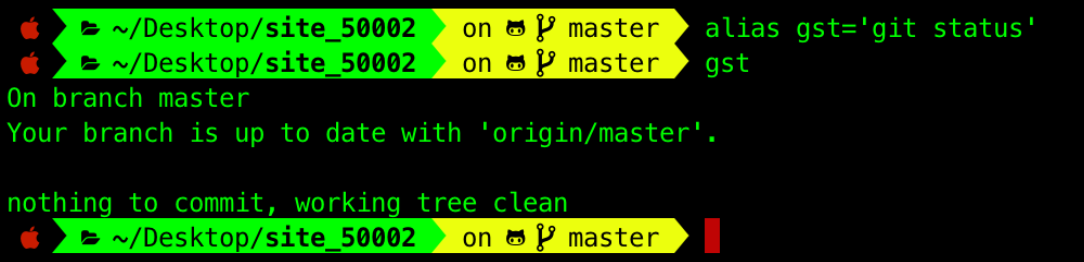
alias is particularly useful when you define them in your shell’s setup script.
General system usage and statistics
Note that each of the commands below accept OPTIONS. Read their manuals for more information using the man command.
man <command>
Shows documentation of the <command> (press q to exit the window after you’re done reading).
ls <options>
Shows the list of files in the current directory.
ps <options>
Shows the list of processes in the system.
sudo <command>, sudo apt install <packagename>
sudo Executes the command with administrative privileges. apt is a package manager, it installs packages for Debian-based Linux distributions. We can use it to install anything, eg install node and npm. Using package manager is recommended since you can simply update or remove (uninstall) it too (sudo apt remove <packagename>, etc).
sudo apt updatesudo apt install nodejs npm- For mac users, you can use brew as your package manager instead.
chmod +x <path/to/filename>
Make a file executable. However, firstly, you need to declare in your script which interpreter to use.
- You state the path to this interpreter as the first line in your file
- This is called a shebang.
- In Unix-like operating systems, the shebang line provides the path to an executable program (e.g.
bash,python) that can interpret the following lines as executable instructions, allowing the user to run the text file as an executable program by typing the name of the file directly in the shell provided the execute permission bit is set.
- In Unix-like operating systems, the shebang line provides the path to an executable program (e.g.
- For instance, if this file is a shell script, it should be
#!/bin/shor#!/bin/bash. If it is a python script, the interpreter should be something like#!/usr/bin/env python
df <options>...
Shows the available disk space in each partition.
top
Monitors processes and system resource usage on Linux.
ifconfig <options>
Displays information about all network interfaces currently in operation.
kill -9 <pid>, pkill <process_name>
Kills (ends) the process matching the given pid, the same thing happens when you click the close (x) button on the window of a running app.
ping <servername> <options>
Checks connection to a server. For example, ping google.com tells you whether your connection is active or not.
File creation and manipulation
Note that each of the commands below accept OPTIONS. Read their manuals for more information using the man command.
mkdir <dirname>
Creates a directory (folder).
rmdir <dirname>, rm -r <dirname>
Deletes an empty directory, and the latter removes a directory that contains files. Be careful! Deleting things from the command line doesn’t allow you to retrieve it back. Unlike deleting from the GUI, it won’t be found in the trash.
touch <newfilename.format>
Creates a new file with whatever name and format you want.
mv <source> <destination>
Moves a file from the source path to destination path. Commonly used to rename files.
cp <source> <destination>
Copies a file from a location to another.
locate <filename>
Locate a particular filename in your file system, if you have set it up in the first place. Will return a path to that <filename>.
cat <path/to/filename>
Displays the contents of a file, and
wc <path/to/filename>
Prints a count of newlines, words, and bytes for each input file.
Command-Line Text Editor: nano, vim
Command-line text editor provides a handy way to manipulate text files in terminal without the need of installing any other apps. There are a few options, but two of the most popular ones are nano and vim. The latter has a higher learning curve, so we will stick to nano for quick editing.
You can open any created text file using the command:
nano <path/to/filename>- Then you can start typing as per normal
- Press Ctrl + X to exit, and then Enter to save
- You can press Ctrl + G as well to bring up the shortcut menu anytime during editing
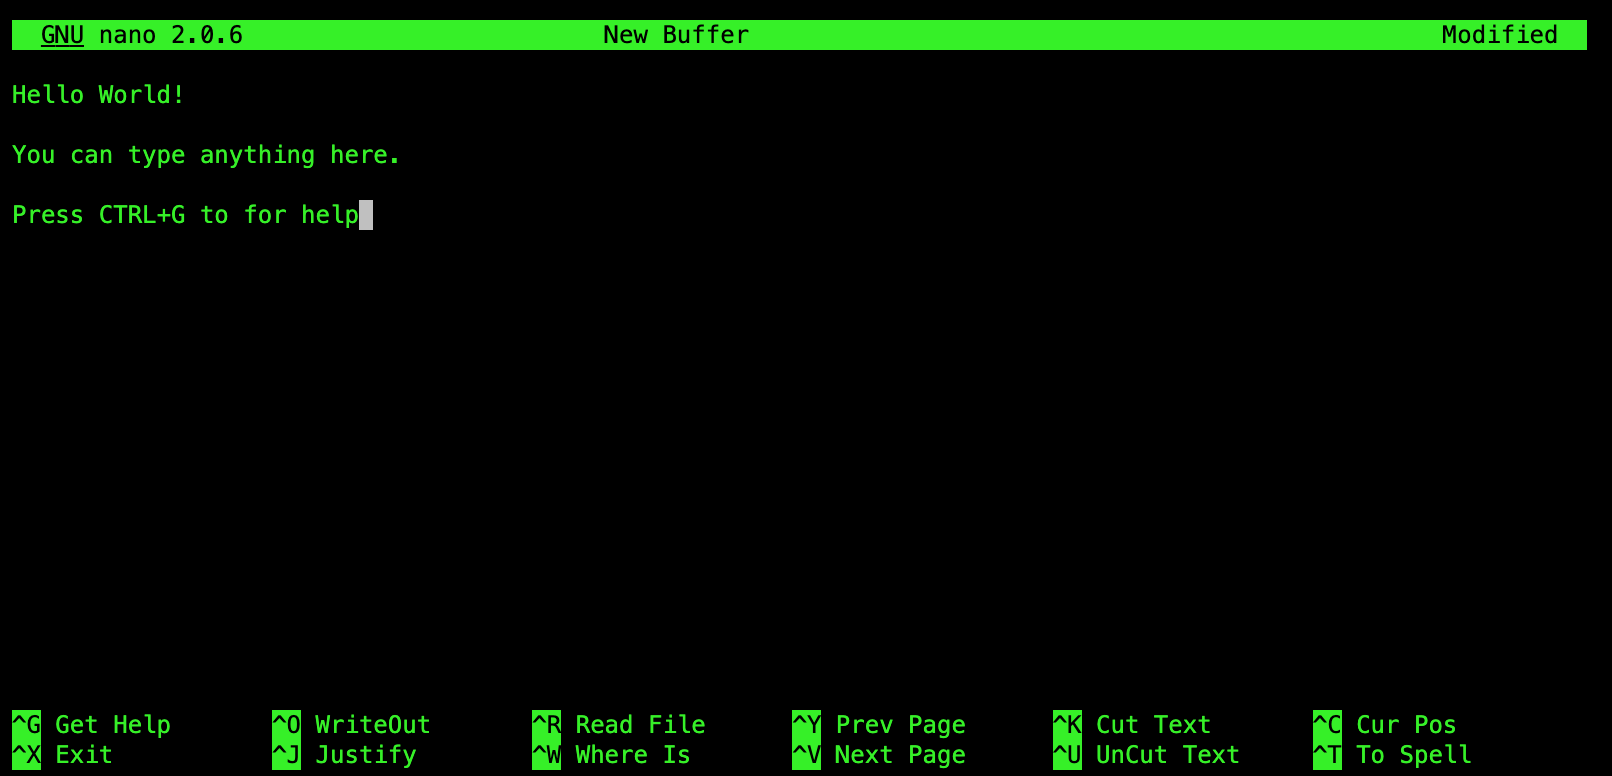
- After saving, you can check back the content of the file using the command
cat <path/to/filename>
Standard Streams
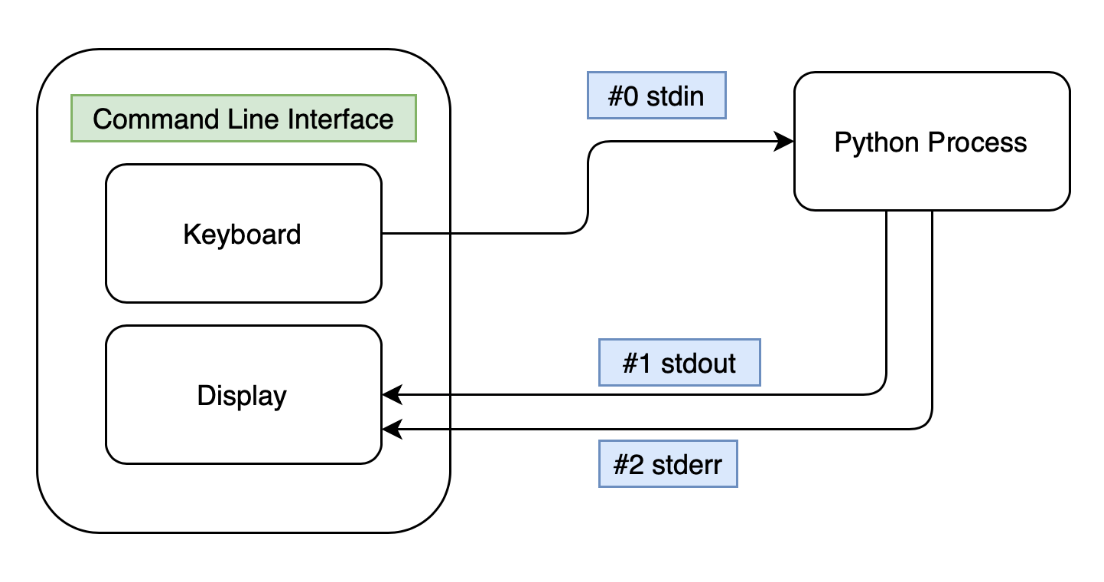
Standard streams are input and output communication channels between a running process and its environment when it begins execution. They are streams of data that travel from where a program was executed, to the places where the program is processed and then back again to where the program was executed.
The three input/output (I/O) connections are called standard input (stdin), standard output (stdout) and standard error (stderr).
Streams are usually connected to the terminal in which they are executed. By default, stdin is connected to your keyboard, and stdout + stderr are directed to your terminal. You might be wondering how your keyboard and display then is shared among so many processes? The details require Streams in Linux are treated as though they were files (Week 6 Material). E.g: you can read text from a file, and you can write text into a file. Both of these actions involve streams of data.
When you run a python script, e.g: python3 playground.py,
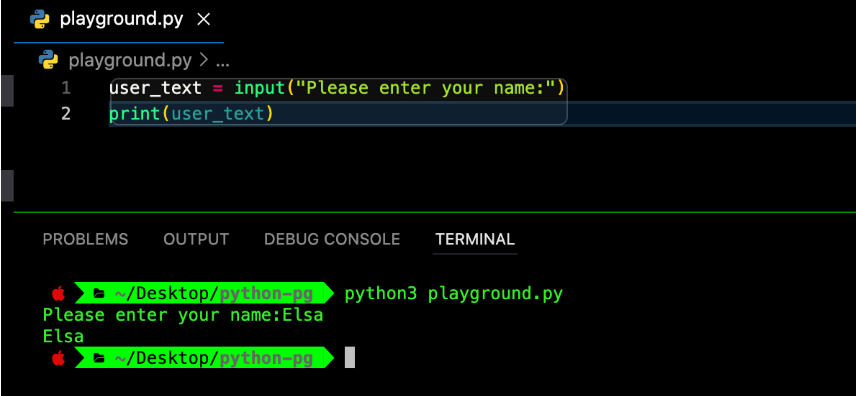
- Input from your keyboard is passed from the terminal into the python process, and
- Output from your python process is passed back to your terminal display. Here’s a simplified illustration:
Where are these “files” for stdin, stdout, and stderr respectively?
Well, they’re created by your OS. You can witness this pretty easily if you run a python script on one terminal (and let it hang there, don’t let it terminate yet! Shown on the right side), find out its process id and then see its details on another terminal (shown on the left) using the lsof command.
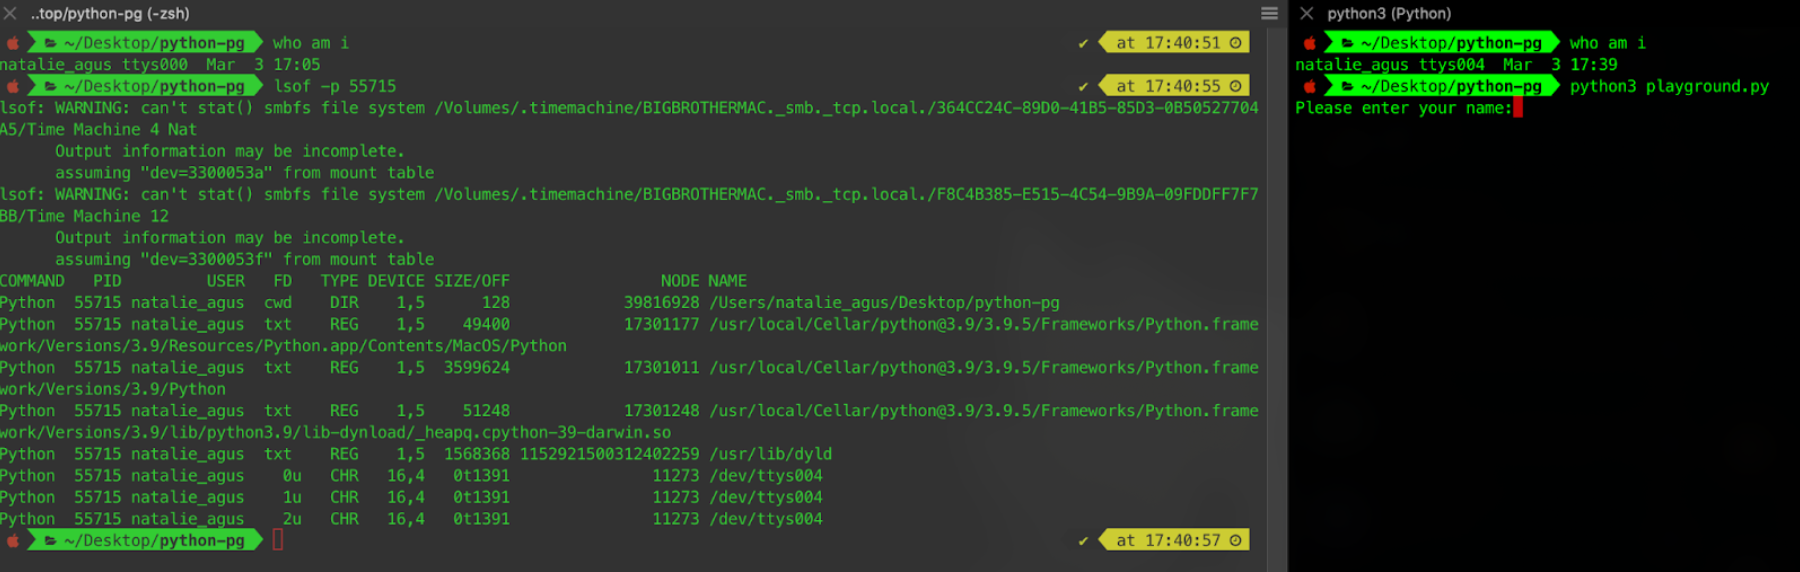
You can see in the last three lines that stdin (0u), stdout (1u), and stderr (2u) all point to the file /dev/ttys004. This is the file that is created by the OS and watched by our terminal.
Standard output
A standard output is a default place (it’s just a file actually) for output to go, also known as stdout. Your shell is constantly watching that output file, and whenever there’s something there, it will automatically print to your screen. For instance, echo "hello" is a command that means ”output the string hello to standard output”.
- The process echo prints to
stdout(probably/dev/ttyx), - …and your terminal in turn shows it in its GUI display.
Standard input
The standard input (stdin) is a default place where processes listen for information. For example, all the commands above with no other arguments listen for input on stdin.
Try typing cat on the command line and press enter:
- Notice you can type any character from your keyboard, because it watches for input on
stdin, - Then, output what you type to
stdout(and your shell is watching that output place so it is being printed on your screen), until you type an EOF (end of line) character:CTRL + d.
Standard error
The standard error (stderr) is the place where error messages go. Try this command that will prompt an error such as: cat <inexistent_path/to/filename>.
What is the output that you see? Similar to stdout, stderr is printed directly to your screen by your shell.

Stream Redirection
stdin, stdout, and stderr for every process is symbolized with file descriptor 0, 1, and 2 respectively. Each file associated with a process is allocated a unique number to identify it, this number is called the file descriptor.
We can redirect stdin using the < operator, stdout using the > operator, and stderr using the 2> operator.
- If we do
<command> > <filename>, it means we are redirecting thestdoutof<command>to the file<filename>. That means, we will write whatever that was printed out by the process<command>to the file with<filename>. - If we do
<command> < <filename>, it means that we are redirecting thestdinof<command>, e.g: use the content of filename as an input to command. This is particularly useful for commands that only take in input streams, and are unable to read the content of a file given a filename.
Note that stdout redirection will truncate (erase) the original content of the <filename>. If you want to append to the existing content of file instead, you can use the >> operator.
Task 6
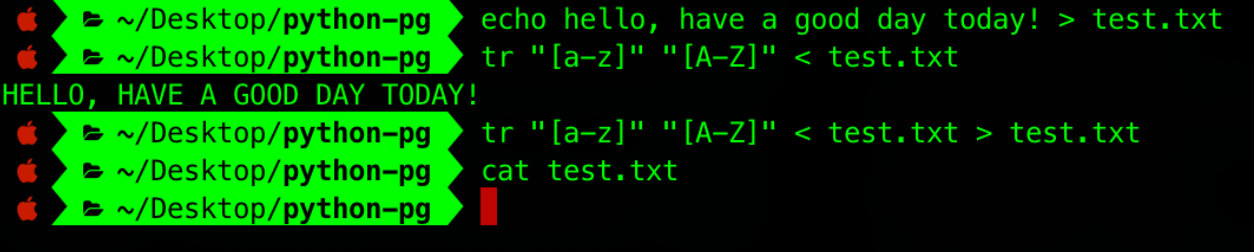
TASK 6: One example of a program that benefits from stream redirection is tr. It is a command line utility for translating or deleting characters. Do the following:
- Create a text file with the following content: ”Hello, have a good day today!”, name it
test.txtand save it to your current directory. - Then, type the following in the command line (don’t forget to navigate to your current directory first using
cd!):tr "[a-z]" "[A-Z]" test.txt - You will see such usage suggestion instead:
usage: 	tr [-Ccsu] string1 string2
        tr [-Ccu] -d string1
        tr [-Ccu] -s string1
        tr [-Ccu] -ds string1 string2
This is because tr CANNOT get input directly from a file. It only reads from stdin. 4. Now try tr "[a-z]" "[A-Z]" < test.txt. Your console should print ”HELLO, HAVE A GOOD DAY TODAY!”, capitalizing the content of the test.txt file (but not changing its content). 5. So based on your observation, can you deduce what is the difference between these two commands:
tr "[a-z]" "[A-Z]" < test.txttr "[a-z]" "[A-Z]" test.txt- Now what if we want to store the capitalized content to another file? Try:
tr "[a-z]" "[A-Z]" < test.txt > new_test.txt. You should find that “HELLO, HAVE A GOOD DAY TODAY!” exists withinnew_test.txt, since we redirectstdoutto create this new file. - What if we want to write back to
test.txt? What can you deduce from the output?
Perhaps the screenshot below might help you for steps 1-7 above.
Pipe
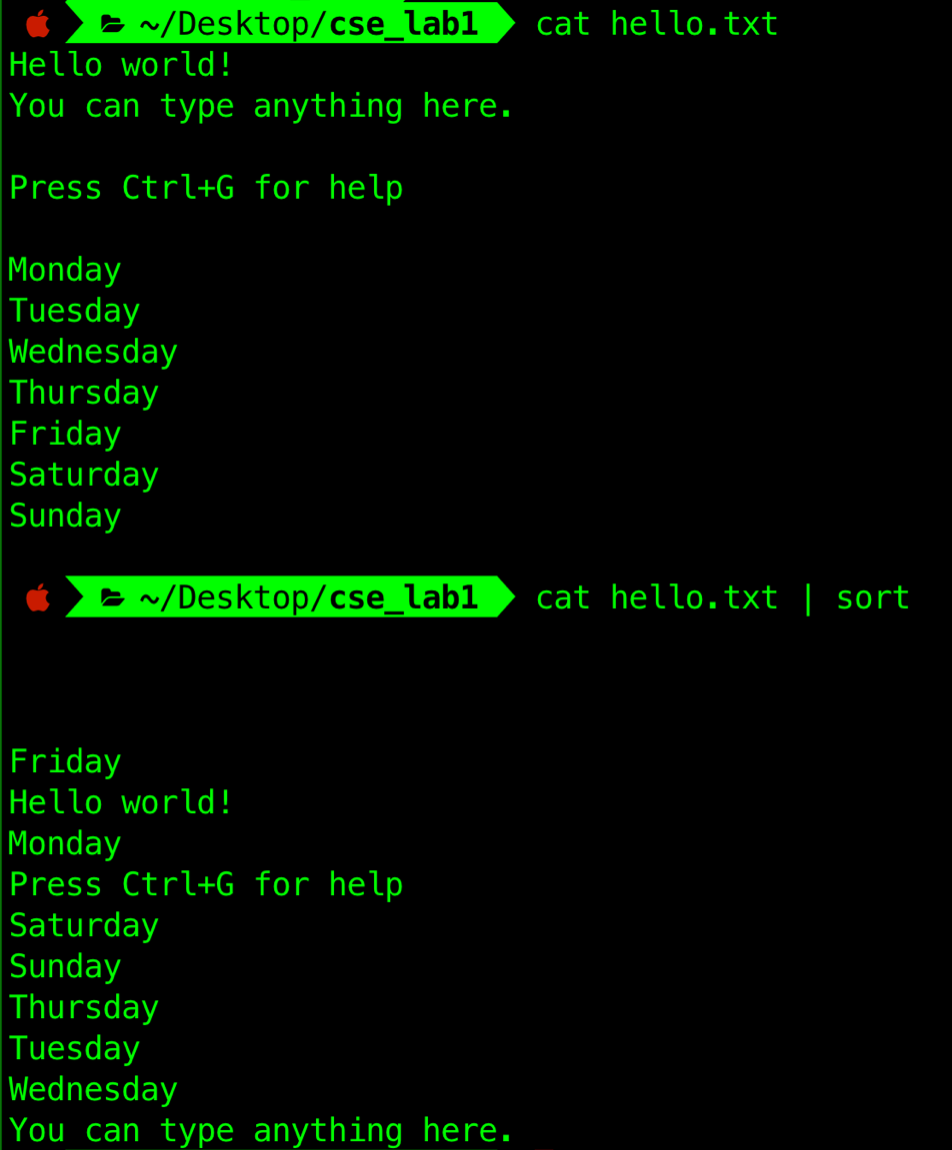
Pipe is a command in Linux that lets you use two or more commands such that output of one command serves as input to the next.
It may sound similar to stream redirection, but the general rule of thumb is that if you’re connecting the output of a command to the input of another command, use a pipe, denoted as | symbol. If you are outputting to or from a file use the redirect.
Task 7
TASK 7: Try out how to pipe:
-
Suppose we want to pass the want to pass the output of
catcommand as the input ofsortcommand. We can’t do this with redirection:
-
However, using pipe works. It serves as a way to allow interprocess communication (Week 3 materials):
Download Files using curl
The curl command allows us to transfer data (download, upload) online. For instance, we can download the GNU general public license text file using the command:
curl -o GPL-3 https://www.gnu.org/licenses/gpl-3.0.txt
- The
-ooption: Write output to<filename>instead ofstdout
If you don’t have it, install it using sudo apt install curl.
Output Filtering
One last handy tool to learn is output filtering. The grep or awk command will scan the document for the desired information and present the result in a format you want. The command grep also accepts regex to search for more complex patterns.
A filter takes input from one command, does some processing, and gives output.
Task 8
TASK 8: Suppose we have a long document, that GNU license we downloaded from the task above.
- To download the license, type the command:
curl -o GPL-3 https://www.gnu.org/licenses/gpl-3.0.txt - Now search for a string inside a file using the commands:
grep "<string>” <path/to/file>- For example:
grep “GNU” GPL-3prints every line containing “GNU” word. - Some shells don’t require the quotation marks for single-word search, so you can try
grep GNU GPL-3as well.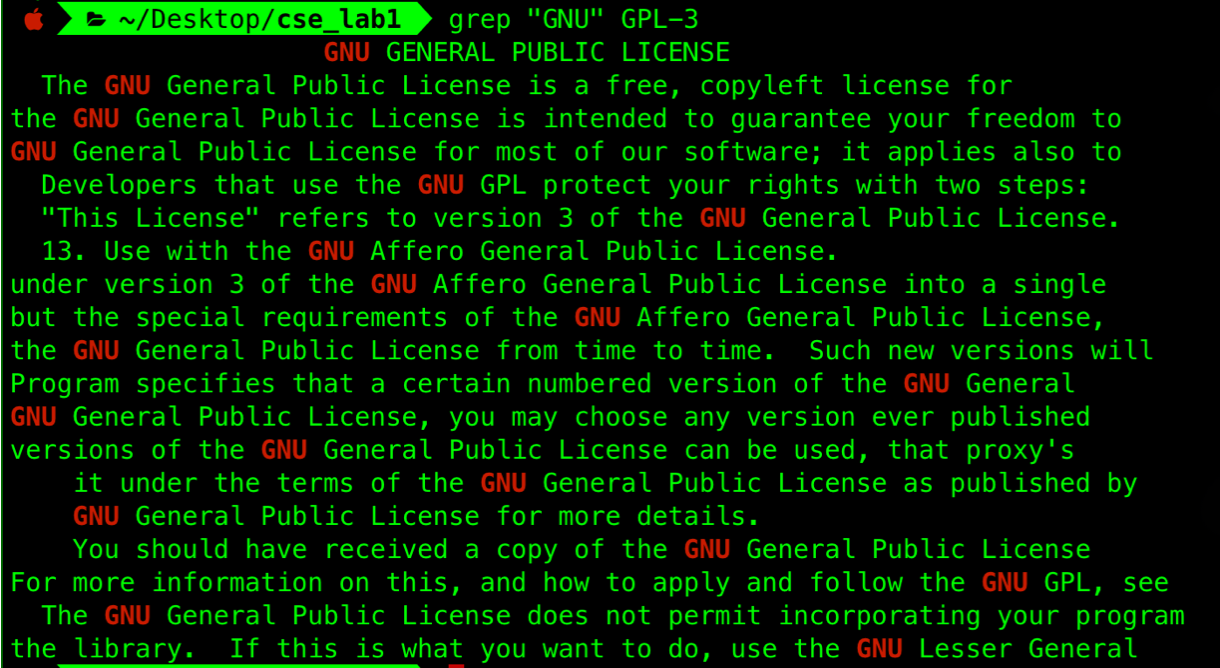
Here are the common grep options to try:
-i: both lower and upper case-v: search everything that does not contain the<string>-n: prints the line number too
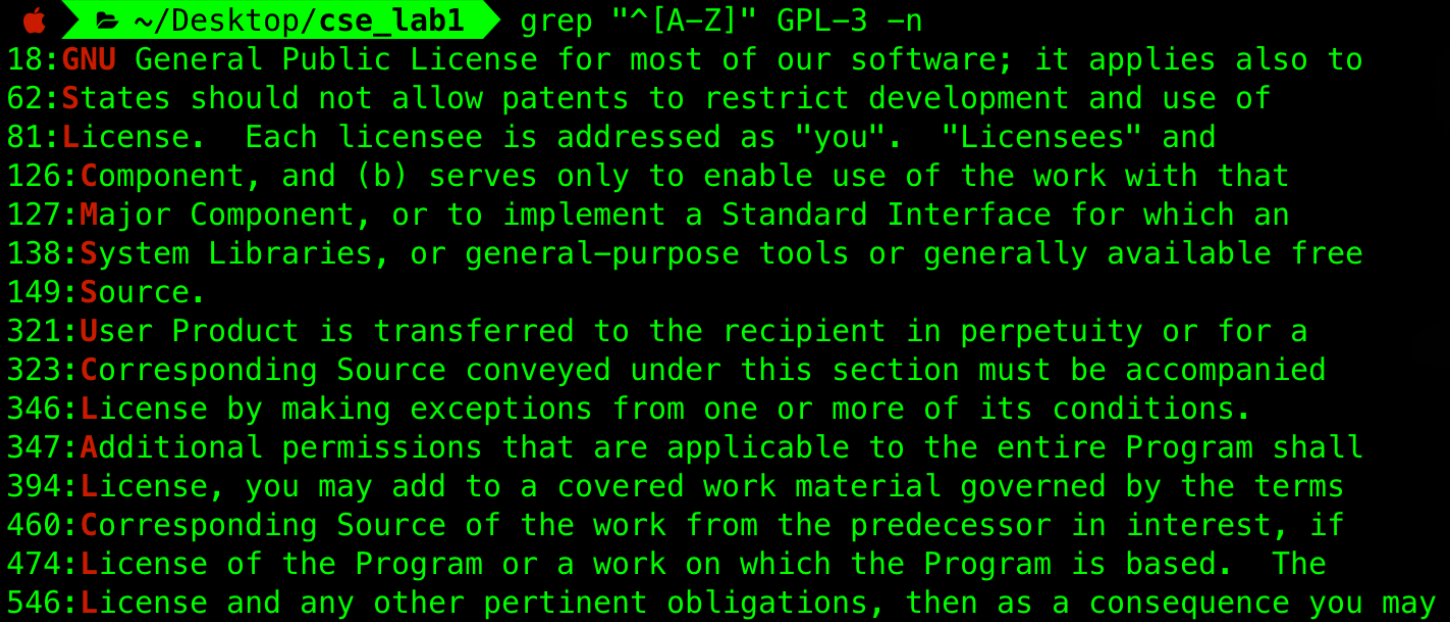
The <string> argument of the grep command can accept regex too, for instance:
grep "^[A-Z]" GPL-3 -n- This search for every line starting with capital letters
You can also pipe the output of a command to the grep command so that you can filter it out. For example, ps -ax will report all running processes in your system (by all users, including your own). If we want to filter some processes by name, we can use grep and pipe to filter the Telegram process: ps -ax | grep -i Telegram
