Congratulations! 🎉, you can now be assured that you are uploading your file to the right destination and not a fake, malicious server.
However, can you trust the network path used for your upload?
- It may go through many intermediate routers and communication links that you don’t know very well (or not at all).
- Could people tap the links and steal your data?
Unfortunately, yes. Malicious parties can eavesdrop on your conversation with the server. Although sometimes confidentiality is not an issue, it is obviously not the case when you’re uploading personal files to a remote server.
To avoid the theft of data in transmission, you should implement a confidentiality protocol (CP). There are two basic ways to do this:
- CP 1: Using public key cryptography
- CP 2: Using symmetric key cryptography
Confidentiality Protocol 1
Task 2 (2%)
TASK 2: Design a protocol to protect the confidentiality of the content of the uploaded file using public key cryptography.
For simplicity, the filename doesn’t have to be encrypted.
The suggested steps are as follows:
-
The client encrypts the file data (in units of byte blocks) before sending, and SecureStore decrypts on receive.
- Since the RSA key size is 1024 bits, it can encrypt/decrypt at most 128 bytes of data at a time.
- However you will need to use a padding for the data blocks and padding + data blocks must be 128 bytes at maximum.
- There are two options:
PKCS5: min 11 bytes of padding, max 117 bytes data blocksOAEPwithMGFandSHA-256: min 66 bytes of padding, max 62 bytes data blocks
-
Since you were able to implement AP, you already have everything you need for CP1. Just remember that in public key cryptography, we could use either the public or private key for the encryption!
Figure out which key to use to encrypt the data from the Client to securely upload your files to the server while protecting the confidentiality of the file.
Expanding the FTP
Make a copy of Task 1 files: ClientWithSecurityAP.py and ClientWithSecurityAP.py each, and name it as ClientWithSecurityCP1.py and ServerWithSecurityCP1.py.
Leave the original files as is. You should have 6
.pyfiles now undersource/.
There’s no need to implement any new MODE in this task.
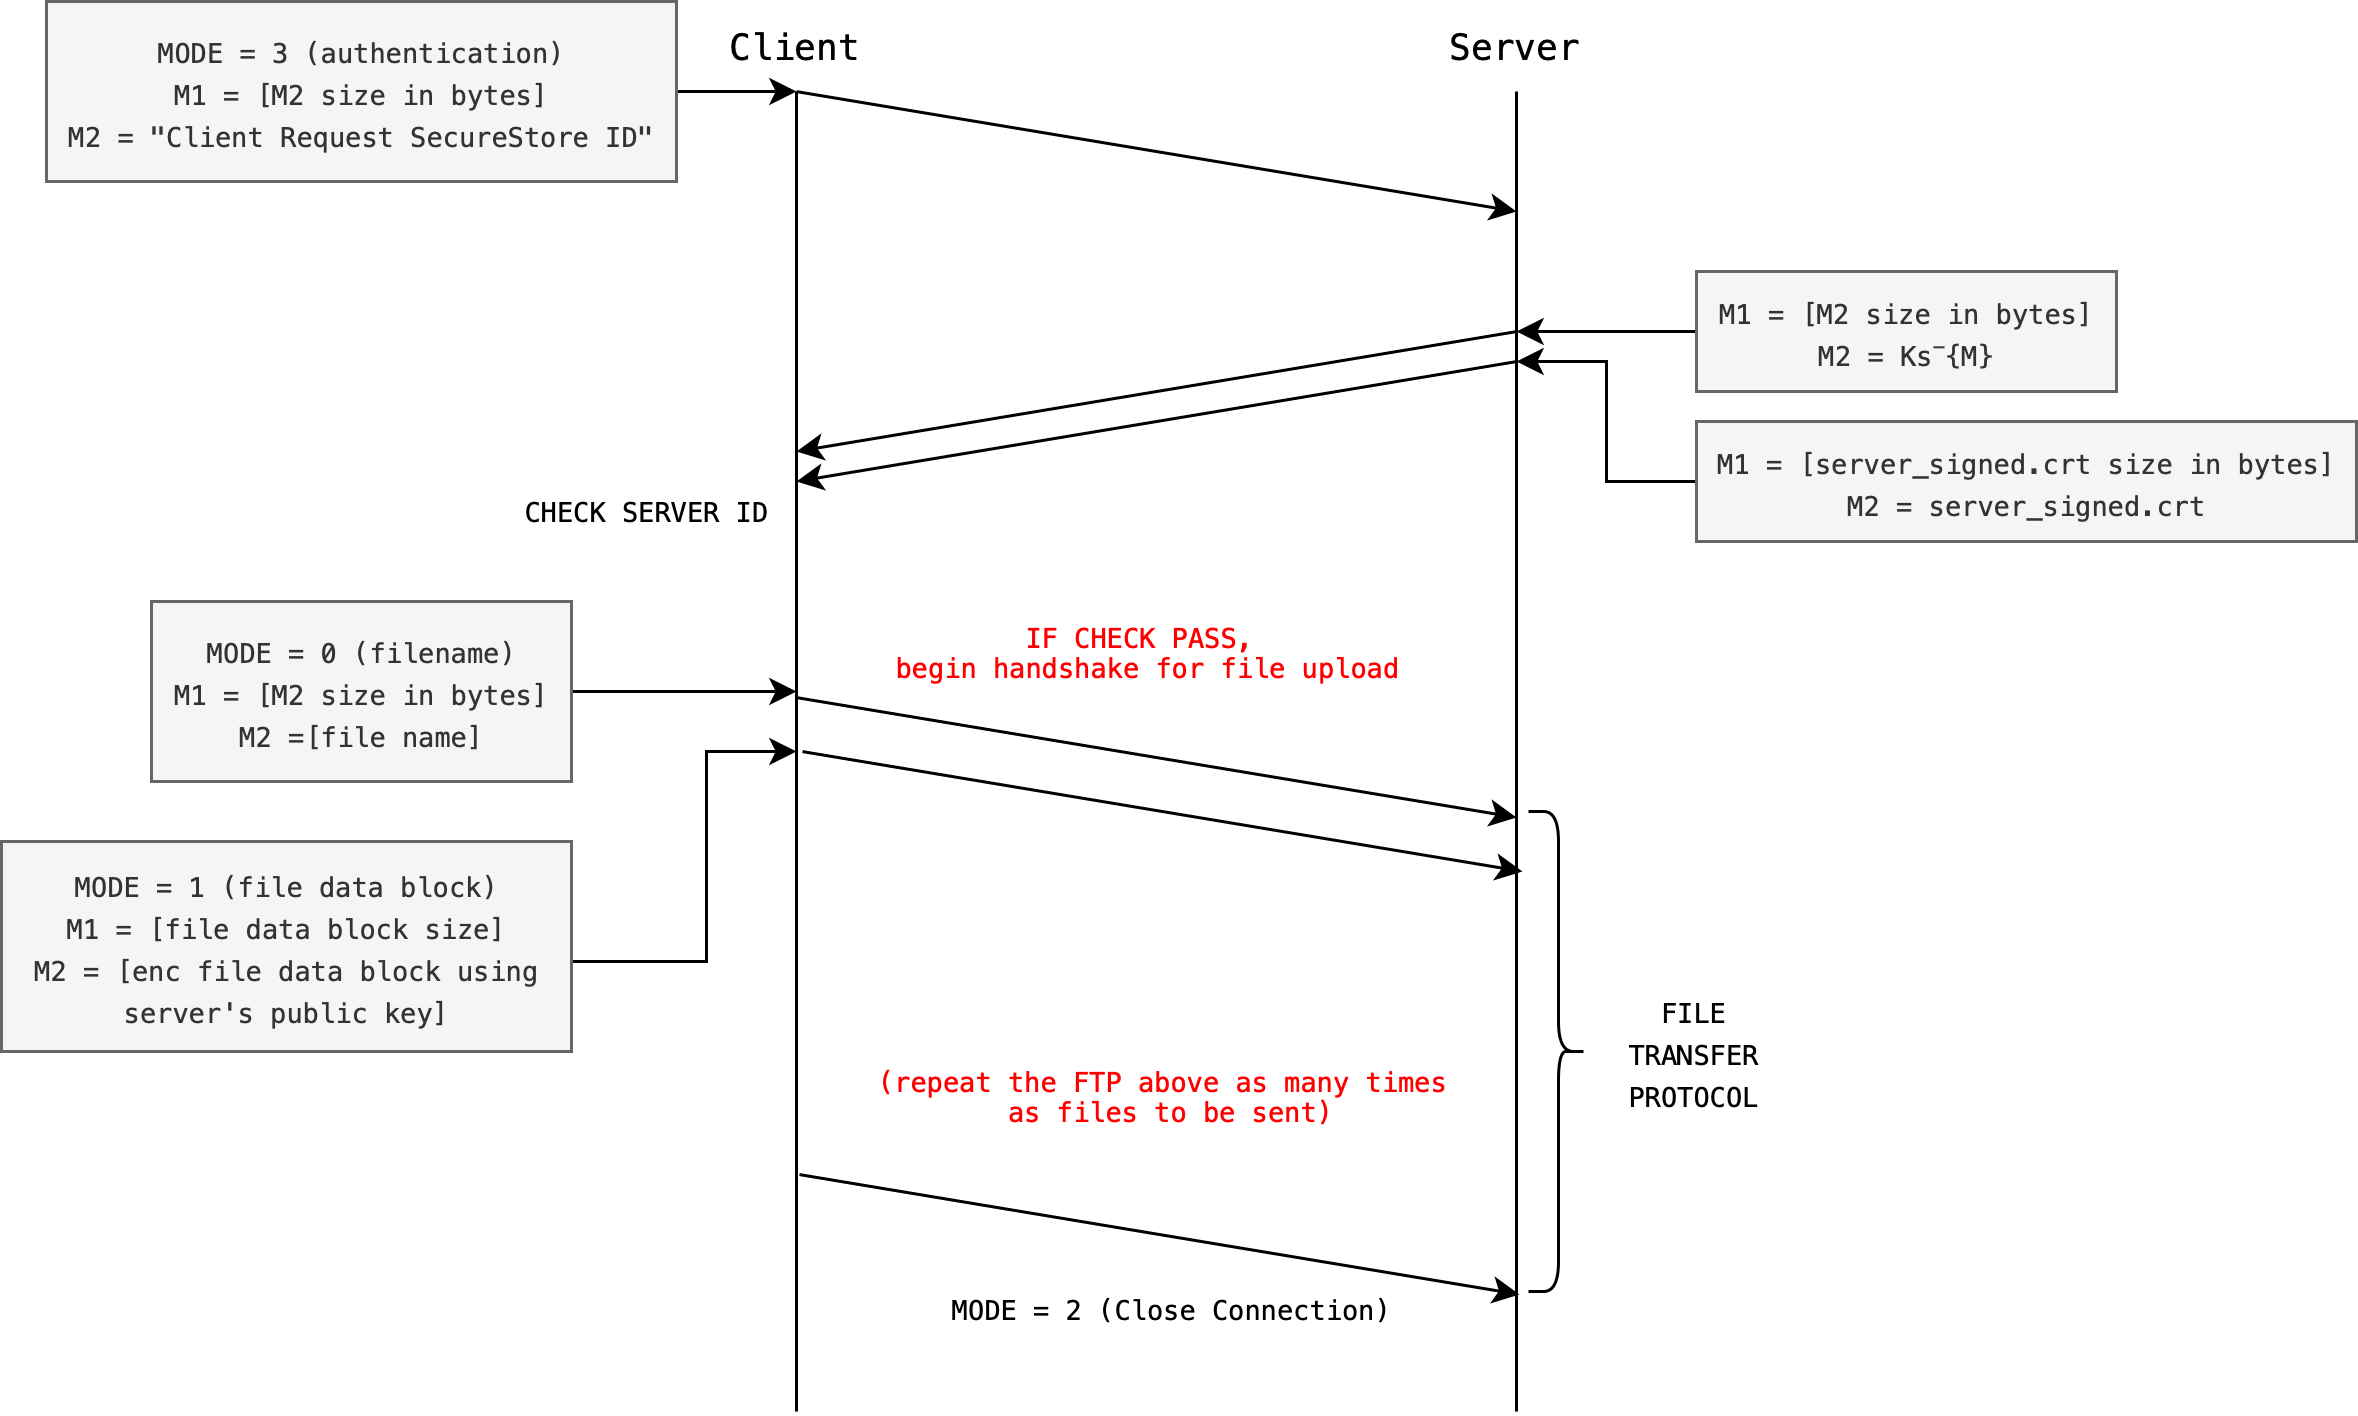
Here’s a recap of the MODE for CP1:
0: client will sendM1: size of filename, andM2: the filename (no need to modify, don’t need to encrypt this)1: client will sendM1: size of data block inM2, andM2: encrypted blocks of data to the server. The server has to decrypt it before writing the file tosource/recv_files/(NEW for Task 2)- Note: It is up to you to either concatenate ALL encrypted bytes and send it all at once as
M2with the appropriateM1value (total encrypted bytes) or to send chunks of 128 bytes at repeatedly, e.g: sendM1: 128 (as bytes), thenM2: encrypted data chunk, repeatedly until the entire encrypted files are sent. The latter requires lots of socketsendfunction calls, but it’s your call. We have accounted for either cases in our grading scheme. - No matter which method you choose, both are still under
MODE 1, which means to send the file data in its entirety. - Do not repeatedly send
MODE 1for every 128-bytes chunk.
- Note: It is up to you to either concatenate ALL encrypted bytes and send it all at once as
2: client closes connection (no need to modify, same as original)3: client begins authentication protocol as per Task 1 (no need to modify, same as AP in Task 1)
And here’s a little diagram to help you in your implementation. Remember, the little vulnerability highlighted in the AP section is still illustrated here.
You might want to refer to the fifth page of this assignment to get started with some basic functionalities of Python cryptography module.
Grading
We will manually check the implementation of your MODE 1 in both Client and Server scripts.
Commit Task 2
Save your changes and commit the changes (assuming your current working directory is source/):
git add ServerWithSecurityCP1.py ClientWithSecurityCP1.py
git commit -m "feat: Complete Task 2"
Confidentiality Protocol 2
Task 3 (2%)
TASK 3: Design a protocol to protect the confidentiality of the content of the uploaded file using symmetric key cryptography.
Although CP1 is easy to implement, it is unbearably slow. Try using it on a large file (>100MB, e.g cmos.mp4) and observe its slowdown relative to no encryption (no confidentiality).
Hence, you will also implement this alternate confidentiality protocol that we call CP2:
- CP2 negotiates a shared session key (symmetric key) between the client and server, and
You should use
Fernetto generate the session keys. Fernet is a symmetric key encryption system based on AES in CBC mode with a 128-bit key for encryption with PCKS7 padding. It is part of Pythoncryptographymodule). Recall that symmetric key encryption is much faster than RSA. - Uses the session key to provide confidentiality of the file data thereafter.
You might want to refer to the fifth page of this assignment to get started with some basic functionalities of Python cryptography module.
Before you proceed, you might want to ask yourself: who should generate the session key? Client or server?
Expanding the FTP
Make a copy of Task 2 files: ClientWithSecurityCP1.py and ServerWithSecurityCP1.py each, and name it as ClientWithSecurityCP2.py and ServerWithSecurityCP2.py.
Leave the original files as is. You should have 8
.pyfiles now under/pa2.
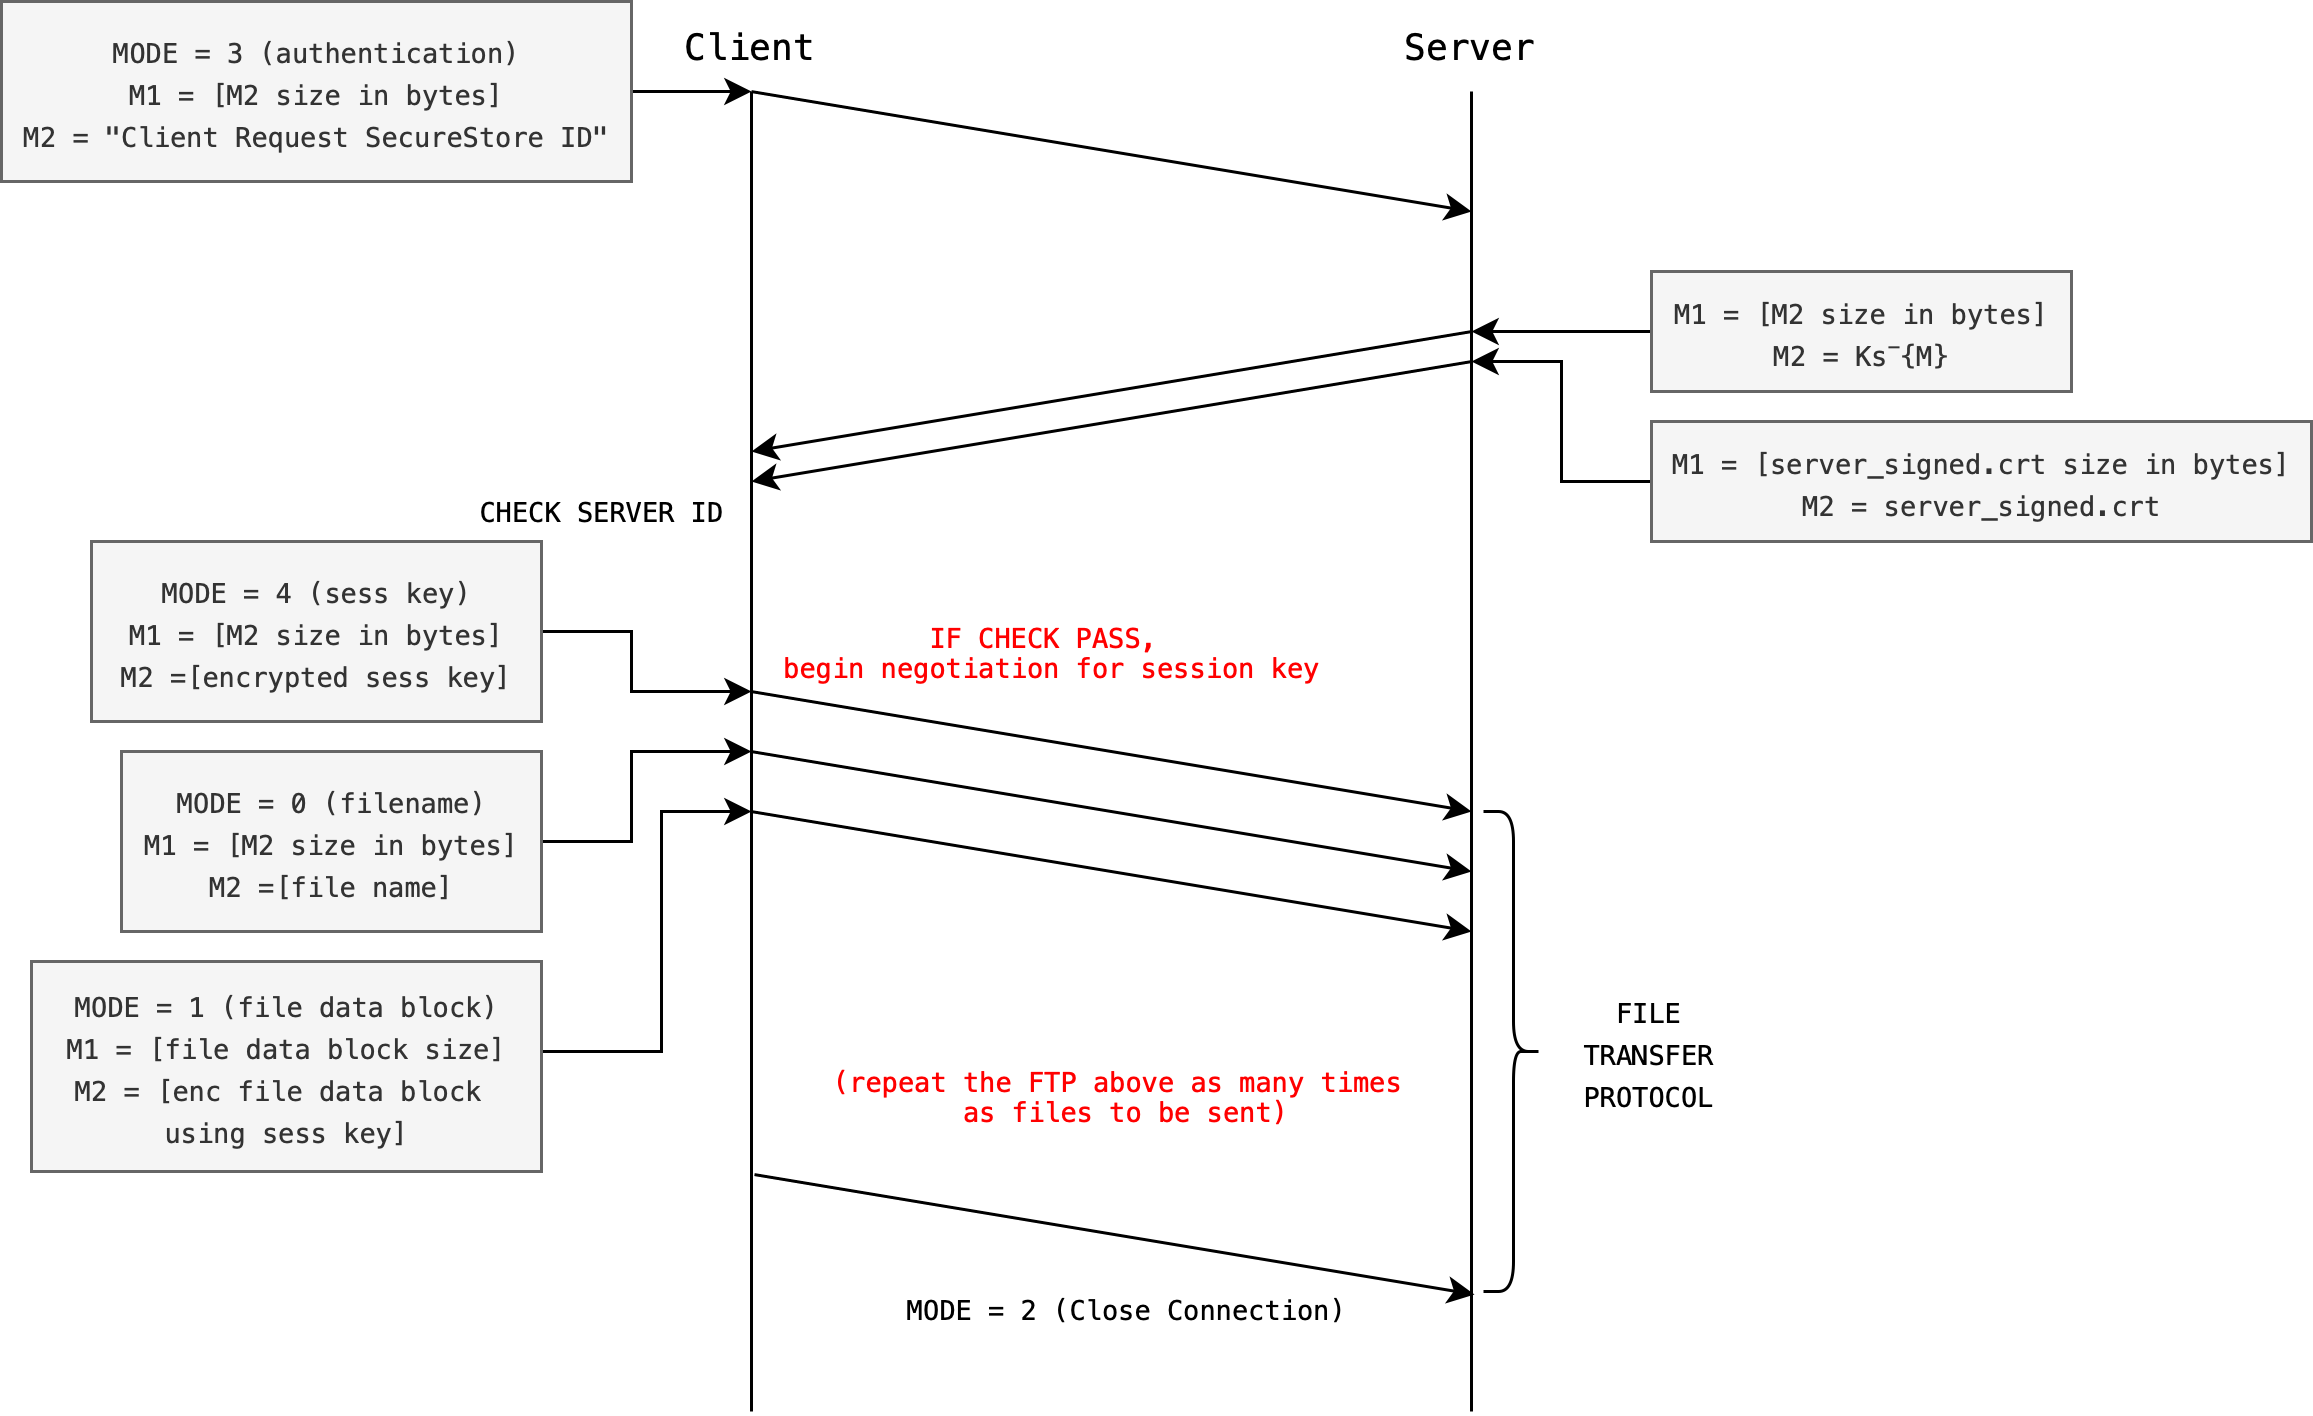
Now both client and server must implement MODE: 4, which signifies the key generation handshake.
- Upon successful AP, client must then generate a session key using
Fernet, then sendMODE: 4, (intconverted tobytes) to the server, followed by two messages:M1: size ofM2in bytesM2: generated session key bytes that is encrypted (by what key? Remember we want to protect the confidentiality of this session key – so only our server can decrypt it).
- Then the client proceed to prompt the user with filename as per the regular FTP.
- Upon receiving
MODE: 4, the server must receive and decrypt the session key.
It goes without saying that MODE: 1 implementation must be modified for both Server and Client to utilise the session key instead.
Here’s a recap of the MODE for CP2:
0: client will sendM1: size of filename, andM2: the filename (no need to modify, don’t need to encrypt this)1: client will sendM1: size of data block inM2, andM2: encrypted blocks of data using the session key. The server has to decrypt it with the session key as well before writing it to file (NEW for Task 3)2: client closes connection (no need to modify, same as original)3: client begins authentication protocol as per Task 1 (no need to modify, same as AP in Task 1)4: client begins sharing of session key protocol (NEW for Task 3)
And here’s a little diagram to help you in your implementation. Remember, the little vulnerability highlighted in the AP section is still illustrated here.
Grading
We will manually check the implementation of your MODE 1 and MODE 4 in both Client and Server scripts.
Commit Task 3
Save your changes and commit the changes (assuming your current working directory is source/):
git add ServerWithSecurityCP2.py ClientWithSecurityCP2.py
git commit -m "feat: Complete Task 3"
By the end of Task 3, you have 1 server-client script pairs for each task (8 scripts in total under source/): the original (non-secure), AP, CP1, and CP2 pairs.