In this assignment, you will implement a secure file upload application from a client to a secure file server. By secure, we mean three fulfilled requirements:
- First, before you do your upload as the client, you should authenticate the identity of the file server so you won’t leak your data to random entities including criminals.
- Secondly, you also want to ensure that you’re talking to a live server too.
- Thirdly, while carrying out the upload you should be able to protect the confidentiality of the data against eavesdropping by any curious adversaries.
You may complete this assignment in pairs. Indicate your partner’s name in the google sheet provided in our course handout.
There are three parts of this assignment:
- Authentication Protocol (AP)
- Confidentiality Protocol 1 (CP1)
- Confidentiality Protocol 2 (CP2)
System Requirements
The starter code provided to you is written in Python. You need at least Python 3.10 to complete this assignment and the cryptography module.
While you can develop in Python using any OS, you still need to ensure that your assignment runs on a POSIX-compliant OS (path, etc is resolved).
Starter Code
Download the starter code:
git clone https://github.com/natalieagus/pa2.git
This will result in a directory called pa2. Anything under source/ is where you will work for this assignment. All files in the same level as source/ are for autograding purposes. Do not modify these.
pa2/
  |-source/
    |-auth/
        |-cacsertificate.crt
        |-generate_keys.py
    |-files/
        |-cbc.bmp
        |-file.txt
        |-image.ppm
        |-jsim.jar
        |-player.psd
        |-squeak.wav
        |-vscodejsim.mp4
        |-week9.html
    |-recv_files/
    |-recv_files_enc/
    |-send_files_enc/
    |-ClientWithoutSecurity.py
    |-ServerWithoutSecurity.py
  |-autograde.py
  |-cleanup.sh
  |-input1
  |-input2
  |-output_client
  |-output_server
  |-result
  |-result_enc
  |-result_plain
source/recv_files, source/recv_files_enc, and source/send_files_enc are all empty directories that are not added in .git. To create them, simply run ./cleanup.sh in pa2 as your current working directory. You should see exactly the above file structure afterwards.
Create a Github Remote Repo
Similar to Programming Assignment 1, create a private remote repo on Github called pa_2.
If you’re lazy (in a good way), simply rename your pa_1 repo to pa_2 on github.com. Then, open your local old pa_1 repo and delete all the old files (but keep .git there). Paste all new files from pa2, including .gitignore. You can simply name the directory of your local pa_1 repo to pa_2 for consistency sake, it doesn’t matter.
Finally push them as per normal. Since natalieagus-sutd is already a collaborator, you don’t need to re-invite her.
If you’d like to save your pa_1 work, you can first create a branch called pa1 before you do all the above:
git checkout -b pa1
Then push it to remote:
git push --set-upstream origin pa1
Afterwards, switch back to master:
git checkout master
…and replace the files with this assignment’s starter code.
Whatever you decide, just make sure
natalieagus-sutdis a collaborator to your remote repo.
Default branch: master
You need to make master your default branch as well. You’re free to create other branches but master is the branch which we will grade.
You will be required to make a commit after each Task in this PA2 as well. This is part of our grading requirement. We want to see that you actually make good practices and perform periodic commits.
Add natalieagus-sutd as collaborator
If you create a new private repo, invite natalieagus-sutd (not natalieagus!) as collaborator and give her 24-48 hours to respond.
Test the Starter Code
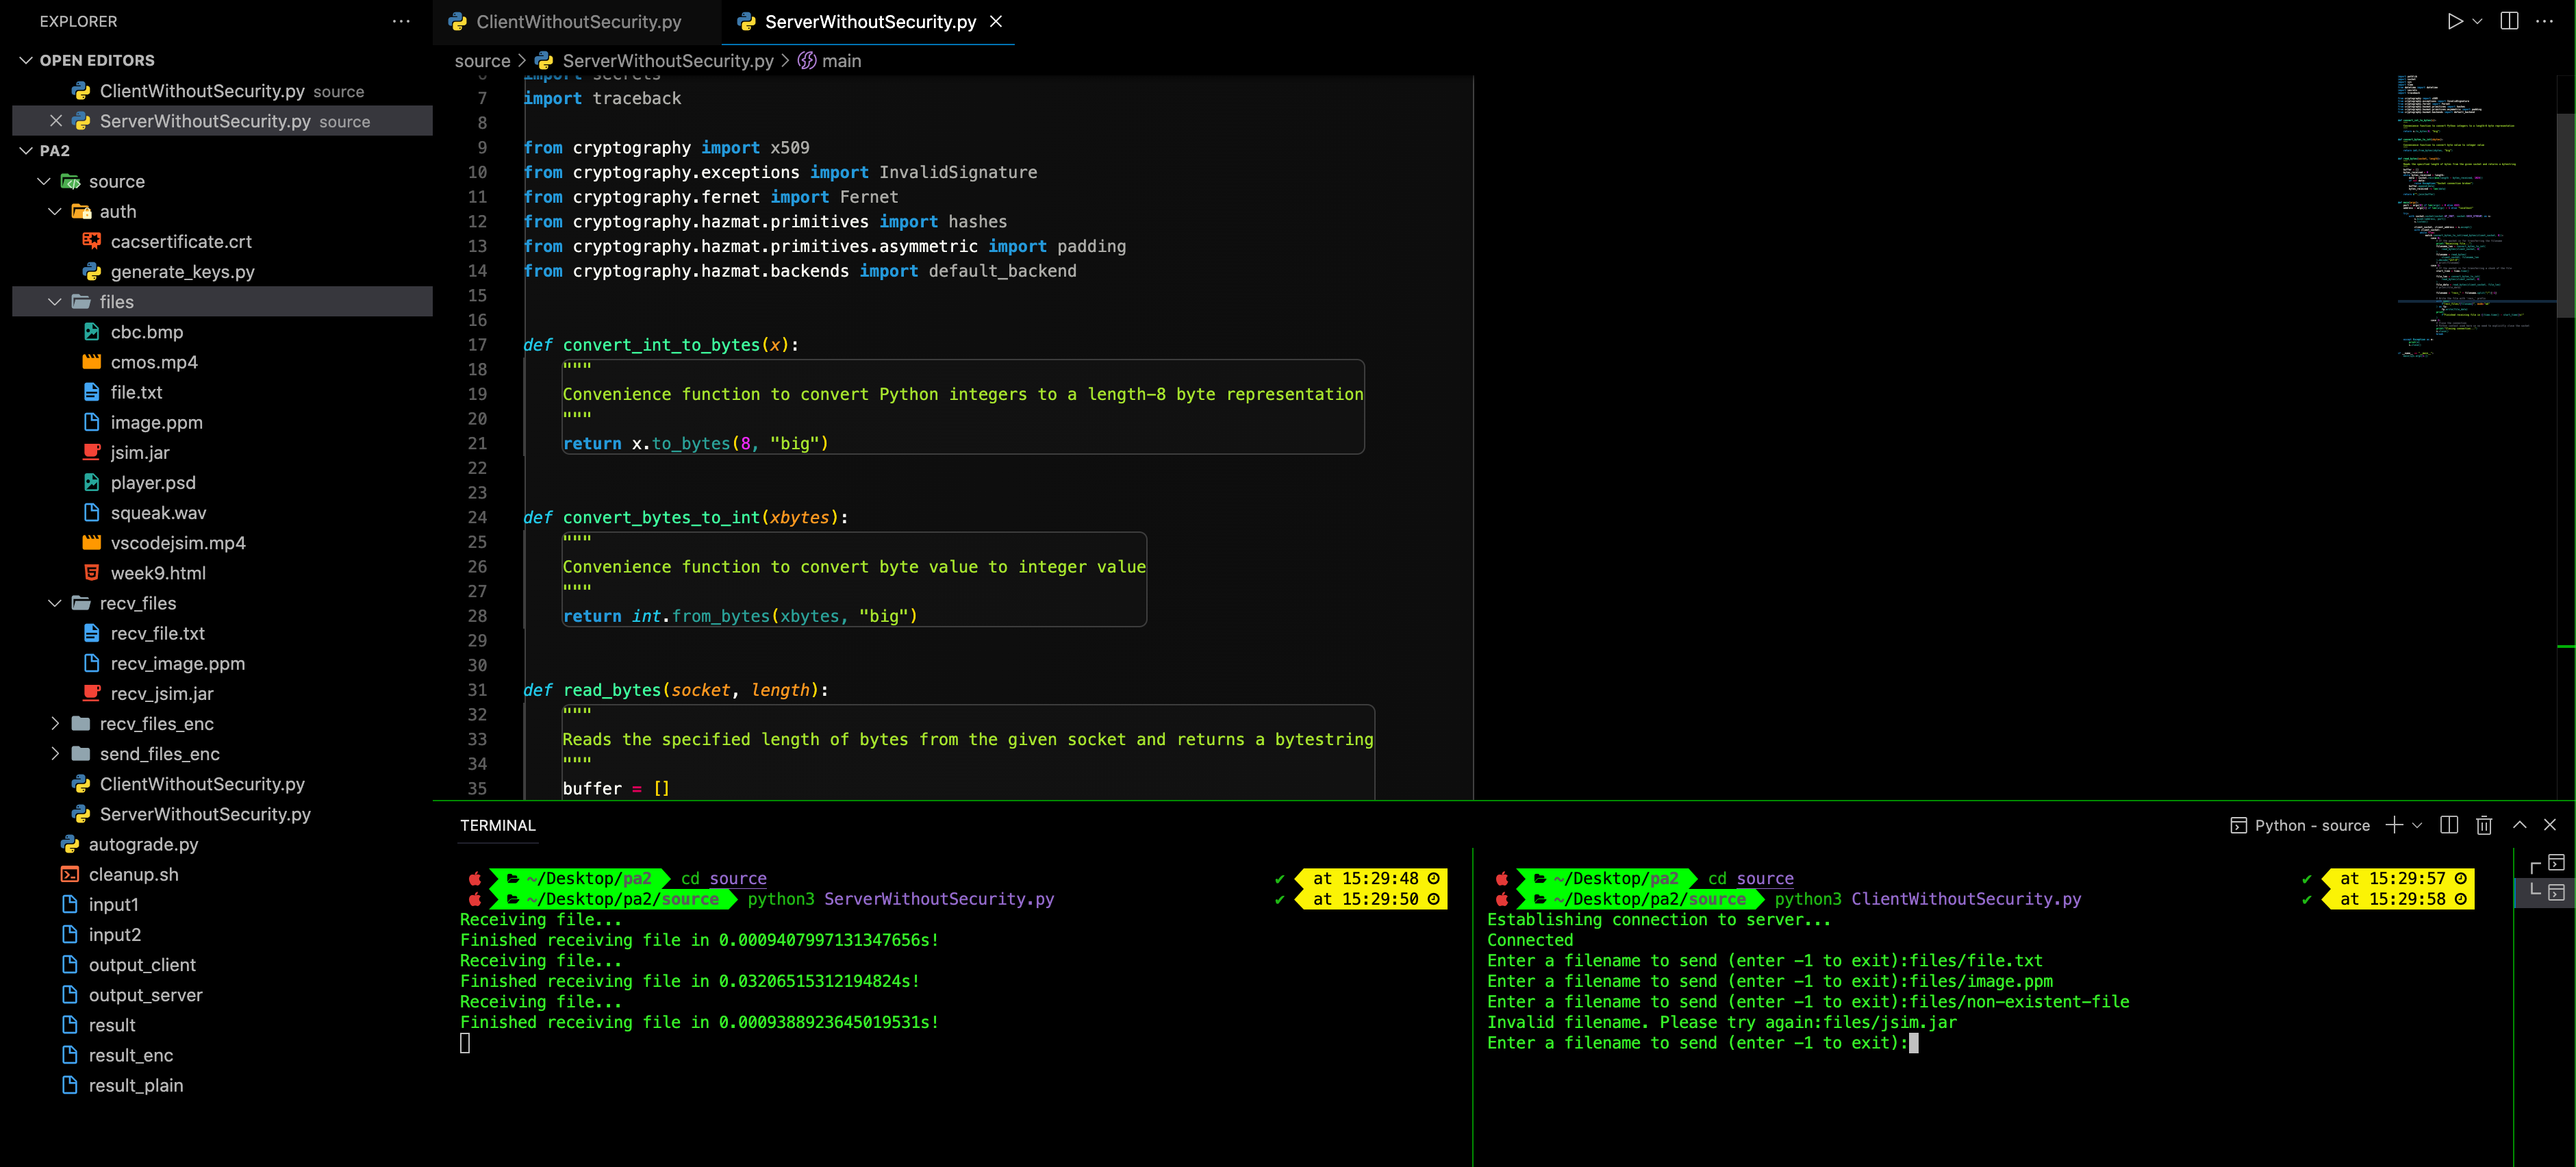
The starter code provided to you implements a simple, non-secure file transfer protocol. We will explain in detail what the protocol is. For now, let’s just ensure that everything runs normally.
- Change the current working directory to
source/.- This is where we assume your working directory is unless otherwise stated.
- Run
python3 ServerWithoutSecurity.py, then runpython3 ClientWithoutSecurity.pyin two terminal windows - You can key in the filename you want to send, e.g
files/image.ppmfrom the Client’s window, and the server will receive it and store it undersource/recv_filesdirectory.- Remember that the current working directory of the Client is
source/
- Remember that the current working directory of the Client is
- You can repeat the above steps multiple times for each file you want to send to the server.
- If the client would like to close connection to the server, key in
-1.
The screenshot below shows how client process can send files to the server process, when both are hosted in the same computer:
You can also host the Server file in another computer:
python3 ServerWithoutSecurity.py [port] [server-ip-address]
The client can connect to it using the command:
python3 ClientWithoutSecurity.py [port] [server-ip-address]
Notes:
- To get this to work, you most probably need to use private ip address instead of public one, unless you have set a static public IP
- You might need to enable port forwarding if you use a public IP, but if you aren’t sure what you’re doing then dont, you might expose yourself to a security vulnerability
- If this is all to complicated for you, skip. You can totally just do the assignment in the same computer
Debug Notes
Invalid Syntax
Some of you might encounter the error when running python3 ServerWithoutSecurity.py
  match convert_bytes_to_int(read_bytes(client_socket, 8)):
        ^
      case 0:

SyntaxError: invalid syntax
That’s because your python3 is NOT aliased to python3.10 or that you don’t have python3.10 installed. Fix this on your own. You’re a CS major student. Not knowing how to install Python and manage its libraries is a really really bad thing; it’s like as if the entire 50.002 and the first 6 weeks of CSE doesn’t mean anything to you.
In this handout, we assume that python3 is always aliased to python3.10.
That is, if you type python3 in the terminal, you’ll see at least version 3.10 printed out:

The autograder file also uses python3 instead of python3.10. You can modify it to call python3.10 instead accordingly.
Module Not Found
Some of you might encouter the error ModuleNotFoundError: No module named ‘cryptography’. You should know what you need to do by now as a CS student. If you have installed cryptography using pip install cryptography, but still suffer from this error, it simply means that the pip you used does not install to the path library of whatever python3 version you are using right now. That is, you may have mixed up Python and pip versions on your machine.
Assuming your python3 is aliased to python3.10, then you can do:
python3 -m pip install cryptography
Command Y Not Found
If you run autograder.py or ./cleanup.sh and you’re met with command Y not found error, then you can simply reisntall your whole OS.
Just kidding. Did you forget your Lab 1 materials? What does that error mean?
That’s right you just dont have the system program like
truncateordiff. Simply install it for your own OS (sudo apt install [program]for Ubuntu,brew install [program]for macOS, etc).
Autograder Complains File Output/Y Not Found
If the autograder complains that your programs did not produce the output files at the designated location under source/output but it did create these when ran manually, it’s due to trailing whitespaces \n\r (invisible to the eye) that’s present when it is reading input1 or input2. For instance, your client program is trying to find files/file.txt\r\n instead of just files/file.txt because of the way the input files are loaded in your system.
Simply add a strip() function inside your Client[version].py scripts when getting filename from the user to eliminate these trailing whitespaces.
No Such File or Directory: recv_files/EXPECTED_FILE
Depending on your OS, when you run ServerWithSecurity[version].py or the autograder, it might complain about files in the directories: recv_files/EXPECTED_FILE, recv_files_enc/EXPECTED_FILE, etc not found when you clearly have it in your project path or have run cleanup.sh.
This is due to differences in what constitutes a line break:
\r\nis a Windows Style\nis a POSIX Style\ris a old pre-OS X Macs Style, Modern Mac’s using POSIX Style
Therefore your directory name might be set as recv_files\r\n when you run cleanup.sh. You can’t tell whether the line break is there or not. Similarly, when you receive filename from input in ClientWithSecurity[version].py, the line break might be there, creating filename like files.txt\r\n. In order to tackle this, you can:
- Add
.strip()at the end ofinput, resulting ininput("Enter a filename....").strip() - Create a new
cleanup.shwith the exact same content and overwrites the old one so that the line break suits your system’s
Command truncate Not Found
It is possible that you might not have truncate system program installed by default. You have learned the File System in Week 6, so we suppose you know why we use it in our autograder.
To install, simply type sudo apt -y install coreutils (Ubuntu), or brew install coreutils (macOS).
Do NOT Import Other Python Modules
You are NOT allowed to import any other python modules other than what’s given:
import pathlib
import socket
import sys
import time
from datetime import datetime
import secrets
import traceback

from cryptography import x509
from cryptography.exceptions import InvalidSignature
from cryptography.fernet import Fernet
from cryptography.hazmat.primitives import hashes, serialization
from cryptography.hazmat.primitives.asymmetric import padding
from cryptography.hazmat.backends import default_backend