Imagine there exist a secure server called SecureStore (the server’s name) at some advertised IP address. As clients, we want to upload our files securely to these file servers. In the real world, this secure server might be Dropbox, Google Drive, etc. We can’t simply trust the IP address because it’s easy to spoof IP addresses.
Hence, before the file upload, your client should authenticate SecureStore’s identity. To do that, you’ll implement an authentication protocol (AP) which bootstraps trust by a certificate authority (CA).
Authentication Protocol Design
It is conceptually simple to design AP using public key (i.e., asymmetric) cryptography, that is to authenticate that a message sent by SecureStore is indeed created by it.
What you can do is:
- Ask SecureStore to sign a message using its private key and send that message to you.
- You can then use SecureStore’s public key to verify the signed message.
- If the check goes through, then since only SecureStore knows its private key but no one else, you know that the message must have been created by SecureStore.
There’s one catch, however.
How can you obtain SecureStore’s public key reliably?
- If you simply ask SecureStore to send you the key, you’ll have to ensure that you’re indeed receiving a reply from SecureStore, otherwise a man in the middle attack is possible like we learned in class.
- There’s circular dependency here: you’re replacing an authentication problem by another authentication problem!
Certificate Authority
In the Internet, trust for public keys is bootstrapped by users going to well known providers (e.g., a reputable company like Verisign or a government authority like IDA) and registering their public keys.
The registration process is supposed to be carefully scrutinized to ensure its credibility, e.g:
- You may have to provide elaborate documents of your identity or
- Visit the registration office personally so that they can interview you,
- Verify your signature, etc (analogous to the process of opening an account with a local bank).
That way, Verisign or IDA can sign an entity’s (in our case, SecureStore’s) public key before giving it to you (client) and vouch for its truthfulness.
Note that we’re bootstrapping trust because we’re replacing trust for SecureStore by trust for VeriSign or IDA. This works because it’s supposedly much easier for you to keep track of information belonging to IDA (i.e., their public keys could be considered “common knowledge” that your browser can obtain) than information about a myriad of companies that you do business with.
Getting CA’s Root Certificate
A certificate contains a public key. If we have the CA’s certificate, we have its public key too.
How do we get CA’s information then? How do we know that CA’s keys indeed belong to the CA?
Either your browser or your OS ships with a set of trusted CA certificates. If a new CA comes into the market, then the browser or the OS will need to ship a software updates containing the new CA’s information.
csertificate
In this assignment, you won’t use VeriSign or IDA. Instead, the CSE teaching staff has volunteered to be your trusted CA – we call our service csertificate, and we’ll tell you (i.e., your SecureStore and any client programs) our public key in advance as “common knowledge”.
We have given our CA certificate in your starter project: source/auth/cacsertificate.crt.
This is analogous to how your browser or OS ships with a set of trusted CA certificates.
Proposed AP
Please read this whole section from start to end carefully before you begin your implementation. You need to stick to the suggested protocol carefully.
Task 1 (3%)
TASK 1: Implement an Authentication Protocol. You are expected to make a copy of the starter non-secure FTP and modify it. Read along first to get the general idea.
To get you started, we suggest a few things that you can do to authenticate the identity of SecureStore:
- SecureStore generates RSA private and public key pair (use 1024 bit keys). It also creates a certificate signing request (
.csr), where it submits the public key and other credentials (e.g., its legal name).
- You can already do this by running
python3 generate_keys.pyfile provided to you insource/auth.- Change your working directory to
source/authfirst before runninggenerate_keys.py.
- Change your working directory to
- Study what it does carefully.
-
SecureStore uploads the certificate signing request (
.csrfile) for approval to csertificate, our CA. Our CA is integrated with our bot. Simply type/startto our bot and follow the instructions. Our CA will:- Verify the request, and
- Sign it to create a certificate containing SecureStore’s public key (
server_signed.crt), and - Pass the signed certificate back to SecureStore.
- This certificate is now bound to SecureStore and contains its public key.
-
SecureStore retrieves the signed certificate by our CA, and you MUST save the file
server_signed.crtundersource/auth/directory. Do not change it to any other name. -
When people (e.g., a client program) later ask the Server for its public key, it provides this signed certificate.
- The client can verify that this certificate is indeed signed (authorised) by our trusted CA csertificate using csertificate’s Public Key, embedded within
cassertificate.crt. - Recall that csertificate’s public key is embedded within
cacsertificate.crtgiven to you in the starter code. In real life, this should be a well known certificate shipped by the Browser/OS.
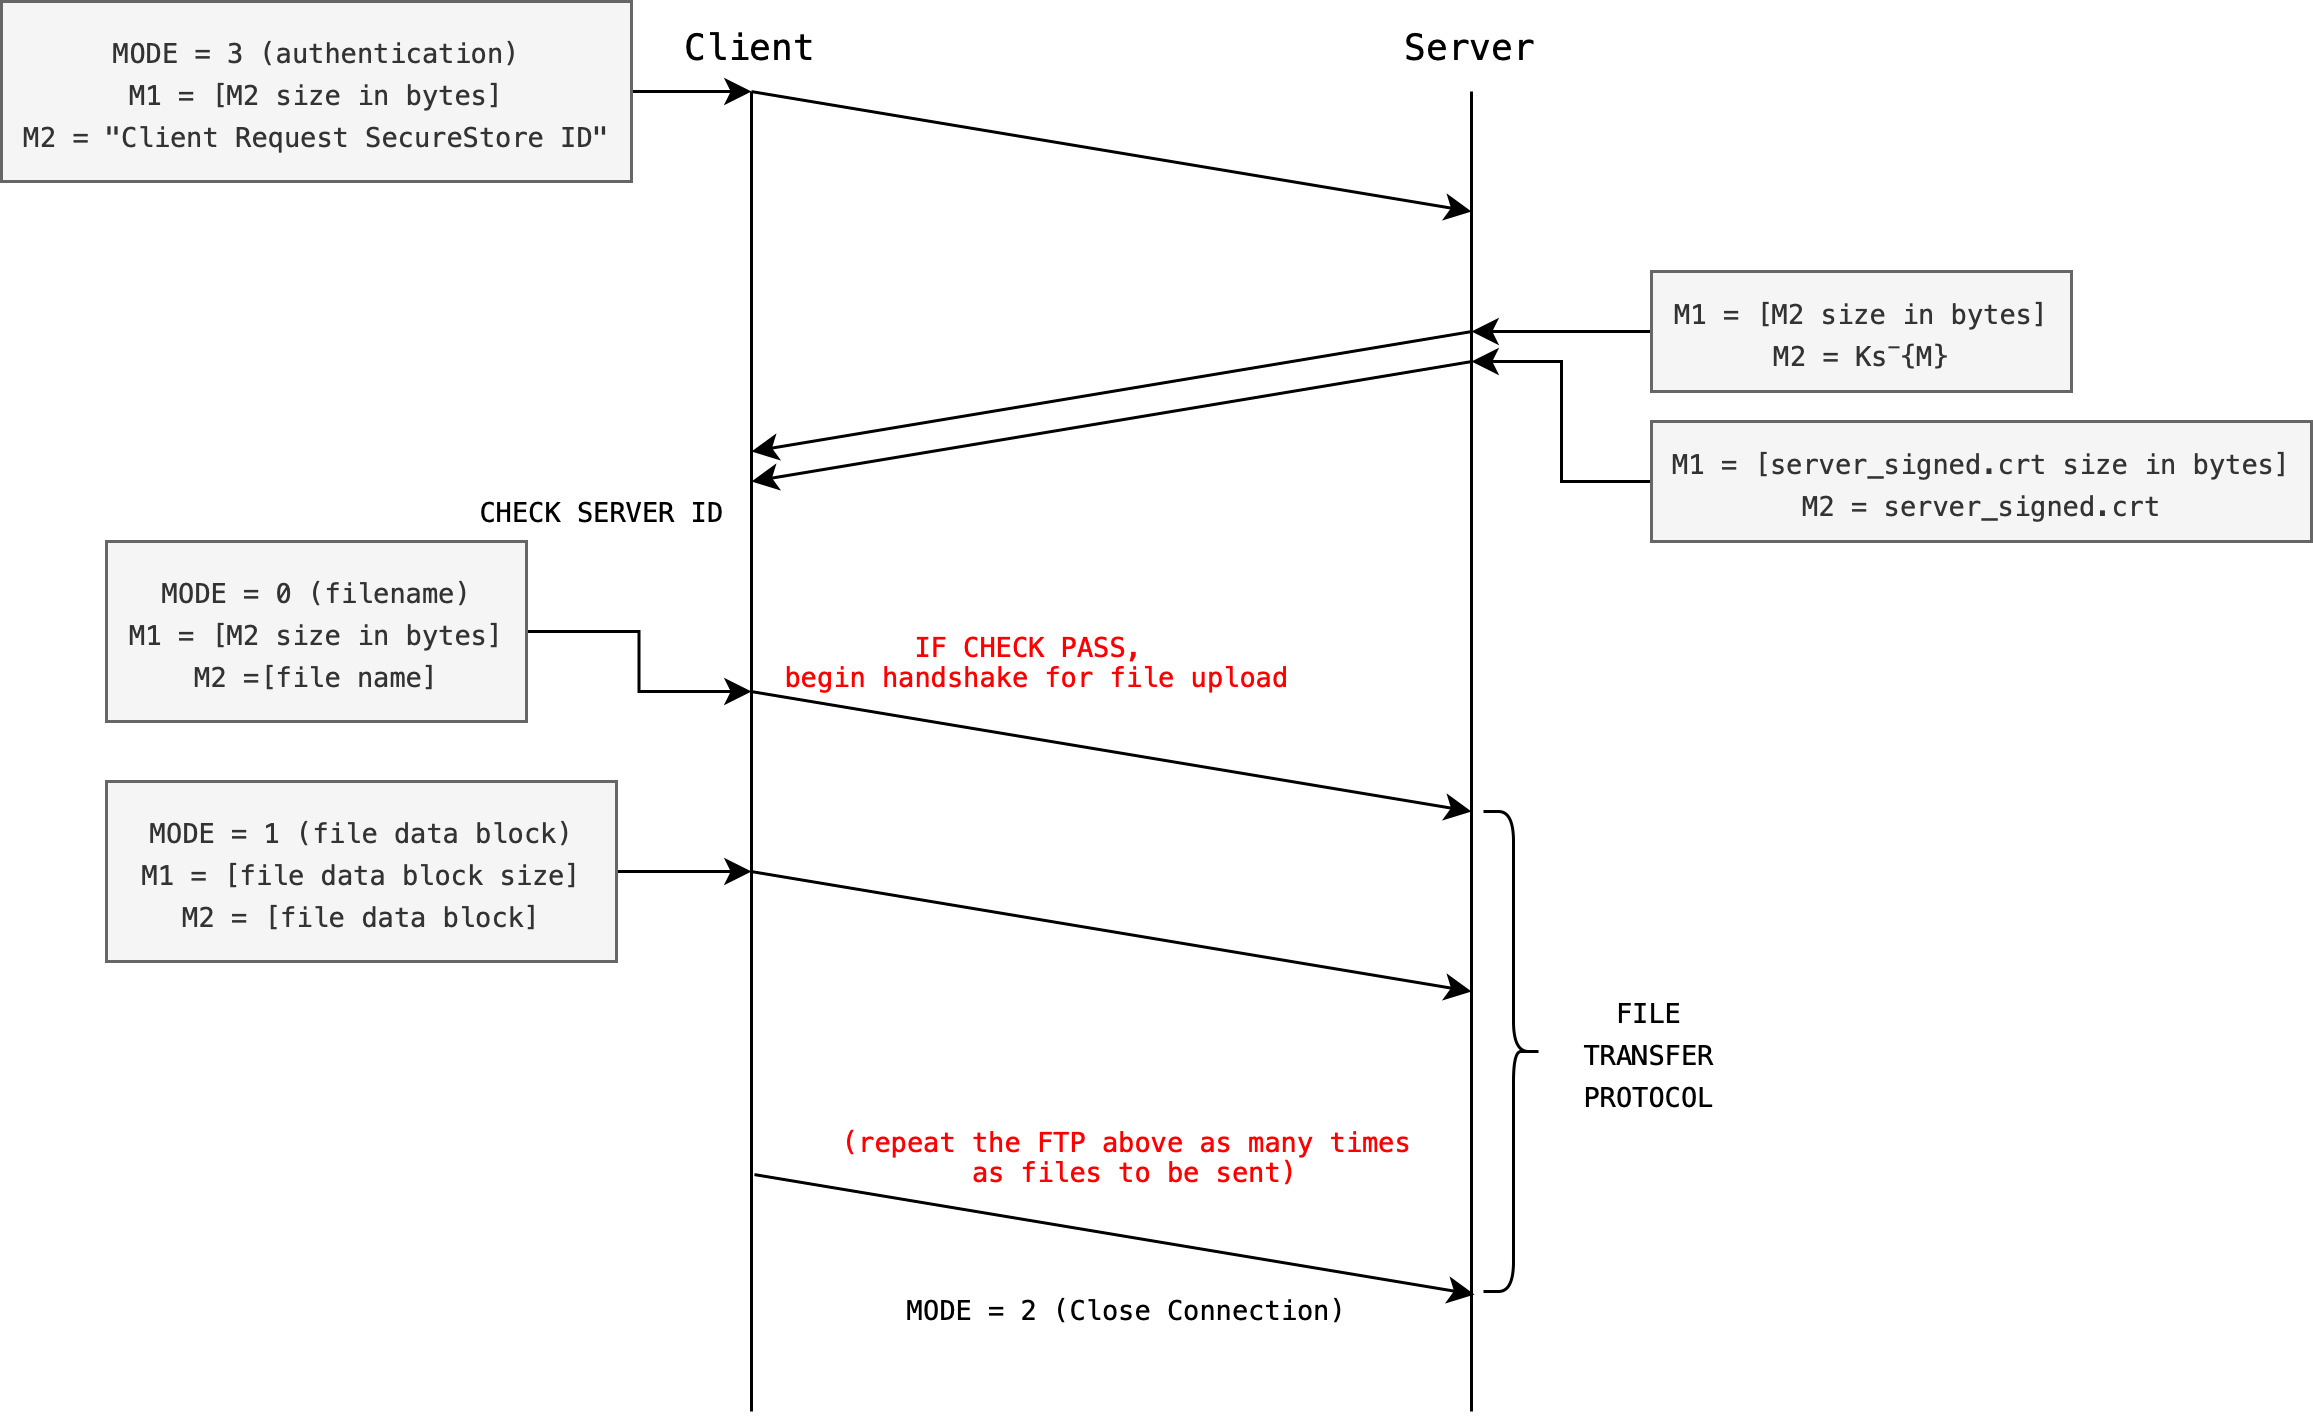
The diagram below gives the basis of a possible authentication protocol. Take note of the MODE. The MODE preceeding the streams of messages (M1, M2) sent by the Client tells the server what kind of message it is. Then, M1 tells the server the size of M2 so that the Server can read that appropriate number of bytes from the socket.
Socket
readis a blocking operation, thus it is important to design a protocol between client and server properly to know who is supposed to read/send at any given time.
The size of M1 is designed to be not more than 8 bytes. The next section will explain this in more detail.
The server (SecureStore) has the following items to encrypt/decrypt messages from the client when necessary:
- Signed certificate
server_signed.crt, containing server public key: \(Ks^+\) signed by our CA - Server private key: \(Ks^-\), can be extracted from
server_private_key.pem
Upon successful connection, the client shall send an arbitrary message to the server, and the server must sign it by its private key. Then, the server sends both the signed message + server_signed.crt certificate to the client.
During the step labeled CHECK SERVER ID, the client must:
- Verify the signed certificate sent by the Server using ca’s public key \(Kca^+\) obtained from
cacsertificate.crtfile, - Extract
server_public_key: \(Ks^+\) from it, - Decrypt signed message: \(Ks^-\{M\}\) (using the
verifymethod) to verify that \(M\) is the same message sent by the client in the first place - Check validity of server cert:
- Afterwards, you can check server certificate’s validity as well
- You can even do this before Step 1-3 above, it is up to you
- We can’t explicitly test you on this without spending too much manpower, but this is good practice
- If the
CHECKpasses, the client will proceed with file upload protocol (next task) - In the event that the
CHECKfails, the client must close the connection immediately (abort mission)
However, theres one problem with the proposed AP above (means it has a vulnerability). You need to identify and fix this problem in your submission.
Hint: read back the second requirement of the assignment in the previous page.
A complete implementation of the AP will grant you 3% of your grades.
Starter Non-secure FTP
The starter code given to you has implemented a simple, non secure file transfer protocol (FTP).
- Upon successful
connect, the Client willsendmessages to the server in this general form:- First to send a
MODE(anintconverted to bytes), - Then to send streams
messages. There might be more than 1 message sent after eachMODEdepending on the purpose of theMODE.- In the diagram above, the first message is labeled as
M1: the size of the second message (this size alone not exceeding 8 bytes to represent by design), - And then the second message labeled as
M2: the actual content of the message.Note that sockets always send and receive in bytes, so whatever you send and read through sockets must be in terms of bytes.
- This is so that the server is able to
readfrom the socket exactly thoseNnumber of bytes dictated in the first message.
- In the diagram above, the first message is labeled as
- First to send a
- The Server will at first listen to message
MODEsent by client at all times, and then attempt toreadaccordingly. -
There are 3 default
MODEprovided, which upon received, the server will categorise the second message as the following:0: two messages are expected following a0,M1: The filename length (this is no more than 8 bytes long by design)Note that it does NOT mean that the length of the filename is less than
8. It means that the length of the filename needs at most 8 bytes to represent. Thats covering integer value between 0 to \(2^{8\times8}\) for unsigned integers, that’s a large number!M2: The filename data itself with size dictated in the first message
-
1: two messages are expected following a1,M1: size of the data block in bytes (not more than 8 bytes long by design)M2: the data block itself with size dictated in the first message
2: no message is expected. This is a connection close request.
Note that it is not always necessary to send two messages after each
MODEintdata is sent, if the server knows EXACTLY the number of bytes that the client will send following aMODE. For instance, if filename has a fixed byte length: 32 bytes for instance, we can condenseMODE 0in the server side to always do aread_bytes(client_socket, 32). For this assignment however, follow the protocol stated in this handout closely.
Expanding the FTP
Make a copy of the original ClientWithoutSecurity.py and ServerWithoutSecurity.py each, and name it as ClientWithSecurityAP.py and ServerWithSecurityAP.py.
Leave the original files as is. You should have 4
.pyfiles now undersource/.
Now both client and server must implement MODE: 3, which signifies the authentication handshake.
-
Upon successful
connect, client must first send3(intconverted tobytes) to the server, followed by two messages:- M1: The authentication message size in bytes
- M2: The authentication message itself
- Then the client expects to read FOUR messages from the server:
- M1 from server: size of incoming M2 in bytes
- M2 from server: signed authentication message
- another M1 from server: size of incoming M2 in bytes (this is
server_signed.crt) - another M2 from server:
server_signed.crt
-
Upon receiving
MODE: 3, the server will send these four messages above immediately, in sequence one after another. There’s no need to send anotherMODEto the client because are still under the AP – and the sequence must be as such: client send MODE 3, then TWO messages, and expecting FOUR messages from the server. -
Once the client receives both replies from the server, it will perform the
CHECKas specified above using the CA’s public key extracted fromcsertificate.crt. If check is successful, the regular non-secure FTP should proceed where we can key in the file names one by one for the server to receive. Otherwise, send aMODE 2to close connection immediately.
You must implement these MODE as specified above, and keep the original MODE 0, 1, 2 as-is. The idea is to stick to this authentication and file transfer protocol so that any client script can communicate with any server script.
Yes, we will test your client script against our server script, and your server script against our client script. It’s gonna be fun!
You might want to refer to the fifth page of this assignment to get started with some basic functionalities of Python cryptography module.
Finally, Here’s a recap of the MODE for AP:
0: client will sendM1: size of filename, andM2: the filename (no need to modify, same as original)1: client will sendM1: size of data block inM2, andM2: plain, unencrypted blocks of data to the server (no need to modify, same as original)2: client closes connection (no need to modify, same as original)3: client begins authentication protocol (NEW for Task 1)
Grading
We will manually check the implementation of your MODE 3 in both Client and Server scripts.
Commit Task 1
Save your changes and commit the changes (assuming your current working directory is source/):
git add ServerWithSecurityAP.py ClientWithSecurityAP.py auth/server_signed.crt auth/server_private_key.pem
git commit -m "feat: Complete Task 1"