Physics2D
The goal of this section is to create some obstacles (breakable boxes, platforms, static blocks, pipes) that exists in Super Mario Bros. Using this, we will learn more about Unity's Physics2D Engine and manage our GameObjects by creating Prefabs (a sort of reusable object).
Alternative: Unity Tilemap
In this section, we’ll focus on building a 2D platformer using individual sprites to introduce key concepts like Physics2D and character movement, giving us a solid foundation in Unity's 2D game development tools.
Sprites serve as the visual representations for objects, while Physics2D defines their movement, collisions, and interactions in the game world.
While we'll work with sprites for clarity and flexibility, Unity's Tilemap system is an excellent alternative for creating grid-based environments efficiently. Once you grasp the basics, you can explore Tilemap to streamline level design and enhance your workflow for more complex projects.
To Use Tilemap: Tilemap is great for grid-based level design, offering efficient editing, automated tile placement, and optimised performance with fewer draw calls. It's ideal for modular, repetitive environments in 2D platformers.
Not to Use Tilemap: For detailed, non-repetitive, or dynamic environments, custom solutions like individual sprites or procedural generation offer more creative freedom but require more effort and may impact performance.
Super Mario Bros-style games are best suited for Unity's Tilemap system, as it simplifies creating grid-based levels with reusable tiles, built-in collision handling, and efficient performance.
However, we’ll still use Physics2D with sprites here to facilitate learning, as it provides a clear understanding of movement, collisions, and interactions without relying on Tilemap-specific tools.
Constraint Z-Rotation
Notice how we always need Mario to stand upright, and not toppling when moving too fast. We definitely do not want Mario to topple when hitting other obstacles as well like this:
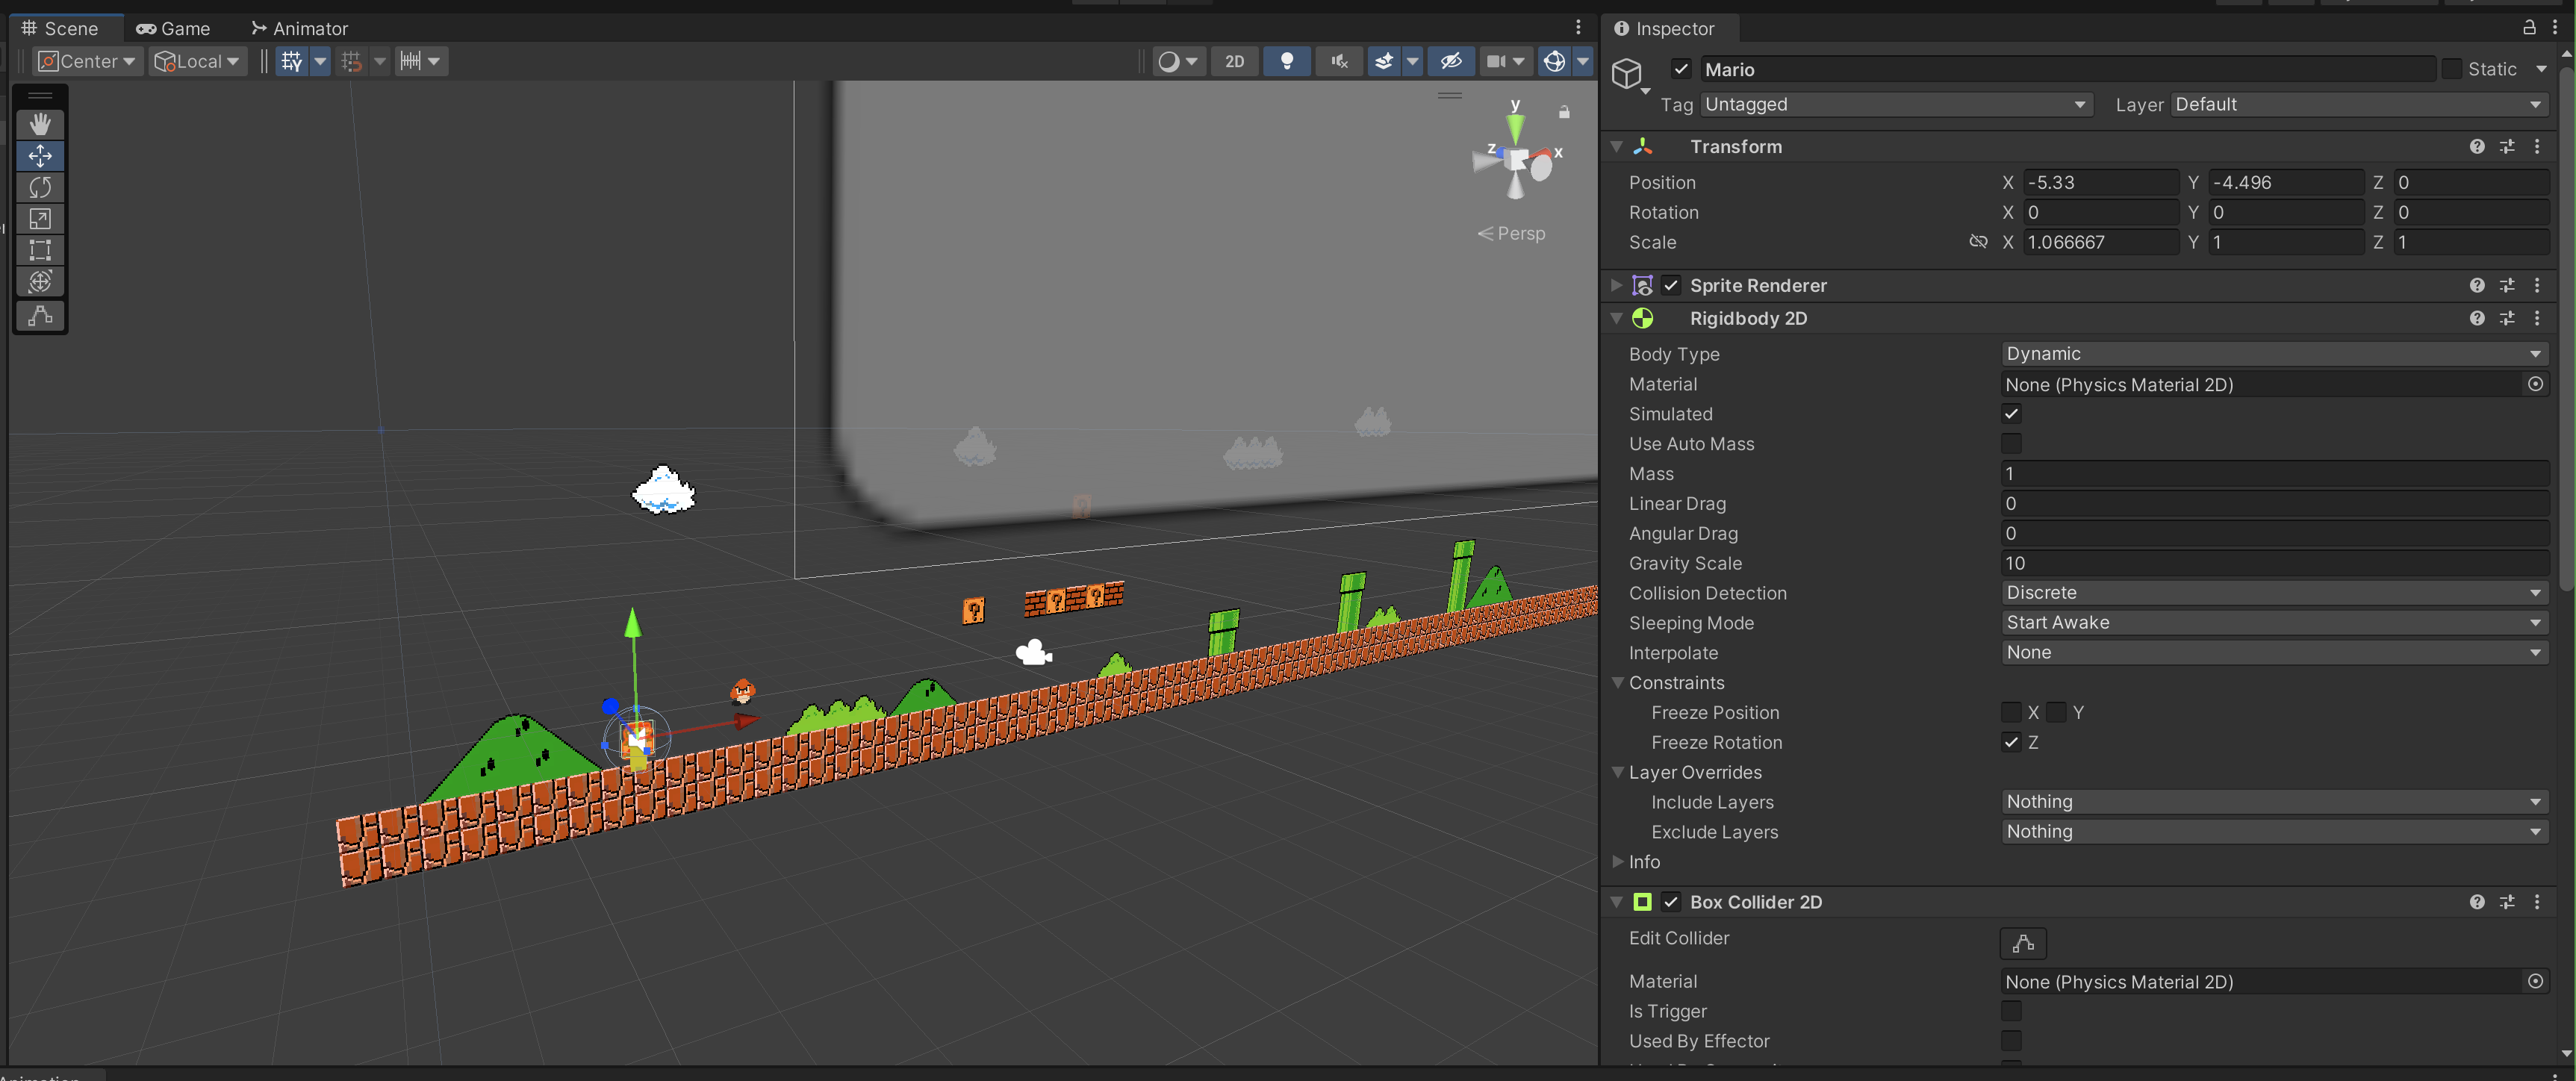
In order to keep Mario standing upright, we need to place constraints on Mario’s Rigidbody2D Z-rotation component. From this screenshot, it should be pretty clear that we want Mario's position (x,y) to vary but not his Z-rotation:
Prefab
In Unity’s Prefab system, Prefab Assets act as templates.
- You create Prefab Assets in the Editor, and they are saved as an Asset in the Project window
- From Prefab Assets, you can create any number of Prefab instances.
- Prefab instances can either be created in the editor and saved as part of your Scenes or instantiated at runtime.
Why do we need to create Prefabs instead of regular GameObjects? To understand fully, create some obstacles for Mario.
Bricks and Question Box
Now that our Mario can move around smoothly with proper animations, it’s time we add some obstacles. Adding bricks that Mario can jump on is easy: simply add Box Collider 2D element on every Brick and Question Box GameObject.

The problem is that we have so many copies of those boxes and bricks in the game. We definitely do not want to manually add collider to all of them. To fix this, we need to create a Prefab of that brick and question box by dragging that GameObject into the Prefab folder. This recording should give you the idea:
From the documentation: Unity’s Prefab system allows you to create, configure, and store a GameObject complete with all its components, property values, and child GameObjects as a reusable Asset. The Prefab Asset acts as a template from which you can create new Prefab instances in the Scene.
We have the Brick and Question Box prefab now, and we can duplicate it across the Scene wherever we want to spawn it. Also, a change made in the Prefab in the Prefab Mode will be applied across all prefabs. You can still however have Prefab variants or override existing Prefab in the Scene if you want it to differ slightly from the base prefab template.
Please do not skip the documentation and read them carefully.
Pipes
Create the pipes prefabs too, setting the appropriate colliders so Mario can collide with it and climb on it. Pipe's Head shape isn't exactly rectangular, so you can use either of the two methods:
Two BoxCollider2D:
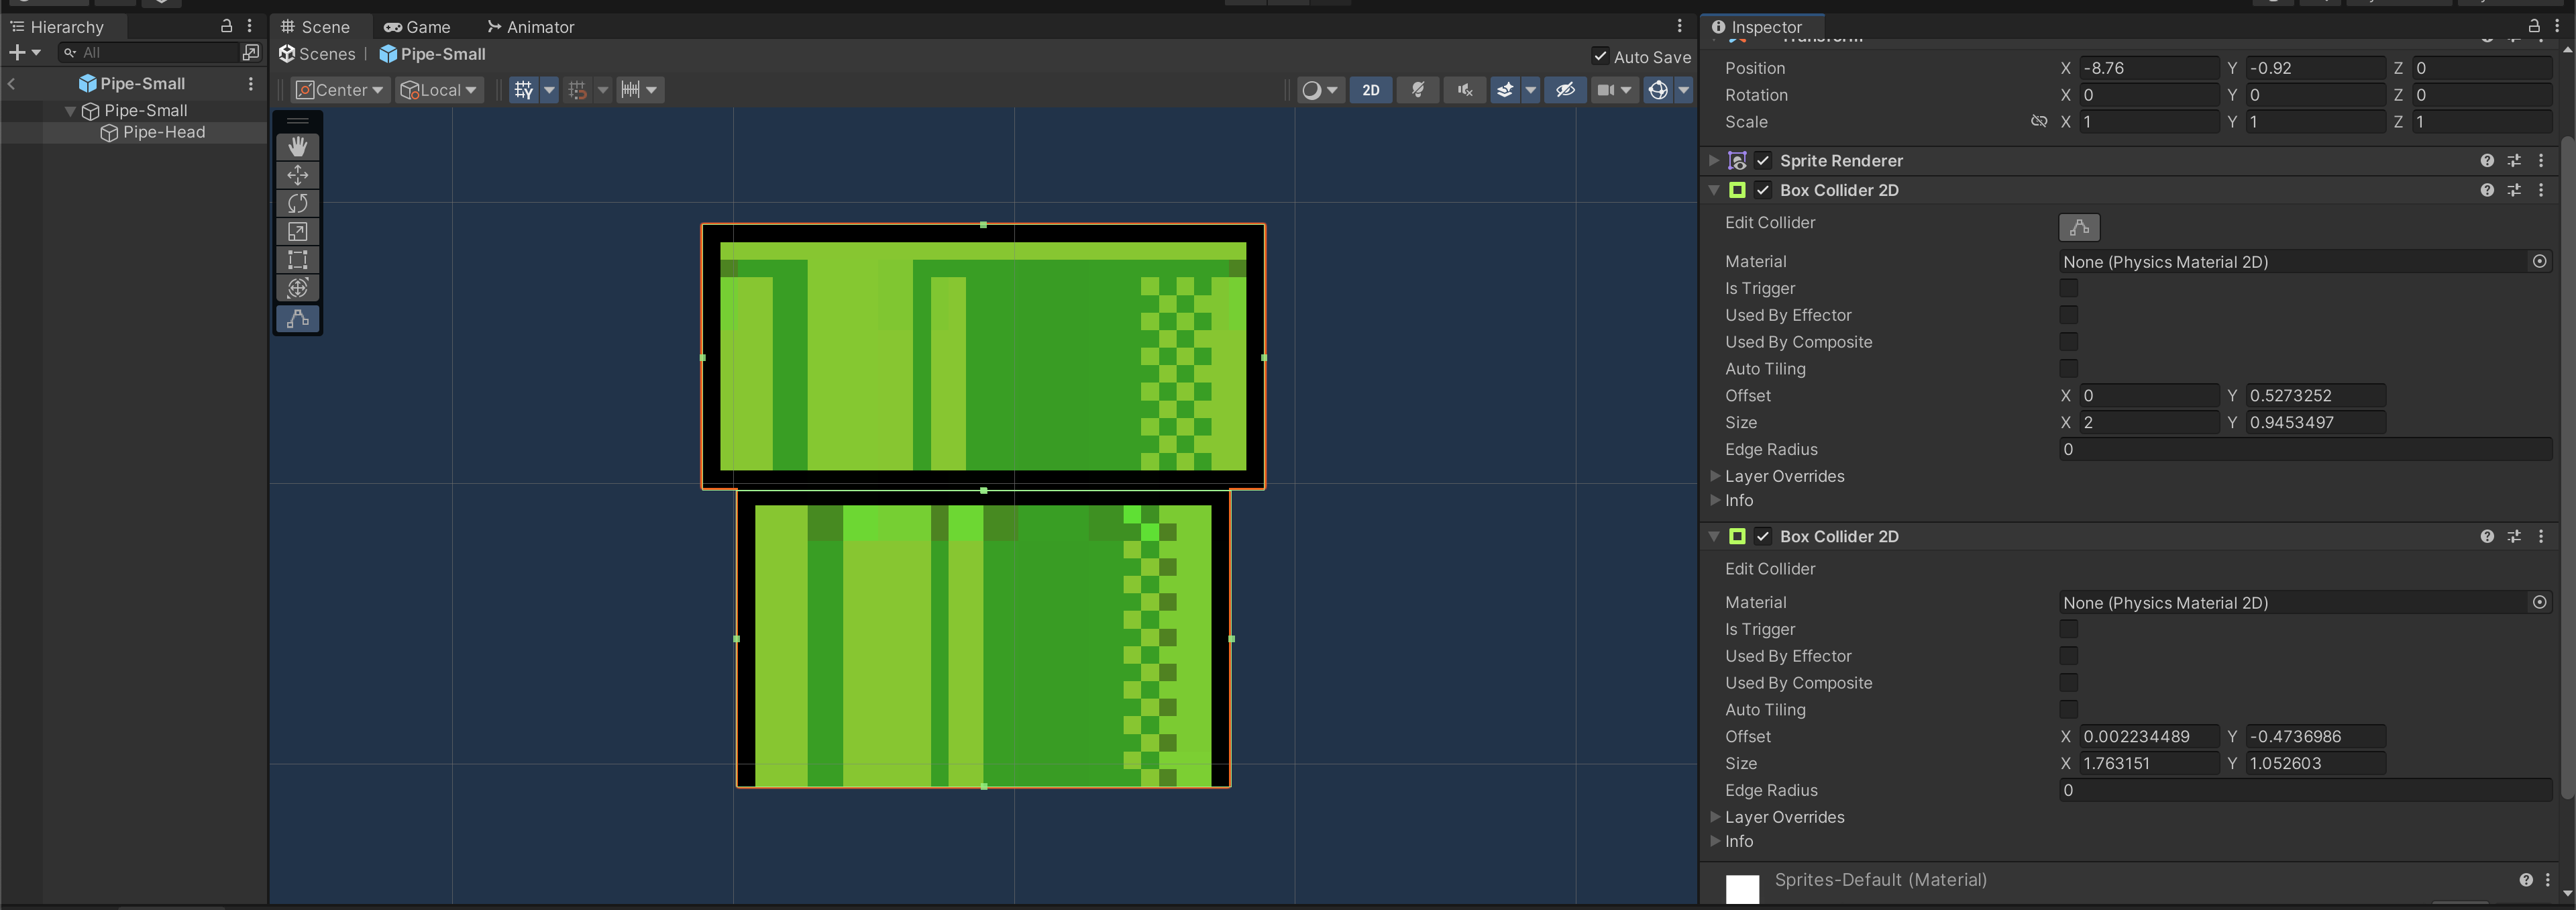
Using one PollygonCollider2D, adjusting the shape to fit the Pipe head sprite:
Goomba
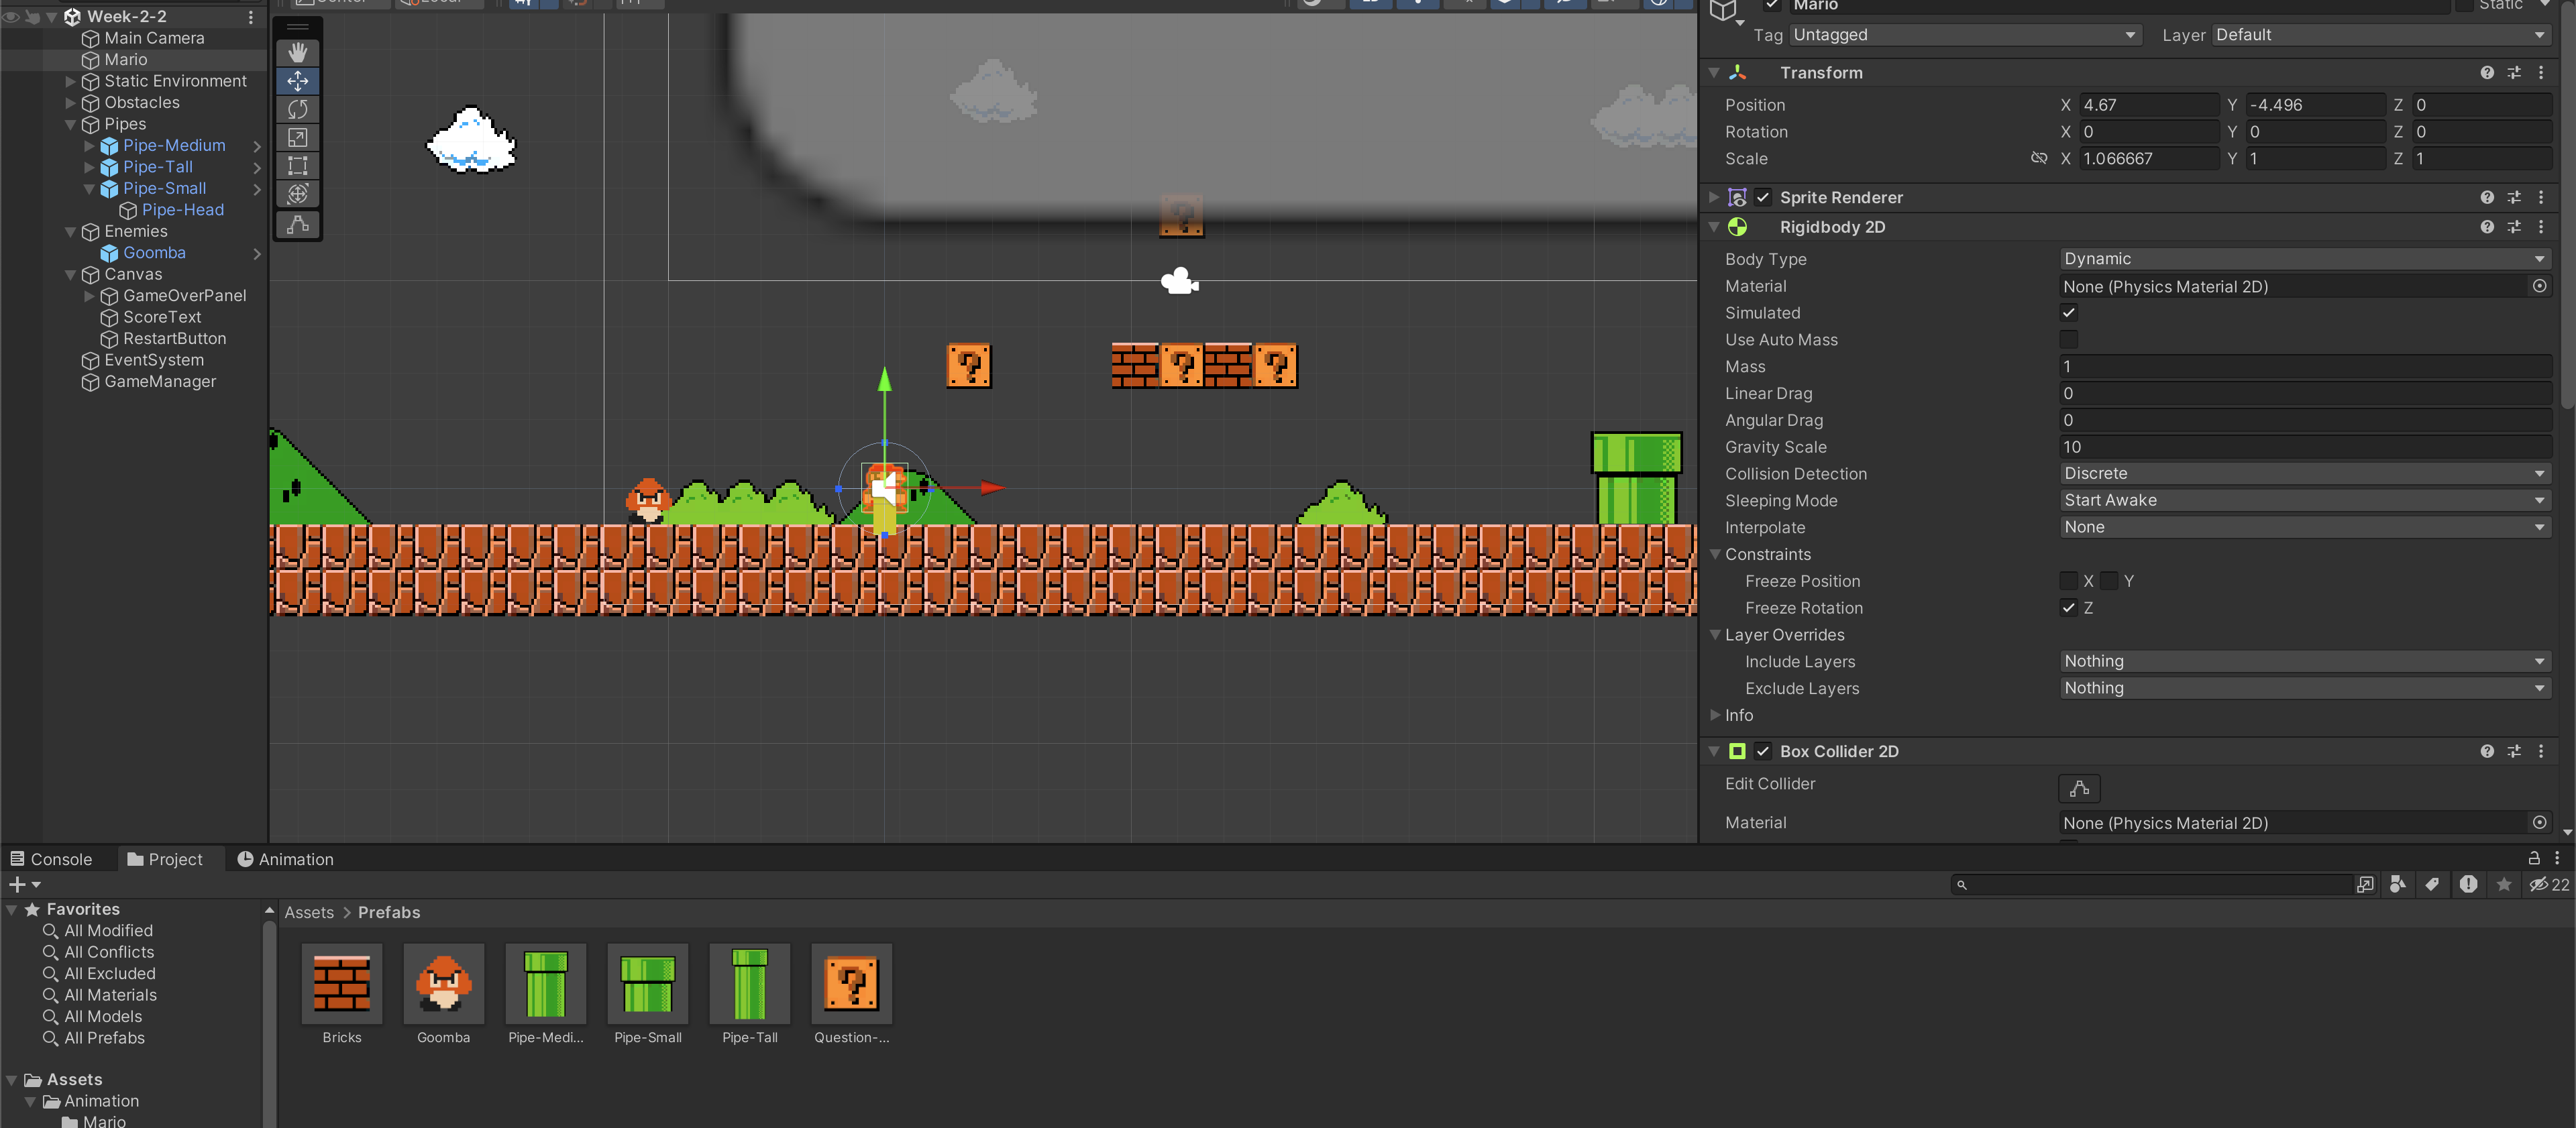
Goomba should also be set as a prefab since we will spawn many of them at once. In the end, check that you have the following Prefabs:
Unpack Prefab
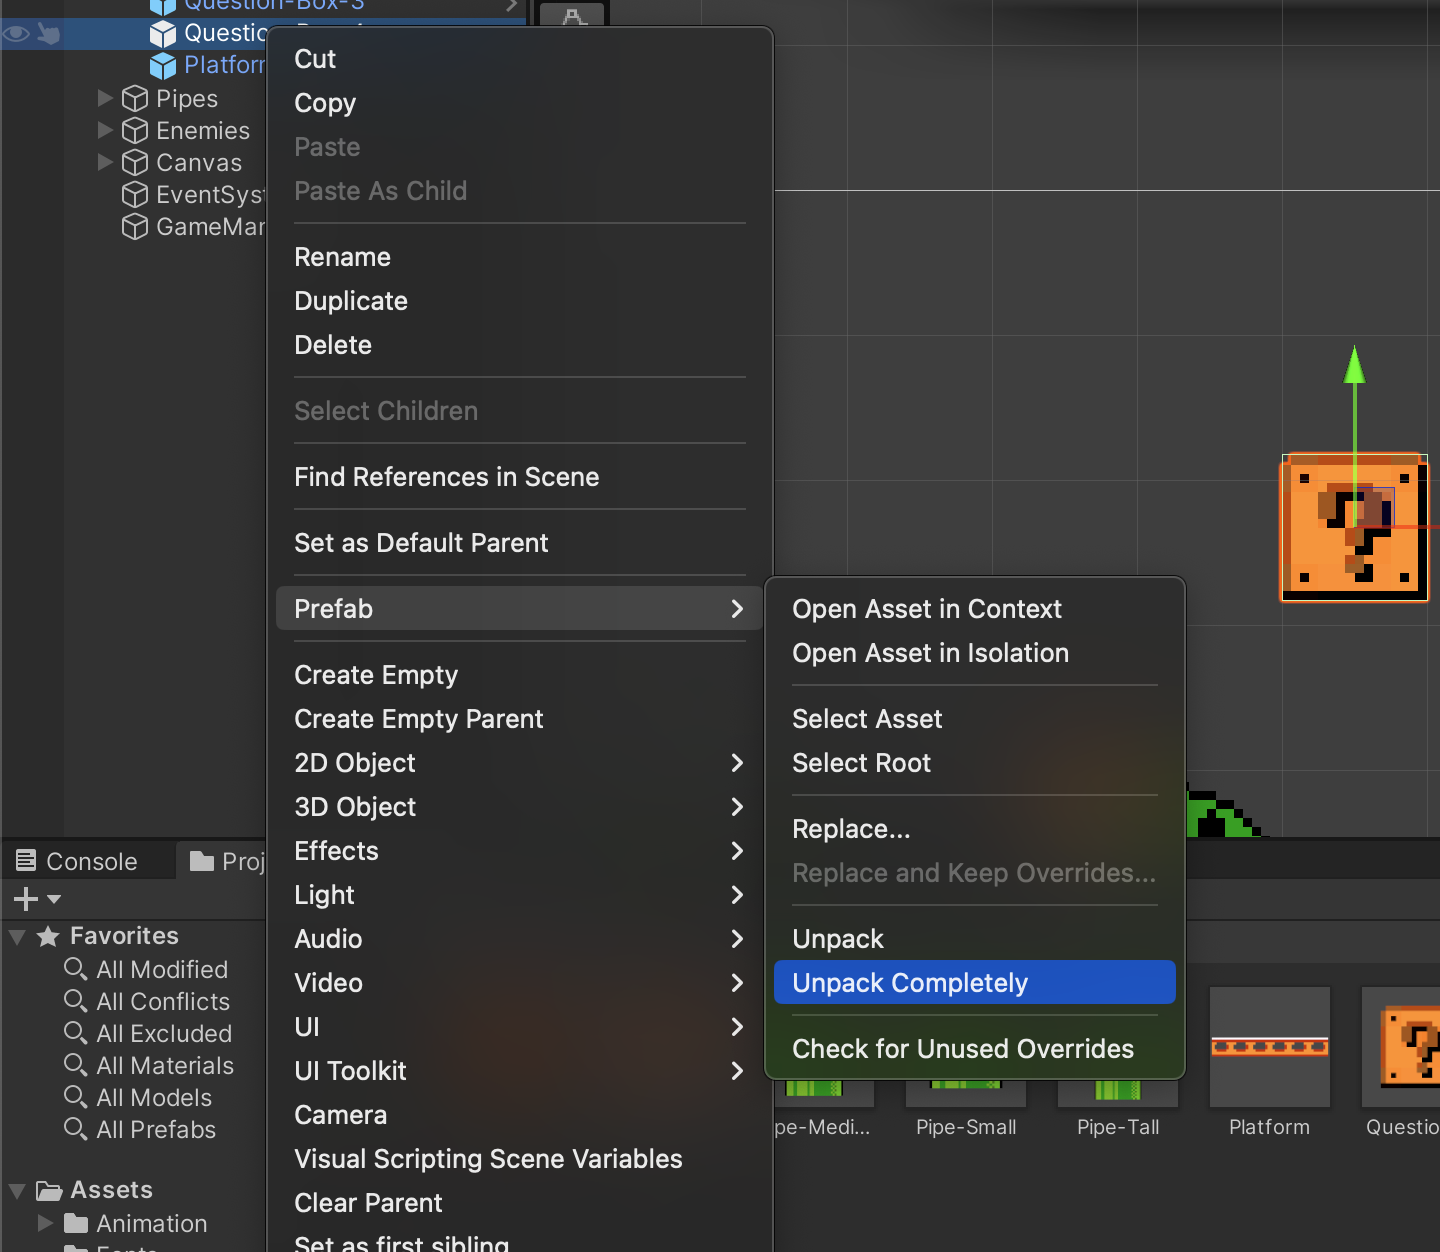
If you no longer want one of your GameObject to be associated with a prefab, simply right click on the GameObject in the Hierarchy and select Prefab >> Unpack Completely:
Layers
We can create Layers via the Inspector of any GameObject to determine:
- What can be rendered (layer-based rendering)
- What can collide with each other (layer-based collision)
For layer-based rendering, we can decide what to be rendered (only a selection of layers) using the Camera's culling mask. Unselecting a particular layer in the Camera's culling mask property will omit it from being rendered in the Game Scene. Our focus now is the second point: layer-based collision. We need to decide what can collide with which object. For example, we:
- Do not need Unity to compute collision between the Pipe's top head with the pipe's body
- Do not need Unity to compute collision between the Pipe's body and the ground
- Do not need Unity to trigger collision between Goomba and any of the obstacles or ground
Layer-based Collision
Create two other layers via any GameObject Inspector: Enemies and Obstacles.
- Set
PipesGameObject Layer toObstacles. - Set
ObstaclesGameObject Layer toObstaclestoo. - Set all
EnemiesGameObject Layer toEnemies.
Apply it to all their children.
Setting the Prefab changes via the Scene instead of Prefab Mode only applies to that instance of that Prefab. This discrepancy is highlighted clearly in the Hierarchy. You can then choose to update the prefab to follow your changes.
Then open Project Settings (Edit >> Project Settings) and set the collision matrix as such. If you untick the boxes that means Unity will ignore collisions between those layers:
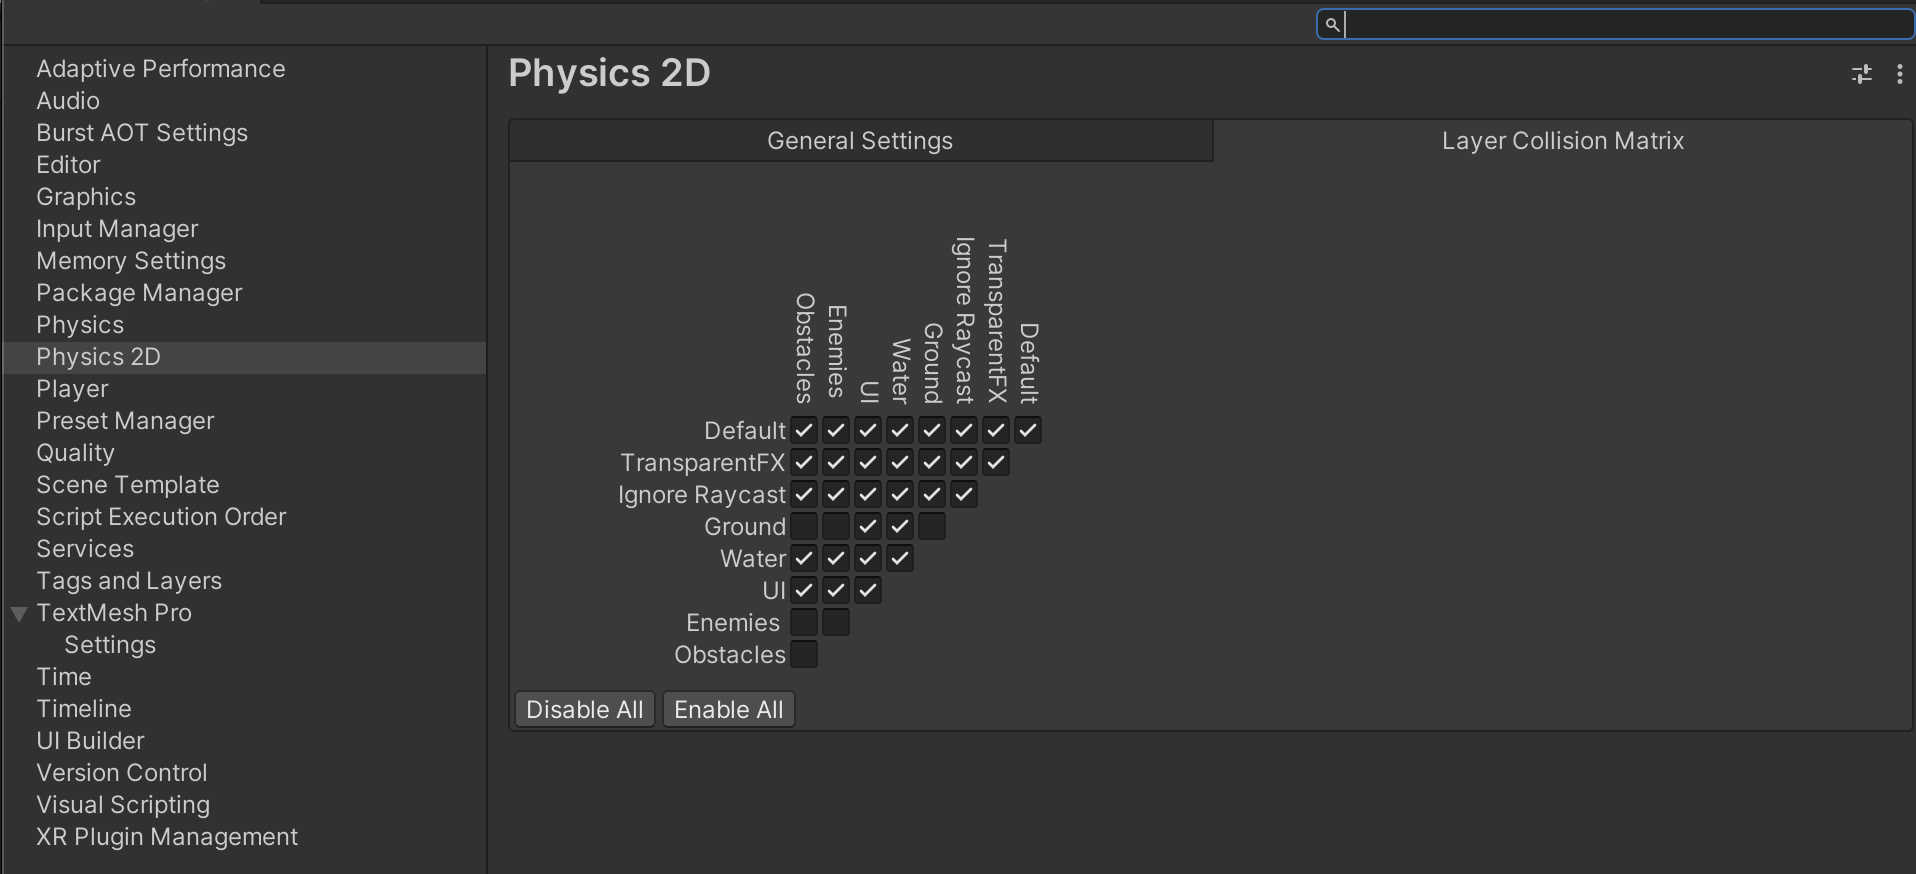
Here's the complete walkthrough:
Collision with Obstacle or Pipes
In PlayerMovement.cs, we have yet to take into account that Mario can land on top of a Pipe or a Box. This is what happens:
More Tags
We can fix that by checking for collision against Obstacles and Pipes too. Sure, we can add Tag to each pipe and each Goomba and do the following check:
    void OnCollisionEnter2D(Collision2D col)
    {

        if ((col.gameObject.CompareTag("Ground") || col.gameObject.CompareTag("Enemies") || col.gameObject.CompareTag("Obstacles")) && !onGroundState)
        {
            onGroundState = true;
            // update animator state
            marioAnimator.SetBool("onGround", onGroundState);
        }

    }
The usage of Tag can be controversial sometimes, with some complaining that it's not resource efficient and whatever but there's no denying that it is convenient, especially in prototyping stage right now (yes, you're building a game in less than 2 months, that's just a prototype).
LayerMask
However, let's be a little fancier. Although Layers are essential (to avoid extra computation on collision and unwanted collision behavior, etc), we don't want to manually Tag every GameObject in our Scene.
Please note that CompareTag is really fast, and there's nothing wrong with the code above in terms of performance! We do not discard it for performance reason, but simply preference and extra convenience (not having to add Tags). Making a functional game is hard enough. If you don't have performance issues, do not blatantly attempt to optimise. Code readability and modularity is more important than that.
Every layer that we set the GameObject to is represented by an integer:
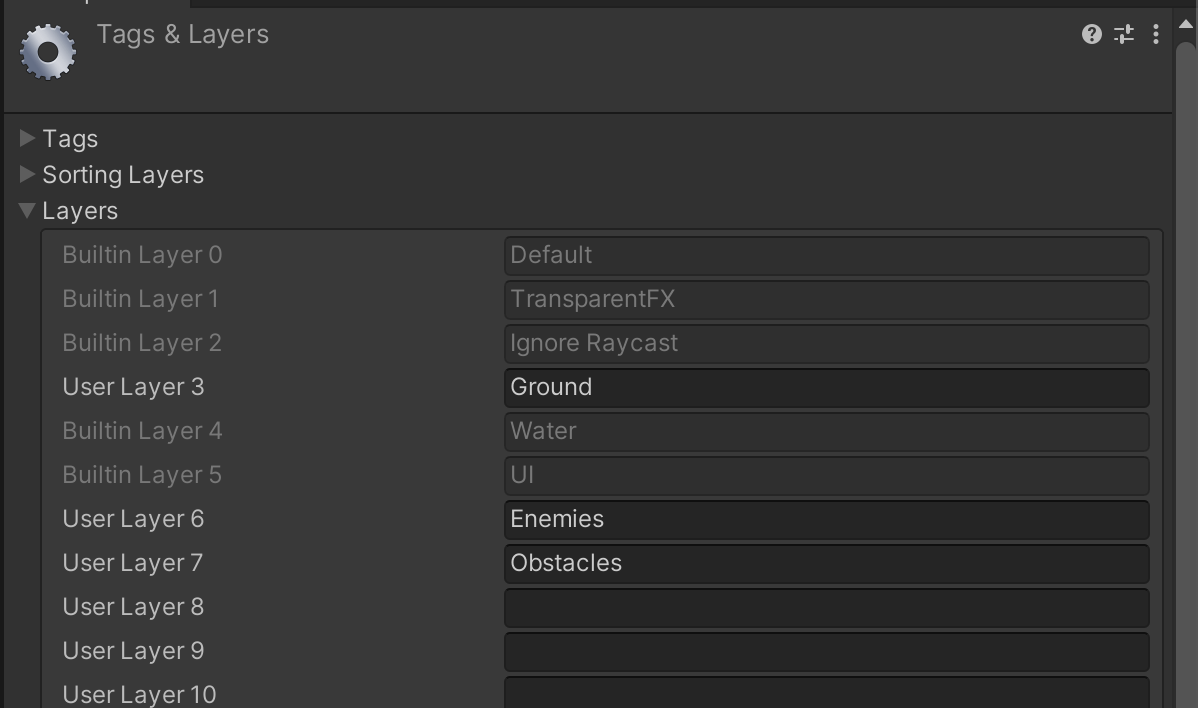
We can then create a 32-bit LayerMask, a one-hot mapping of Layer id to a 32-bit value as such:
Groundis0x00000008- This translate to
0000 1000in binary (leading zeroes are omitted) - The value
1lies on the 3rd bit from the right (we count from 0, so 0th bit from the right is the LSB) - You can create this binary value using leftshift operation:
int groundMask = 1 << 3
- This translate to
Enemiesis0x00000040Obstaclesis0x00000080
To check if LayerX hits LayerY, we simply perform a bitwise AND between them and check if the resulting value is .
We can modify PlayerMovement.cs into this:
    int collisionLayerMask = (1 << 3) | (1 << 6) | (1 << 7);
    void OnCollisionEnter2D(Collision2D col)
    {

        if (((collisionLayerMask & (1 << col.transform.gameObject.layer)) > 0) & !onGroundState)
        {
            onGroundState = true;
            // update animator state
            marioAnimator.SetBool("onGround", onGroundState);
        }
    }
The resulting behavior should be as follows, where Mario can now climb obstacles (both boxes and pipes):
Profiler
If you really want to optimise your game, or feel like some part has high latency, you can use Unity's Profiler to identify the root cause of the heavy computations. Select Window >> Analysis >> Profiler, and begin recording your gameplay.
Notice that it reports CPU usage at 33ms (30FPS) because we did set the game to play at 30FPS under the Start() method of PlayerMovement.cs. The rest of the results are pretty straightforward to inspect. You can watch the official guide here, but this is not part of our syllabus. We just want to show you the recommended way to even have an idea on where to optimise instead of optimising stuffs blindly.
Physics 2D
Unity's Physics 2D engine handles 2D physics and optimises them. You don't have to reinvent the wheels. In this section, we briefly introduce to you three more components: Effectors, Joints, and Materials. Please read the documentation for a more detailed usage.
Effector2D
Suppose you want to create a platform that allows only one-way collision. You can upgrade your 2DColliders to be used with a new component called effectors. To demonstrate how this works, let’s create a platform where Mario can “climb onto” from underneath it but can stay upright on top of it.
Yes, World 1-1 in Super Mario Bros doesn't have this item, but we are just going to build it here for learning sake.
Create a platform GameObject, and place it under Obstacles GameObject. Then,
- Add a
SpriteRendererwithmoving_platform_6as sprite - Add EdgeCollider2D and place it just at the top edge of the sprite. Tick the
Used By Effectorproperty - Add
PlatformEffector2Dand set theSurfaceArcto 180, andOneWayproperty ticked - Set its layer to "Obstacles". Even though
Obstaclesparent GameObject has its layer set asObstacles, this does not automatically propagate to its children all the time.
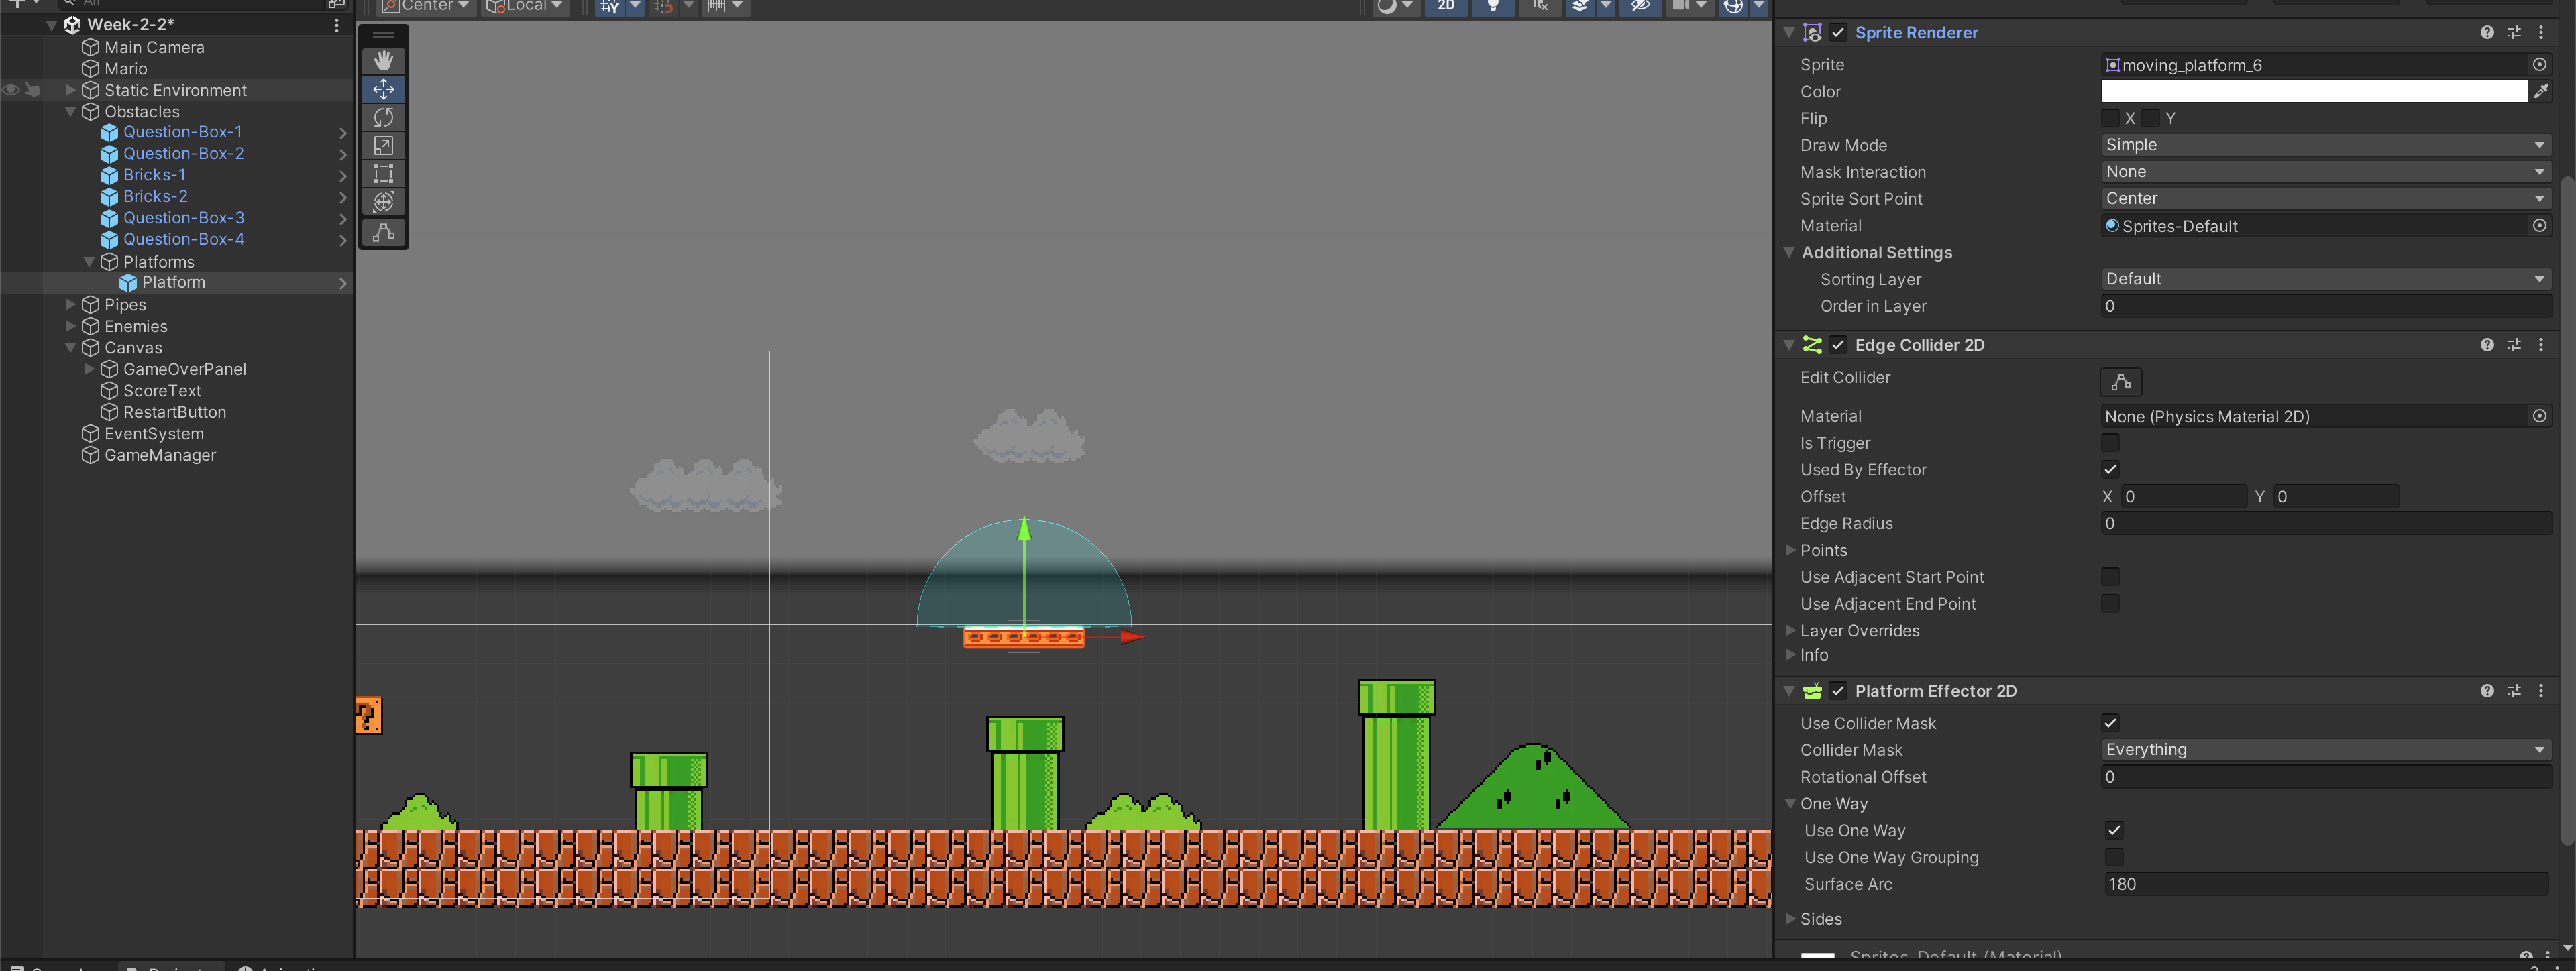
Try jumping onto the brick and onto the platform from right underneath the platform. You should notice that Mario can’t jump onto the brick from underneath it, while he can do so on the platform. You shall experiment with other effectors and their properties as well so that you know what features are supported or suitable for your game idea: some kind of boost, buoyancy, etc. Effectors is what you can use if you try to implement a pinball game with many different areas that can affect the kinematics of the ball .
PhysicsJoint2D
The question boxes should bounce when Mario collides with it from below, then turn into an empty box. We can do this easily by creating an Animation Clip, but where's the fun in that? Let's simulate it with a spring. Unity provides us with various useful joints. It will save you so much time if you want to implement any basic joints: hinge, spring, slider, wheel, etc.
Springy Question Box
Unpack one of the Question Box prefabs on your scene, then create a parent GameObject to it (name it Question-Box-Spring or whatever you like) as follows, with RigidBody2D set to Static body type. This will be the anchor of your spring.
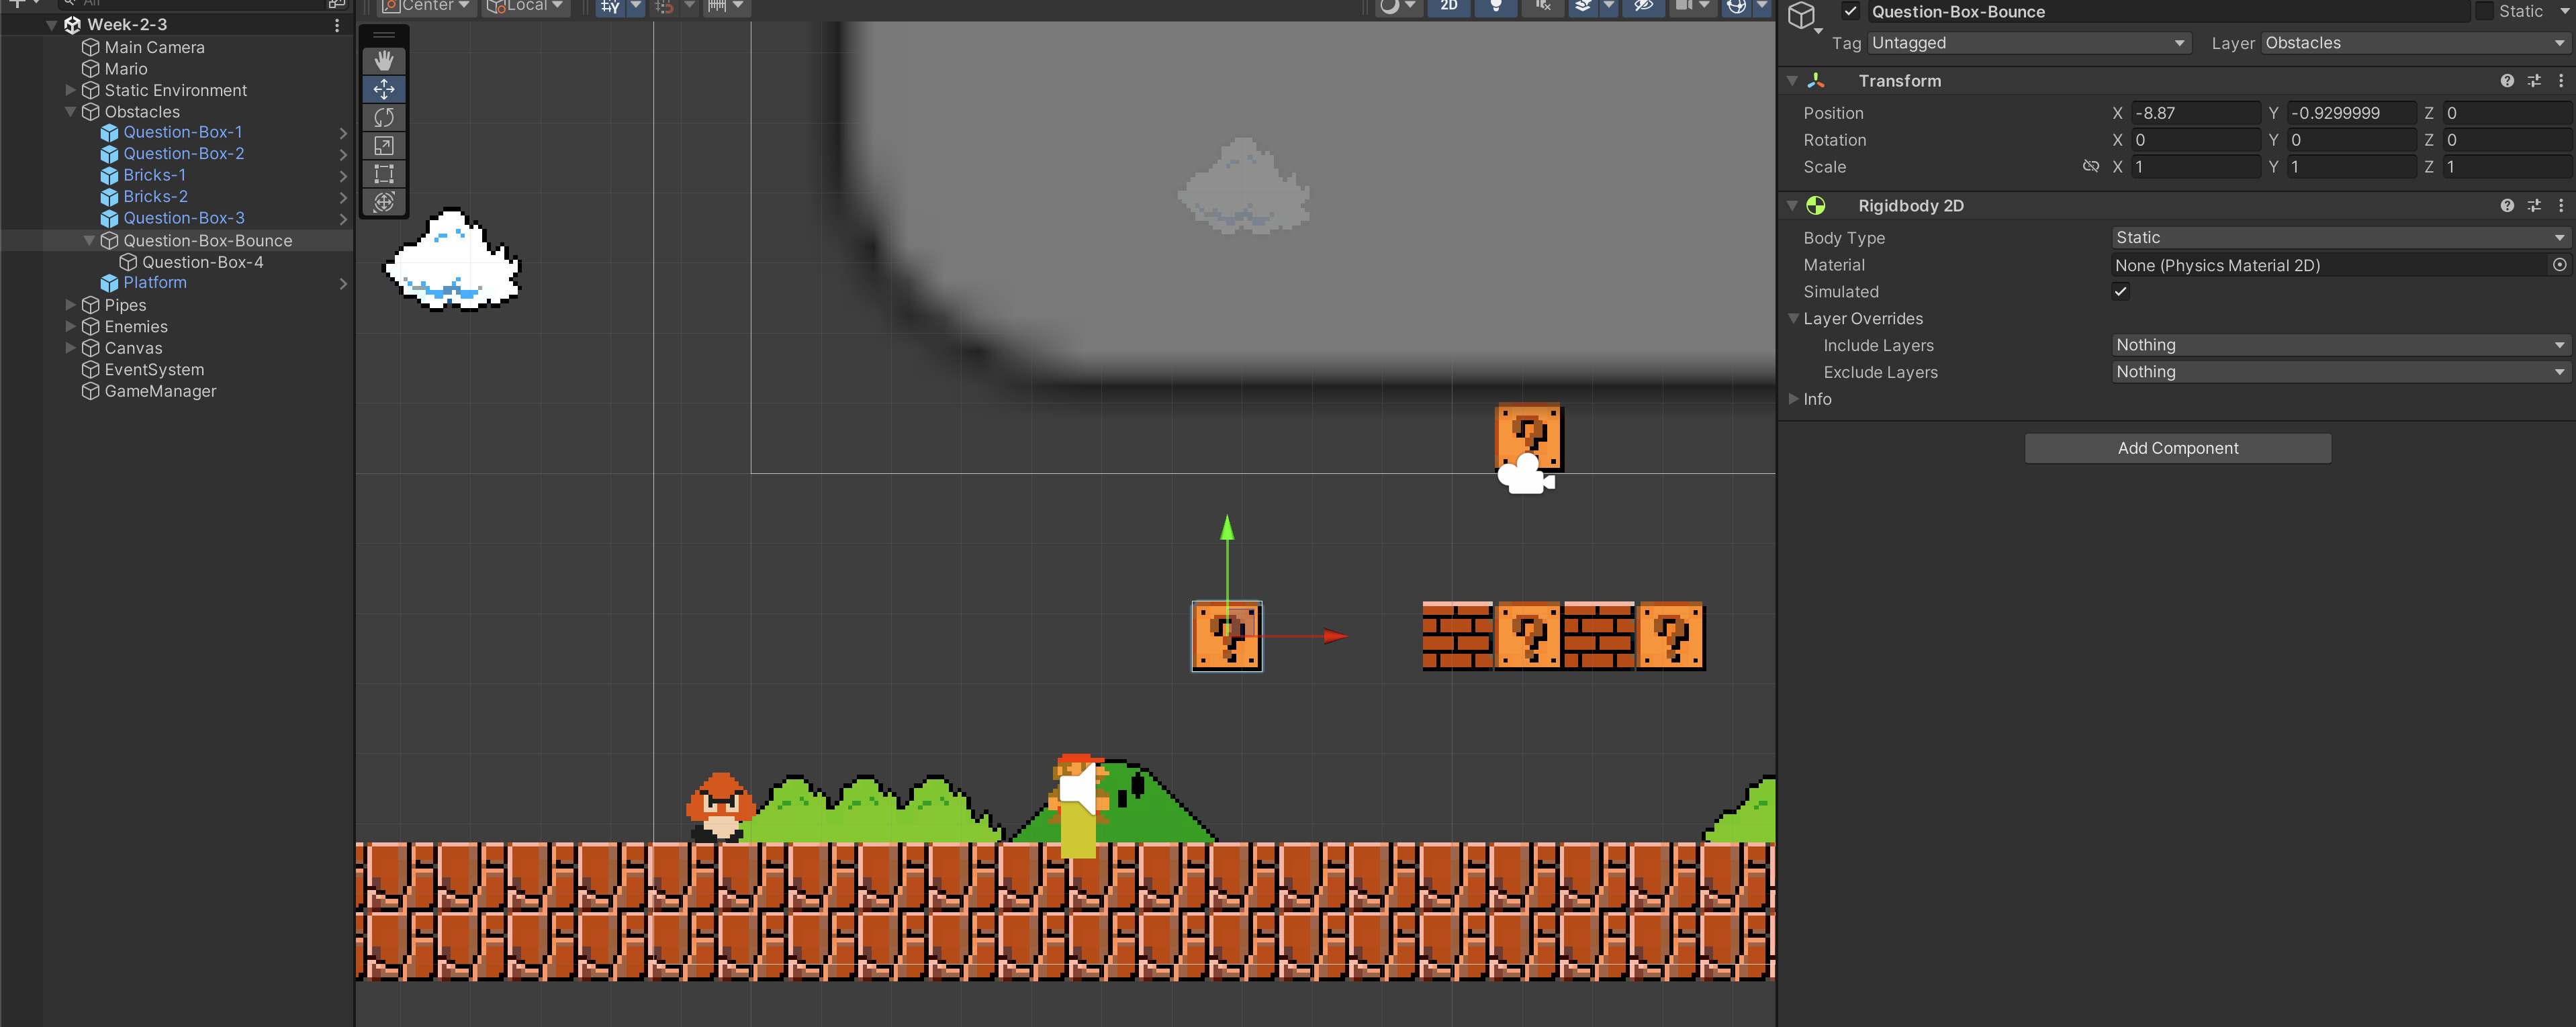
Then, add RigidBody2D to the question box. Also make sure that its Transform position is at (0,0,0) (means no relative coordinate wrt parent object). This is important to set your spring Anchor properly later. Enable Auto Mass to reduce our headache in deciding what the box's mass should be, let Unity standardize it based on the size of the Collider2D element attached to the GameObject. Finally, constant X position and Z rotation. We only want our box to bounce up and down along the Y-axis.
Then, add SpringJoint2D component, and set the properties as follows:
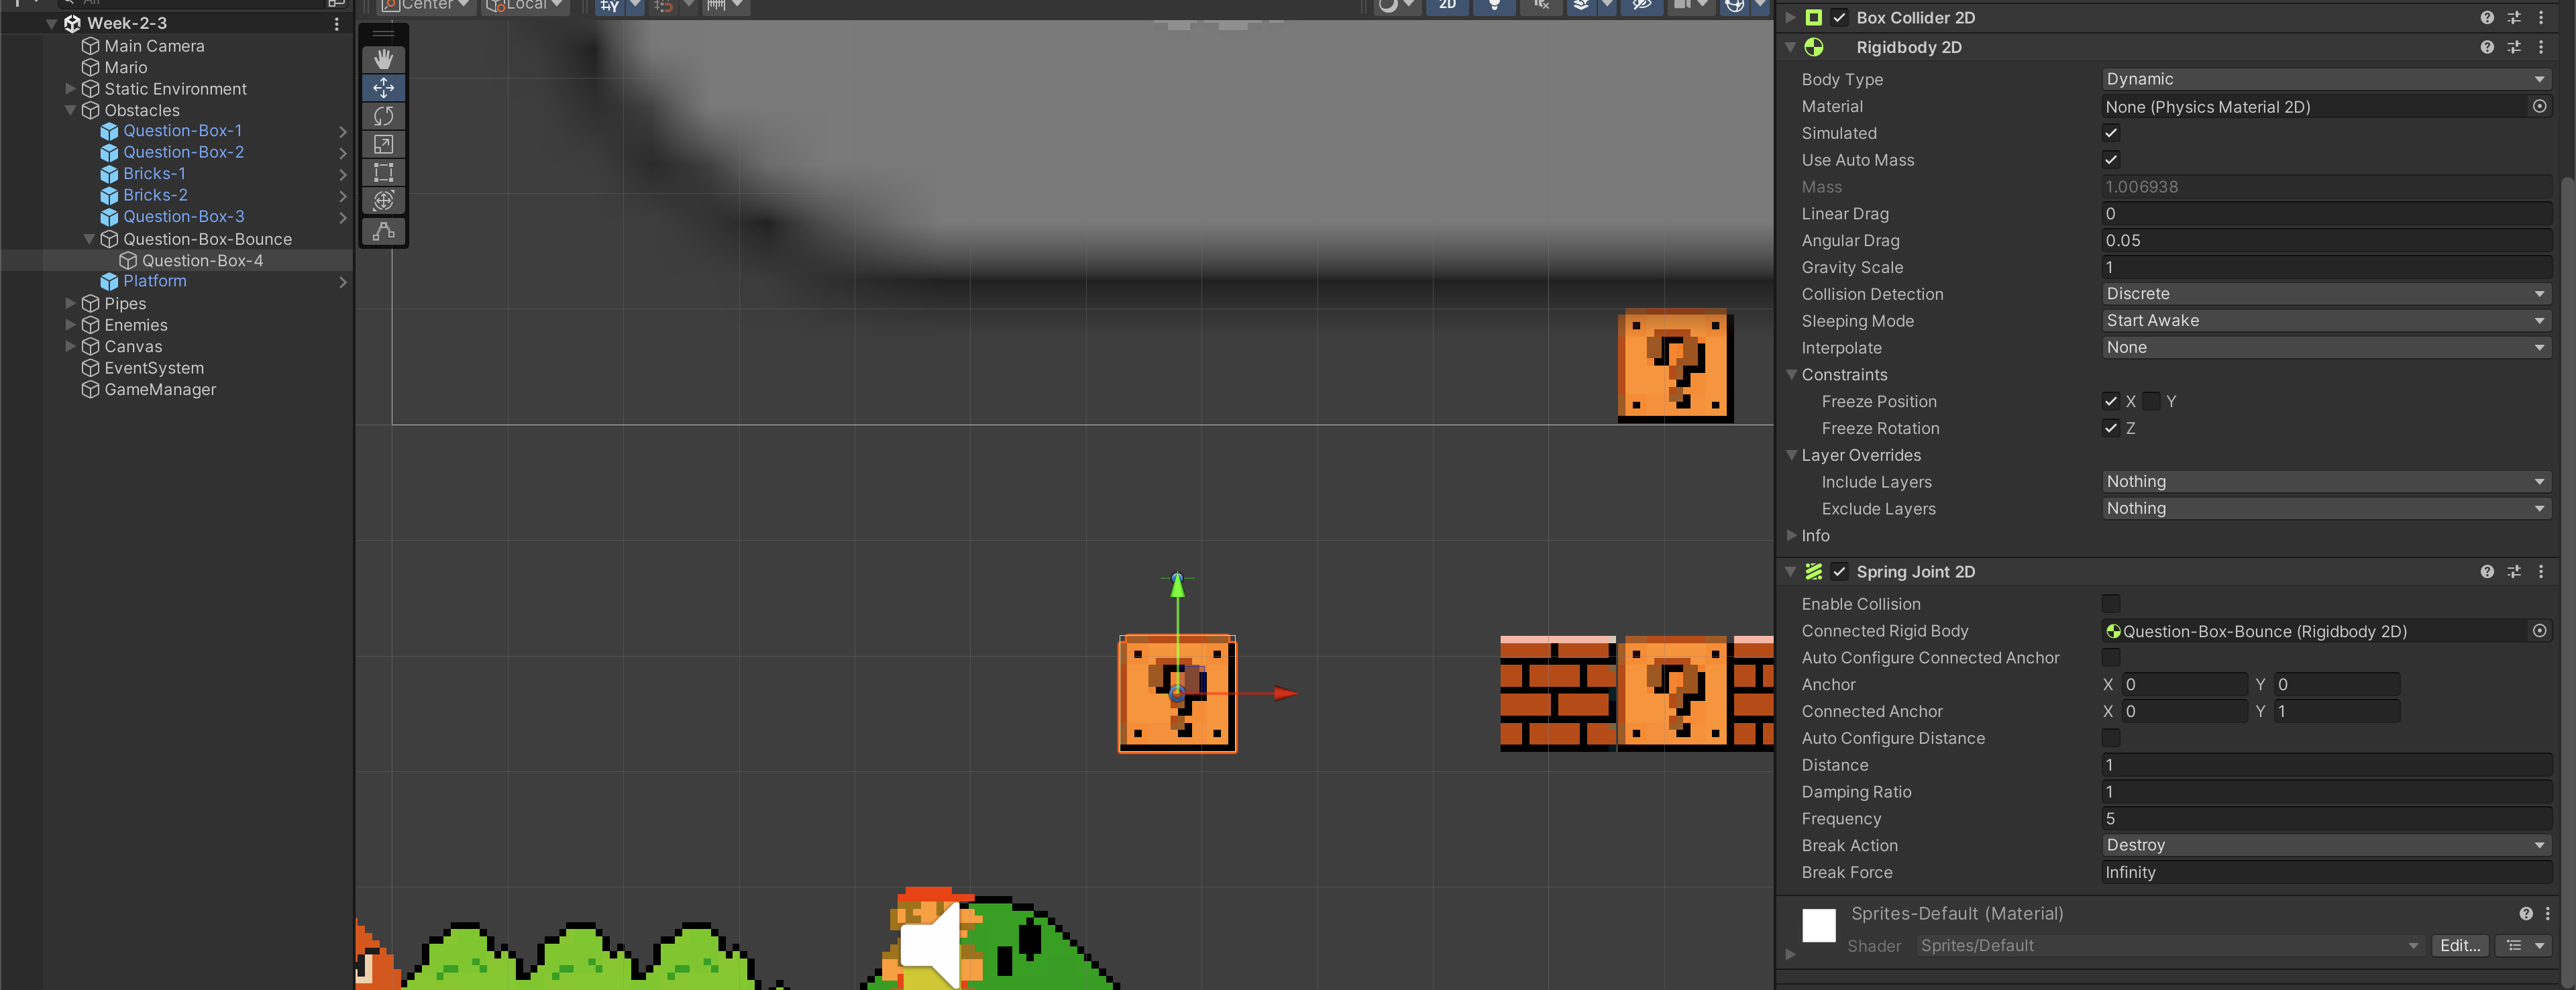
Here's a further explanation:
- We connect the spring to parent's static Rigidbody, and disable collision with it (we want to have an "invisible" anchor, we don't want our box to collide with it)
- We set the
Connected Anchorat(0,1)(this is local position, or in other words: the position of the anchor relative to the connected Rigidbody's transform). That means to set the anchor of the spring to the connected Rigidbody inQuestion-Box-Bounceat 1 unit away in the y-axis direction fromQuestion-Box-Bounce's position on the Scene. Distanceis set to1because we don't want the spring to shorten once the game startsFrequencyandDamping Ratioaffects the "feel" of the spring
You should try out different property values for Frequency and Damping Ratio to get the right feel:
Note that all values in the inspector that you change during Play mode will disappear. Make sure you only change these variables for testing purposes only, and set it later after you stop the game.
Once you are satisfied, set Question-Box-Bounce as a prefab.
Physics Material 2D
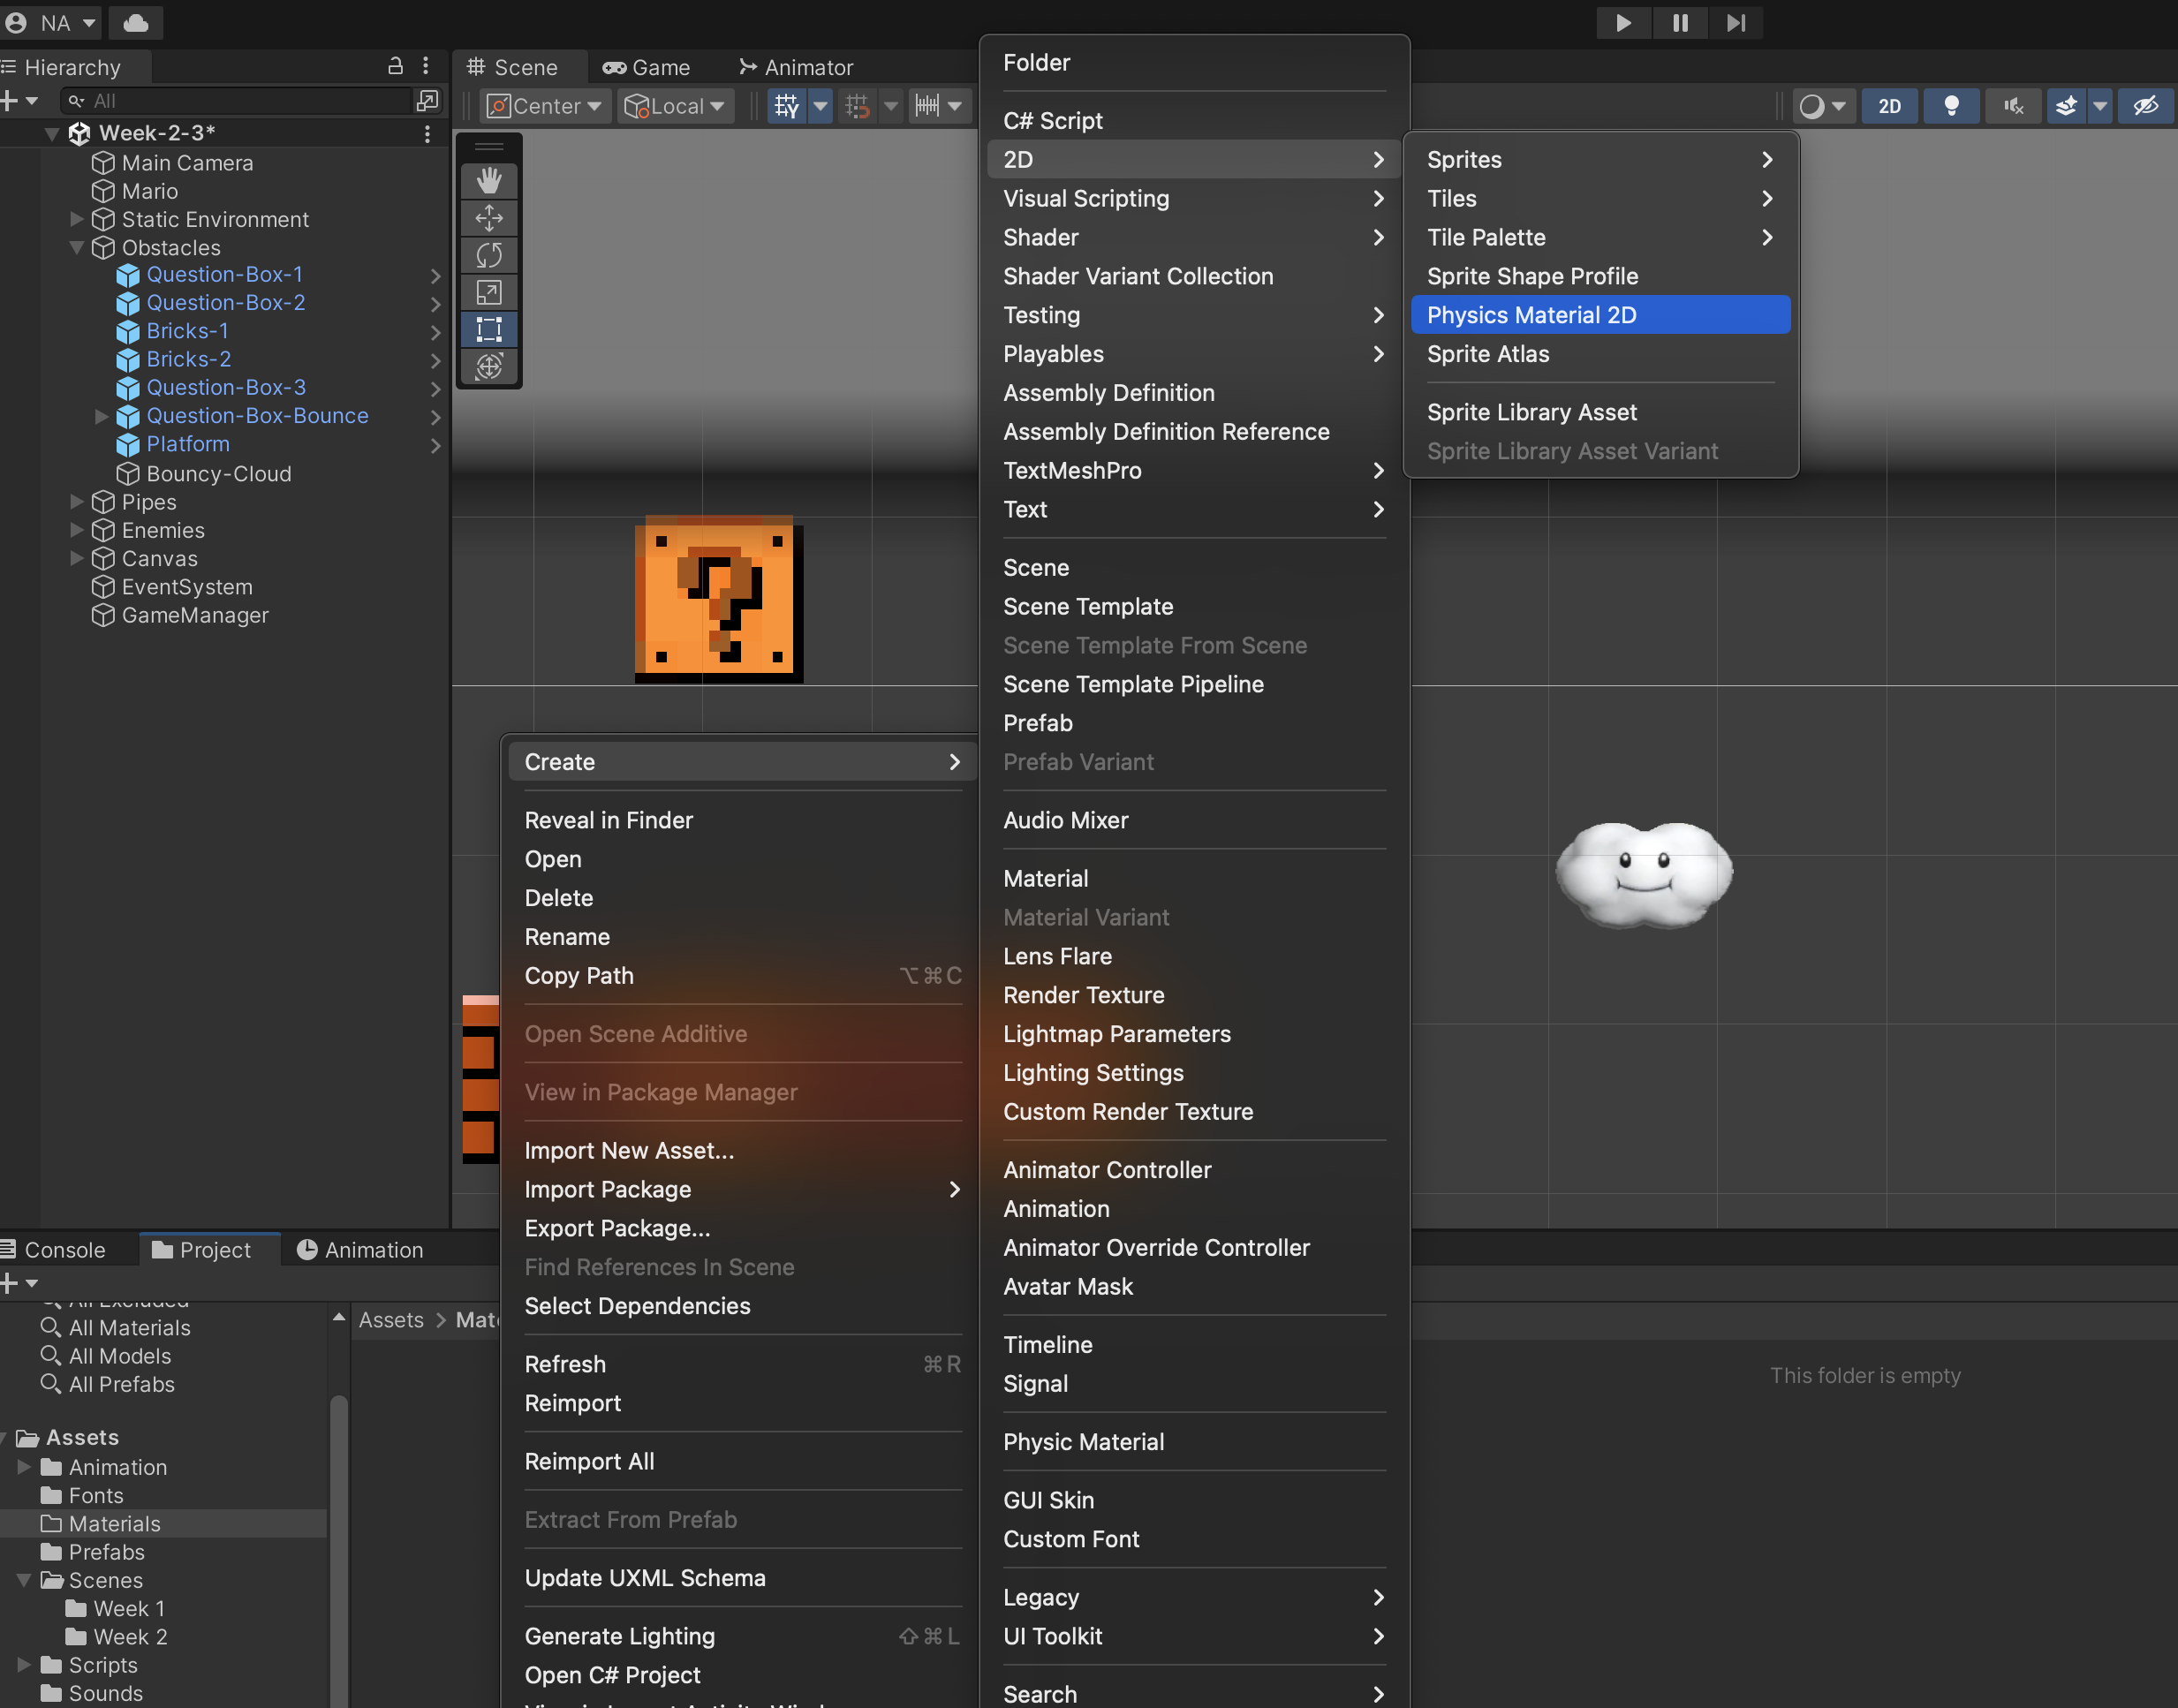
We can create a Physics Material to adjust the friction and bounce of 2D objects when they collide, then attach it to our collider. We don't really need it in this game, but for demonstration purposes, lets create some "bouncy cloud" (called Lakitu's cloud) for Mario. Create a new Materials folder in the Project Window. Then, right click and select Create >> 2D >> Physics Material 2D:
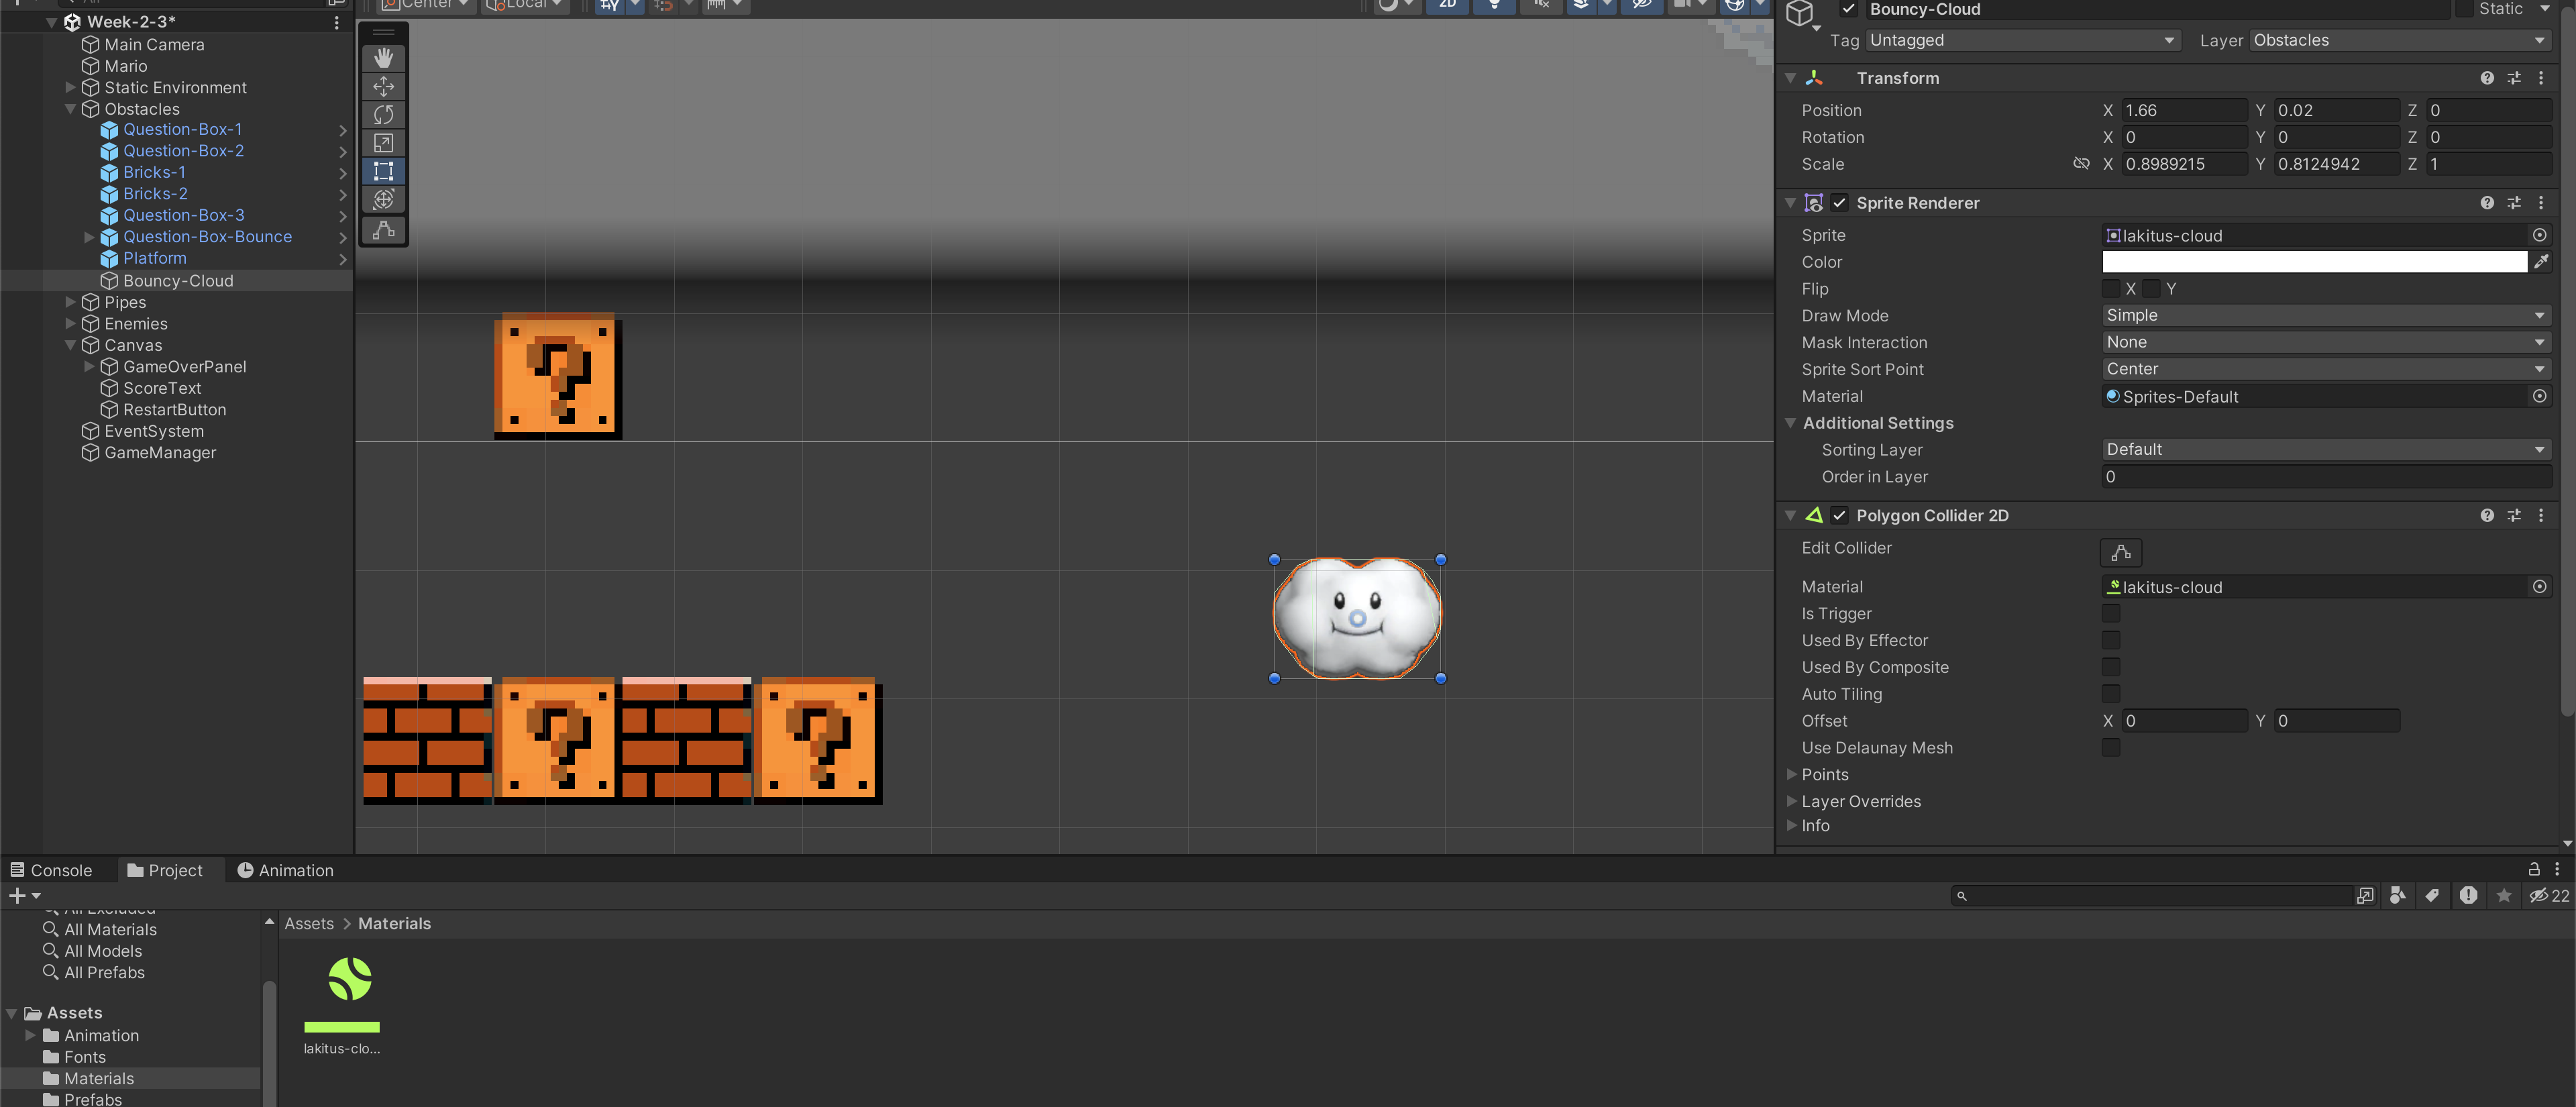
Set the newly created material Bounciness to 1 (max value is 1, no loss of energy). Then, create a GameObject called Bouncy-Cloud (download the Sprite here) with the following components and Layer. Hook up your newly created bouncy material in its Collider:
Well, that's a bouncy cloud.