Using Sprite Resolver With Sprite Library
Goal: to make Animator run purely on Category/Label, while you hot-swap the SpriteLibraryAsset at runtime and not care about which sprite is being shown.
This approach is a good fit when you want to reuse the same animation data but present it with different sprite sets. A common example is cosmetic systems in games: your character has a walk cycle, an attack animation, and a death animation, and all of those are driven purely by label changes (Walk_01, Walk_02, …).
When creating a game, sometimes you have multiple NPCs that behave the same way (e.g: walk, attack, stunned, etc), only that they differ in skin. Instead of creating new animation clips and controller per NPC, you might want to use the Sprite Resolver with Sprite Library asset.
You can swap the entire sprite library at runtime, so you can instantly turn the same underlying animation into a “pirate” skin, a “cyber” skin, or a “holiday event” variant without duplicating any clips.
This not only reduces animator workload but ensures timing and polish remain consistent across variants.
Finally, it’s useful when you want to scale to multiple platforms or art directions. You can prepare low-resolution vs high-resolution atlases (mobile vs desktop), or censored vs uncensored regional art sets, and select the correct library at load time. Because the animator only cares about labels, you don’t need to maintain separate timelines, which keeps your project much leaner and easier to maintain.
The only requirement for this method to work is to have the same number of frames for each clip, e.g: walking clip contains 18 frames for ANY character.
We would suggest certain naming conventions later on that matters if you want to automate the creation of your sprite library.
Step 1: Install 2D Animation Package
Open Window >> Package Management >> Package Manager and search for 2D Animation Package.
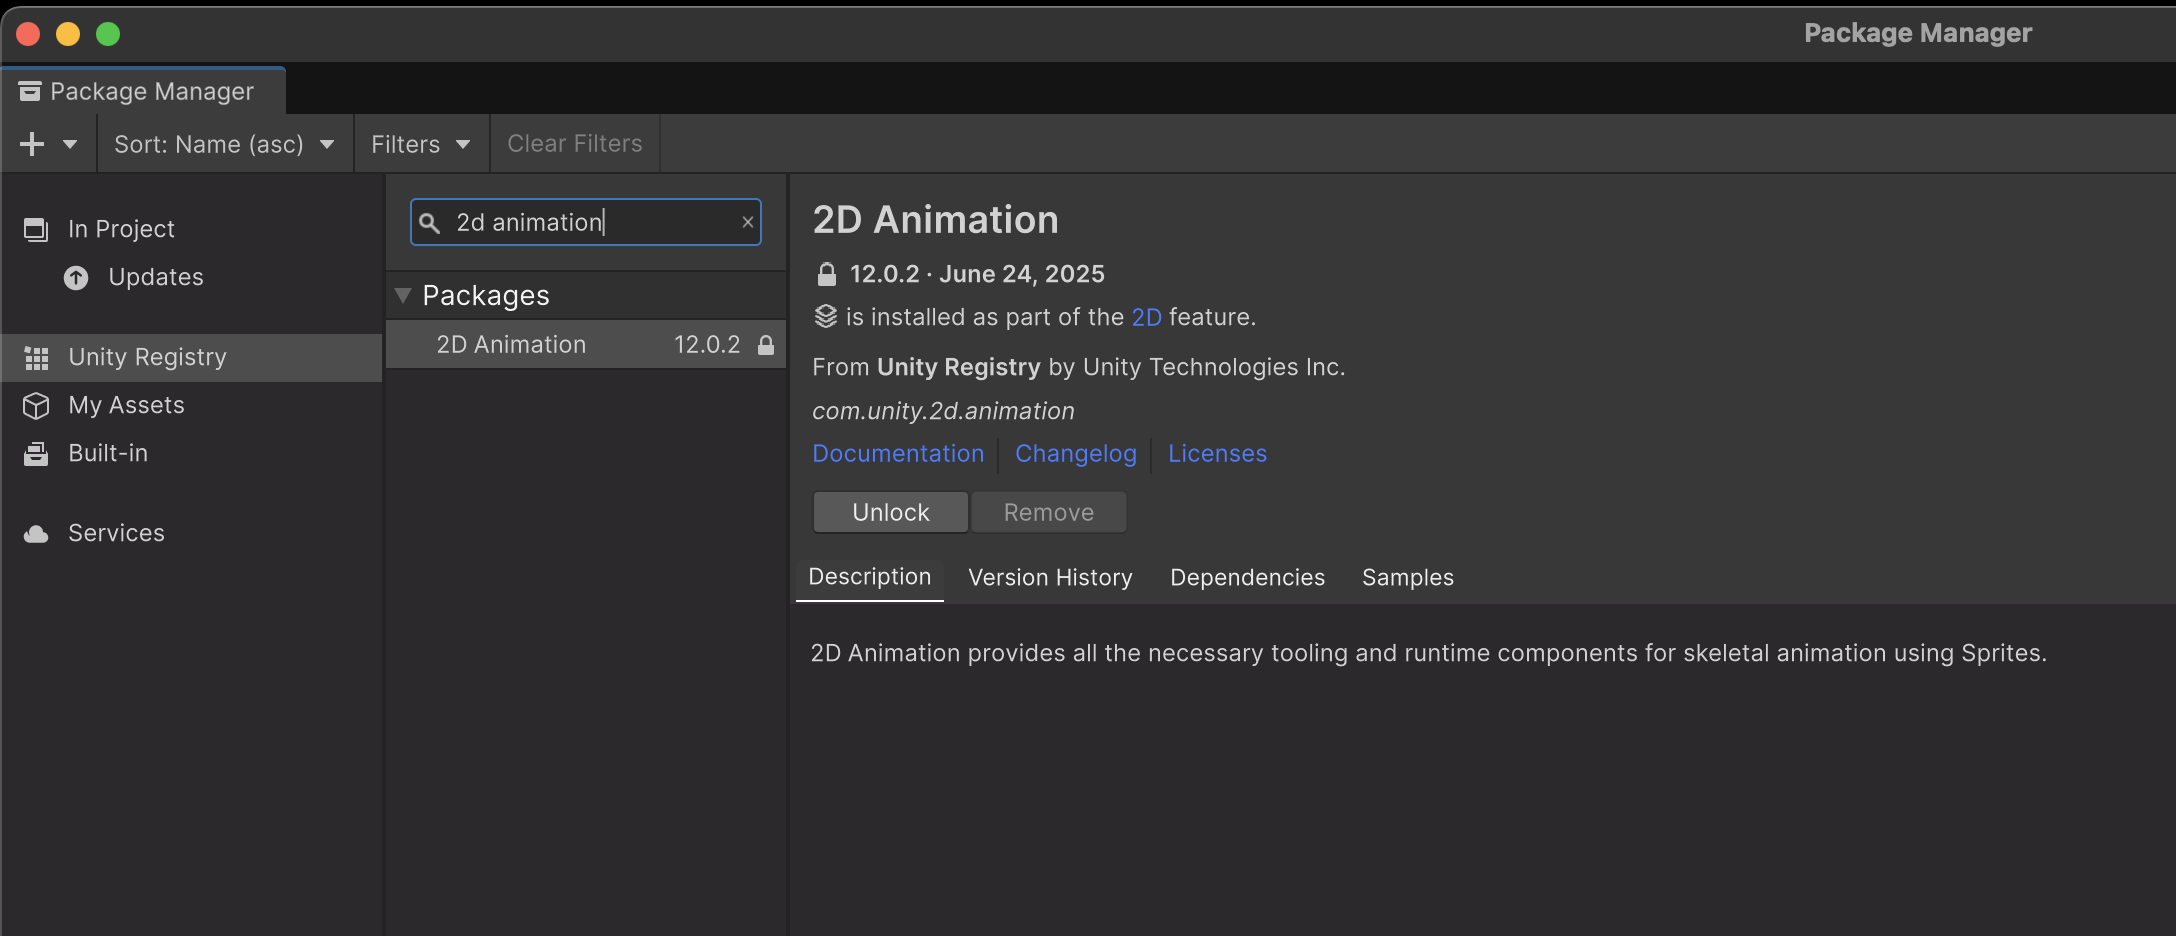
This unlocks Sprite Library Asset + Sprite Resolver workflow.
Step 2: Preparing the Spritesheets
Consider a system you have a large cast of characters or NPCs that behave identically but should look different, such as: villagers in a town, enemies in a dungeon, or units in a strategy game.
Recall the goal: instead of authoring separate animation controllers, you keyframe the labels once and let different sprite libraries provide the art.
Naming Convention
You need to decide your naming scheme up front.
Make sure your sprites are named consistently. This makes it easier if you want to automate the creation of the Sprite Library later on. Here we suggest a naming convention and we design batch processor around this construct.
The filename structure of your spritesheets should follow this rule:
{Category}[_StyleId]_{Dim}_{Variant}_{Slice}
- Category: Body, Hairstyle, Outfit, etc.
- StyleId: (optional) → which design (e.g. Hairstyle_24).
- Dim: resolution tag (e.g. 48x48).
- Variant: color/skin index (e.g. 01, 05).
- Slice: frame number from slicing (e.g. 114). This can be automatically generated in Unity.
For instance (without style ID),
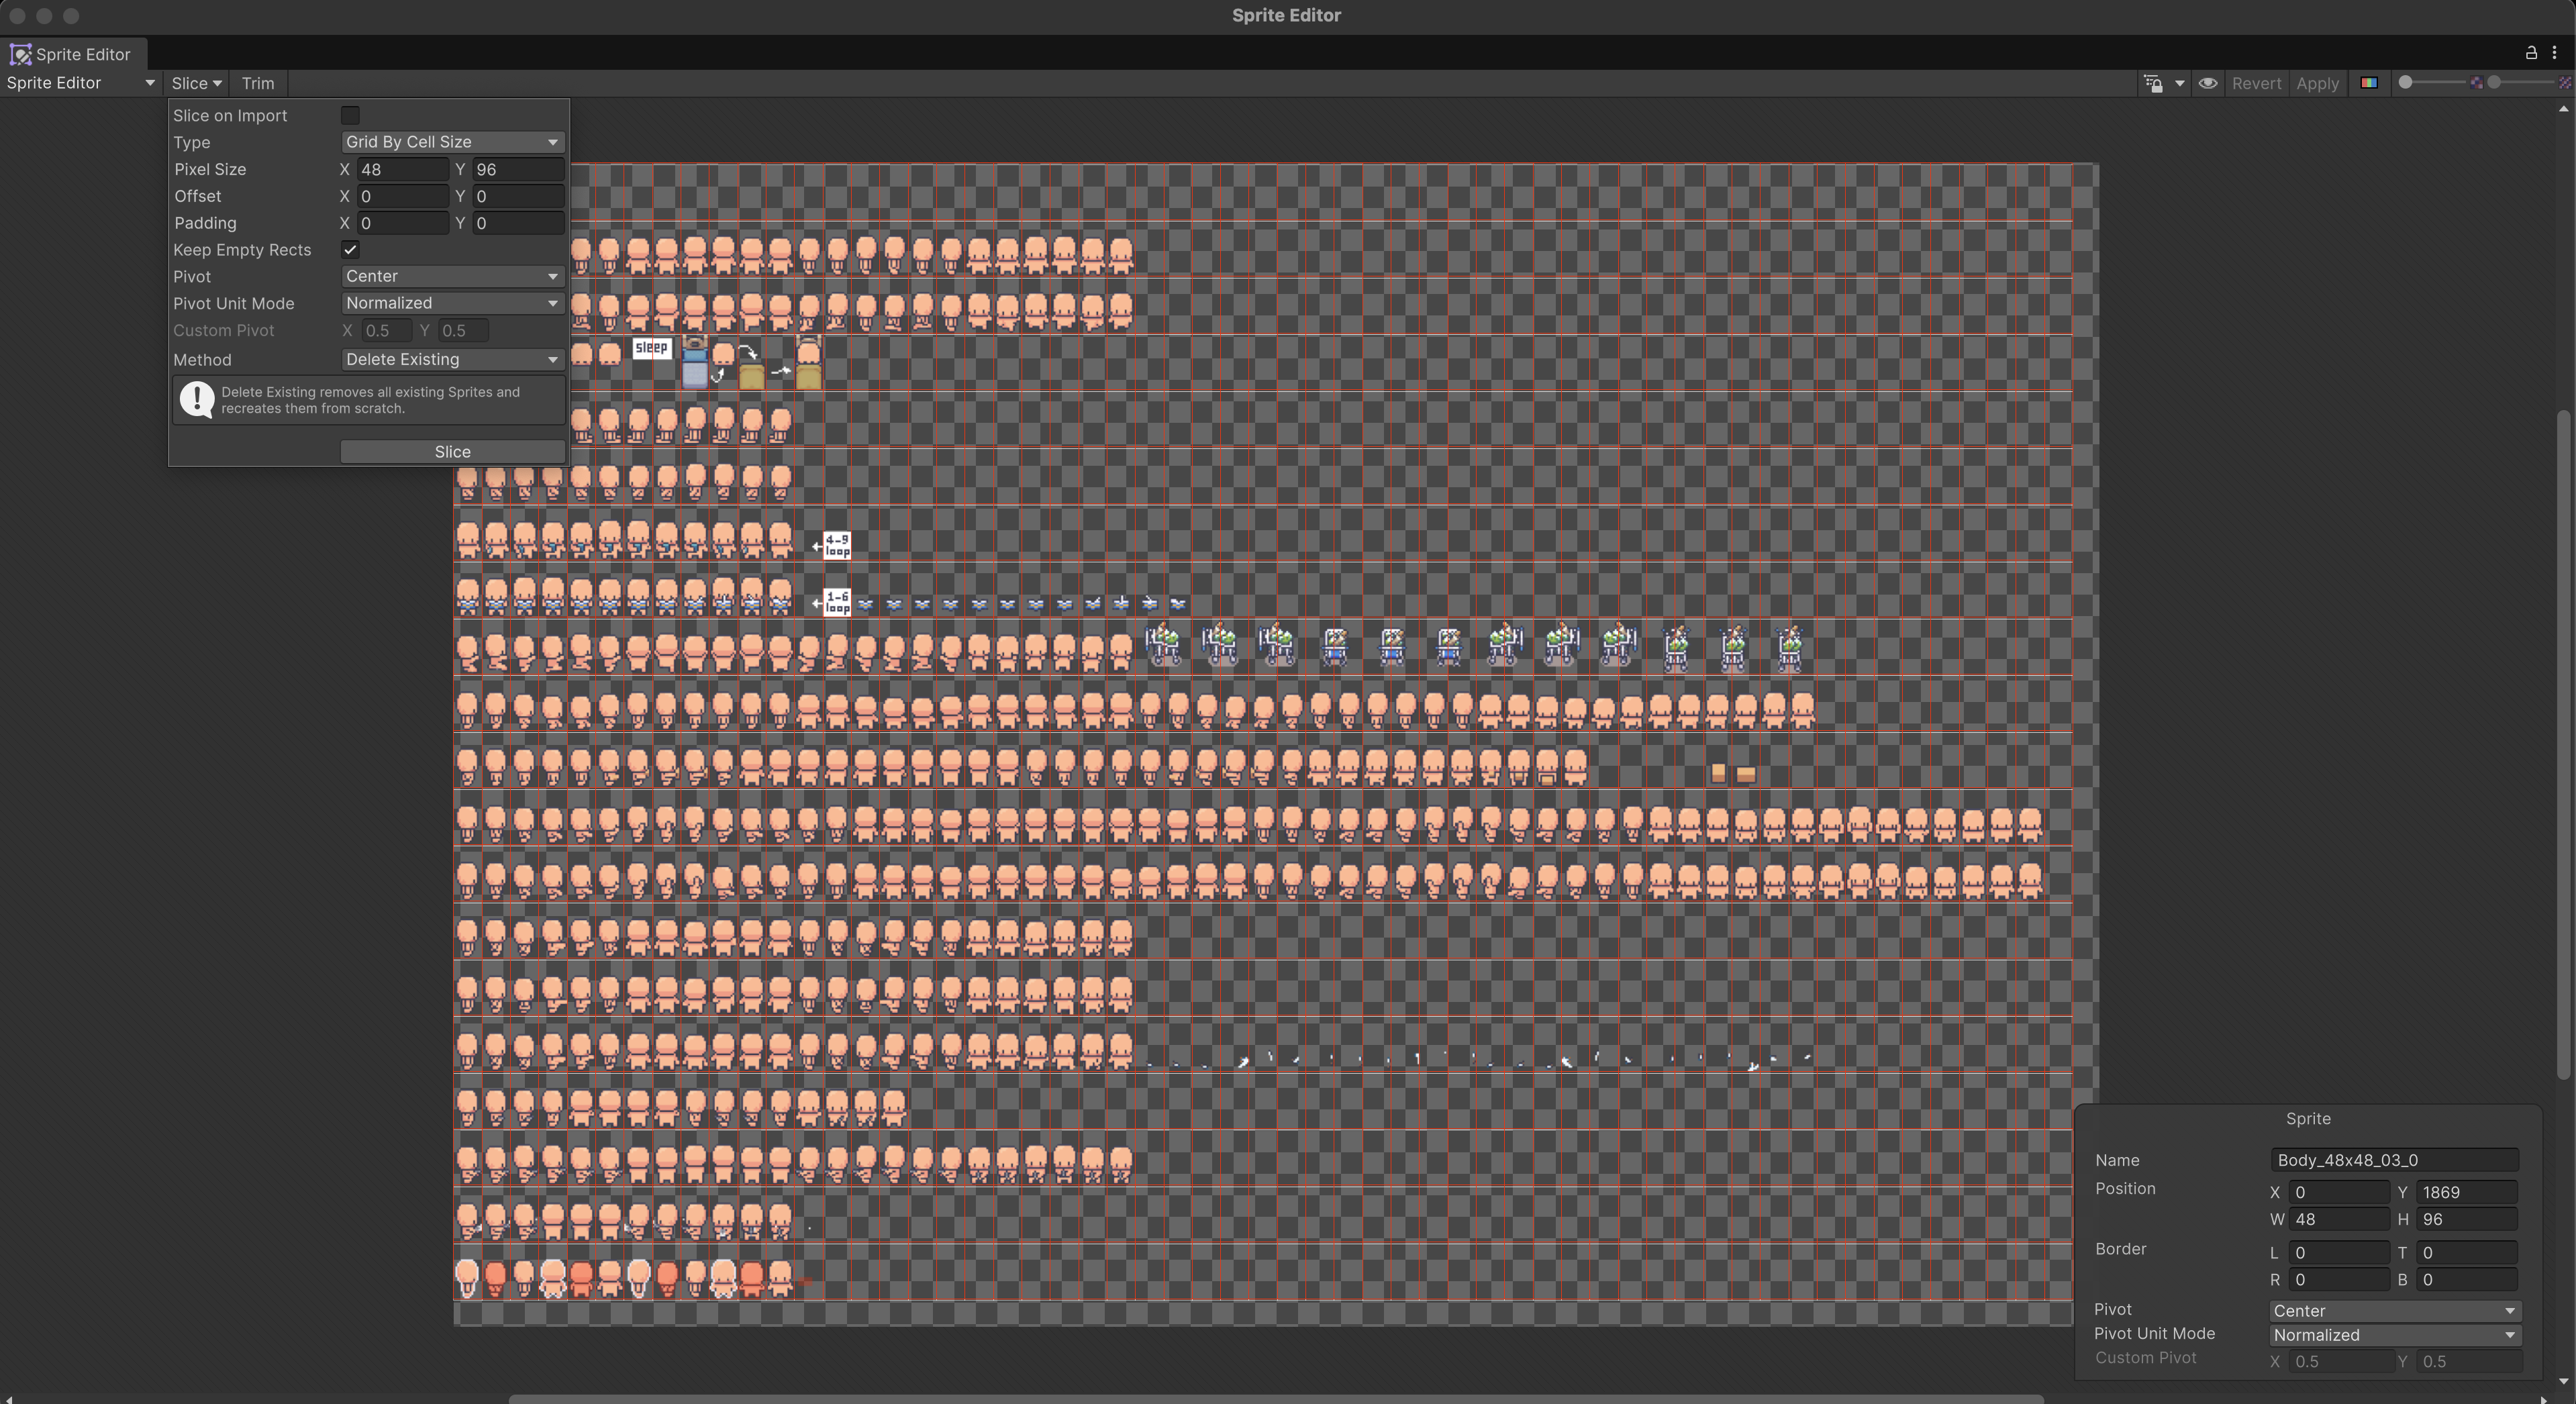
Body_48x48_03_0
This shows a Body category spritesheet, 48×48 pixel dimension, variant 03, slice 0. This sheet would have its PPU set to 48 as well.
Sometimes we need a style ID as well to differentiate between hairstyles, etc:
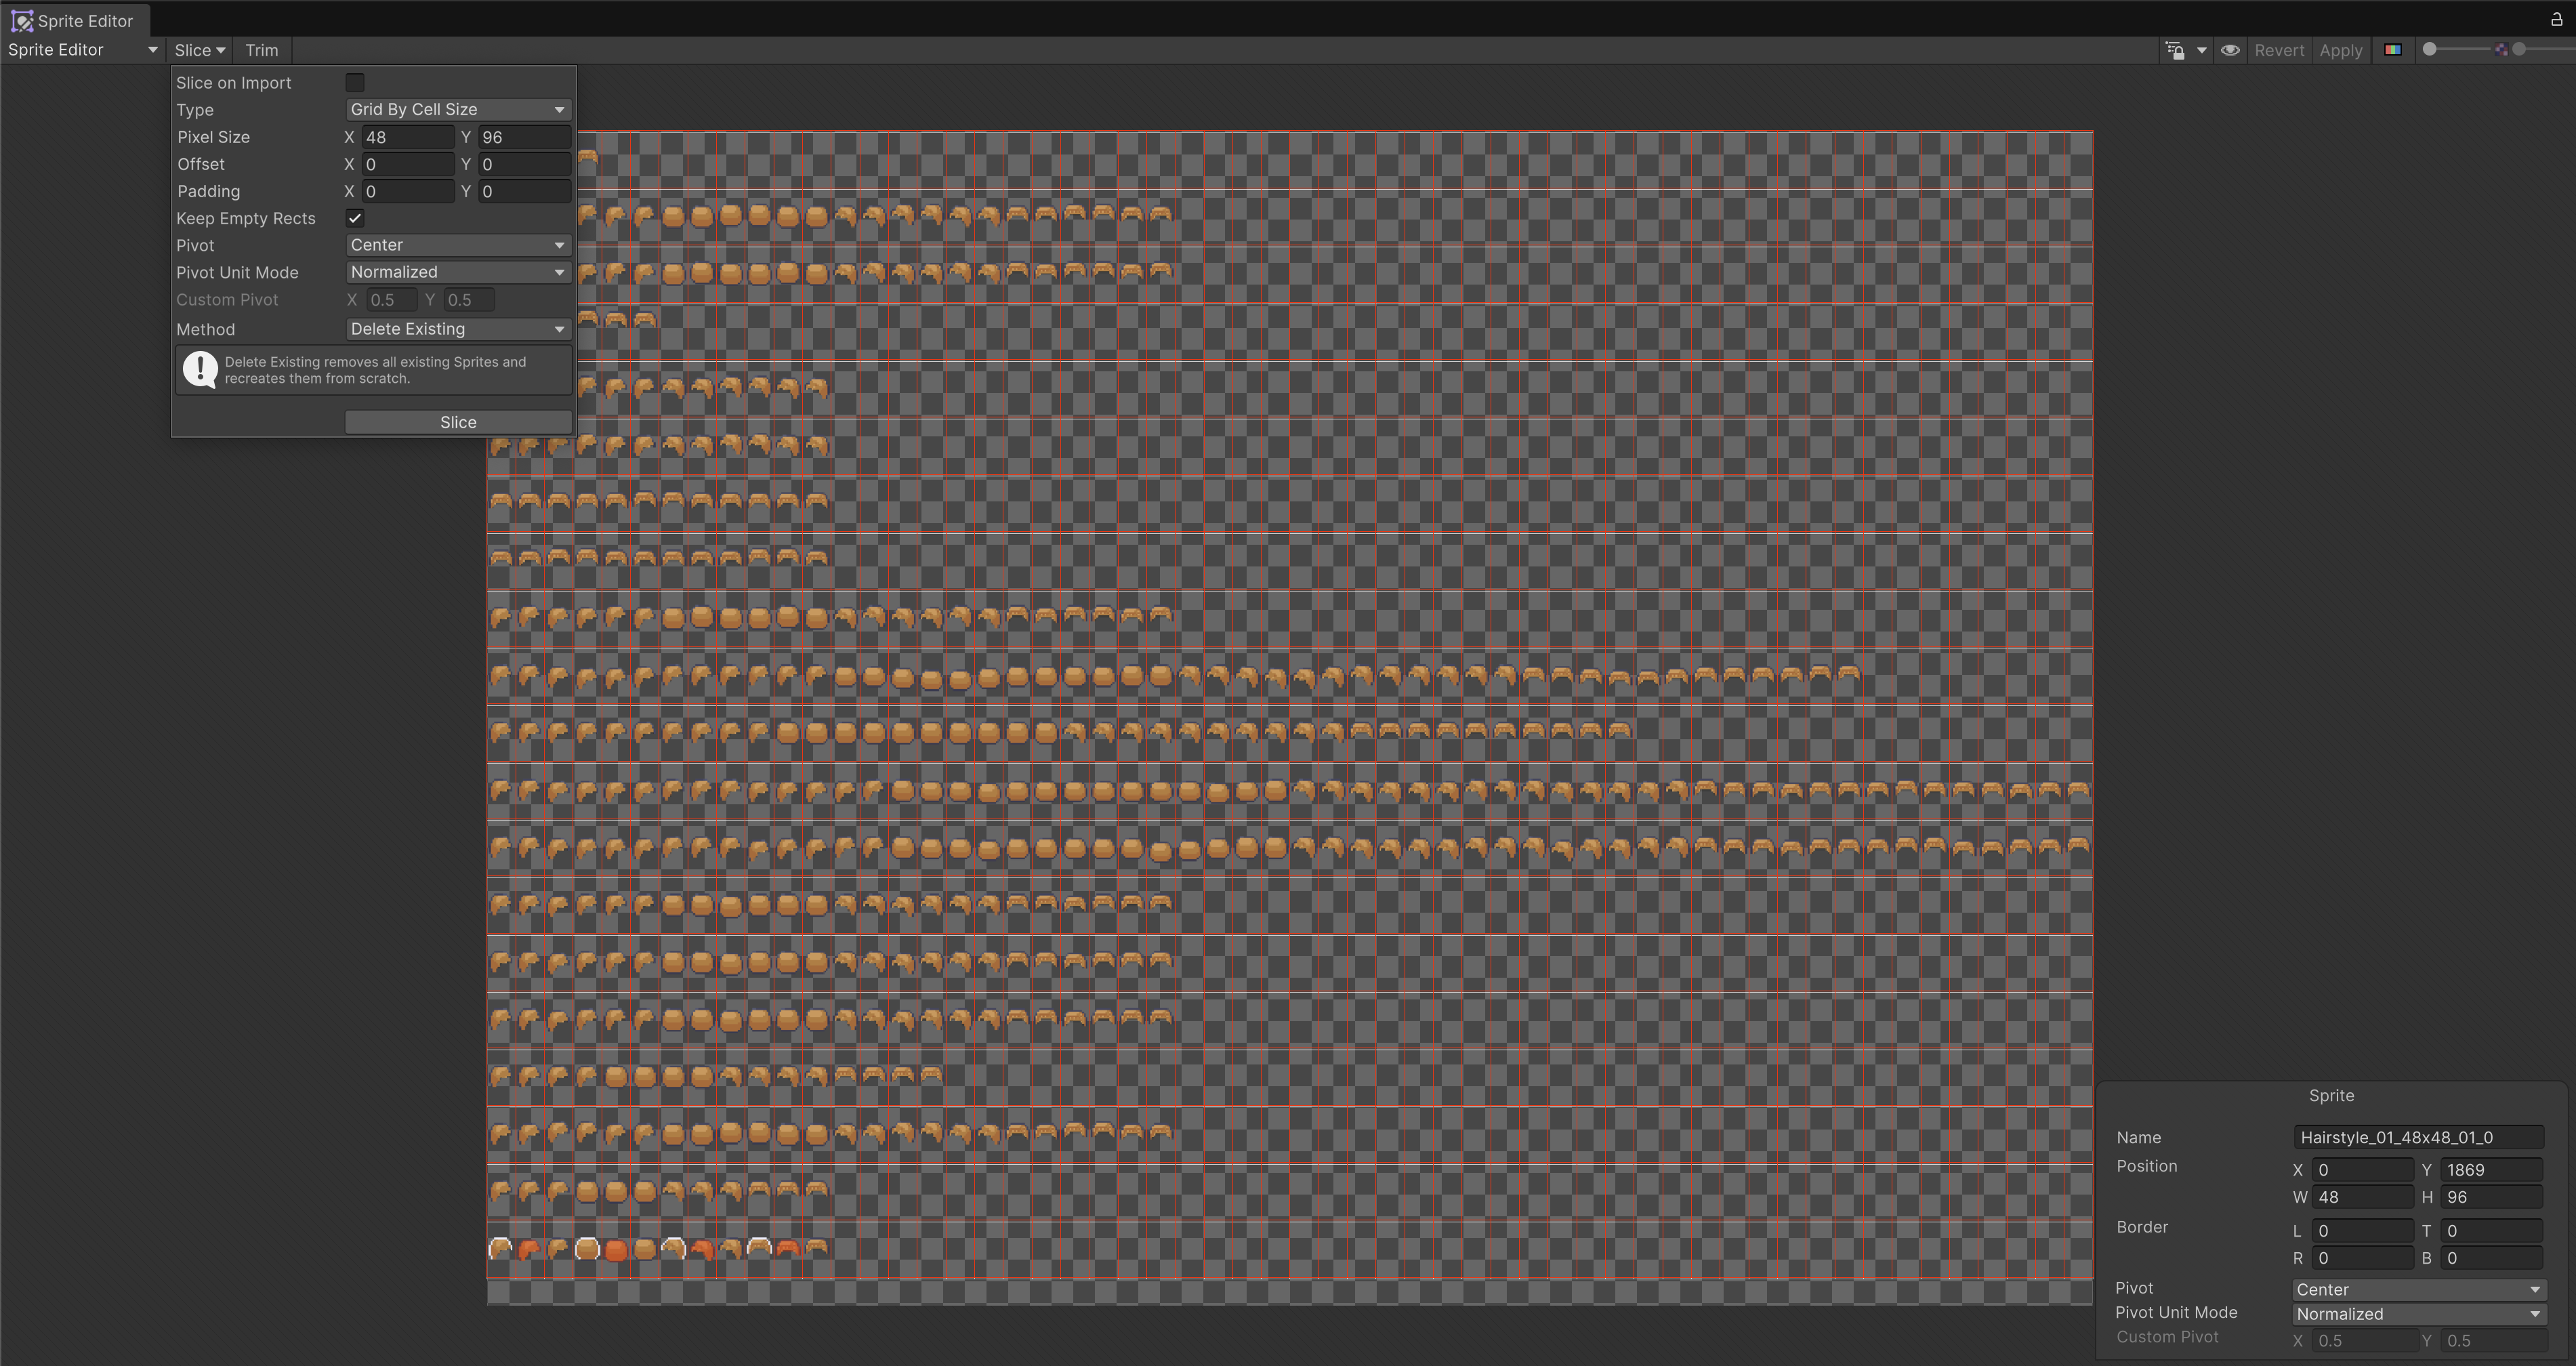
Hairstyle_01_48x48_01_0
This mean hairstyle category, style #01, 48×48 pixel dimension, variant 01, slice 0.
Sprite slicing and import settings
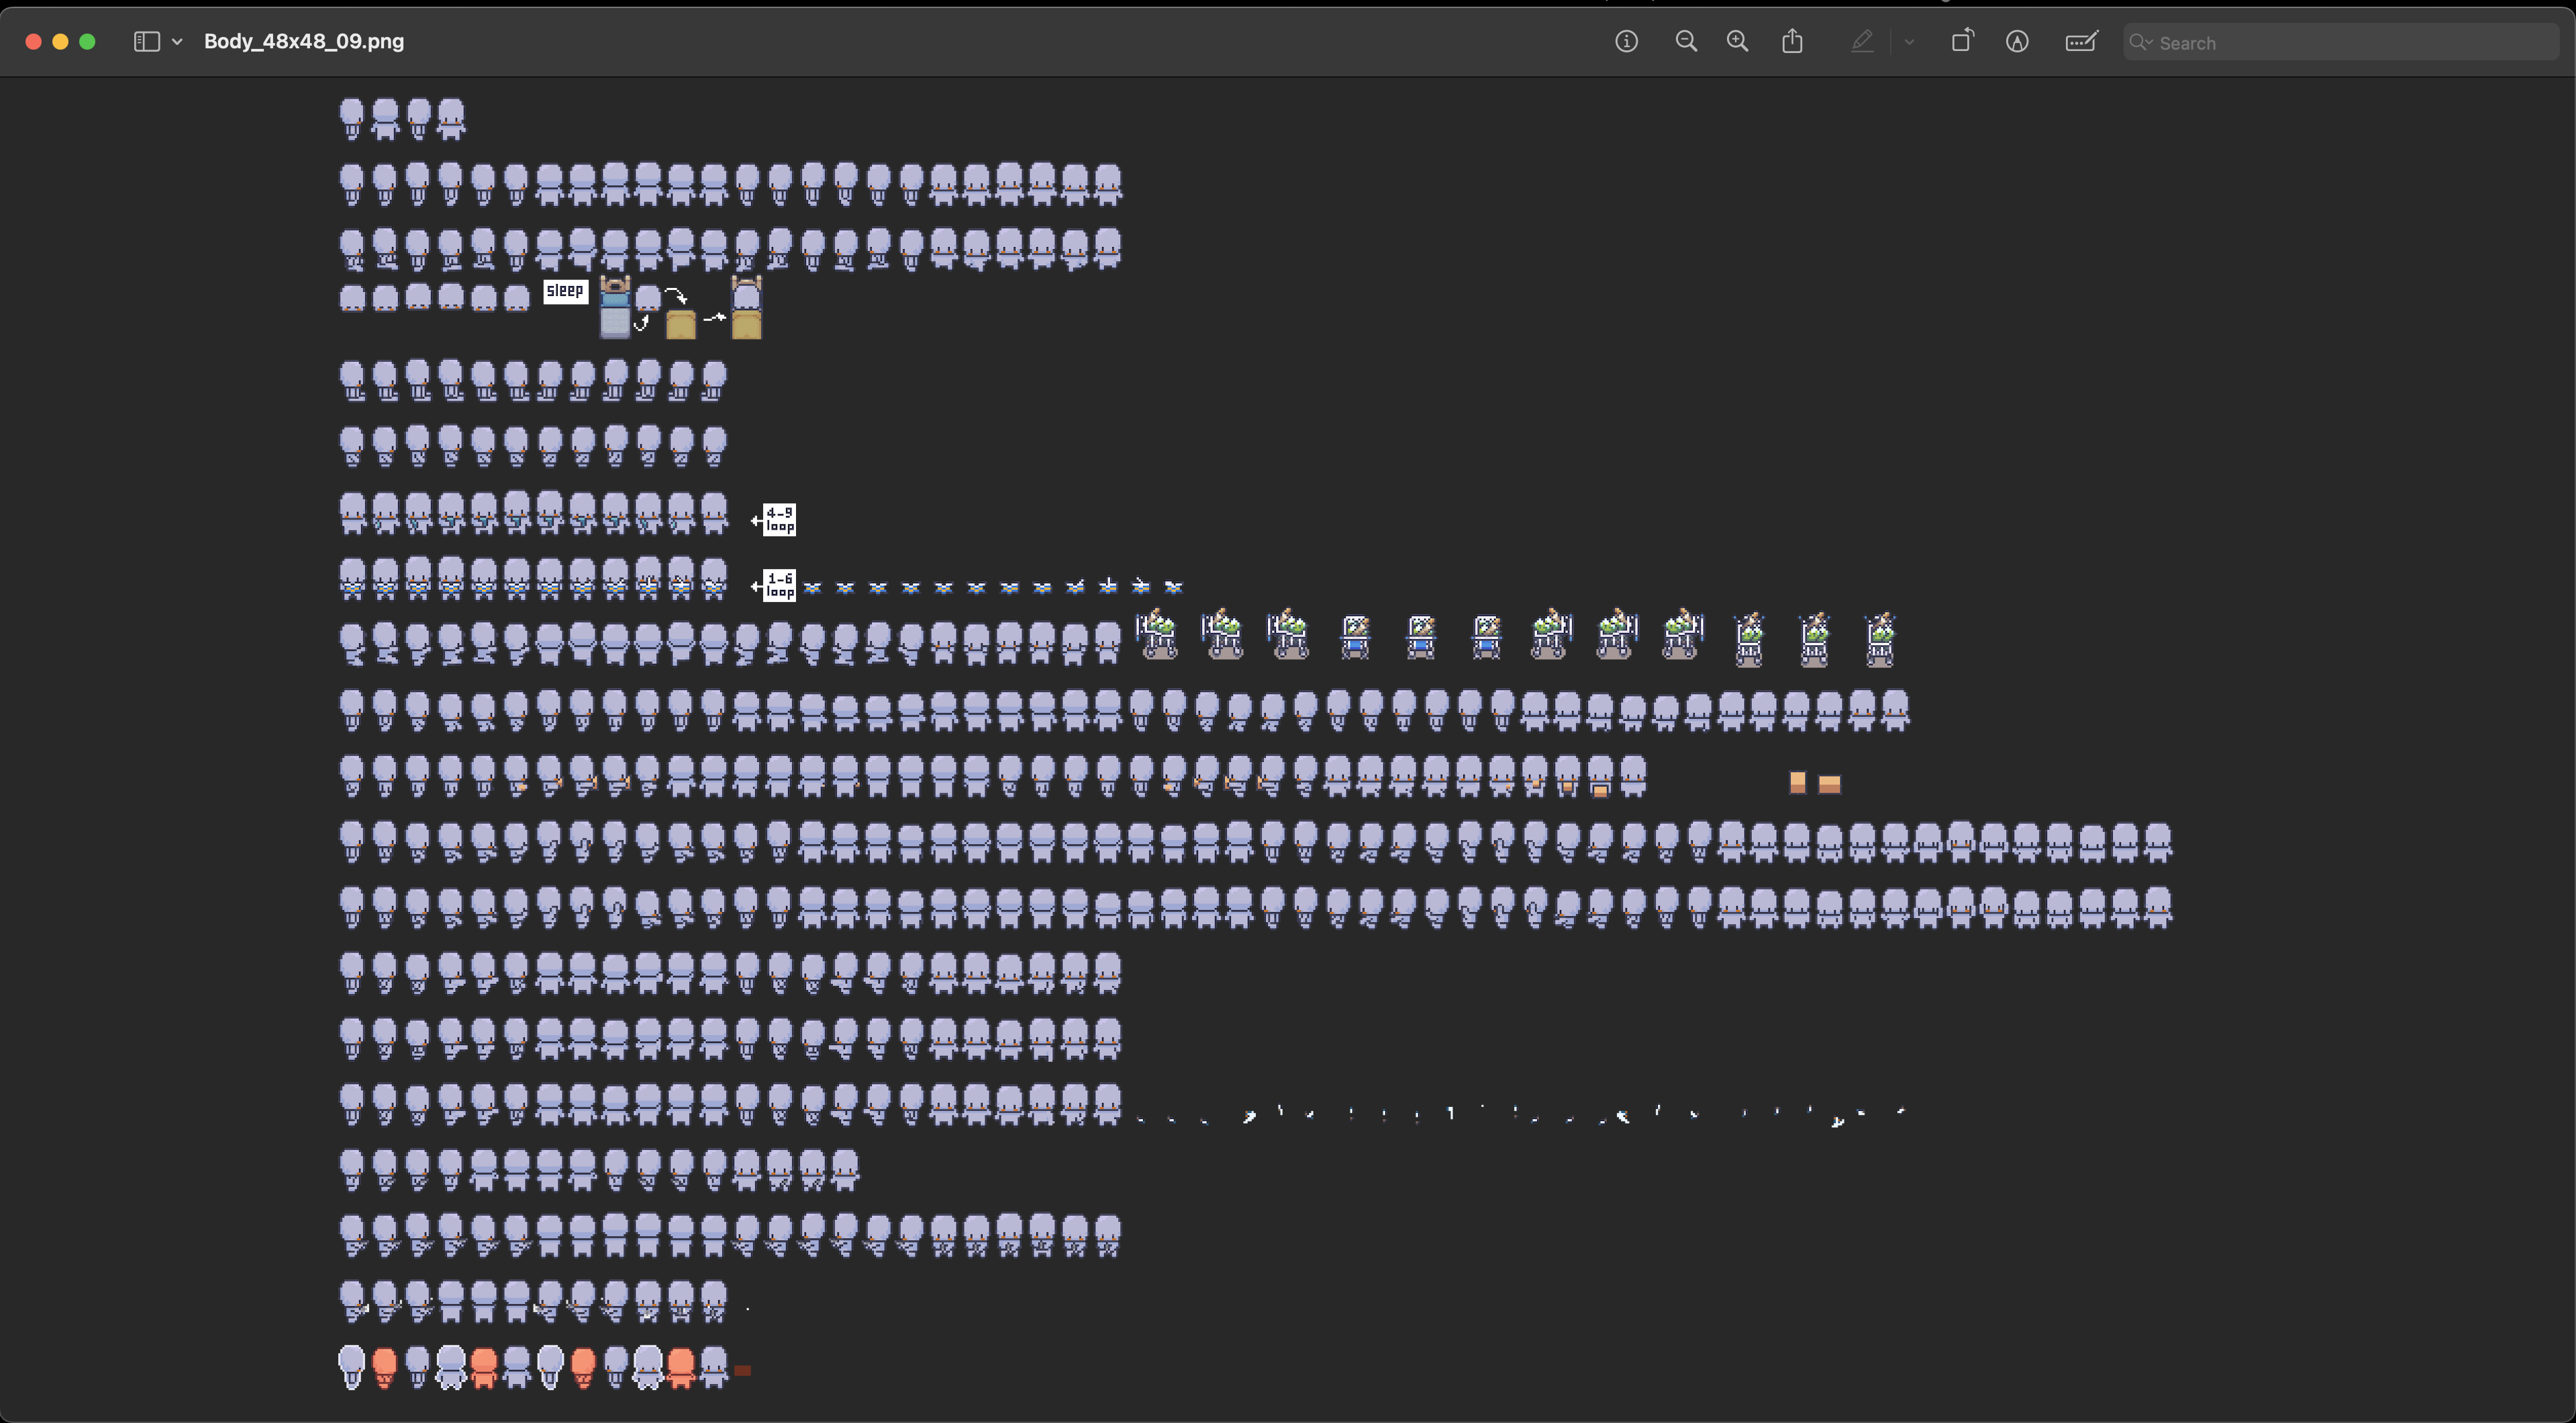
For each art set, your sprite sheet must slice into the same naming scheme.
It is also important to ensure that each sprite has the same pivot (e.g., at the feet), same Pixels Per Unit (PPU), and same orientation.
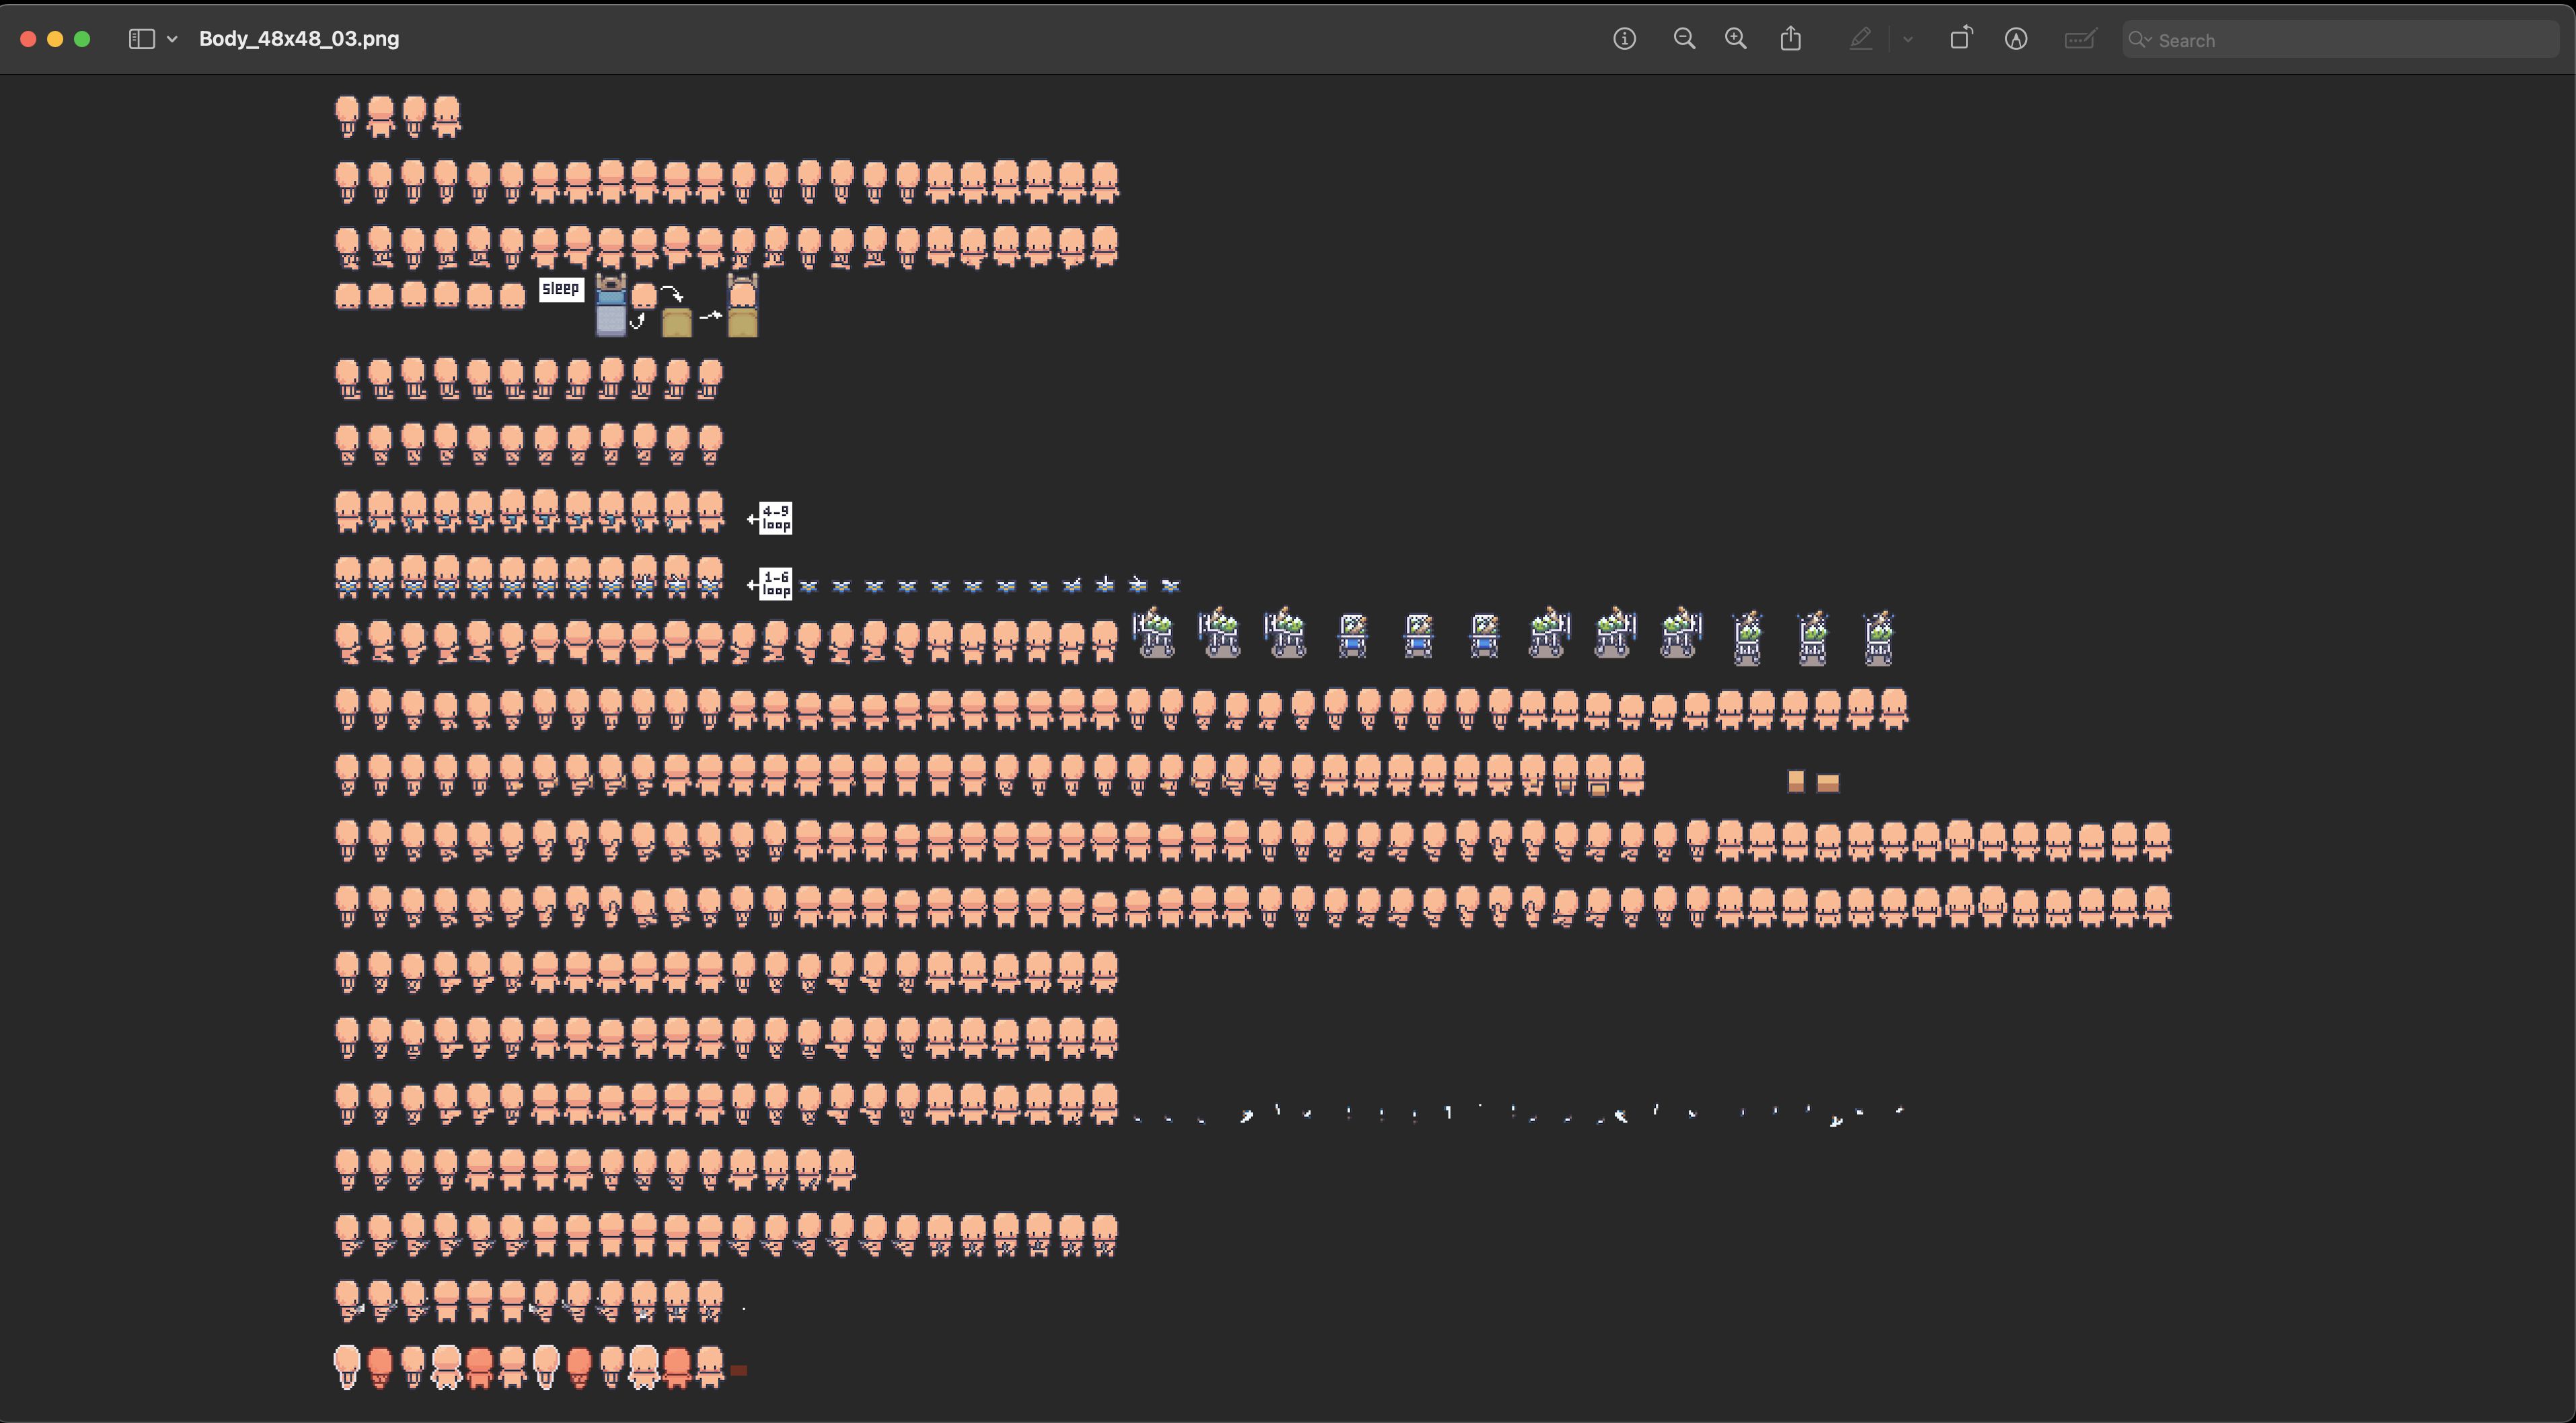
Here's some example of such spritesheets (e.g: VillagerA and VillagerB):
Workflow Overview
When building characters with swappable parts (Body, Hairstyle, Outfit, etc.), you have two main ways of organizing your SpriteLibraryAssets. The choice you make affects how you author assets, how you set up your Animator, and how much flexibility you have for customization at runtime. Below are the two dominant patterns, with their trade-offs spelled out.
The two approaches are Monolithic and Modular workflows.
Monolithic Workflow (all-in-one libraries) Overview
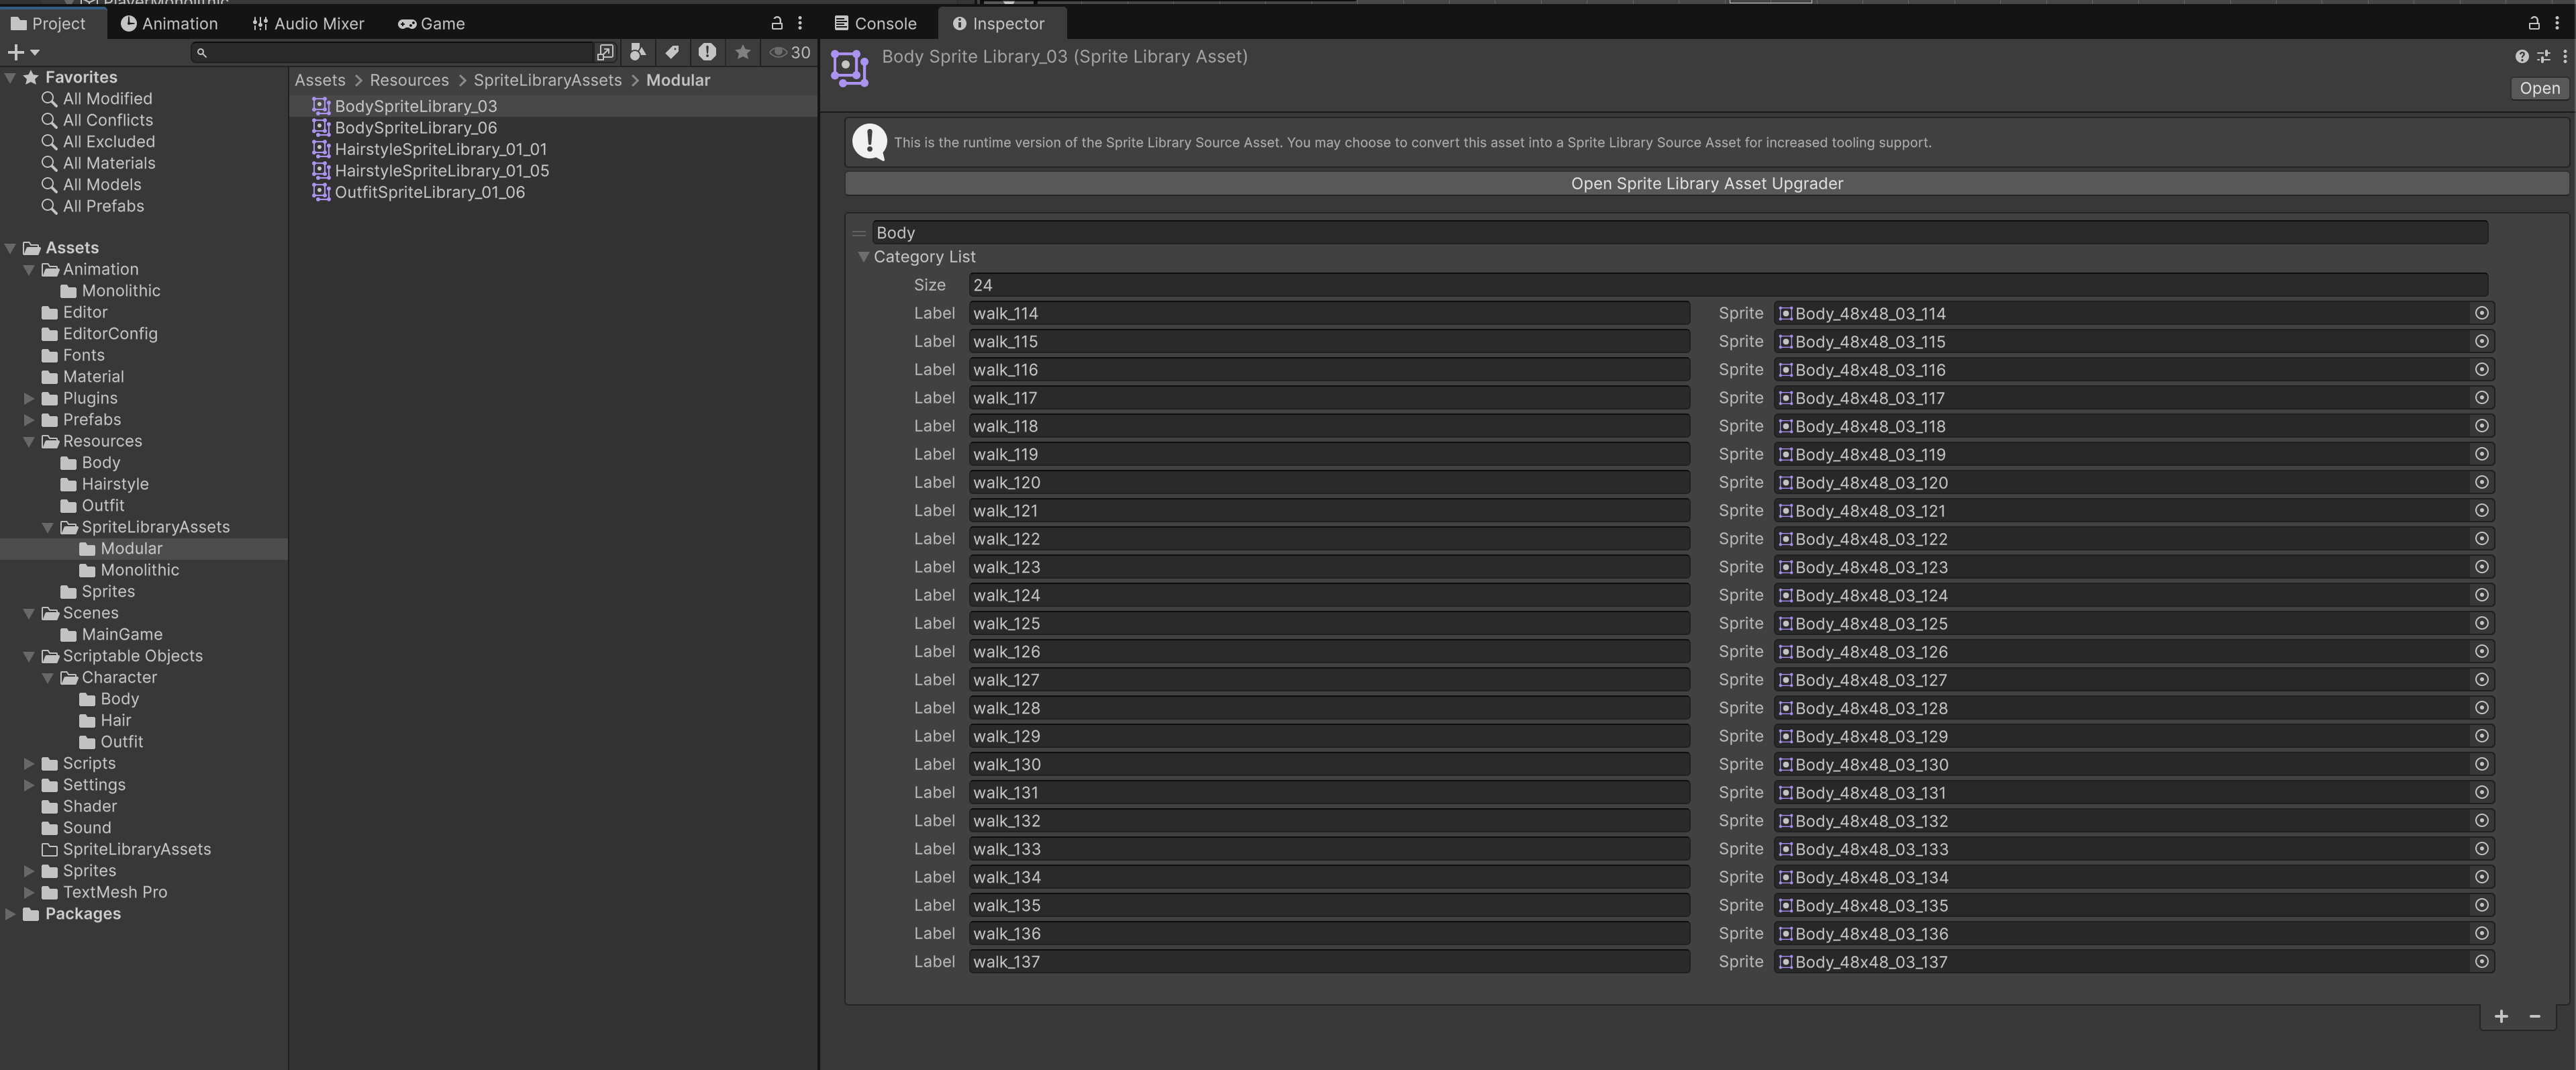
In the monolithic approach, you pre-bake every part into a single SpriteLibraryAsset. Each library contains all the categories (Body, Hairstyle, Outfit, etc.) for a specific full character look. For example, Character_03_24_02.asset might contain Body03, Hairstyle24, Outfit02 all inside one file.
Your Player GameObject is much simpler here: it only has ONE SpriteRenderer + SpriteResolver + SpriteLibrary, all under the root Animator. The Animator still drives the same label changes (walk_114, walk_115, …), but the active library asset already knows which Body/Hair/Outfit sprites to display for that skin. To change appearance at runtime, you simply assign a different monolithic asset, and the whole character swaps instantly.
This approach is straightforward for games that only have a handful of predefined skins. However, it doesn’t scale well: if you want 3 Bodies × 4 Hairstyles × 3 Outfits, you’ll need 36 separate SpriteLibraryAssets to cover all combinations.
Modular Workflow Overview
In the modular approach, you keep each category (Body, Hairstyle, Outfit) in its own SpriteLibraryAsset. Instead of baking all the art into one giant library, you generate smaller, focused libraries that hold only one category at a time.
Your Player GameObject has one Animator at the root, but each part (Body, Hairstyle, Outfit) gets its own SpriteRenderer + SpriteResolver + SpriteLibrary. The Animator drives label changes (e.g. walk_114 → walk_115 → walk_116), and because all libraries share the same label scheme, Body, Hair, and Outfit update together without you having to animate them separately.
At runtime, you decide which variant to load for each category. For example, you can assign BodySpriteLibrary_03.asset, HairstyleSpriteLibrary_24.asset, and OutfitSpriteLibrary_02.asset to the respective resolvers, and the Animator will seamlessly run them in sync. This makes modular especially powerful for character customization systems where players can freely mix and match parts.
Visual Summary
Monolithic (one shared library asset)
PlayerCharacter (Root)
 ├── Components on Root:
 │    • Animator
 │    • SpriteLibrary (Assign CharacterX.asset here)
 │
 ├── Body (Child GameObject)
 │    • SpriteRenderer
 │    • SpriteResolver (Category = "Body")
 │
 ├── Hair (Child GameObject)
 │    • SpriteRenderer
 │    • SpriteResolver (Category = "Hairstyle")
 │
 └── Outfit (Child GameObject)
      • SpriteRenderer
      • SpriteResolver (Category = "Outfit")
Modular (separate library assets per part)
PlayerCharacter (Root)
 ├── Components on Root:
 │    • Animator
 │
 ├── Body (Child GameObject)
 │    • SpriteRenderer
 │    • SpriteLibrary (assign Body_X.asset or similar)
 │    • SpriteResolver (Category = "Body")
 │
 ├── Hair (Child GameObject)
 │    • SpriteRenderer
 │    • SpriteLibrary (assign Hairstyle_X.asset or similar)
 │    • SpriteResolver (Category = "Hairstyle")
 │
 └── Outfit (Child GameObject)
      • SpriteRenderer
      • SpriteLibrary (assign Outfit_X.asset or similar)
      • SpriteResolver (Category = "Outfit")
Creating the SpriteLibraryAsset
There are two approaches to this: Manual or Batch Processing.
Manual Creation of SpriteLibraryAsset
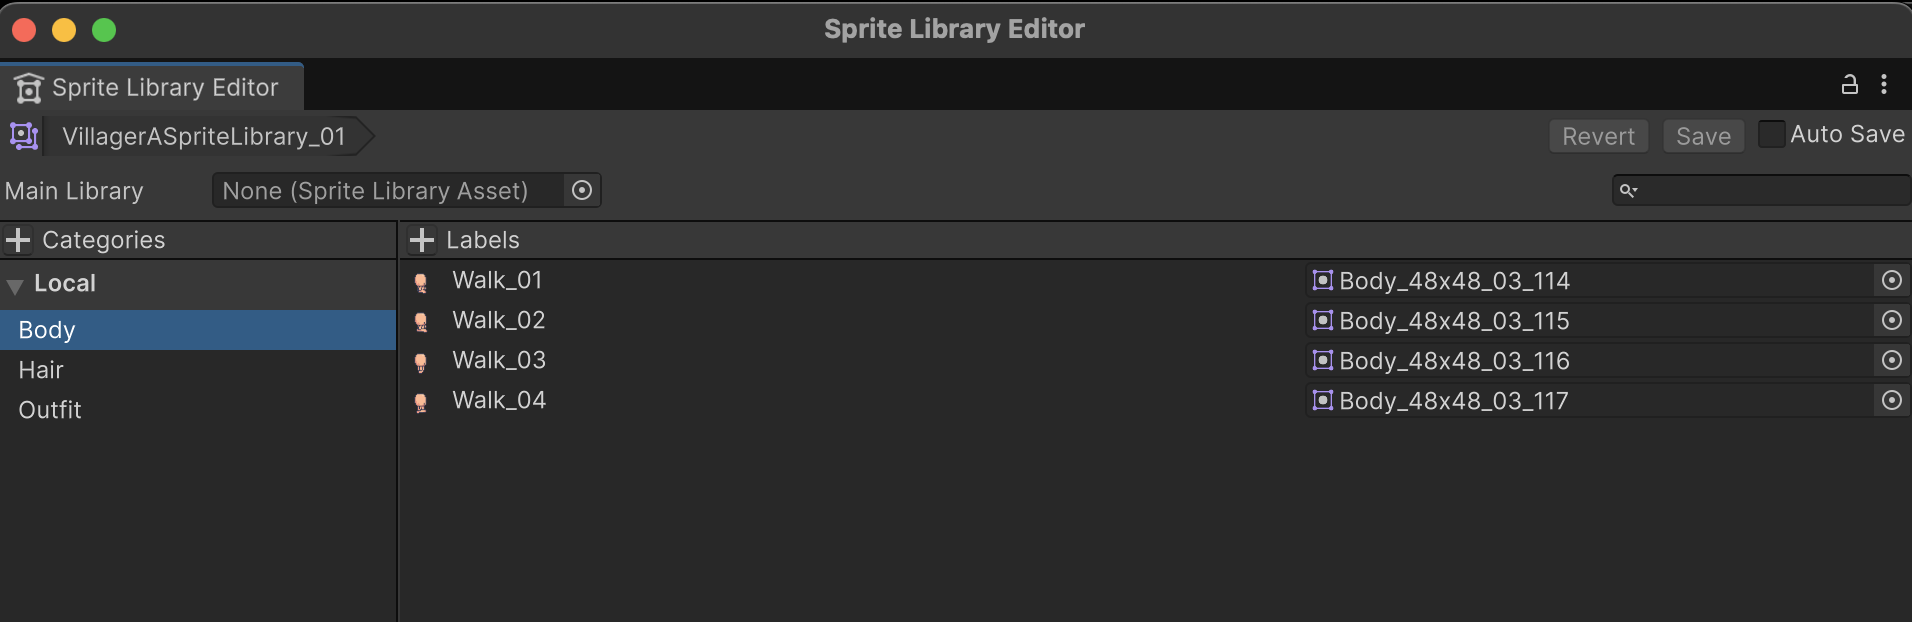
Manual creation of the assets is tedious but it allows you to be more relaxed with the naming convention of your sprites. You can use different .png files (doesnt have to be in the same spritesheet) for each category-label pair.
In the Project window, right click >> Create >> 2D >> Sprite Library Asset. Then open its Sprite Library Editor via the inspector and start populating it. You can organize by Category such as Body, Head, Weapon, and Label such as Idle01, Walk01, Attack 01 etc. You should create one SpriteLibraryAsset per skin/variant.
- The Animator only ever talks in Category + Label terms (Body: Walk01, Head: Smile, etc).
- Each
SpriteLibraryAssetis just a dictionary mapping those labels to actual sprites. - So if VillagerA and VillagerB both have categories/labels defined the same way, you can swap the library, and all the existing Animator clips continue to work but the art changes.
All variants must share the SAME categories/labels. Animator only cares about the label, not which art set.
For instance, suppose we have these SpriteLibraryAssets:
Categories:
  Body:
    Walk_01: Body_48x48_03_114.png
    Walk_02: Body_48x48_03_115.png
    Walk_03: Body_48x48_03_116.png
    ...
  Hair:
    Walk_01: Hairstyle_01_48x48_05_112.png
    Walk_02: Hairstyle_01_48x48_05_113.png
    ...
Categories:
  Body:
    Walk_01: Body_48x48_06_114.png
    Walk_02: Body_48x48_06_115.png
    Walk_03: Body_48x48_06_116.png
    ...
  Hair:
    Walk_01: Hairstyle_03_48x48_04_112.png
    Walk_02: Hairstyle_03_48x48_04_113.png
    ...
In the animator timeline, we refer to them as such:
Frame 0: Body Walk_01 & Hair Walk_01
Frame 5: Body Walk_02 & Hair Walk_02
Frame 10: Body Walk_03 & Hair Walk_02
Then during runtime, we would swap them:
spriteLibrary.spriteLibraryAsset = villagerA; // uses VillagerA art
spriteLibrary.spriteLibraryAsset = villagerB; // instantly swaps to VillagerB art
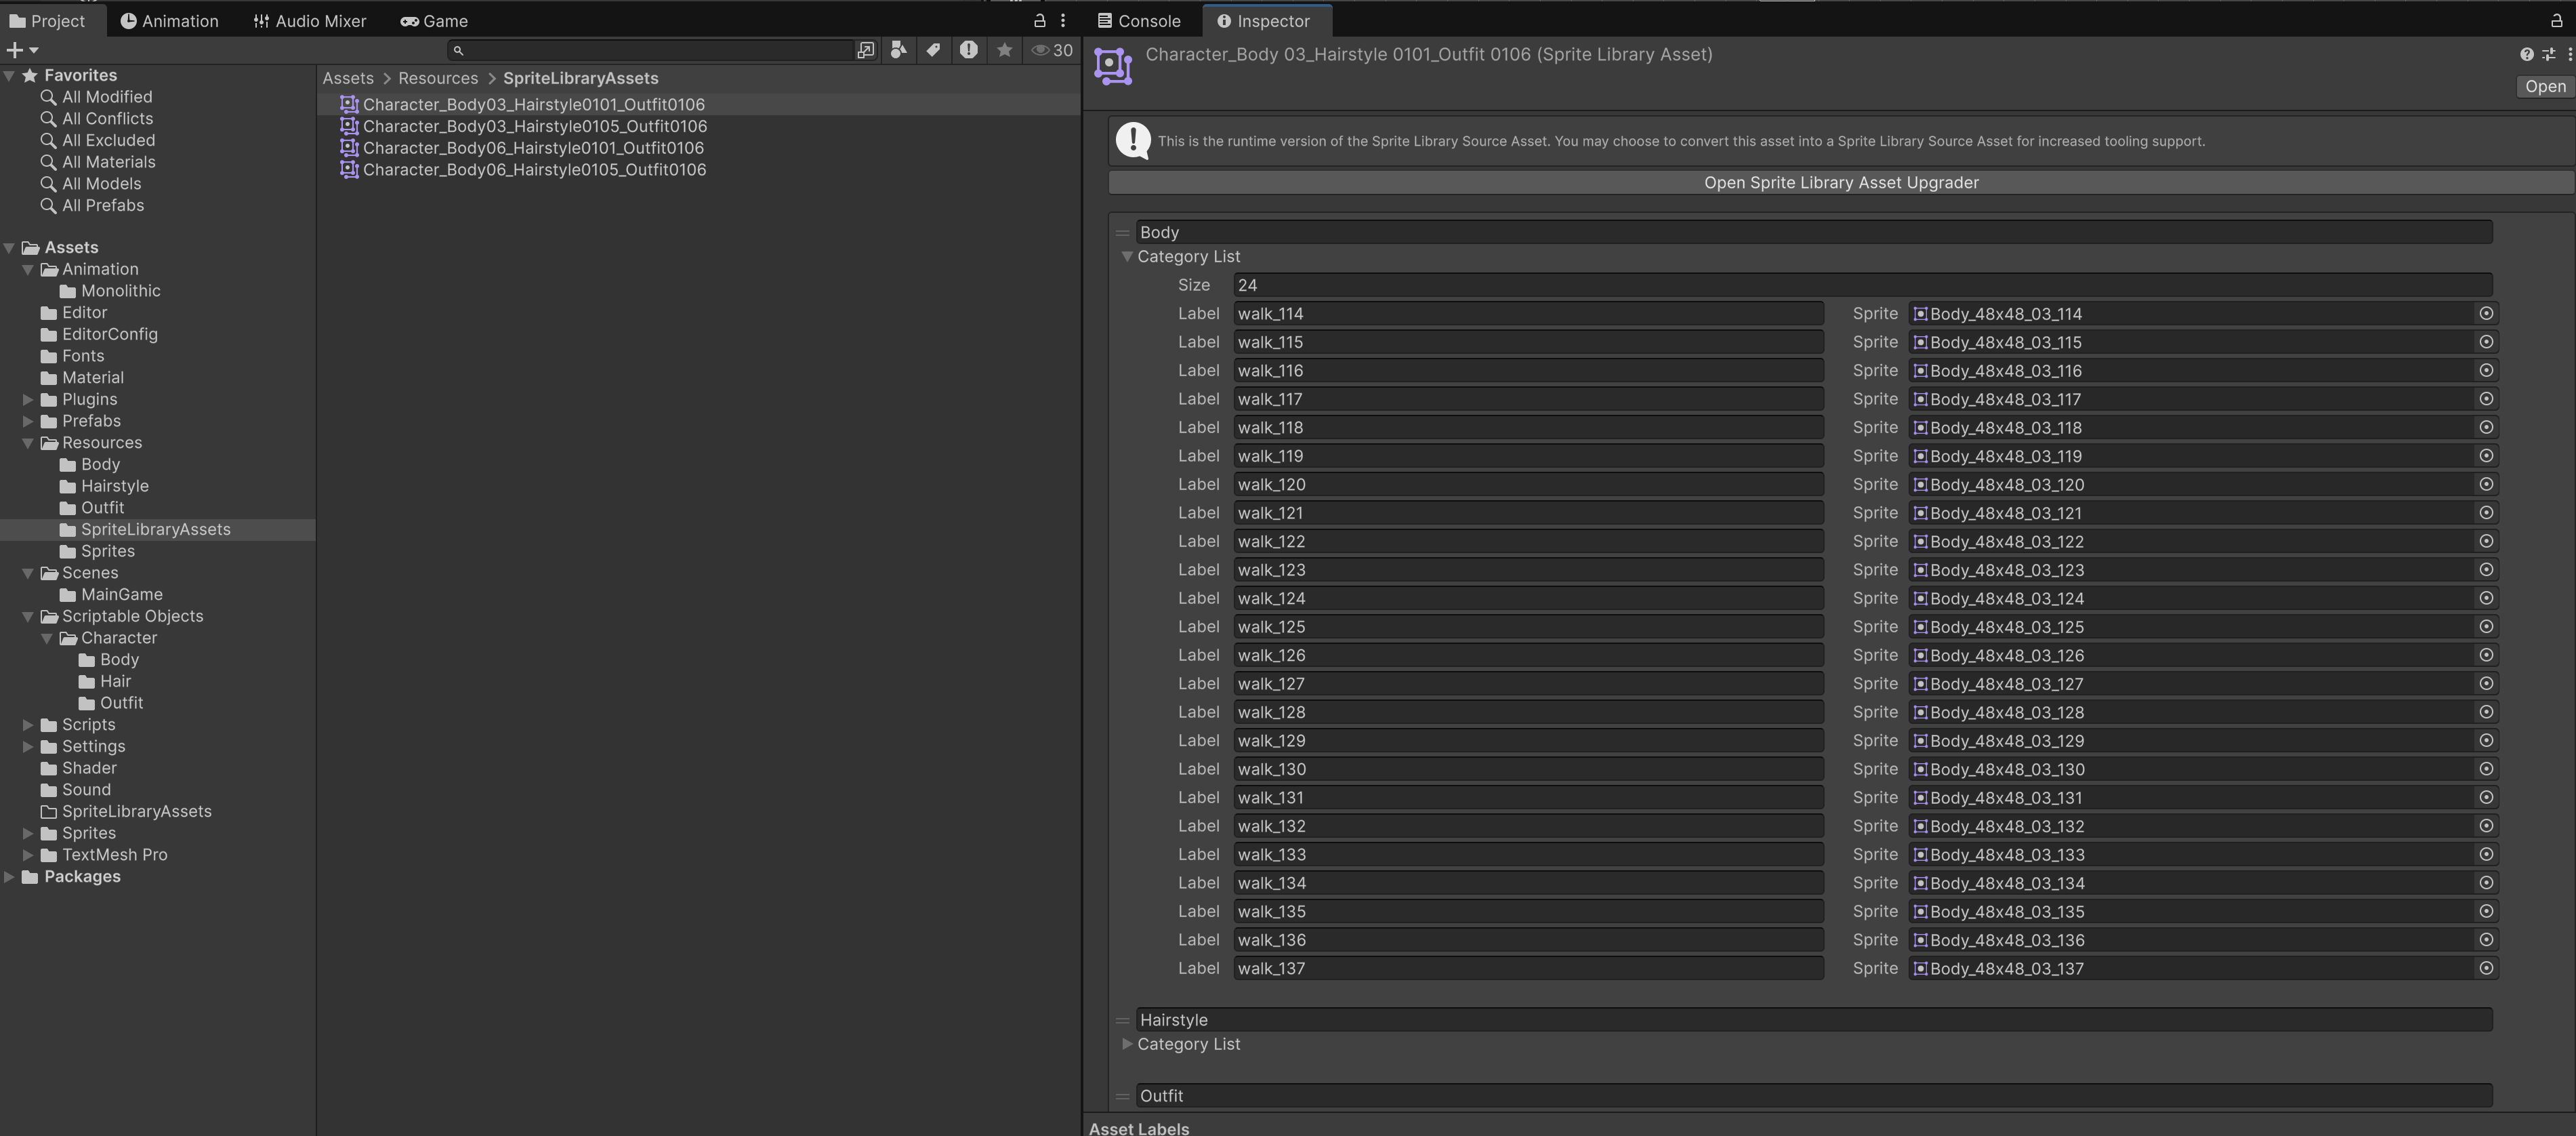
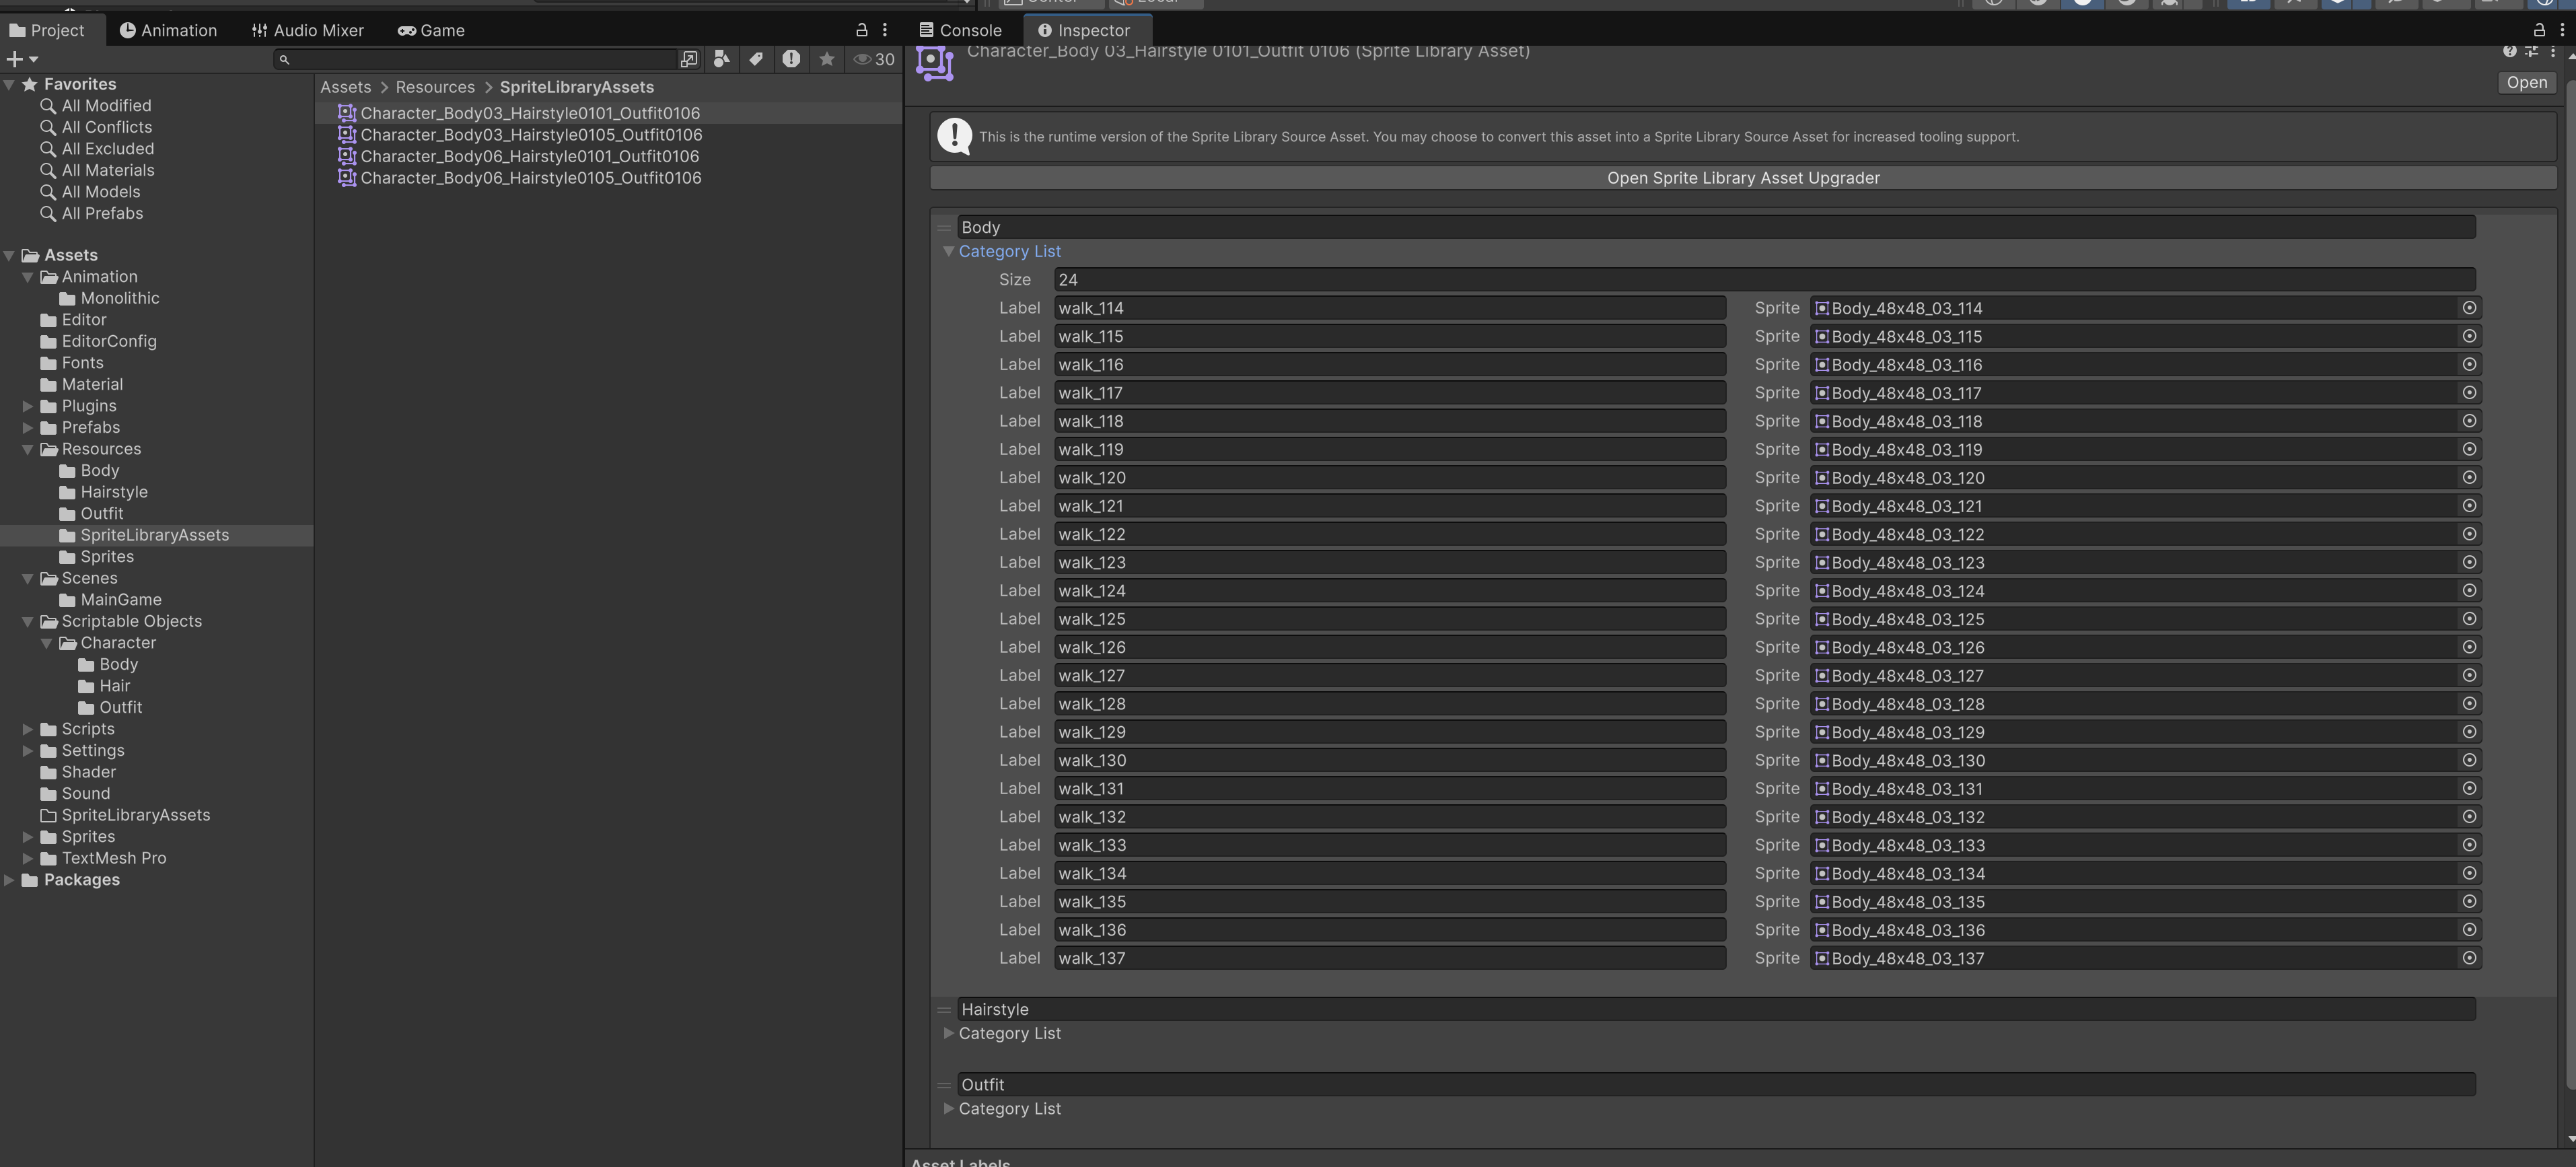
For monolithic approach, you need to create ONE sprite library asset per combination. Suppose you have 3 Body spritesheets, 4 Hair spritesheets, and 2 Outfit spritesheets.
- You need to create 3x4x2 = 24
SpriteLibraryAsset, which is quite a hefty work - Each asset has ALL three categories (
Hair,Body,Outfit) as shown in the screenshot above - Each category has labels such as
Walk_01, etc
Here's a sample screenshot:
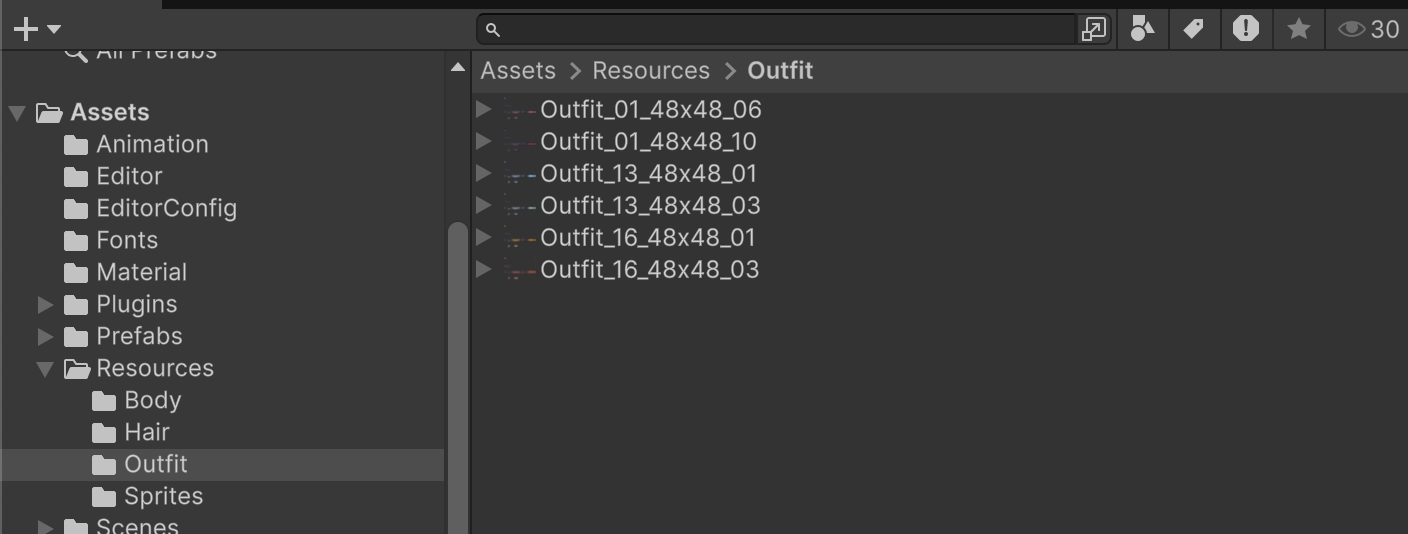
For modular approach, you need to create ONE sprite library asset per type, that is:
- Create 3 different
SpriteLibraryAssetBodyfor each Body type- Each asset only has one category e.g: Body, and labels such as
Walk_01, etc
- Each asset only has one category e.g: Body, and labels such as
- And 4 for hair, as well as 2 for outfit
- In the end, you have 3+4+2 = 9
SpriteLibraryAsset
Here's a sample screenshot:

Batch Creation of SpriteLibraryAsset
Creating sprite library asset per skin/variant is a hefty task, be it the modular or monolithic way. If you can slice your sprites consistently (same pivot, PPU, and frame count), and name all the spritesheets consistently, you can batch create the library asset. For these batch processors (both Modular and Monolithic) to work, your sprites must follow a strict filename pattern.
This is how the script knows which category, style, variant, and slice each sprite belongs to.
Common Filename Structure of Spritesheets
Your spritesheet should have the following structure as name:
{Category}[_StyleId]_{Dim}_{Variant}_{Slice}
Explanation:
{Category}: the type of asset (e.g., Body, Hairstyle, Outfit).[_StyleId]: optional style identifier (e.g., 24 for Hairstyle #24).{Dim}: the dimension string, often matching your sliced sheet (e.g., 48x48).{Variant}: the color/variant index (e.g., 01, 05).{Slice}: the frame number produced when Unity slices your sheet (e.g., 114, 594).
If a category does not use StyleId, the filename has 4 parts. If it does, the filename has 5 parts.
Why This Matters
The batch processors:
- Split the name on
_ - Filter by category, dimension, styleId, variant, and slice range
- Generate labels inside the Sprite Library using your
labelTemplate
So if your filenames don’t follow the rule, the script won’t know how to organize them. You are free to come up with your naming convention but you need to edit the Batch Processor's logic accordingly.
JSON Config Format for Sprite Library Generation
You can specify the Sprite Library Rules with a JSON file placed in a specific path of your choice. Right now we choose Assets/EditorConfig.
The JSON file defines rules for each category of sprites (Body, Hairstyle, Outfit, etc.).
Each rule tells the generator how to parse filenames, filter sprites, and build labels inside a SpriteLibraryAsset.
Common Fields
{
  "category": "Body",
  "hasStyleId": false,
  "variants": ["03", "06", "09"],
  "dimFilter": "48x48",
  "labelTemplate": "walk_{Slice}",
  "minFrame": 114,
  "maxFrame": 137
}
Explanation:
-
category: The folder name under
Assets/Resourcesthat holds the sprites.- Example:
"Body"→ looks insideAssets/Resources/Body.
- Example:
-
hasStyleId (
trueorfalse): Whether sprite filenames for this category contain a styleId field.Body_48x48_03_120→hasStyleId = falseHairstyle_24_48x48_01_594→hasStyleId = true
-
dimFilter: Resolution or dimension string (e.g.
"48x48") used to filter which sprites are included. If empty, no dimension filtering is applied. -
labelTemplate: A string pattern that decides what labels are added inside the Sprite Library. It can use placeholders:
{Category}→ type (e.g.,"Body"){StyleId}→ the style identifier (if any, e.g."24"){Dim}→ dimension filter string (e.g."48x48"){Variant}→ variant or color ID (e.g."01"){Slice}→ the frame/slice number (e.g."120")
Example:
"walk_{Slice}"→walk_114,walk_115,walk_116"{StyleId}_{Slice}"→24_594
-
minFrame / maxFrame: Optional numeric filters on the slice/frame number.
- Example:
minFrame=114, maxFrame=137means only frames between 114–137 are included. - Leave at
-1to disable filtering.
- Example:
Categories Without Style IDs
If hasStyleId = false, you just provide variants:
{
  "category": "Body",
  "hasStyleId": false,
  "variants": ["03", "06", "09"],
  "dimFilter": "48x48",
  "labelTemplate": "walk_{Slice}",
  "minFrame": 114,
  "maxFrame": 137
}
This means we will create libraries out of Spritesheets named Body_48x48_03, Body_48x48_06, Body_48x48_09.
- Each library only includes slices 114–137.
- Labels are formatted as
"walk_{Slice}".
Categories With Style IDs
If hasStyleId = true, you define explicit pairs of styleId and variant. This avoids parallel arrays and makes it clearer which goes with which.
{
  "category": "Hairstyle",
  "hasStyleId": true,
  "pairs": [
    { "styleId": "01", "variant": "01" },
    { "styleId": "01", "variant": "05" },
    { "styleId": "24", "variant": "01" },
    { "styleId": "28", "variant": "01" },
    { "styleId": "28", "variant": "04" }
  ],
  "dimFilter": "48x48",
  "labelTemplate": "walk_{Slice}",
  "minFrame": 112,
  "maxFrame": 135
}
This means we will create libraries out of Spritesheets named Hairstyle_01_48x48_01, Hairstyle_01_48x48_05, Hairstyle_24_48x48_01, Hairstyle_28_48x48_01, and Hairstyle_28_48x48_04_*.
JSON Example
Here's a full example of the sprite library rules in JSON format:
[
  {
    "category": "Body",
    "hasStyleId": false,
    "variants": ["03", "06", "09"],
    "dimFilter": "48x48",
    "labelTemplate": "walk_{Slice}",
    "minFrame": 114,
    "maxFrame": 137
  },
  {
    "category": "Hairstyle",
    "hasStyleId": true,
    "pairs": [
      { "styleId": "01", "variant": "01" },
      { "styleId": "01", "variant": "05" },
      { "styleId": "24", "variant": "01" },
      { "styleId": "28", "variant": "01" },
      { "styleId": "28", "variant": "04" }
    ],
    "dimFilter": "48x48",
    "labelTemplate": "walk_{Slice}",
    "minFrame": 112,
    "maxFrame": 135
  },
  {
    "category": "Outfit",
    "hasStyleId": true,
    "pairs": [
      { "styleId": "01", "variant": "06" },
      { "styleId": "01", "variant": "10" },
      { "styleId": "13", "variant": "01" },
      { "styleId": "13", "variant": "03" },
      { "styleId": "16", "variant": "01" },
      { "styleId": "16", "variant": "03" }
    ],
    "dimFilter": "48x48",
    "labelTemplate": "{StyleId}_{Slice}"
  }
]
Spritesheet Path
The spritesheets must be stored inside a folder that matches the name of its category. For instance:
Assets/Resources
├── Body
│   ├── Body_48x48_03.png
│   ├── Body_48x48_06.png
│   └── Body_48x48_09.png
├── Hairstyle
│   ├── Hairstyle_01_48x48_01.png
│   ├── Hairstyle_01_48x48_05.png
│   ├── Hairstyle_24_48x48_01.png
│   ├── Hairstyle_28_48x48_01.png
│   └── Hairstyle_28_48x48_04.png
├── Outfit
│   ├── Outfit_01_48x48_06.png
│   ├── Outfit_01_48x48_10.png
│   ├── Outfit_13_48x48_01.png
│   ├── Outfit_13_48x48_03.png
│   ├── Outfit_16_48x48_01.png
│   └──Outfit_16_48x48_03.png
Batch File (Modular)
Add this file into the path Assets/Editor:
using UnityEngine;
using UnityEditor;
using UnityEngine.U2D.Animation;
using System.IO;

public class SpriteLibraryBatchAutoCreateSpriteAssetLibrary_Modular
{
    // ------------------------------------------------------------------------
    // USER PATH SETTINGS
    // ------------------------------------------------------------------------

    private const string BaseSpritesPath = "Assets/Resources";          // Where sprites are stored, e.g: Assets/Resources/Body, Assets/Resources/Hairstyle
    private const string LibraryOutputPath = "Assets/Resources/SpriteLibraryAssets"; // Where to save generated libraries
    private const string ConfigPath = "Assets/EditorConfig/SpriteLibraryRules.json"; // JSON config

    // ------------------------------------------------------------------------

    [System.Serializable]
    public class StyleVariantPair
    {
        public string styleId;
        public string variant;
    }

    [System.Serializable]
    private class CategoryRule
    {
        public string category;
        public bool hasStyleId;
        public StyleVariantPair[] pairs;
        public string[] variants;
        public string dimFilter;
        public string labelTemplate;
        public int minFrame = -1;
        public int maxFrame = -1;
    }

    private struct ParsedName
    {
        public string type;
        public string styleId;
        public string dim;
        public string colorId;
        public string frameId;
    }

    [MenuItem("Tools/Sprite Library/Generate All Libraries (Modular JSON Config)")]
    public static void GenerateAll()
    {
        if (!File.Exists(ConfigPath))
        {
            Debug.LogError($"Config file not found: {ConfigPath}");
            return;
        }

        var json = File.ReadAllText(ConfigPath);
        var rules = JsonHelper.FromJson<CategoryRule>(json);

        foreach (var rule in rules)
        {
            if (rule.hasStyleId && rule.pairs != null)
            {
                foreach (var pair in rule.pairs)
                    FillLibraryFor(rule, pair.styleId, pair.variant);
            }
            else
            {
                foreach (var variant in rule.variants)
                    FillLibraryFor(rule, null, variant);
            }
        }

        AssetDatabase.SaveAssets();
        Debug.Log("Finished generating all modular libraries.");
    }

    private static void FillLibraryFor(CategoryRule rule, string styleId, string targetVariant)
    {
        string suffix = styleId == null ? targetVariant : $"{styleId}_{targetVariant}";
        string spritesPath = Path.Combine(BaseSpritesPath, rule.category);
        string libraryPath = Path.Combine(LibraryOutputPath, $"{rule.category}SpriteLibrary_{suffix}.asset");

        var library = AssetDatabase.LoadAssetAtPath<SpriteLibraryAsset>(libraryPath);
        if (library == null)
        {
            library = ScriptableObject.CreateInstance<SpriteLibraryAsset>();
            AssetDatabase.CreateAsset(library, libraryPath);
        }

        var allGuids = AssetDatabase.FindAssets("t:Sprite", new[] { spritesPath });
        int added = 0;

        foreach (var guid in allGuids)
        {
            string assetPath = AssetDatabase.GUIDToAssetPath(guid);
            var assetsAtPath = AssetDatabase.LoadAllAssetsAtPath(assetPath);
            Debug.Log($"[FillLibraryFor] Found sprite source: {assetPath}");

            foreach (var obj in assetsAtPath)
            {
                if (obj is not Sprite s) continue;
                if (!TryParse(s.name, rule.hasStyleId, out var parsed)) continue;
                if (parsed.type != rule.category) continue;
                if (!string.IsNullOrEmpty(rule.dimFilter) && parsed.dim != rule.dimFilter) continue;
                if (parsed.colorId != targetVariant) continue;
                if (styleId != null && parsed.styleId != styleId) continue;
                if (!InFrameRange(rule, parsed.frameId)) continue;

                string label = BuildLabel(rule.labelTemplate, parsed);

                var existing = library.GetSprite(rule.category, label);
                if (existing != null)
                {
                    try { library.RemoveCategoryLabel(rule.category, label, false); } catch { }
                }

                library.AddCategoryLabel(s, rule.category, label);
                added++;
            }
        }

        EditorUtility.SetDirty(library);
        Debug.Log($"{added} sprites added to {libraryPath} for {rule.category} style {styleId ?? "-"} variant {targetVariant}");
    }

    private static bool InFrameRange(CategoryRule rule, string frameIdStr)
    {
        if (rule.minFrame < 0 && rule.maxFrame < 0) return true;
        if (!int.TryParse(frameIdStr, out int frame)) return false;
        if (rule.minFrame >= 0 && frame < rule.minFrame) return false;
        if (rule.maxFrame >= 0 && frame > rule.maxFrame) return false;
        return true;
    }

    private static string BuildLabel(string template, ParsedName p)
    {
        return template
            .Replace("{Category}", p.type)
            .Replace("{StyleId}", p.styleId ?? "")
            .Replace("{Dim}", p.dim)
            .Replace("{Variant}", p.colorId)
            .Replace("{Slice}", p.frameId);
    }

    private static bool TryParse(string spriteName, bool hasStyleId, out ParsedName p)
    {
        p = default;
        var parts = spriteName.Split('_');
        if (hasStyleId)
        {
            if (parts.Length < 5) return false;
            p.type = parts[0];
            p.styleId = parts[1];
            p.dim = parts[2];
            p.colorId = parts[3];
            p.frameId = parts[4];
            return true;
        }
        else
        {
            if (parts.Length < 4) return false;
            p.type = parts[0];
            p.styleId = null;
            p.dim = parts[1];
            p.colorId = parts[2];
            p.frameId = parts[3];
            return true;
        }
    }

    public static class JsonHelper
    {
        public static T[] FromJson<T>(string json)
        {
            string wrapped = "{\"Items\":" + json + "}";
            Wrapper<T> wrapper = JsonUtility.FromJson<Wrapper<T>>(wrapped);
            return wrapper.Items;
        }

        [System.Serializable]
        private class Wrapper<T>
        {
            public T[] Items;
        }
    }
}
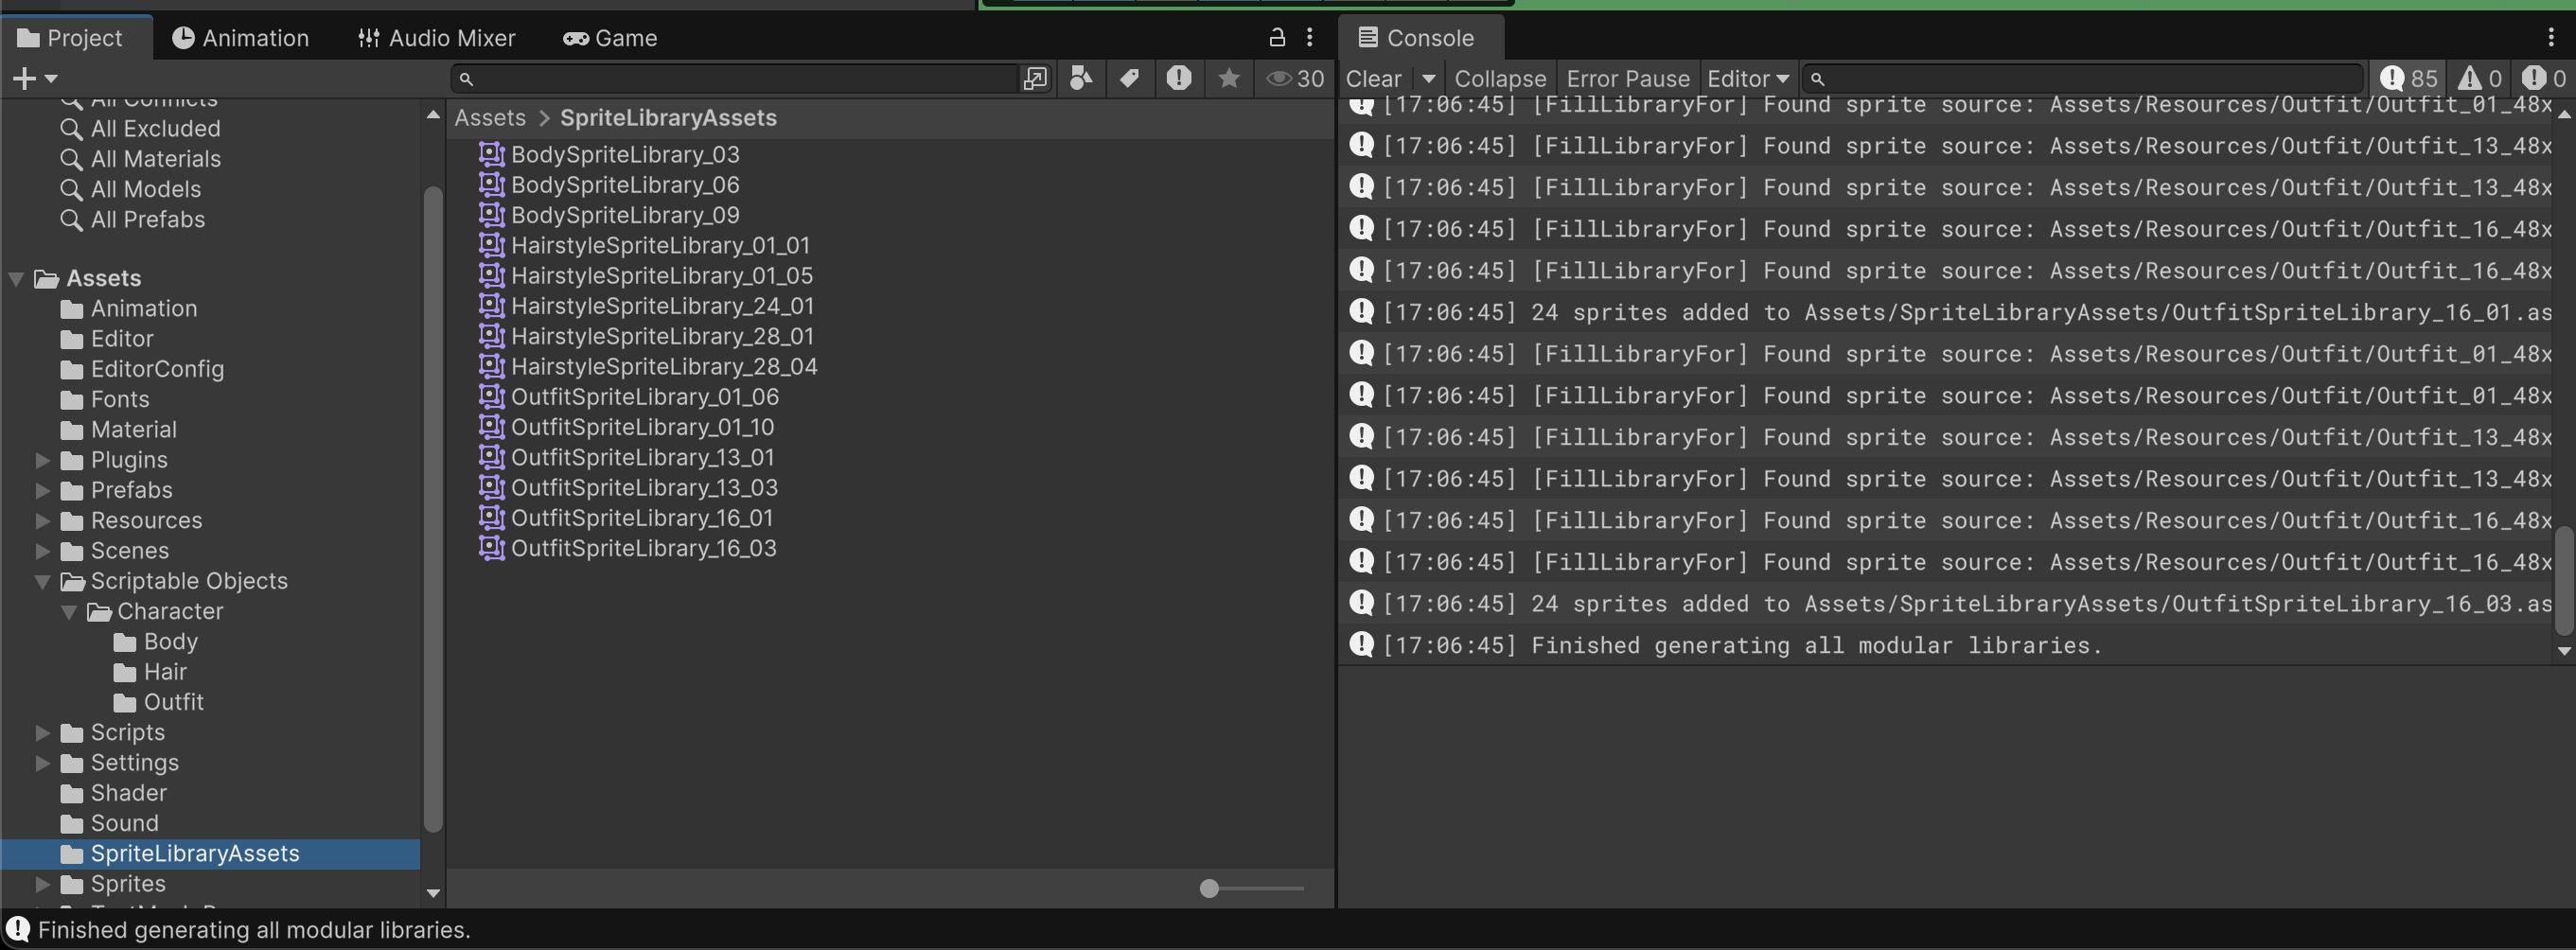
Then go to Tools >> Sprite Library >> Generate All Libraries (Modular JSON Config). Wait for awhile, your computer might hang for a bit. This will create 14 libraries under Assets/SpriteLibraryAssets if the JSON example above is used:
Batch File (Monolithic)
Add this file into the path Assets/Editor:
using UnityEngine;
using UnityEditor;
using UnityEngine.U2D.Animation;
using System.IO;
using System.Collections.Generic;

// Generates one SpriteLibraryAsset per full character combo across all categories.
// Uses pairs for categories with styleId.
public class SpriteLibraryBatchAutoCreateSpriteAssetLibrary_Monolithic
{
    // ------------------------------------------------------------------------
    // USER PATH SETTINGS
    // ------------------------------------------------------------------------

    private const string BaseSpritesPath = "Assets/Resources";          // Where sprites are stored, e.g: Assets/Resources/Body, Assets/Resources/Hairstyle
    private const string LibraryOutputPath = "Assets/Resources/SpriteLibraryAssets"; // Where to save generated libraries
    private const string ConfigPath = "Assets/EditorConfig/SpriteLibraryRules.json"; // JSON config

    // ------------------------------------------------------------------------

    [System.Serializable]
    public class StyleVariantPair
    {
        public string styleId;
        public string variant;
    }

    [System.Serializable]
    private class CategoryRule
    {
        public string category;
        public bool hasStyleId;
        public StyleVariantPair[] pairs;
        public string[] variants;
        public string dimFilter;
        public string labelTemplate;
        public int minFrame = -1;
        public int maxFrame = -1;
    }

    private struct ParsedName
    {
        public string type;
        public string styleId;
        public string dim;
        public string colorId;
        public string frameId;
    }

    [MenuItem("Tools/Sprite Library/Generate All Libraries (Monolithic JSON Config)")]
    public static void GenerateAll()
    {
        if (!File.Exists(ConfigPath))
        {
            Debug.LogError($"Config file not found: {ConfigPath}");
            return;
        }

        var json = File.ReadAllText(ConfigPath);
        var rules = JsonHelper.FromJson<CategoryRule>(json);

        GenerateCombinations(rules, new Dictionary<string, (string styleId, string variant)>(), 0);

        AssetDatabase.SaveAssets();
        Debug.Log("Finished generating all monolithic libraries.");
    }

    private static void GenerateCombinations(CategoryRule[] rules,
        Dictionary<string, (string styleId, string variant)> chosen, int depth)
    {
        if (depth == rules.Length)
        {
            BuildLibrary(rules, chosen);
            return;
        }

        var rule = rules[depth];

        if (rule.hasStyleId && rule.pairs != null)
        {
            foreach (var pair in rule.pairs)
            {
                chosen[rule.category] = (pair.styleId, pair.variant);
                GenerateCombinations(rules, chosen, depth + 1);
            }
        }
        else
        {
            foreach (var variant in rule.variants)
            {
                chosen[rule.category] = (null, variant);
                GenerateCombinations(rules, chosen, depth + 1);
            }
        }
    }

    private static void BuildLibrary(CategoryRule[] rules,
        Dictionary<string, (string styleId, string variant)> chosen)
    {
        string comboName = "Character";
        foreach (var kv in chosen)
        {
            string stylePart = kv.Value.styleId != null ? kv.Value.styleId : "";
            comboName += $"_{kv.Key}{stylePart}{kv.Value.variant}";
        }

        string libraryPath = Path.Combine(LibraryOutputPath, $"{comboName}.asset");

        var library = AssetDatabase.LoadAssetAtPath<SpriteLibraryAsset>(libraryPath);
        if (library == null)
        {
            library = ScriptableObject.CreateInstance<SpriteLibraryAsset>();
            AssetDatabase.CreateAsset(library, libraryPath);
        }

        int totalAdded = 0;

        foreach (var rule in rules)
        {
            var choice = chosen[rule.category];
            string spritesPath = Path.Combine(BaseSpritesPath, rule.category);
            var allGuids = AssetDatabase.FindAssets("t:Sprite", new[] { spritesPath });

            foreach (var guid in allGuids)
            {
                string assetPath = AssetDatabase.GUIDToAssetPath(guid);
                var assetsAtPath = AssetDatabase.LoadAllAssetsAtPath(assetPath);

                foreach (var obj in assetsAtPath)
                {
                    if (obj is not Sprite s) continue;
                    if (!TryParse(s.name, rule.hasStyleId, out var parsed)) continue;
                    if (parsed.type != rule.category) continue;
                    if (!string.IsNullOrEmpty(rule.dimFilter) && parsed.dim != rule.dimFilter) continue;
                    if (parsed.colorId != choice.variant) continue;
                    if (choice.styleId != null && parsed.styleId != choice.styleId) continue;
                    if (!InFrameRange(rule, parsed.frameId)) continue;

                    string label = BuildLabel(rule.labelTemplate, parsed);

                    var existing = library.GetSprite(rule.category, label);
                    if (existing != null)
                    {
                        try { library.RemoveCategoryLabel(rule.category, label, false); } catch { }
                    }

                    library.AddCategoryLabel(s, rule.category, label);
                    totalAdded++;
                }
            }
        }

        EditorUtility.SetDirty(library);
        Debug.Log($"{comboName}: {totalAdded} sprites added.");
    }

    private static bool InFrameRange(CategoryRule rule, string frameIdStr)
    {
        if (rule.minFrame < 0 && rule.maxFrame < 0) return true;
        if (!int.TryParse(frameIdStr, out int frame)) return false;
        if (rule.minFrame >= 0 && frame < rule.minFrame) return false;
        if (rule.maxFrame >= 0 && frame > rule.maxFrame) return false;
        return true;
    }

    private static string BuildLabel(string template, ParsedName p)
    {
        return template
            .Replace("{Category}", p.type)
            .Replace("{StyleId}", p.styleId ?? "")
            .Replace("{Dim}", p.dim)
            .Replace("{Variant}", p.colorId)
            .Replace("{Slice}", p.frameId);
    }

    private static bool TryParse(string spriteName, bool hasStyleId, out ParsedName p)
    {
        p = default;
        var parts = spriteName.Split('_');
        if (hasStyleId)
        {
            if (parts.Length < 5) return false;
            p.type = parts[0];
            p.styleId = parts[1];
            p.dim = parts[2];
            p.colorId = parts[3];
            p.frameId = parts[4];
            return true;
        }
        else
        {
            if (parts.Length < 4) return false;
            p.type = parts[0];
            p.styleId = null;
            p.dim = parts[1];
            p.colorId = parts[2];
            p.frameId = parts[3];
            return true;
        }
    }

    public static class JsonHelper
    {
        public static T[] FromJson<T>(string json)
        {
            string wrapped = "{\"Items\":" + json + "}";
            Wrapper<T> wrapper = JsonUtility.FromJson<Wrapper<T>>(wrapped);
            return wrapper.Items;
        }

        [System.Serializable]
        private class Wrapper<T>
        {
            public T[] Items;
        }
    }
}
Since we are generating all combinations, let's use a smaller JSON config as demo:
[
  {
    "category": "Body",
    "hasStyleId": false,
    "variants": ["03", "06"],
    "dimFilter": "48x48",
    "labelTemplate": "walk_{Slice}",
    "minFrame": 114,
    "maxFrame": 137
  },
  {
    "category": "Hairstyle",
    "hasStyleId": true,
    "pairs": [
      { "styleId": "01", "variant": "01" },
      { "styleId": "01", "variant": "05" }
    ],
    "dimFilter": "48x48",
    "labelTemplate": "walk_{Slice}",
    "minFrame": 112,
    "maxFrame": 135
  },
  {
    "category": "Outfit",
    "hasStyleId": true,
    "pairs": [{ "styleId": "01", "variant": "06" }],
    "dimFilter": "48x48",
    "labelTemplate": "{StyleId}_{Slice}",
    "minFrame": 112,
    "maxFrame": 135
  }
]
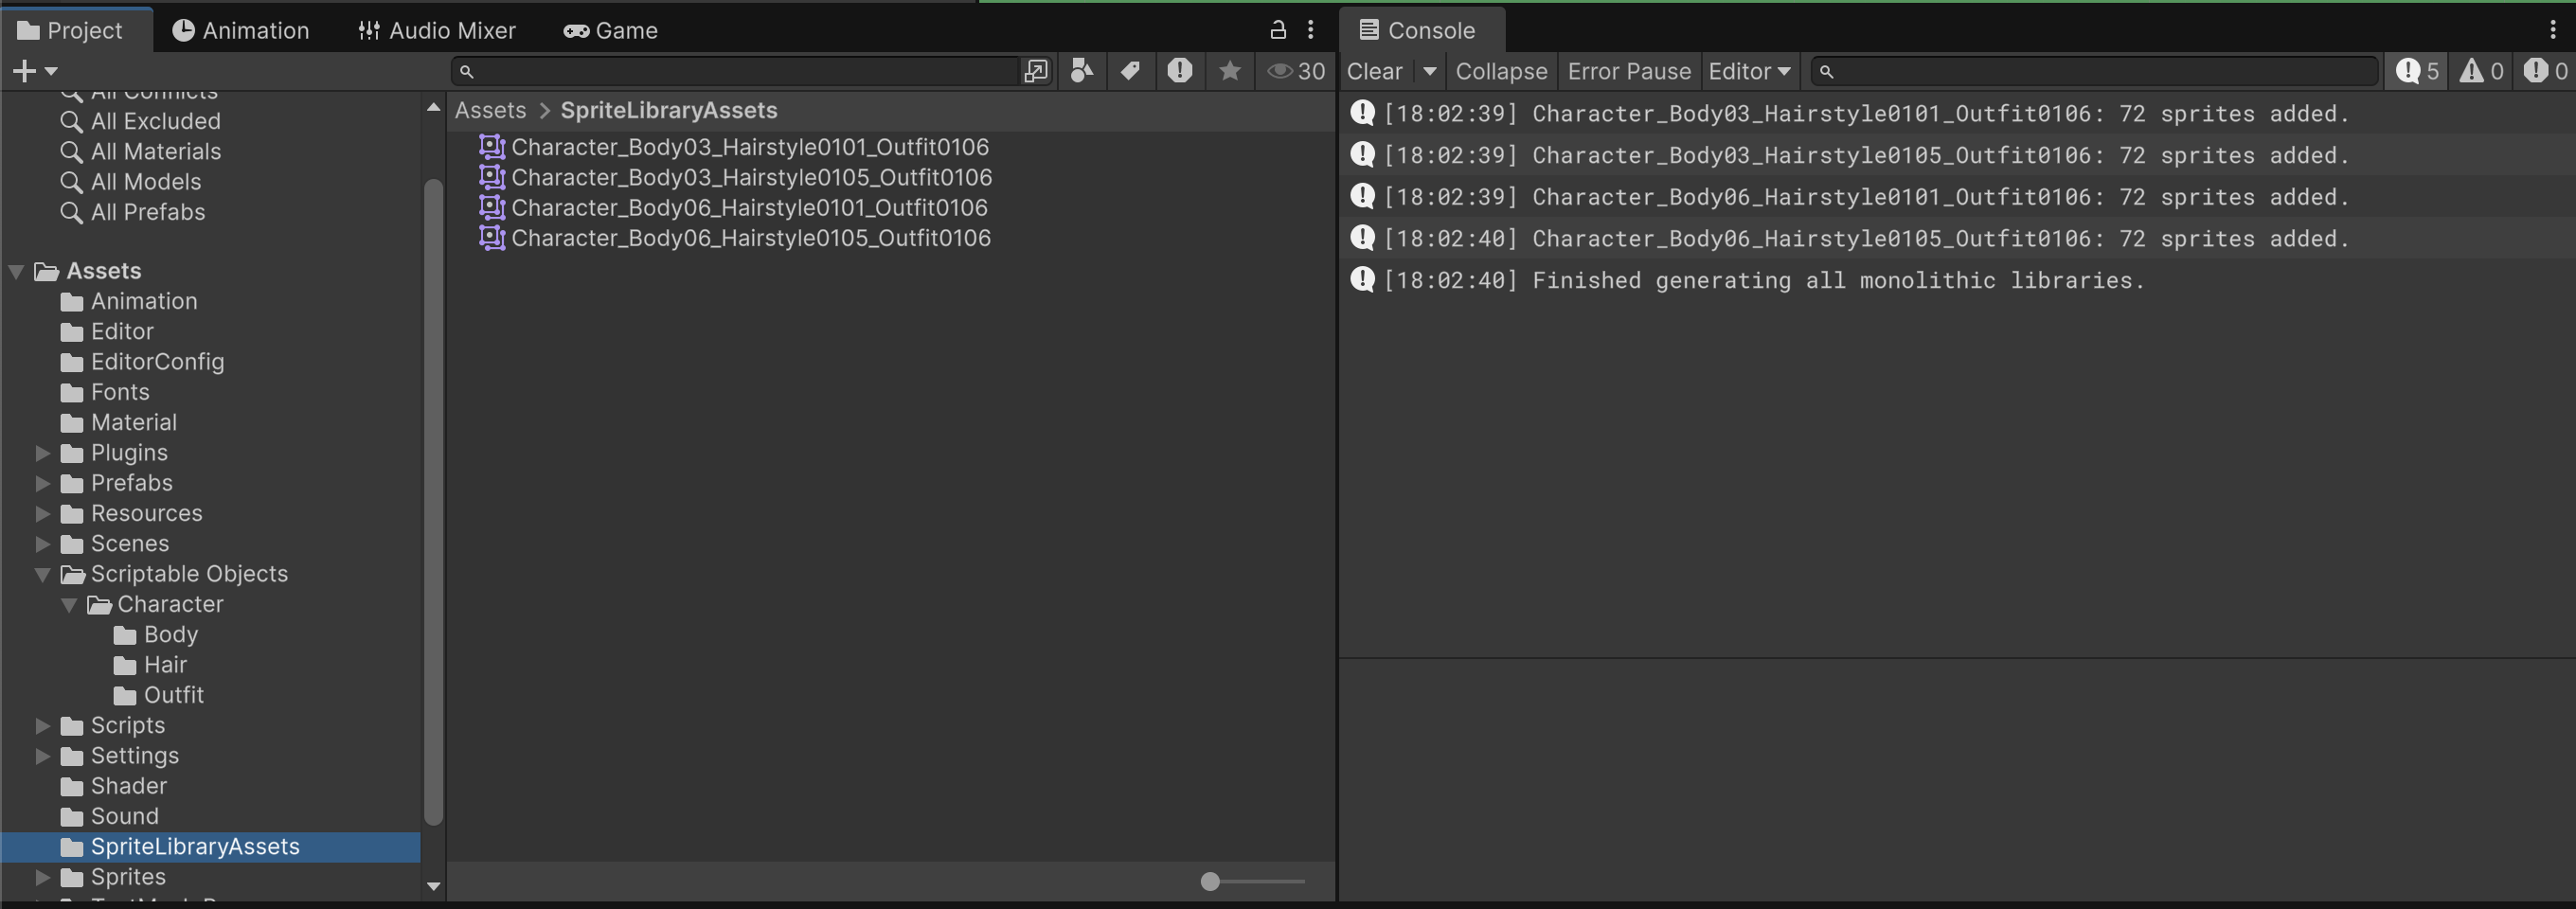
Then go to Tools >> Sprite Library >> Generate All Libraries (Monolithic JSON Config). Wait for awhile, your computer might hang for a bit. This will create 4 libraries under Assets/SpriteLibraryAssets if the JSON example above is used:
Workflow Details
Monolithic Workflow (One Library Per Full Character)
You should have pre-baked SpriteAssetLibrary for each combination of sprites as follows:
Then, create a gameobject with this structure, where Root contains an Animator + SpriteAssetLibrary and the child Object contains Renderer + Resolver each.
PlayerCharacter (Root)
 ├── Components on Root:
 │    • Animator
 │    • SpriteLibrary (Assign CharacterX.asset here)
 │
 ├── Body (Child GameObject)
 │    • SpriteRenderer
 │    • SpriteResolver (Category = "Body")
 │
 ├── Hair (Child GameObject)
 │    • SpriteRenderer
 │    • SpriteResolver (Category = "Hairstyle")
 │
 └── Outfit (Child GameObject)
      • SpriteRenderer
      • SpriteResolver (Category = "Outfit")
The children SpriteResolver all points to the same library at Root.
You can set an initial sprite to show in the SpriteResolver Inspector window for each object, as such so you can visualise the character:
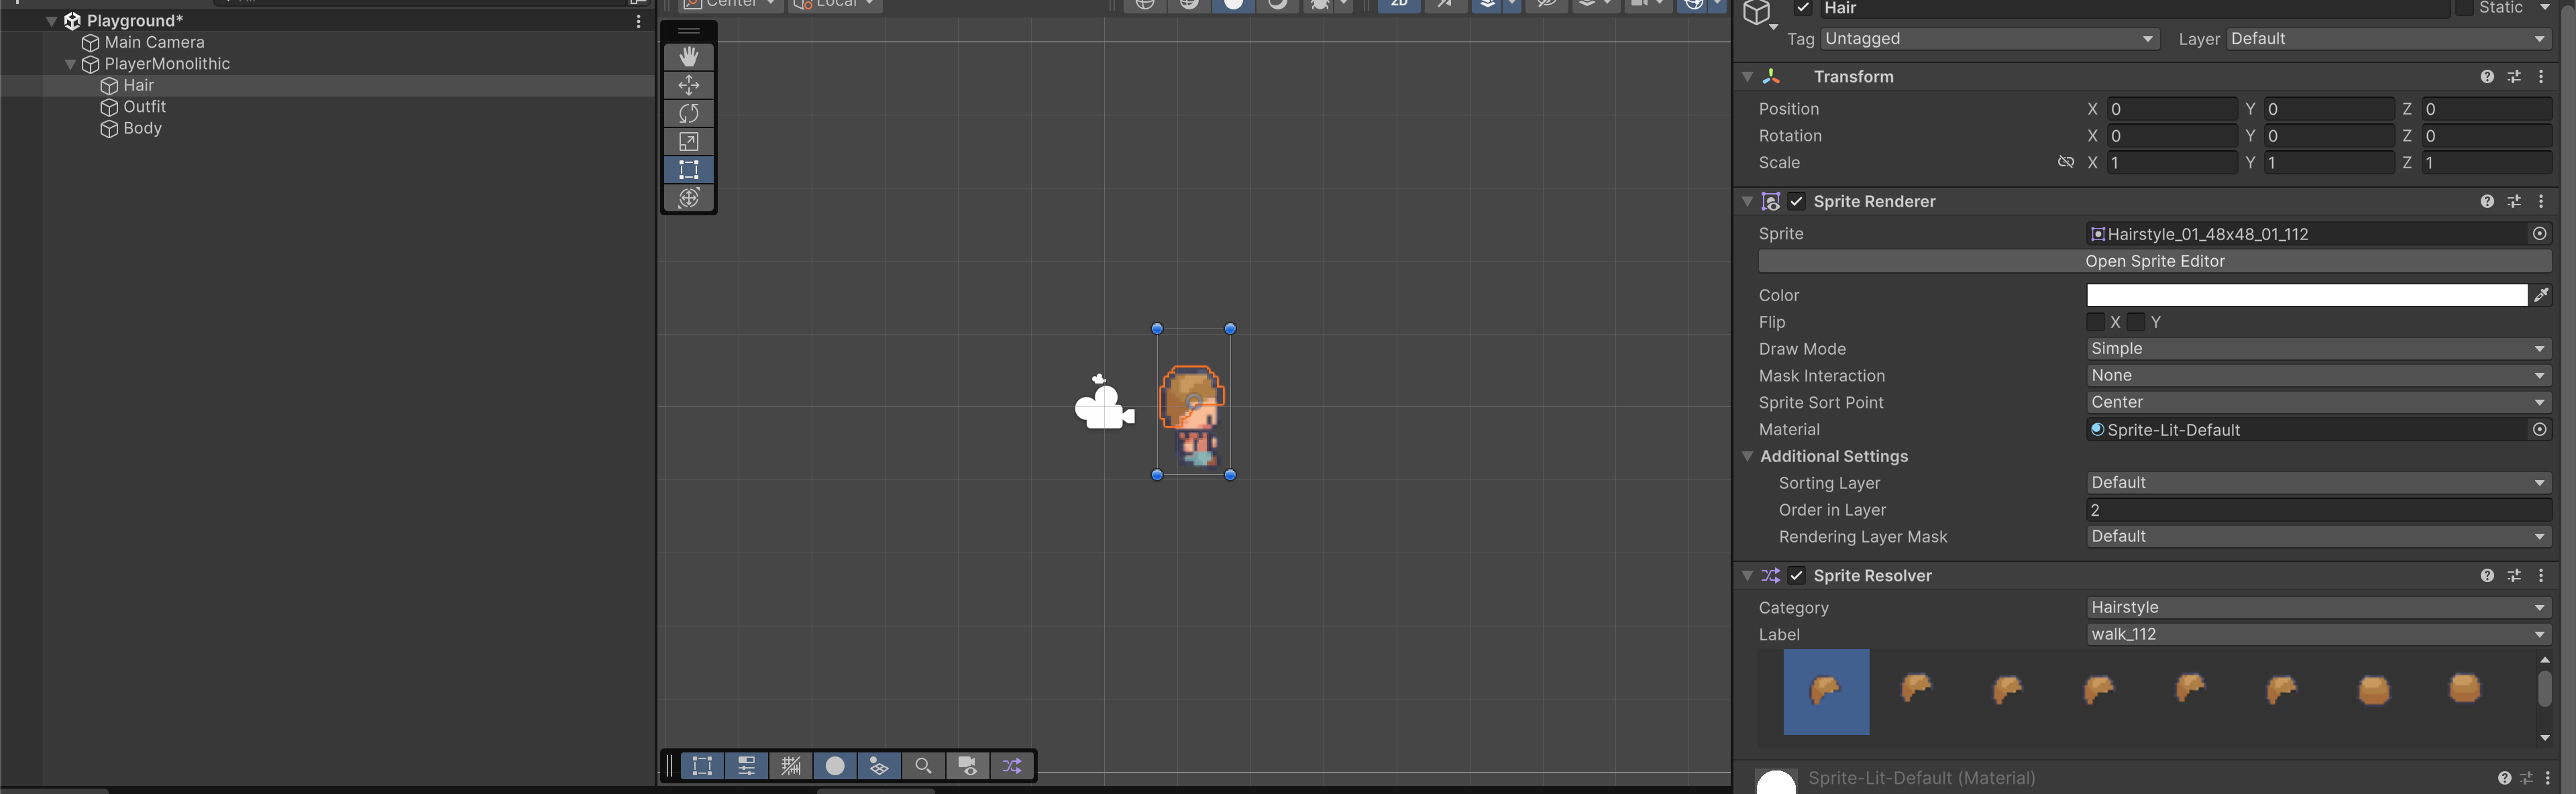
Afterwards, create animation clips and record as usual, but this time around record the changing of sprites by clicking the sprites in the SpriteResolver of each child GameObject. This gif shows the process to create one animation clip:
The dopesheet should record Sprite Hash in your sprite resolver instead of sprite address. This way, your animator creates key frame based on the Sprite Hash in the Sprite Library, and does not reference the sprite itself.
Test Swap at Runtime
Attach the following script to your Root GameObject:
- We use
InspectorButtonattribute from this tutorial so that we can run those functions using buttons in the Inspector
using UnityEngine;
using UnityEngine.U2D.Animation;
using Game.DebugTools;
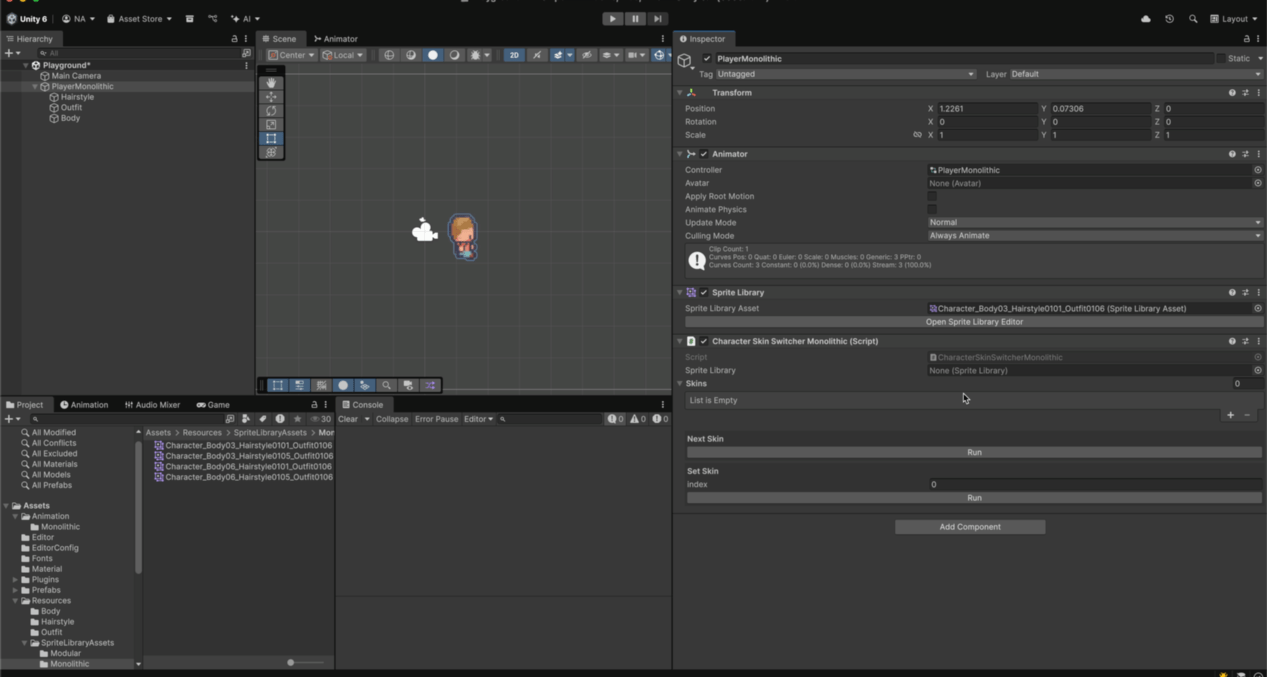
public class CharacterSkinSwitcherMonolithic : MonoBehaviour
{
[SerializeField] private SpriteLibrary spriteLibrary; // attach root SpriteLibrary
[SerializeField] private SpriteLibraryAsset[] skins; // drag in all monolithic assets
private int currentIndex = 0;
[InspectorButton]
public void NextSkin()
{
currentIndex = (currentIndex + 1) % skins.Length;
spriteLibrary.spriteLibraryAsset = skins[currentIndex];
Debug.Log($"Swapped to monolithic skin: {skins[currentIndex].name}");
}
[InspectorButton]
public void SetSkin(int index)
{
if (index < 0 || index >= skins.Length) return;
spriteLibrary.spriteLibraryAsset = skins[index];
currentIndex = index;
Debug.Log($"Set monolithic skin: {skins[index].name}");
}
}
Then load all skin assets you have created before. During runtime, you should see that they are easily swapped and the animation works seamlessly:
Modular Workflow (One Library Per Type of Sprite)
You should have pre-baked library for each type of sprites as follows:
Then, create a gameobject with this structure, where Root contains an Animator and the child Object contains Renderer + Resolver + Library each. This is unlike the Monolithic structure where there's only one Library at the Root:
PlayerCharacter (Root)
 ├── Components on Root:
 │    • Animator
 │
 ├── Body (Child GameObject)
 │    • SpriteRenderer
 │    • SpriteLibrary (assign Body_X.asset or similar)
 │    • SpriteResolver (Category = "Body")
 │
 ├── Hair (Child GameObject)
 │    • SpriteRenderer
 │    • SpriteLibrary (assign Hairstyle_X.asset or similar)
 │    • SpriteResolver (Category = "Hairstyle")
 │
 └── Outfit (Child GameObject)
      • SpriteRenderer
      • SpriteLibrary (assign Outfit_X.asset or similar)
      • SpriteResolver (Category = "Outfit")
Then record the animation clips as usual by changing the Sprite Resolver sprites on each child object:
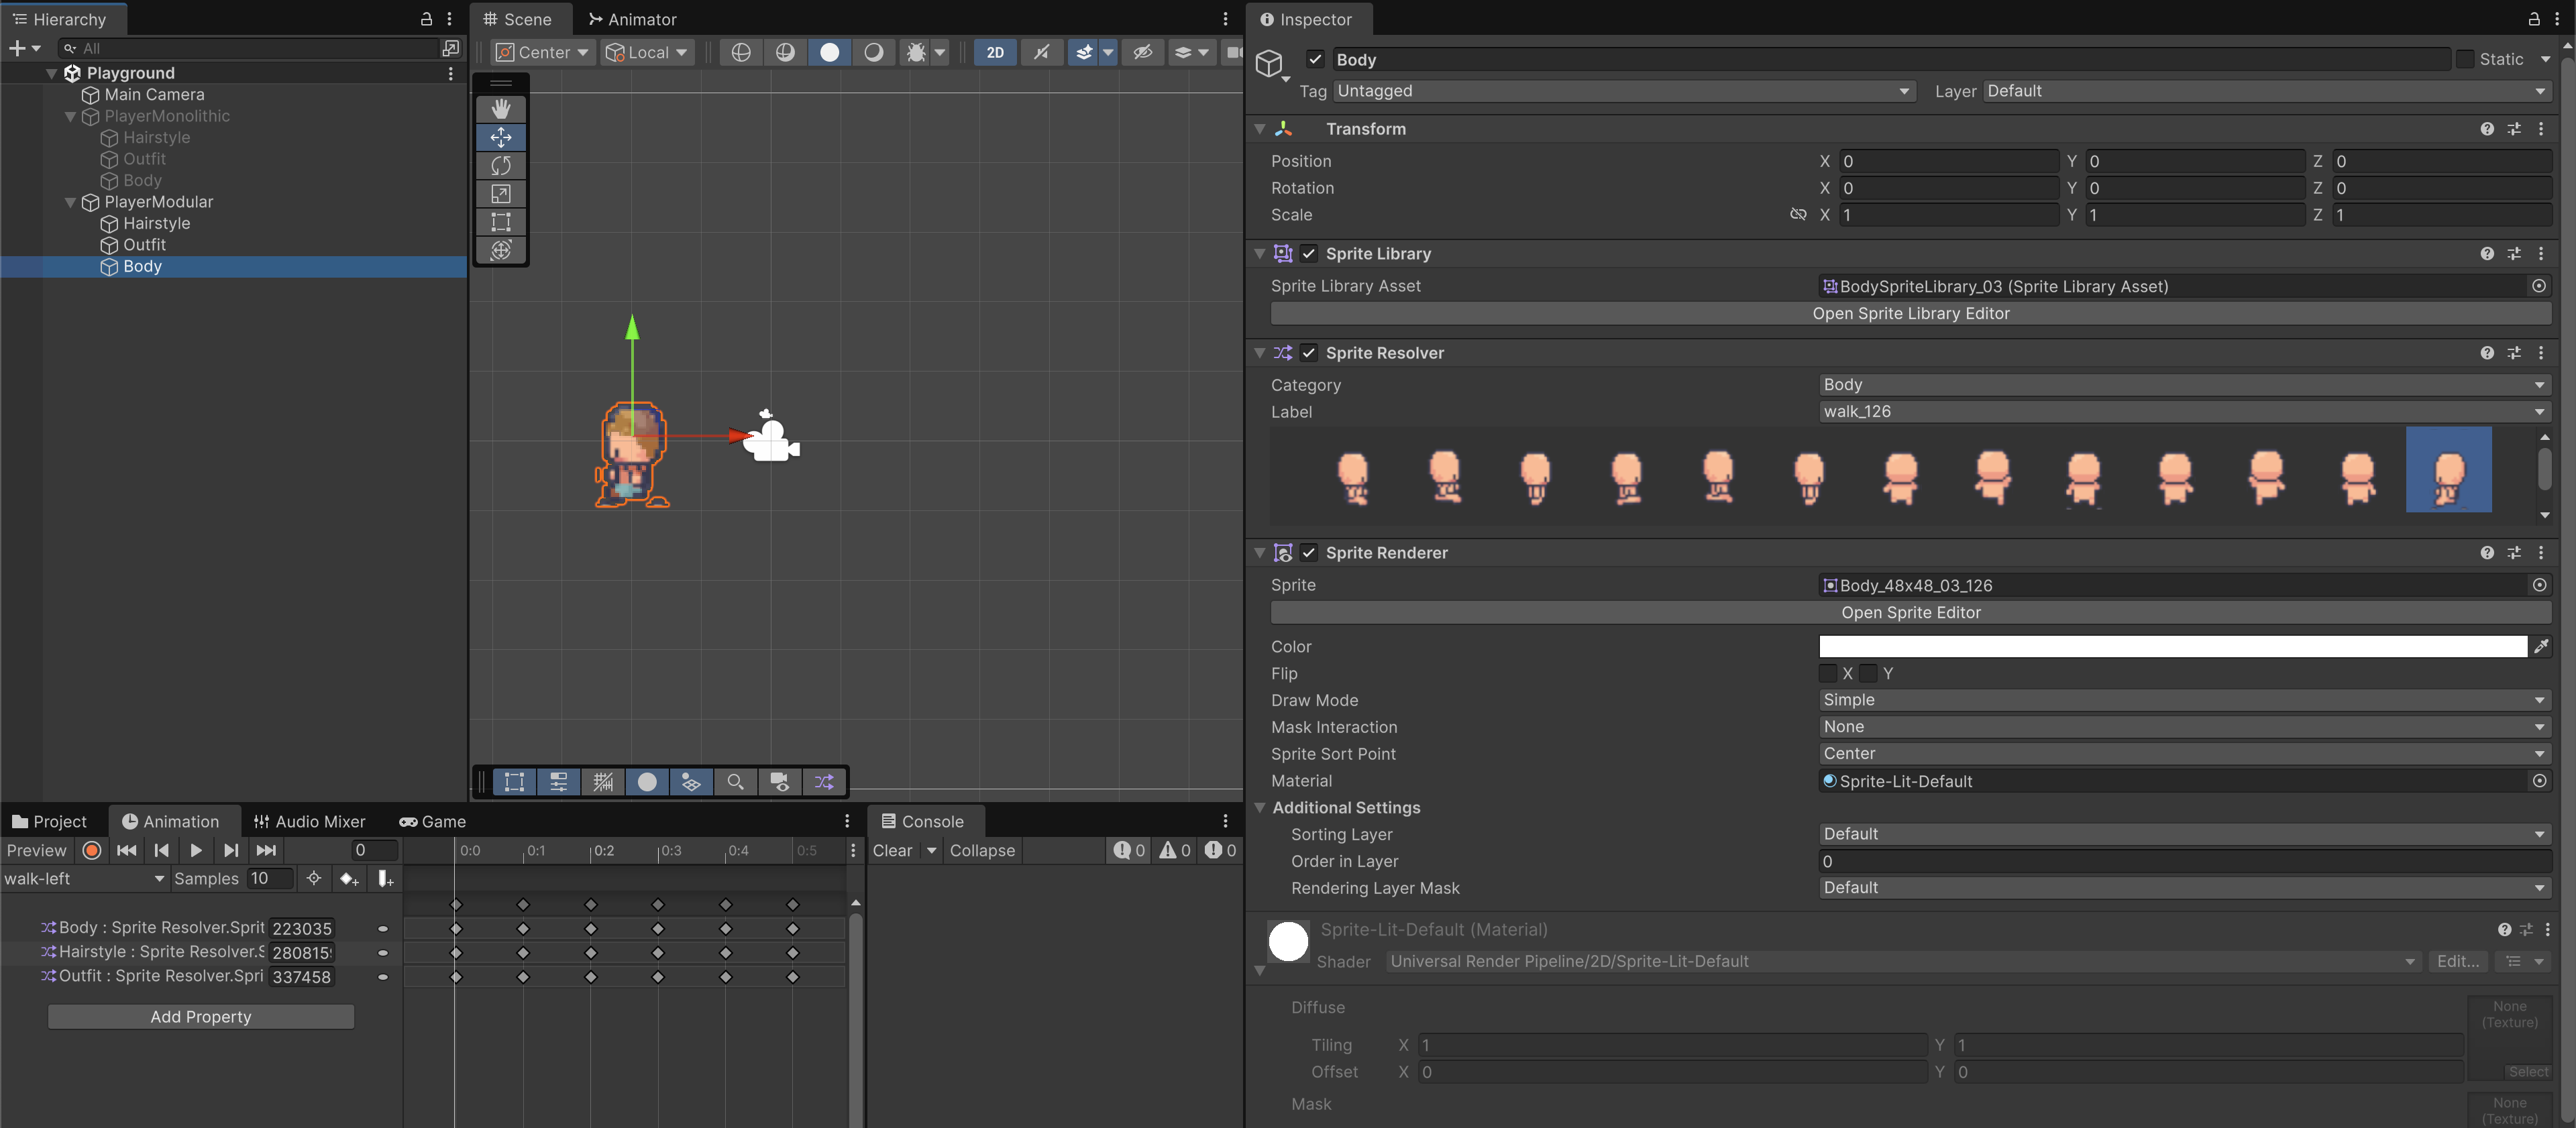
Likewise, the dopesheet should record Sprite Hash in your sprite resolver instead of sprite address. This way, your animator creates key frame based on the Sprite Hash in the Sprite Library, and does not reference the sprite itself.
Test Swap at Runtime
Attach the following script to your root gameobject:
- We use
InspectorButtonattribute from this tutorial so that we can run those functions using buttons in the Inspector
using UnityEngine;
using UnityEngine.U2D.Animation;
using Game.DebugTools;
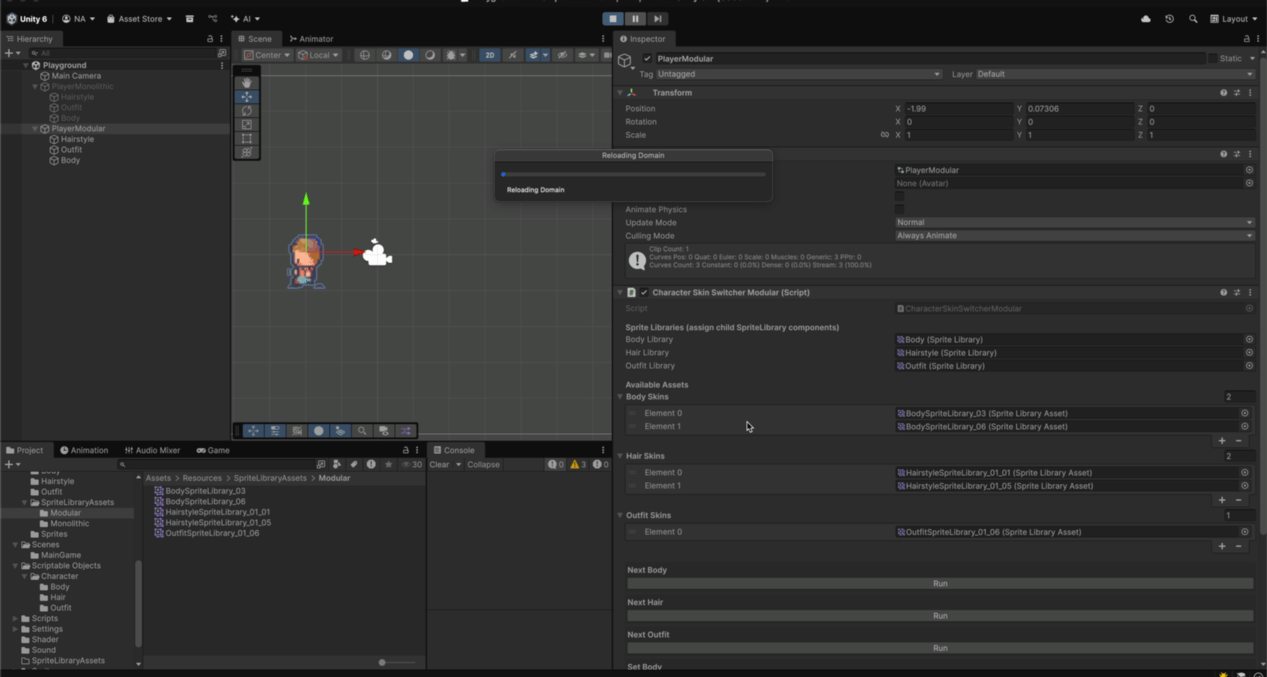
public class CharacterSkinSwitcherModular : MonoBehaviour
{
[Header("Sprite Libraries (assign child SpriteLibrary components)")]
[SerializeField] private SpriteLibrary bodyLibrary;
[SerializeField] private SpriteLibrary hairLibrary;
[SerializeField] private SpriteLibrary outfitLibrary;
[Header("Available Assets")]
[SerializeField] private SpriteLibraryAsset[] bodySkins;
[SerializeField] private SpriteLibraryAsset[] hairSkins;
[SerializeField] private SpriteLibraryAsset[] outfitSkins;
private int bodyIndex = 0;
private int hairIndex = 0;
private int outfitIndex = 0;
[InspectorButton]
public void NextBody()
{
if (bodySkins == null || bodySkins.Length == 0) return;
bodyIndex = (bodyIndex + 1) % bodySkins.Length;
bodyLibrary.spriteLibraryAsset = bodySkins[bodyIndex];
Debug.Log($"Swapped Body: {bodySkins[bodyIndex].name}");
}
[InspectorButton]
public void NextHair()
{
if (hairSkins == null || hairSkins.Length == 0) return;
hairIndex = (hairIndex + 1) % hairSkins.Length;
hairLibrary.spriteLibraryAsset = hairSkins[hairIndex];
Debug.Log($"Swapped Hair: {hairSkins[hairIndex].name}");
}
[InspectorButton]
public void NextOutfit()
{
if (outfitSkins == null || outfitSkins.Length == 0) return;
outfitIndex = (outfitIndex + 1) % outfitSkins.Length;
outfitLibrary.spriteLibraryAsset = outfitSkins[outfitIndex];
Debug.Log($"Swapped Outfit: {outfitSkins[outfitIndex].name}");
}
[InspectorButton]
public void SetBody(int index)
{
if (index < 0 || index >= bodySkins.Length) return;
bodyLibrary.spriteLibraryAsset = bodySkins[index];
bodyIndex = index;
Debug.Log($"Set Body: {bodySkins[index].name}");
}
[InspectorButton]
public void SetHair(int index)
{
if (index < 0 || index >= hairSkins.Length) return;
hairLibrary.spriteLibraryAsset = hairSkins[index];
hairIndex = index;
Debug.Log($"Set Hair: {hairSkins[index].name}");
}
[InspectorButton]
public void SetOutfit(int index)
{
if (index < 0 || index >= outfitSkins.Length) return;
outfitLibrary.spriteLibraryAsset = outfitSkins[index];
outfitIndex = index;
Debug.Log($"Set Outfit: {outfitSkins[index].name}");
}
}
Then load all the modular skin assets you have created before. During runtime, you should see that they are easily swapped and the animation works seamlessly:

Here's a gif of the test script in action:
Which Workflow Should I Use?
Pick Modular if:
- You need customization: players can pick any Body + Hairstyle + Outfit combination
- You want to add new parts later (new haircuts, costumes) without re-authoring old assets
- You want to reuse Animator clips across many characters
- You care about keeping library asset count low (no combinatorial explosion)
- You’re okay with each character GameObject having multiple
SpriteResolvers (one per part) - Best when: you want prefab-per-character, few total variants, and cheap swaps
- Cost: large asset count if you support mix-and-match
Pick Monolithic if:
- You only need a small set of predefined full skins
- Your game’s characters are fixed (e.g. fighting game roster, boss enemies)
- You want the simplest runtime swapping (just one asset per character)
- You prefer a minimal hierarchy (only one
SpriteResolveron the root) - You don’t expect to mix & match Body/Hair/Outfit at runtime
- Best when: you want a customization system (mix-and-match parts)
- Cost: 2–3x as many lookups per frame compared to monolithic, but still negligible in real games
Rule of thumb:
- If your design doc says “player can choose hair, outfit, etc.”: choose Modular
- If it says “this NPC has one skin, and we’ll maybe have 3 alternate costumes”: choose Monolithic